background image

Super Quick wash

Short programme lasting about 15 minutes with
acceptable results for very slightly dirty dishes.

Delicate wash

If the dishes are not very dirty, you can select
Delicate wash. This programme is intended for
glasses and porcelain that have just been used and
as such do not require such a powerful
programme.

This programme can be used for fragile dishes.
Select Short dry if you want to be especially
cautious. See also the section Fragile dishes in the
chapter Loading the dishwasher.

Eco wash

This programme is intended for cleaning normally
dirty dishes and is the most effective programme
in terms of combined energy and water
consumption.

The High temperature option must be selected
to access the programme used to compile the
information for energy labelling.

Rinse & Dry

This programme comprises a rinse with heating
and drying. This is a suitable programme if, for
example, you plan to make jam and want to rinse
and heat clean glass jars.

Rinse & Hold

Used to rinse dishes while you wait for the
dishwasher to become fully loaded.
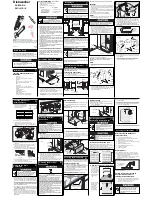
SELECTING OPTIONS

To select an option, press one of the option
buttons. The field under the button lights when
the option is activated. The available options
depend on the selected programme. Once you
have started the programme, the options you
selected are saved for the next time you use the

same programme. An exception is the Delayed
start option.

High temperature

Activate this option for improved dishwashing
results. The machine then uses a higher
temperature for the main wash.

If you want to use the lower temperature, press
again so that the field under the button turns off.

You can vary the temperature as shown below:

55 °C / 70 °C

Heavy wash:

60 °C / 65 °C

Normal wash:

60 °C / 65 °C

Daily wash:

30 °C / 60 °C

Quick wash:

30 °C / 60 °C

Super Quick wash:

40 °C / 50 °C

Delicate wash:

50 °C / 60 °C

Eco wash:

Long dry

A higher temperature in the final rinse and a
longer drying phase improves the drying result if
you activate the Long dry option. This causes a
slight increase in energy consumption. This option
can be used with all programmes except Rinse &
Dry and Rinse & Hold.

If you want a programme with Short dry, press
again so that the field under the button turns off.

Delayed start

When you select Delayed start, the dishwasher
will start 1-24 hours after you press the Start/Stop
button.

1 Press the button once to activate Delayed

start. Press the button several times – or hold
it in – to set the desired number of hours.

2 Press Start/Stop and the dishwasher counts

down 1 hour at a time and starts after the
selected delay.

Press and hold Start/Stop for three seconds if you
want to cancel the Delayed start option.

10

Summary of Contents for GDV642X A

Page 1: ...Operating Instructions GDV642X A GDV642XLA...

Page 2: ...panel is fitted with touch buttons with audible feedback see the chapter Settings 1 3 2 5 6 9 10 11 12 7 8 4 1 On Left on mode 2 Programme selector 3 Programme symbol 4 Display 5 Rinse aid indicator 6...

Page 3: ...ng sharp items Always close the door and start the programme immediately after you have added the detergent Keep children away from the dishwasher when the door is open Some detergent may remain insid...

Page 4: ...rogramme keys in different languages Attach the programme key in the desired language to the top of the door THE WATER SOFTENER In order to achieve good dishwashing results the dishwasher needs soft w...

Page 5: ...TOR When the salt needs topping up the above symbol lights on the display When the salt runs out unscrew the cap and fill the container with salt Water is only needed the first time Wipe clean and tig...

Page 6: ...Short dry To save energy use Short dry The drying result will be better if once the programme is finished you leave the door slightly open Do not rinse under running water Simply scrape off large foo...

Page 7: ...sher if marked dishwasher safe Aluminium Aluminium can lose its shine if washed in a dishwasher However good quality aluminium pans can be washed in a dishwasher even if some of the shine will be lost...

Page 8: ...tlery basket NOTE Do not place cutlery made of different materials such as silver and stainless steel in the same place risk of discolouration WARNING Knives and other pointed items must be placed wit...

Page 9: ...correctly NOTE Dishwasher tablets are not recommended for short programmes less than 75 minutes Use powder or liquid dishwasher detergent instead 3 in 1 All in one detergent Read through the direction...

Page 10: ...lected programme Once you have started the programme the options you selected are saved for the next time you use the same programme An exception is the Delayed start option High temperature Activate...

Page 11: ...u run the programme a second time the dishwasher will calculate the remaining time based on the previous duration of the programme STATUS LIGHT The status light at the bottom on the dishwasher provide...

Page 12: ...for more than 2 minutes ONCE THE PROGRAM HAS FINISHED Once the programme has finished and the door is opened End appears on the display A buzzer also sounds at the end of the programme See the section...

Page 13: ...he set value and continue to the next setting Current setting Current setting value Press to browse between setting values YOU CAN NOW ADJUST THE FOLLOWING SETTINGS Description Settings Options Button...

Page 14: ...his sound is used to confirm each button press Operation volume Off Low High Press Start Stop to save the setting value and continue to the next setting For adjusting the contrast of the display on th...

Page 15: ...here is no need to add rinse aid since this option disables rinse aid dispens ing It also reduces the amount of salt added to the water softener NOTE In order to achieve good dish washing results it i...

Page 16: ...er Read off the appropriate setting from the water hardness table below dH 0 5 6 8 9 11 12 14 15 19 20 24 25 29 30 39 40 49 50 0 9 10 14 15 20 21 25 26 34 35 43 44 52 53 70 71 88 89 fH Water hardness...

Page 17: ...n replacing the fine filter Pipe section 5 Lock the filter in place by turning the handle clockwise to the stop position The handle should point straight out from the dishwasher 1x NOTE The dishwasher...

Page 18: ...nly a slightly damp cloth with a little cleaner if necessary WARNING Do not use a spray bottle or the like around the door lock This is to ensure that water does not penetrate the door catch and come...

Page 19: ...shes are not clean Check that the dishes are not blocking the spray arms Avoid large packages Old detergent Detergent is a perishable product Dose according to water hard ness Far too much or far too...

Page 20: ...ttings If you have very soft water you may want to dilute the rinse aid 50 50 with water Rinse aid dosage setting too high The dishes have a sticky white blue film Rinse off these types of foodstuffs...

Page 21: ...and hold Start Stop for three seconds if you want to can cel the Delayed start option Check that the Delayed start op tion has not been selected Loosen the drainage hose where it connects to the sink...

Page 22: ...finished Check that the baskets are cor rectly positioned horizontally The baskets are not correctly po sitioned Cannot close door Check that the dishes are not blocking the baskets from sliding prope...

Page 23: ...accordance with EN 60436 Detergent 7 5 gram Prewash 25 gram Main wash In accordance with EN 60436 Rinse aid 5 Rinse aid dosage LOADING THE DISHWASHER b b c a egg a minced meat b spinach c 1 Teaspoons...

Page 24: ...rdance with standard EN 50242 2 Based on 280 standard cleaning cycles with a cold water connection and consumption in accordance with energy saving mode The actual energy consumption depends on how th...

Page 25: ...ional Always follow applicable regulations for water drainage and electricity An incorrect or flawed installation can result in higher consumption of energy water and detergent which can result in inc...

Page 26: ...ould ideally be replaced with a new hose without joins No part of the drainage hose may be more than 950 mm above the bottom of the dishwasher Ensure that the drainage hose has no kinks CONNECTION TO...

Page 27: ...r Troubleshooting before contacting the service department Note down the details on the rating plate positioned on the right inside the dishwasher Note down the item number 1 and serial number 2 SERIA...

Page 28: ...30 0 Quick wash 10 0 1 0 15 0 2 0 15 2 30 0 Super Quick wash 15 0 2 1 25 0 9 1 40 50 2 40 1 Delicate wash 11 0 6 3 05 0 9 3 20 60 2 60 0 Eco wash 4 3 0 4 0 40 0 5 0 45 50 1 0 Rinse Dry 3 0 01 0 06 0 0...

Page 29: ...YOUR NOTES 29...

Page 30: ...YOUR NOTES 30...

Page 31: ...one smaller compartment for the prewash and one for the main wash PRESS AND HOLD THE ON LEFT ON MODE BUTTON UNTIL THE DISPLAY LIGHTS UP 4 SELECT A PROGRAMME AND ANY OPTIONS SEE PAGE 9 5 Daily wash is...

Page 32: ...Art No 701744 Rev 02 We reserve the right to make changes en 12 14...

Reviews: