background image

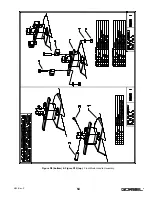
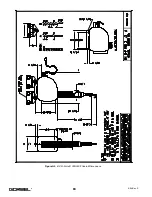
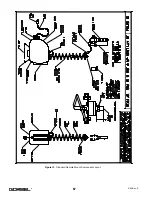
APPENDIX G - OVERALL G-FORCE® REFERENCE DIMENSIONS

Figure G1.

BX G-Force® 150# Overall Dimensions.

62

4/04-Rev. S

®

Summary of Contents for 150 BX G-Force

Page 1: ... S 5 865 426 6 386 513 6 886 812 OTHER PATENTS PENDING 1 15 50 0 3 30 00 0 3 38 80 0 l lb bs s B BX X S Se er ri ie es s Gorbel Dealer ________________________________ Serial Number _________________________________ Gorbel Customer Order No ____________________ Date _________________________________________ CAPACITY MAXIMUM lbs 150 ...

Page 2: ...ion Option 16 Step 7 Initial Power Up 16 Step 8 Adjusting Lift Speed 16 17 Step 9 Float Mode Option 17 Step 10 Final Steps 17 Drive Fault Troubleshooting Chart 17 18 Wire Rope Inspection Maintenance Replacement Criteria Replacement Instructions 19 23 Appendix A 150 BX Actuator Assembly Drawings 24 32 Appendix B 300 380 BX Actuator Assembly Drawings 33 41 Appendix C BX Standard Handle Assembly Draw...

Page 3: ...o not operate hoist to extreme limits of travel of cable without first checking for proper limit switch action 7 Avoid sharp contact between two hoists or between hoist and end stops 8 Do not tamper with or adjust any parts of the hoist unless specifically authorized to do so 9 Never use the load cable as a sling 10 Do not divert attention from load while operating hoist 11 Never leave a suspended...

Page 4: ...act the BX G Force into the end stops This condition will seriously reduce the life of the Controls and could lead to premature failures If the unit impacts the end stop more than 10 times in a single shift contact Gorbel Customer Service for alternative end stop options WARNING The BX G Force ILD does not meet Wash down environment requirements The BX G Force ILD does not meet Explosion Proof req...

Page 5: ...efects before operating Do not over twist coil cable assembly 360 Damage and or failure could occur The Operator Present switch should be depressed the entire time the G Force is in use Press Float Mode Button with only the load weight hanging from unit Applying other force will cause unit to drift The wire rope should never be more than 20 out of vertical while the G Force is in use Do not bang t...

Page 6: ... be used for lifting supporting or transporting humans Failure to comply with any one of the limitations noted herein can result in serious bodily injury and or property damage Check Federal State and Local regulations for any additional requirements WARNING Prior to installation consult a qualified structural engineer to determine if your support structure is adequate to support the loadings crea...

Page 7: ...to not over rotate the Handle as serious damage can occur when the Coil Cord binds up around the wire rope 3 Handle The Handle is the main interface between the operator and the lifting device The Handle comes standard equipped with a lifting hook The supplied lifting hook can be removed and replaced with customer tooling Tooling must meet the guidelines set forth by Gorbel Inc Improper tooling in...

Page 8: ...stem Option This mode is initiated by simply pressing the Float Mode Enable button on the hand controller In this mode the operator can simply handle the load directly with either one or two hands and cause the load to raise or lower by applying either an upward or downward force on the load This mode overrides the need to depress the operator present switch The greater the force applied the faste...

Page 9: ... the handle in the standard position remote mounting the handle is recommended The tooling must be mounted and balanced on the end of the wire rope while the handle can be remote mounted The tooling must be attached to the end of the wire rope with a swivel assembly supplied by Gorbel Inc Failure to mount the tooling with a swivel assembly can result in premature failure of both the wire rope and ...

Page 10: ... controller exits the power up diagnostic mode and goes into normal operation Note The Yellow Power On indicator will remain on during the power up diagnostic mode test 4 Power On LED Yellow The Power On LED illuminates when the required 220 VAC single phase power has been correctly applied to the system and the E Stop button has been released 5 Standard Mode LED Green The Standard Mode LED illumi...

Page 11: ...Lift Stroke 7 ft 7 ft 7 ft Primary Lift Voltage 220 VAC 1 Phase 10 220 VAC 1 Phase 10 220 VAC 1 Phase 10 Amps 5 5 5 Capacity Overload Safety Yes Yes Yes LED Indicator Lights Yes Yes Yes Anti Recoil Yes Yes Yes Failsafe Brake Yes Yes Yes Float Mode Capable Yes Option Yes Option Yes Option Inertia Management Yes Yes Yes Precision Lift Capability Yes Yes Yes Drive Control System Servo Servo Servo Spe...

Page 12: ...sted on the packing slip are included 1 3 If any items are missing or were damaged during shipping please contact Gorbel Customer Service immediately TIP Packing list can be found in plastic pocket attached to shipping box Diagram 1A 150 BX series shipped components Diagram 1B 300 380 BX series shipped components 11 4 04 Rev S ...

Page 13: ...3 4 Remove the Coil Cord mounting clamps from the bottom side of the Actuator assembly reference Diagram 3B page 13 3 5 Assemble the Coil Cord to the clamps by capturing the cord in the opening in the clamp reference Diagram 3B page 13 3 6 Re assemble the Coil Cord mounting clamps to the bottom side of the Actuator assembly reference Diagram 3B page 13 3 7 Adjust the Coil Cord in the clamps so tha...

Page 14: ... replaced by the customer end tooling 3A 5 Remove the Coil Cord mounting clamps from the bottom side of the Actuator assembly reference Diagram 3B 3A 6 Assemble the Remote Mount Coil Cord to the clamps by capturing the cord in the opening in the clamp reference Diagram 3B 3A 7 Re assemble the Remote Mount Coil Cord to the clamps to the bottom side of the Actuator assembly reference Diagram 3B 3A 8...

Page 15: ...2 will be replaced by the customer end tooling 3B 5 Remove the Coil Cord mounting clamps from the bottom side of the Actuator assembly reference Diagram 3B page 13 3B 6 Assemble the Remote Mount Coil Cord to the clamps by capturing the cord in the opening in the clamp reference Diagram 3B page 13 3B 7 Re assemble the Remote Mount Coil Cord mounting clamps to the bottom side of the Actuator assembl...

Page 16: ...e end stops Roll the Actuator assembly along the full length of the Bridge to assure that the travel is smooth throughout STEP 5 ELECTRICAL POWER CONNECTION STANDARD 5 1 Prior to final wiring inspect the entire system to assure that all connections are seated properly and are without kinks or bends Verify the following connections a Coil Cord to Handle b Coil Cord to Actuator Assembly 5 2 Connect ...

Page 17: ...d onto the part while initiating Float Mode This will give the unit a false reading and cause excessive drift Grasping the load run the unit up and down several times at least 20 times in each direction to assure proper operation Float Mode should provide a nice smooth feel 7 7 Finally test the operation of any special tooling that may have been integrated to the G Force BX ILD STEP 8 ADJUSTING LI...

Page 18: ...TROUBLESHOOTING CHART The G Force ILD has extensive diagnostic capability The Red System Fault LED flashes when basic faults have been detected by the control system If a fault has occurred the Standard Mode Operating or Float Mode LEDs will go off The red System Fault LED flashes a simple code when a fault has occurred The sequence of flashes indicates the type of fault The sequence consists of a...

Page 19: ...ing lifted by the unit applies if weight limit set greater than 185 pounds on a 150 pound unit 3 Wire Rope is bound 4 The motor is wired incorrectly 5 IGBT failure applies if code will not reset with the cycling of power 7 Motor Over Temperature 1 Motor has exceeded its upper temperature limit 8 Safety Relay Failure 1 Relay timing closing the motor brake and opening the motor windings does not mee...

Page 20: ...s in the strands of the rope shall be visible to this person during the inspection Any deterioration resulting in appreciable loss of original strength such as described below shall be noted and determination shall be made as to whether further use of the rope would constitute a hazard a points listed in previous section on frequent inspection b reduction of rope diameter below nominal diameter du...

Page 21: ...or four broken wires in one strand in one lay reference Diagram E below b one outer wire broken at the contact point with the core of the rope which has worked its way out of the rope structure and protrudes or loops out from the rope structure c wear of one third the original diameter of outside individual wires d kinking crushing birdcaging or any other damage resulting in distortion of the rope...

Page 22: ... Drum Cover off of the Main Drum Pulley 5 Re attach the Coil Cord Plug to the Controls Interface and Power to the unit 6 Release the Emergency Stop E Stop button on the Handle At the Controls Interface jog the unit down until the remaining Wire Rope has been payed off of the Main Drum Pulley 7 Depress the Emergency Stop E Stop button on the Handle and disconnect Power to the unit 8 Detach the Wire...

Page 23: ... 27 from Step 10 to the new wire rope assembly 22 Re attach the Handle to the new wire rope assembly 23 Plug the Coil Cord Connector into the Controls Interface and reconnect power to the unit 24 Release the Emergency Stop button on the Handle and grasp the operator present switch Run the unit up and down several times to assure proper operation 25 Depress the Emergency Stop button on the Handle a...

Page 24: ...power to the unit 30 Release the Emergency Stop button on the Handle and grasp the operator present switch Run the unit up and down several times to assure proper operation 31 Continue normal operation 23 4 04 Rev S ...

Page 25: ...APPENDIX A 150 BX ACTUATOR ASSEMBLY DRAWINGS Figure A1 bottom Figure A2 top 150 BX Actuator Assembly 24 4 04 Rev S ...

Page 26: ...Figure A3 bottom Figure A4 top 150 BX Actuator Assembly 25 4 04 Rev S ...

Page 27: ...Figure A5 150 BX Actuator Assembly 26 4 04 Rev S ...

Page 28: ...Figure A6 150 BX Actuator Assembly 27 4 04 Rev S ...

Page 29: ...Figure A7 bottom Figure A8 top 150 BX Actuator Assembly 28 4 04 Rev S ...

Page 30: ...Figure A9 bottom Figure A10 top 150 BX Actuator Assembly 29 4 04 Rev S ...

Page 31: ...Figure A11 bottom Figure A12 top 150 BX Actuator Assembly 30 4 04 Rev S ...

Page 32: ...Figure A13 150 BX Actuator Assembly 31 4 04 Rev S ...

Page 33: ...Figure A14 150 BX Actuator Assembly 32 4 04 Rev S ...

Page 34: ...APPENDIX B 300 380 BX ACTUATOR ASSEMBLY DRAWINGS Figure B1 bottom Figure B2 top 300 380 BX Actuator Assembly 33 4 04 Rev S ...

Page 35: ...Figure B3 bottom Figure B4 top 300 380 BX Actuator Assembly 34 4 04 Rev S ...

Page 36: ...Figure B5 300 380 BX Actuator Assembly 35 4 04 Rev S ...

Page 37: ...Figure B6 300 380 BX Actuator Assembly 36 4 04 Rev S ...

Page 38: ...Figure B7 bottom Figure B8 top 300 380 BX Actuator Assembly 37 4 04 Rev S ...

Page 39: ...Figure B9 bottom Figure B10 top 300 380 BX Actuator Assembly 38 4 04 Rev S ...

Page 40: ...Figure B11 bottom Figure B12 top 300 380 BX Actuator Assembly 39 4 04 Rev S ...

Page 41: ...40 Figure B13 300 380 BX Actuator Assembly 4 04 Rev S ...

Page 42: ...Figure B14 300 380 BX Actuator Assembly 41 4 04 Rev S ...

Page 43: ...APPENDIX C BX STANDARD HANDLE ASSEMBLY DRAWINGS Figure C1 bottom Figure C2 top Standard Handle Assembly 42 4 04 Rev S ...

Page 44: ...Figure C3 Standard Handle Assembly 43 4 04 Rev S ...

Page 45: ...Figure C4 Standard Handle Assembly 44 4 04 Rev S ...

Page 46: ...Figure C5 bottom Figure C6 top Standard Handle Assembly 45 4 04 Rev S ...

Page 47: ...Figure C7 bottom Figure C8 top Standard Handle Assembly 46 4 04 Rev S ...

Page 48: ...Figure C9 bottom Figure C10 top Standard Handle Assembly 47 4 04 Rev S ...

Page 49: ...Figure C11 bottom Figure C12 top Standard Handle Assembly 48 4 04 Rev S ...

Page 50: ...Figure C13 Standard Handle Assembly 49 4 04 Rev S ...

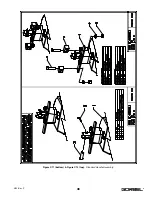
Page 51: ...APPENDIX D BX FLOAT MODE HANDLE ASSEMBLY DRAWINGS Figure D1 bottom Figure D2 top Float Mode Handle Assembly 50 4 04 Rev S ...

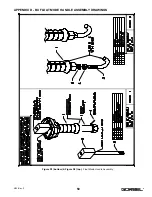
Page 52: ...Figure D3 bottom Figure D4 top Float Mode Handle Assembly 51 4 04 Rev S ...

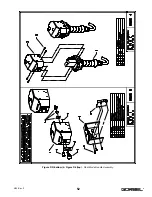
Page 53: ...Figure D5 bottom Figure D6 top Float Mode Handle Assembly 52 4 04 Rev S ...

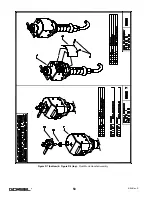
Page 54: ...Figure D7 bottom Figure D8 top Float Mode Handle Assembly 53 4 04 Rev S ...

Page 55: ...Figure D9 bottom Figure D10 top Float Mode Handle Assembly 54 4 04 Rev S ...

Page 56: ...Figure D11 Float Mode Handle Assembly 55 4 04 Rev S ...

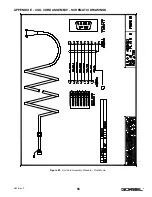
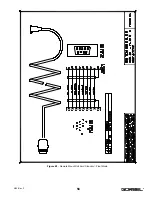
Page 57: ...APPENDIX E COIL CORD ASSEMBLY SCHEMATIC DRAWINGS Figure E1 Coil Cord Assembly Standard Float Mode 56 4 04 Rev S ...

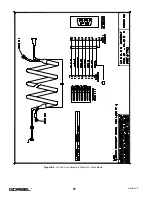
Page 58: ...Figure E2 Air Coil Cord Assembly Standard Float Mode 57 4 04 Rev S ...

Page 59: ...Figure E3 Remote Mount Coil Cord Standard Float Mode 58 4 04 Rev S ...

Page 60: ...Figure E4 Air Remote Mount Coil Cord Standard Float Mode 59 4 04 Rev S ...

Page 61: ...APPENDIX F CONTROLS SCHEMATIC DRAWINGS Figure F1 Remote Load Cell Assembly 60 4 04 Rev S ...

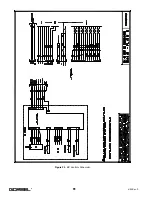
Page 62: ...Figure F2 BX Controls Schematic 61 4 04 Rev S ...

Page 63: ...APPENDIX G OVERALL G FORCE REFERENCE DIMENSIONS Figure G1 BX G Force 150 Overall Dimensions 62 4 04 Rev S ...

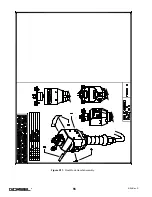
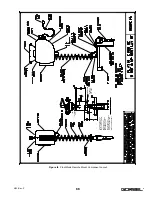
Page 64: ...Figure G2 BX G Force 300 380 Overall Dimensions 63 4 04 Rev S ...

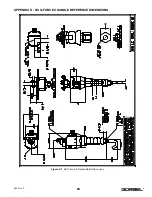
Page 65: ...APPENDIX H BX G FORCE HANDLE REFERENCE DIMENSIONS Figure H1 BX G Force Handle Detail Dimensions 64 4 04 Rev S ...

Page 66: ...APPENDIX I COMPONENT LAYOUT DRAWINGS Figure I1 150 Standard Inline Component Layout 65 4 04 Rev S ...

Page 67: ...Figure I2 300 380 Standard Inline Component Layout 66 4 04 Rev S ...

Page 68: ...Figure I3 Standard Remote Mount Component Layout 67 4 04 Rev S ...

Page 69: ...S JAM LOCKING NUT LOCKING NUTS LOCK SWIVEL ASSEMBLY TO LOAD CELL NUTS MUST BE PERIODICALLY INSPECTED TO ASSURE ENGAGEMENT SEE INSPECTION AND MAINTENANCE SCHEDULE AT END OF MANUAL FOR INSPECTION FREQUENCY 1 2 20 INTERNAL THREAD X 9 16 DEEP LOAD CELL MOUNTING DETAIL ...

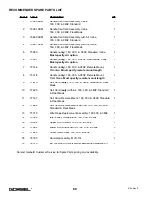
Page 70: ...ength 1 8 73148 Handle only 150 300 380 Remote Mount Float Mode Must specify remote mount length 1 9 77610 Coil Cord only 150 300 380 Standard Float Mode 1 10 77620 Coil Cord only with Air 150 300 380 Standard Float Mode 1 11 77157 Coil Cord Remote Mount 150 300 380 Standard Float Mode 1 12 77665 Coil Cord Remote Mount with Air 150 300 380 Standard Float Mode 1 13 77315 Wire Rope Replacement Assem...

Page 71: ...rchaser agree that Purchaser has been put on notice that dealer or distributor is not Gorbel s agent in any respect for any reason Gorbel and Purchaser also agree that Purchaser has been put on notice that dealer or distributor is not authorized to incur any obligations or to make any representations or warranties on Gorbel s behalf other than those specifically set forth in Gorbel s warranty prov...

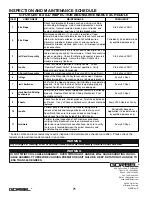
Page 72: ... excessive wear Replace Pulleys immediately if excessive wear or damage is present Every 90 Days 7 Limit Switches Verify that the Upper and Lower Limit Switches are operating properly Verify that the Slack Switch is operating properly Replace Switches immediately if they are damaged Every 90 Days 8 Slack Switch Sliding Mechanism Verify that the Slack Switch Sliding Mechanism is functioning properl...

Reviews: