background image

Point of Interest (POI)

The Point of Interest (POI)
destination entry method allows a
destination to be chosen from
the POI list.

i

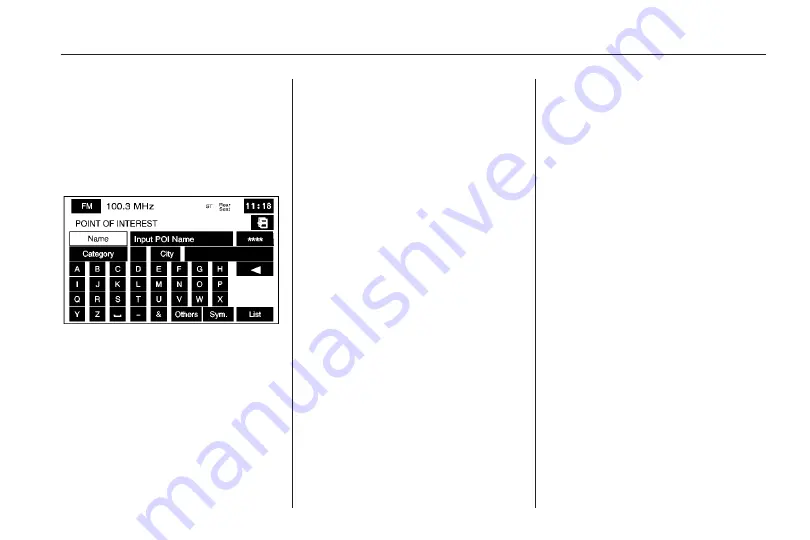
(Point of Interest): Touch to

access the POINT OF INTEREST
screen. From this screen there
are three options to select/enter the
destination. Either input the name
using the keypad, select a category
from the category list, or select
the city by selecting the city screen
button.

To input the POI name:

1. Use the alpha keypad to enter

the POI name.

Touch Sym. (symbol) to select
symbols and numbers for
the POI, touch Others to select
special characters for the POI, or
touch A - Z to return to the
alpha keypad.

A list of POIs appear using the
information from the alpha
keypad input. A list of available
POIs displays if there are
less than five POIs available.
Touch the List screen
button at any time to view
the available POIs.

2. Select the desired POI from

the list.

A map screen appears with the
destination marked.

3. Select the

h

(destination)

symbol screen button to calculate
the route.

4. Select the Guide screen button

to start route guidance.

See “Getting Started on Your
Route” later in this section
for more information.

To select a POI from a category:

1. Touch the Category screen

button from the POINT OF
INTEREST screen to view a list
of POI categories.

2. Select a category, and then a

sub-category.

3. The system displays available

POIs names in the selected
sub-category or if the list is too
long the system displays the
alpha keypad.

4. If the alpha keypad displays,

input the POI name until a
list of available POIs appear.
The List screen button can also
be selected when it becomes
available.

Infotainment System

67

Summary of Contents for Cadillac STS 2010

Page 1: ...stem 34 Maps 36 Navigation Symbols 39 Navigation Menu 47 Destination 63 OnStar System 79 Configure Menu 80 Global Positioning System GPS 88 Vehicle Positioning 89 Problems with Route Guidance 89 If the System Needs Service 90 Ordering Map DVDs 90 Database Coverage Explanations 90 Voice Recognition 91 Personalization 101 Phone 102 Bluetooth 102 Index 1 2010 Cadillac STS Navigation System M ...

Page 2: ......

Page 3: ...on your specific vehicle either because they are options that you did not purchase or due to changes subsequent to the printing of this owner manual Please refer to the purchase documentation relating to your specific vehicle to confirm each of the features found on your vehicle For vehicles first sold in Canada substitute the name General Motors of Canada Limited for Cadillac Motor Division where...

Page 4: ...ing The navigation system has built in features intended to help keep your eyes on the road and mind on the drive Some features may be disabled while driving Note that these functions will be grayed out A grayed out function indicates it is not available when the vehicle is moving All functions are available when the vehicle is parked Do the following before driving Become familiar with the naviga...

Page 5: ...of the guidance from the navigation system Because the navigation system uses street map information that does not include all traffic restrictions or the latest road changes it may suggest using a road that is now closed for construction or a turn that is prohibited by signs at the intersection Because the system uses limited information you must always evaluate whether following the system s dir...

Page 6: ...tion in the navigation system or access other functions See instructions later in this section Every fifty times the vehicle is started and the navigation system is turned on the Warning screen appears After reading the warning select OK to load the map DVD information If OK is not selected all hard keys except for NAV Navigation and DEST Destination can be accessed You can also press the NAV hard...

Page 7: ...vigation Symbols on page 39 for more information E Navigation Menu Symbol See Using the Navigation System on page 34 for more information F Map Scales See Map Scales under Maps on page 36 for more information G Guidance Window Symbol See Navigation Symbols on page 39 for more information H Z Map DVD Eject Key See Hard Keys under Using the Navigation System on page 34 for more information I Map DVD...

Page 8: ...d Satellite Radio on page 21 for more information S AUX Auxiliary key See Hard Keys under Using the Navigation System on page 34 for more information T ROUTE key See Destination on page 63 for more information U Map Key See Hard Keys under Using the Navigation System on page 34 for more information V w Tune Knob See AM FM Radio on page 14 and Satellite Radio on page 21 for more information W SRCE ...

Page 9: ...p is heard or see the station displayed on the selected preset button 6 Repeat the steps for each preset See Preset Stations under AM FM Radio on page 14 and Satellite Radio on page 21 for more information Setting the Clock To set the time 1 Press the power volume knob to turn the system on 2 Press the CONFIG hard key 3 Press the H clock screen button 4 Select the 12hour or 24hour screen button to...

Page 10: ...ge 63 for more information Entering an Address To set a destination by entering a street address 1 Press the power volume knob to turn the system on 2 Insert the DVD map disc See Installing the Map DVD under Maps on page 36 for more information A notice may appear Touch the I agree screen button to proceed 3 Press the ROUTE hard key Verify that the selected Region is correct 4 Press the C Address ...

Page 11: ...oceed 3 Press the ROUTE hard key Verify that the selected Region is correct 4 Press the i POI screen button 5 Enter the specific title of the POI in the name space i e Washington Monument using the alpha keypad on the screen 6 Select the POI from the list 7 If there is more than one city the system displays the list of cities that have a street with that name Select a city from the list or select ...

Page 12: ...igation Menu on page 47 for more information Storing a Preset Destination 1 Press the power volume knob to turn the system on 2 Insert the DVD map disc See Installing the Map DVD under Maps on page 36 for more information A notice may appear Touch the I agree screen button to proceed 3 Press the map hard key 4 Press the Menu screen button from the map screen 5 Press the N Memory Points screen butt...

Page 13: ...o the highlighted route is heard The vehicle is now in route guidance mode See Preset Destination or Home under Destination on page 63 for more information Canceling Guidance Guidance is canceled once at the final destination To cancel guidance prior to arrival at the final destination 1 Press the map hard key 2 Press the Menu screen button from the map screen 3 Press the E Change Route screen but...

Page 14: ...er manual for more information The audio system is operated using navigation system menus The audio menus are explained in this section Radio Personalization With this feature the latest audio system settings that were adjusted the last time your vehicle was operated can be recalled This feature allows two different drivers to store and recall their own audio system settings The settings recalled ...

Page 15: ...ay there To scan stations press and hold either arrow for less than two seconds The radio goes to a station plays for a few seconds then goes to the next station To stop scanning press either arrow again or touch the scan screen button Tuning Knob Turn to change frequencies Finding a Station Press the band source screen button located in the top left corner AM FM CD etc from any screen to access t...

Page 16: ...stem on or select the BAND hard key 2 Select the audio band 3 Seek scan or tune to the desired station 4 Press and hold one of the six preset screen buttons for more than two seconds or until a beep is heard 5 Press the e audio adjust hard key to adjust the tone Digital Signal Processing DSP fade and balance The screen times out and the changes are stored to the preset station 6 Repeat the steps f...

Page 17: ... settings as changes are made to a preset station Audio Pilot Noise Compensation Technology The vehicle has Bose AudioPilot noise compensation technology To use this feature touch the Audio Pilot screen button To turn it off touch the screen button again The button highlights when this feature is on When on AudioPilot continuously adjusts the audio system equalization to compensate for background ...

Page 18: ...s the amount of surround sound Touch the center position to adjust the setting to the center Adjusting the Speakers Left Right Balance To adjust the balance between the right and the left speakers touch and hold the Left or Right screen buttons To center the balance and the fade touch the center where the two lines meet Front Rear Fade To adjust the fade between the front and the rear speakers tou...

Page 19: ...to Store on for the current audio source selected When on this button appears on the main audio screen This button is not available when in XM Info Information This button is only available when in FM or XM Select this button to turn information on The information changes depending on the audio source is selected When on the Info screen button is available to select from the audio main menu Catego...

Page 20: ...ing the selected type of programming Receive announcements concerning local and national emergencies Display messages from radio stations Seek to stations with traffic announcements This system relies on receiving specific information from these stations and only works when the information is available In rare cases a radio station may broadcast incorrect information that causes the radio features...

Page 21: ...r AM or WX weather stations Group Name Category POP Rock Classic Rock Adult Hits Top 40 Oldies Music Nostalgia College EASY Soft Rock Soft R B Soft R B Religious Music TALK News Information Sports Talk Language Religious Talk Personality Public Weather CNTRY Country Music CLASS Classical JAZZ Jazz Music Satellite Radio XM Satellite Radio Service XM is a satellite radio service that is based in the...

Page 22: ...elect the category then use the tune knob or seek button to scroll through the available channels Category Scanning This function allows scanning through the channels in a specific category To activate the category scan function 1 Select the XM audio source 2 Select the Category screen button The system displays the available categories in place of the preset stations 3 Use the left and right arro...

Page 23: ... cracked broken or scratched the CD will not play properly If the surface of the CD is soiled see Care of Your CDs in the Index of your vehicle s owner manual If there is no apparent damage try a known good CD Notice If a label is added to a CD or more than one CD is inserted into the slot at a time or an attempt is made to play scratched or damaged CDs the CD player could be damaged While using t...

Page 24: ...m Once all discs have been inserted the system starts playing the last loaded disc If no CD or DVD is loaded in the CD DVD changer and the SRCE hard key is pressed a No disc loaded error message displays Select the Cancel screen button when available to stop the loading process and to start playing the last loaded disc Z Eject To eject a disc 1 Press the eject hard key 2 Select the slot number 1 t...

Page 25: ... on the display after pressing the Scan screen button the system plays the first 10 seconds of each track on all of the loaded discs of the same media type Select the OFF screen button to stop scanning When the system has scanned through all of the discs the system automatically stops scanning y Random Select to toggle between the following random options B RND Random One Disc If this symbol appea...

Page 26: ...has been loaded the following screen appears Some features do not function for both audio and video DVDs To get the best sound quality from an audio DVD the current group that is playing may need to be changed Audio DVDs are usually set up with multiple copies of the album on the disc called groups Group 1 may play the album in PPCM audio and Group 2 may play the album in Dolby Surround Sound To s...

Page 27: ...amera angle This may not be available on all DVDs Subtitle Select to play back the video with subtitles Select English French or Off DVD must be playing to select this feature This may not be available on all DVDs Search Select to search through a DVD by Title Group or Chapter Track Touch Keypad to access the numeric keypad used to enter data in these searches To use the search button 1 Select the...

Page 28: ...random play This function is available for DVD audio only k Repeat Select to repeat the current track Select this screen button again to repeat the current playing group on the disc Select the OFF screen button to turn off repeat play This function is available for DVD audio only OFF Select to turn off the scan random and repeat functions t u Seek Key Press the up arrow hard key to go to the next ...

Page 29: ...o the previous screen Screen Adjust Menu Screen Adjust Select to access the audio video DVD screen adjust menu _ Contrast Select the plus or minus signs next to this symbol to increase or decrease the contrast Brightness Select the plus or minus signs next to this symbol to increase or decrease the brightness Tint Select the plus or minus signs next to this symbol to increase or decrease the scree...

Page 30: ...g rate 16 kHz 22 05 kHz 24 kHz 32 kHz and 44 1 kHz Bit rates supported 32 40 48 56 64 80 96 112 128 160 192 224 256 and 320 kbps ID3 tag information is displayed by the radio if it is available The radio supports ID3 tag information v1 0 or v1 1 The radio will display a filename song name artist name album name and directory name Maximum 32 characters including spaces in a file or folder name Maxi...

Page 31: ...ry if available on the MP3 disc While in this mode you can select a specific folder to play HOME Select this screen button to allow you to go to the Home folder This is the first folder on the disc r Reverse Press and hold to reverse through the current track Fast forward Press and hold to fast forward through the current track j Pause Select to pause play Select this button or the play button to ...

Page 32: ...If this symbol appears on the display after pressing the random screen button the system plays the tracks in all folders on the current playing disc in random rather than sequential order Select the OFF screen button to turn off random play M RND Random All Discs If this symbol appears on the display after pressing the random screen button the system plays the tracks on all of the loaded discs in ...

Page 33: ...ource is viewed on the navigation system screen and the audio is heard through the speakers The video image is only available when the vehicle is in P Park Drivers are encouraged to set up any auxiliary device while the vehicle is in P Park See Defensive Driving in the Index of the vehicles owner manual for more information on driver distraction Connect the auxiliary device to the audio and video ...

Page 34: ...he navigation system along with the available touch screen buttons on the navigation screen to operate the system See Overview on page 4 for more information Once the vehicle is moving various functions are disabled to reduce driver distractions Hard Keys The following hard keys are located on the navigation system Z Map DVD Eject Press this key located next to the map DVD loading slot to eject th...

Page 35: ...etooth OnStar or control video input See Bluetooth on page 102 OnStar System on page 79 and Auxiliary Devices on page 33 for more information e Audio Press to access the Audio Adjust screen to adjust bass midrange fade balance and DSP Digital Signal Processing settings See AM FM Radio on page 14 and Satellite Radio on page 21 ROUTE Press to access the Destination Entry screen or the search area an...

Page 36: ...selections easier the system only allows selection of a character which can follow the last one entered For example if a Z is entered a T is not available to select The system highlights the available characters If a name is not available after input it may need to be entered differently the map DVD database may not contain that information or the correct search area has not been selected See Maps...

Page 37: ...Center DIC Head Up Display HUD etc See Language under Personalization on page 101 for more information Once a language has been selected touch I agree to enter the navigation system The map appears showing the current vehicle position DVD Map Disc Messages If an error appears on the display and or the map disc comes out it could be for one of the following reasons The map disc was installed into t...

Page 38: ...ents or other cleaners Do not use the disc to rest on while writing or drawing using any writing utensil or attach a seal to any of the sides or the disc Do not keep the disc in direct sunlight high temperatures or humidity After using the disc place it back into the original case Setting the Search Area See Destination on page 63 for information on changing the search area Map Adjustments The sca...

Page 39: ...distance If the scroll feature is used to scroll the map and the vehicle icon becomes lost press the map hard key to return to the current vehicle location on the map When scrolling on the map the system displays the address of the scroll symbol location and the distance from the vehicle s current position to the scroll symbol location Use the scroll feature on the map to set a destination See Map...

Page 40: ...me is not available or when scrolling on the map The distance and time to destination symbol indicates the distance and the estimated time remaining to the final destination or arrival time depending on the option selected See Destination on page 63 The straight line to distance symbol shows the straight line distance to your destination This symbol appears before starting to drive on the route or...

Page 41: ...e indicates the North direction While in Heading Up mode the direction the vehicle is traveling is always at the top of the map screen The vehicle icon is always headed in the direction the vehicle is traveling Select this screen symbol to switch between Heading Up and North Up modes The No GPS symbol appears when the vehicle is not receiving a Global Positioning System GPS satellite signal See Gl...

Page 42: ...the screen as a memory point The system automatically stores the memory point in the Marked Point folder category Touch anywhere on the map to display the Point of Interest POI screen button on the bottom right corner of the map screen Select the POI screen button to display the following screen Select one of the categories to display or to delete the POI icons from the map If the POI icons are cu...

Page 43: ...e category 2 Select the subcategory that was added All Local POI s Select to display the list of available POIs This list is based on the added POI categories The list contains the POIs within a 32 km 20 mile area from the current position of the vehicle The list provides the POI icon the name the direction and the distance to the POI from your vehicles current position Use the scroll symbols to m...

Page 44: ...ol from the map to display the guidance window options Select from one of the following six options that allow you different views and information of the map screen Availability of these options depends on the current route Single Map Mode Select the map view symbol to display more of the map with a window that gives the direction and distance to the upcoming maneuver 44 Infotainment System ...

Page 45: ...d to turn the POIs on and off To change the heading direction in the right map touch the north up or heading up symbol Turn List Mode Select the turn list symbol to display the next three upcoming maneuvers Directional arrows street name and distance to the next turn displays As the vehicle approaches the next turn the system automatically displays a zoomed in view of the upcoming maneuver Infotai...

Page 46: ...coming maneuver Guidance Screen Mode Select the next maneuver symbol to display only the next maneuver When approaching the next maneuver the navigation system automatically displays this guidance window Freeway Mode Select the highway guidance symbol to display the following information The upcoming exit number distance to the exit available POIs at the exit and a window with direction and distan...

Page 47: ...screen Traveling Across Regions If planning to drive across many states the region selected might have to be changed while travelling to the destination To do so Change the selected region in the search area when getting closer to the destination See Destination on page 63 Change the selected region in the search area when entering the destination and route settings See Destination on page 63 For ...

Page 48: ...istance between waypoints and final destination can have an individual setting y z Scroll Arrows Use the up and down arrows to scroll through your route Quick Normal Short Select one of the route preference options to change the planning method Calculate After selecting the new methods select Calculate to plan the route with the changes The map screen displays Detour Select this screen button from...

Page 49: ... system to use toll roads when calculating a route b Allow Ferry This feature allows the system to use ferries when calculating a route Calculate W Back Select either screen button to calculate the route if a destination has been entered o Dest Way Pt Destination and Way Point Select this screen button from the ROUTE OPTIONS screen to access the DEST WAY POINT screen Use this screen to plan a dest...

Page 50: ...he turn To cancel the avoided turn select Avoid again to deselect it Reroute W Back Select either screen button to calculate the route based on the selected avoided maneuvers Delete Press to cancel an avoided turn after the route has been replanned A list of all of the avoided turns displays Select the street that you want to add back to the route A confirmation window displays Select Yes to have ...

Page 51: ...t POI depending on the mode selected This button toggles between slow and fast speed t h Skip to Destination Select to skip to the destination next waypoint or next POI depending on the mode selected Info Information When the skip scroll functions are used and the cursor stops at a POI this screen button appears Press this screen button to provide information regarding the POI name address city an...

Page 52: ...ORED LOCATIONS screen the following options can be accessed N Memory Points Select this screen button from the STORED LOCATIONS screen to access the MEMORY POINTS screen This feature allows the ability to store memory points Storing memory points makes these points easily available to set as a destination See Memory Points under Navigation Menu on page 47 for more information Memory points can be ...

Page 53: ...ed point 1 Select the Memory Points screen button from the STORED LOCATIONS screen 2 Select one of the folders categories listed 3 Select the Edit screen button 4 Select the memory point from the list Use the Dist distance Icon Name and Date screen buttons to change the sort methods 5 Select the Name screen button 6 Use the backspace screen button to delete the current name or use the alpha keypad...

Page 54: ...at was recorded and then asks you to confirm the nametag State Yes to confirm the nametag state No to cancel the nametag and to try again Choose whether or not to have the name show on the map screen next to the POI icon by selecting the Show Name On or Off screen buttons Del Nametag Delete Once a nametag has been added the Add Nametag screen button changes to Del Nametag To delete a nametag press...

Page 55: ...the Memory Points screen button from the STORED LOCATIONS screen 2 Select the folder category the memory point is stored in 3 Select the Edit screen button 4 Select the memory point from the list 5 Select the Tel telephone screen button 6 Use the numeric keypad to change the phone number 7 Select the OK screen button to store the changed phone number To delete a memory point 1 Select the Memory Po...

Page 56: ...ategory 1 Select the Memory Points screen button from the STORED LOCATIONS screen 2 Select the folder category that is to have a name change 3 Select the Edit Category screen button 4 Use the q backspace screen button to delete the displayed name 5 Use the alpha keypad to input the name of the folder category 6 Select the OK screen button to save the changes 3 Avoid Area This feature allows you to...

Page 57: ...utton 3 Select the point to be changed from the list 4 Select the Name screen button 5 Use the alpha keypad to add or to change the name 6 Select the OK screen button to save the changes Choose whether or not to have the name show on the map screen next to the avoided area by selecting the Show Name On or Off screen buttons To edit the position of the point to be avoided 1 Select the Avoid Area sc...

Page 58: ...the AVOID AREA screen Dest Way Pt Destination and Way Point This feature allows up to five waypoints to be stored to the current route From this screen waypoints can be added edited or deleted to the route To add a waypoint 1 Select the Dest Way Pt screen button from the STORED LOCATIONS screen 2 Select the Add screen button 3 Using the desired method of entering a destination enter the waypoint S...

Page 59: ...o save the changes To change the location of a waypoint 1 Select the Dest Way Pt screen button from the STORED LOCATIONS screen 2 Select the Edit screen button 3 Select the Chg Loc screen button from the CHANGE ORDER screen 4 From the CHANGE LOCATION screen select the point whose location needs to change 5 The system displays the map screen with the destination marked Touch the position on the map...

Page 60: ... to be stored as your home destination To store the home destination 1 Select the L Home screen button from the STORED LOCATIONS screen 2 Select the Add screen button 3 Select a destination entry method See Navigation Menu on page 47 for more information 4 Select the OK screen button to store the destination The home icon is highlighted on the DESTINATION ENTRY screen To edit the home destination ...

Page 61: ...confirmation message Select Yes to delete all of the destinations select No to not delete all of the destinations A Preset Dests Destinations This feature adds deletes or changes one of five preset destinations Storing preset destinations makes these destinations easily available to set as a destination See Preset Destination under Navigation Menu on page 47 for more information To store a preset ...

Page 62: ...ton from the STORED LOCATIONS screen 2 Select the Edit screen button 3 Select the preset destination to be changed 4 Select the Position screen button 5 Touch the position on the map to move the destination to that location 6 Select the OK screen button to save the changes To add or change the phone number of a preset destination 1 Select the Preset Dests screen button from the STORED LOCATIONS sc...

Page 63: ... confirmation message Select Yes to delete all destinations select No to not delete all destinations Display Memory Pt Icons When memory points have been stored this screen button displays Select this screen button from the STORED LOCATIONS screen to display memory point icons on the map screen Calculate Select this screen button from the STORED LOCATIONS screen to calculate the route Destination ...

Page 64: ...region Touch the REGION screen button from the DESTINATION ENTRY screen to see a list of states included in the highlighted region or to change the region The SEARCH AREA screen displays Touch the numbered screen button to the left of the search area map that corresponds with the numbered region you wish to select or to view a list of states included in the region Touch the down arrow to select CA...

Page 65: ... to calculate the route 7 Select the Guide screen button to start route guidance See Getting Started on Your Route later in this section for more information To use the street name first destination entry method 1 Touch the Street screen button from the address menu and start entering the street name using the alpha keypad A list of available street names display if there are less than five items ...

Page 66: ...y name and then touch the List screen button to display a list of available cities Choose a city from the list If choosing from one of the prior mentioned lists select the city from the list displayed 4 The House number screen displays Enter the house number using the numeric keypad 5 Select the Street screen button from the address menu and start entering the street name using the alpha keypad A ...

Page 67: ... POIs displays if there are less than five POIs available Touch the List screen button at any time to view the available POIs 2 Select the desired POI from the list A map screen appears with the destination marked 3 Select the h destination symbol screen button to calculate the route 4 Select the Guide screen button to start route guidance See Getting Started on Your Route later in this section fo...

Page 68: ... list Last 5 Cities The city names of the last five cities that were stored as a previous destination displays Select a city from the list 2 Use the alpha keypad to enter the POI name Touch Sym symbol to select symbols and numbers for the POI touch Others to select special characters for the POI or touch A Z to return to the alpha keypad 3 A list of POIs appear using the information from the alpha...

Page 69: ...save the address as a destination or waypoint If select this position as a waypoint the point is stored as a waypoint The system displays the STORED LOCATIONS screen See Memory Points under Navigation Menu on page 47 for more information If select the h destination symbol screen button the system calculates the route Select the Guide screen button to start route guidance See Getting Started on You...

Page 70: ...uidance See Getting Started on Your Route later in this section for more information Phone Number The phone number destination entry method allows a destination to be chosen by entering a phone number The phone number must be in the list of POIs that is contained on the map DVD in order for the system to retrieve the destination U Phone Number Touch to access the PHONE NUMBER screen To use the pho...

Page 71: ...he Entrance or Exit screen button to choose a point Choose an exit entrance point from the list of names that appear Input the exit entrance by name Touch the Input Name screen button If the freeway exit or entrance name is input the alpha keypad displays Touch the alpha keypad to enter the freeway exit or entrance name The list can be sorted by distance or name Touch the Name Sort screen button t...

Page 72: ...ter selecting a destination from the list a map screen appears with the destination marked 3 Select the h destination symbol screen button to calculate the route 4 Select the Guide screen button to start route guidance See Getting Started on Your Route later in this section for more information To use the emergency destination entry method when a route has been planned 1 Select a category 2 The sy...

Page 73: ...the desired memory point A map screen appears with the destination marked 3 Select the h destination symbol screen button to calculate the route 4 Select the Guide screen button to start route guidance See Getting Started on Your Route later in this section for more information Previous Destination The previous destination entry method allows a destination to be chosen from a list of previous dest...

Page 74: ...e Touch to sort the list by the date the destination has been entered The list will be in order by the latest to the oldest destinations that have been entered Previous Start Point Touch this screen button for the system to plan a route to the previous point you were at when a route was entered This option is available while the vehicle is moving Coordinates The coordinates destination entry metho...

Page 75: ... by voice recognition If a destination is not set for one of the screen buttons the button dims and becomes unavailable See Memory Points under Navigation Menu on page 47 for more information To use the preset destination entry method 1 Select the desired preset destination from the DESTINATION ENTRY screen The screen buttons are numbered 1 5 A map screen appears with the destination marked and th...

Page 76: ...set the entered destination as it is without further adjustment o Waypoint Touch to enter this point as a waypoint along the route See Dest Way Pt under Stored Locations under Navigation Menu on page 47 for more information Route Preference Touch to access the Route Preference screen and adjust the route preferences The current setting displays in the Route Preference section of the Map screen See...

Page 77: ...ble the system calculates up to three different versions of the current route in three different colors Quick Normal and Short The routes are shown with distance to destination and estimated travel time The quickest route may not be the shortest and vice versa When an optional route is selected it is shown on the map in another color Touch Info on the three routes screen to access the INFO FOR 3 R...

Page 78: ...om a turn in residential areas and 2 0 km or 2 0 mi away from a turn on freeways A Directional Arrow Displays the direction of the next turn B Distance Bar Decreases as the vehicle approaches the turn C Street Name Line Displays the name of the street that the vehicle will be turning on D Mile Kilometer Scale Indicates the scale of the distance bar The scale is 0 80 km 0 5 mi in residential areas ...

Page 79: ...e other red Touch the green button to answer the call Touch the red button to reject the call When using the OnStar system the audio system mutes The volume of an OnStar call can be adjusted by using the steering wheel controls or the volume knob on the navigation system See OnStar System in the Index of the vehicle s owner manual for more information Using the OnStar Screen to Make a Phone Call T...

Page 80: ...Day and Night Day mode changes the navigation system screen to a lighter background for better viewing in the daytime Night mode changes the navigation system screen to a darker background for better viewing at night Auto mode adjusts the screen automatically depending on exterior lighting conditions _ Contrast Adjusts the contrast of the navigation screen Touch the plus or minus signs on either s...

Page 81: ...nging the map to the 3 dimensional view use the up down arrows to change the angle of the map Select Default to return to the factory settings 2 dimensional C Quick POI Selection Sets six Point of Interest POI categories that can be selected from while driving To set the Quick POI selection 1 Select the Quick POI Selection screen button 2 Select the sub category to be replaced 3 Select a Quick POI...

Page 82: ...which you would like to move the current position mark 3 Touch the OK screen button once the vehicle is in the current position If a route had already been set the map screen displays select Guide to change the route to the vehicle s new position Once the process of changing the vehicle s current position is complete the map screen displays with rotate arrow screen buttons around the vehicle 4 To ...

Page 83: ...ically displays freeway information in the guidance window while on a freeway during route guidance Select the Off screen button to not display this guidance window Text size on map Adjusts the text size on the map between Large Medium and Small This option is located on the second page of the USER SETTINGS screen Touch the down arrow to access this option Restore System Defaults Select this optio...

Page 84: ...age 101 for more information on language and personal settings and see Memory Settings later in this section Clock H Clock Adjust Touch and hold this screen button in the upper right corner of the screen to access the Clock Adjust screen and adjust several time features Adjustments from this screen 12Hour Touch to display the time in standard AM PM format 24Hour Touch to display the time in milita...

Page 85: ...he vehicle has the memory feature memory settings for the following features for up to two drivers can be programmed and recalled The driver seat position The outside rearview mirrors position The telescopic steering column position The language radio and XM presets tone volume playback mode AM FM or CD last displayed stations and CD position are set automatically The last climate control setting ...

Page 86: ...ess transmitter to identify yourself as Driver 1 or Driver 2 The numbers on the back of the keyless access transmitters correspond to the driver number 3 Press the CONFIG hard key 4 Adjust the settings for the driver seat the outside mirrors and the steering column to a comfortable driving position or exit position 5 Push and hold either the Driver 1 or Driver 2 screen buttons to store the driving...

Page 87: ...Enhanced StabiliTrak If the vehicle has this feature select between the following screen buttons Touring Select this screen button for normal city and highway driving This setting provides a smooth soft ride Performance Select this screen button when road conditions or personal preference demand more control This setting provides more feel or response to road conditions Active Steering and Magneti...

Page 88: ...r market glass tinting has been applied to the vehicle s windshield Notice Do not apply after market glass tinting to the vehicle s windows Glass tinting interferes with the system s ability to receive GPS signals and causes the system to malfunction The window might have to be replaced to correct the problem This would not be covered by the warranty For more information if the GPS is not function...

Page 89: ...n your vehicle The vehicle is equipped with tire chains The tires are replaced The tire pressure for your tires is incorrect The tires are worn The first time the map DVD is inserted The battery is disconnected for several days The vehicle is driving in heavy traffic where driving is at low speeds and the vehicle is stopped and started repeatedly If these problems are experienced with the system t...

Page 90: ...pdated periodically provided that the map information has changed For any questions about the operation of the navigation system or the update process contact the GM Nav Disc Center toll free phone number 1 877 NAV DISC 1 877 628 3472 or go to the center s website gmnavdisc com For any updates or replacements call the GM Nav Disc Center or order a new disc online Have the Vehicle Identification Nu...

Page 91: ...nts for Stating Commands When a multiple command is available choose the command that best works for you Words that are in brackets are optional For example for the command Radio band select FM stating Radio FM or Radio select FM are both valid commands When the system recognizes the command the system Either performs the function Asks you to confirm your choice by clearly stating yes or no Issues...

Page 92: ...ch one of the buttons on the right of the screen to choose the commands to view Use the up and down arrows to scroll through the list of commands Navi Navigation Touch to display the list of navigation commands Radio Touch to display the list of radio commands CD Touch to display the list of CD commands DVD Touch to display the list of DVD commands Heater Touch to display the list of climate contr...

Page 93: ...tructions listed previously Display Commands Display set English units Instructs the system to switch to English units of measurement All display settings change Display set metric units Instructs the system to switch to metric units of measurement All display settings change Display set day mode Instructs the system to switch the system display to day mode See Screen Appearance under Configure Me...

Page 94: ...g Navigation store this point navigation mark this point Instructs the system to store or mark a point in its memory These commands are available while a map screen is displayed Navigation change to 3 D map mode navigation change to 2 D map mode Instructs the system to switch between 2 D and 3 D map modes These commands are available while a map screen is displayed Point of Interest POI Commands T...

Page 95: ...ourist Attraction Navigation Tourist Information Navigation Video Rental Navigation Winery Financial Locations Navigation ATM Navigation Bank Navigation Other Financial Services Governmental Offices Navigation Town Center Navigation City Center Navigation Convention Center Navigation Exhibition Center Navigation Court House Navigation Government Offices Navigation Higher Education Navigation Unive...

Page 96: ...d Navigation Other Restaurant Navigation Other Food Shopping Locations Navigation Convenience Store Navigation Department Store Navigation Grocery Store Navigation Home and Garden Navigation Pharmacy Navigation Shopping Mall Navigation Specialty Food Store Navigation Other Retail Stores Transportation Navigation Airport Navigation Bus Station Navigation Campground Navigation Ferry Terminal Navigat...

Page 97: ...ect a destination saved under the stored nametag The system asks whether the nametag should be set as a waypoint or final destination State waypoint or destination after the prompt Cancel Instructs the system to cancel the most recent command Guidance Commands Navigation louder navigation softer Instructs the system to increase and decrease the volume of the voice guidance and voice recognition sy...

Page 98: ...adio scan down Instructs the system to scan up or down through radio stations Radio band select AM radio band select FM radio band select XM radio band select satellite radio band select WX radio band select weather band Instructs the system to go to either the AM FM XM if equipped or WX if equipped radio bands Radio select frequency AM radio select frequency FM radio select channel weather band I...

Page 99: ... place of the word balance The word chapter can be substituted in place of the word track DVD Changer Commands The following commands are only available when a CD MP3 or DVD is loaded DVD Instructs the system to turn the CD DVD changer on DVD turn off Instructs the system to turn the CD DVD changer off DVD set balance center Instructs the system to set the fade and balance to the center and middle...

Page 100: ...set driver two Instructs the system to change the driver setting between driver 1 and driver 2 See Configure Menu on page 80 for more information Select driver one Selects the memory settings for driver 1 The seat steering wheel and navigation system settings change to those stored by driver 1 Select driver two Selects the memory settings for driver 2 The seat steering wheel and navigation system ...

Page 101: ...Dialing and Making Calls Using Your Bluetooth Phone in the vehicle s owner manual for more information on how to store a nametag Phone redial recall Instructs the system to redial a phone number Phone help Instructs the system to assist with phone commands Help commands display on the map screen when the vehicle is stopped The word telephone can be substituted in place of the word phone OnStar Com...

Page 102: ...normally in the phone settings Bluetooth option 4 Select the Search screen button The system searches for the compatible Bluetooth devices 5 Choose your device by touching the icon next to the device name Scroll through the choices using the arrow buttons 6 Select the Connect screen button Your phone and the Bluetooth system will begin a connecting procedure 7 Follow the instructions on the screen...

Page 103: ... a time F Cancel Select to return to the setup screen Registered Device Select to display a list of all Bluetooth phones that have been registered connected to the vehicle From this list you can set your default device change the phones to be used in the vehicle search for a new device delete a device and receive or connect a new device New Device Select when you are in the process of adding a new...

Page 104: ... phones in a designated area Bluetooth Phone Screen This information on this screen depends on the information received from the phone Some phones may not support this feature While in this screen use the different features to dial or to make a call Press the AUX hard key to get to the BLUETOOTH PHONE screen The screen displays even if the phone is not connected If the phone is not connected the s...

Page 105: ...ta cannot be transferred from the Bluetooth phone book to the phone s address book or vise versa V Send End Call This screen button lets you place a call after using the alpha keypad or to end a call at the end of the conversation When you send a call the button is green When you are in a call the button is red to indicate that touching the button ends the call Dialing and Making Calls Using Your ...

Page 106: ...See OnStar System on page 79 for more information Video Select when using an auxiliary device See Auxiliary Devices on page 33 for more information F Cancel Select to return to the BLUETOOTH PHONE screen W Back This screen button returns the screen to the previous page q r Scroll to End Beginning These screen buttons allow you to scroll through the entry as necessary New This screen button begins ...

Page 107: ...n 5 The system requests confirmation Press Yes to confirm or No to cancel Edit This screen button edits an existing phone book entry Y All Delete All This screen button deletes all phone book entries Last 10 This screen button goes to a screen showing the last 10 calls either sent or received using the Bluetooth system Phone calls can be placed from this screen See the Last 10 Calls Screen later i...

Page 108: ...placed after touching the appropriate phone book entry or to cancel a call at the end of the conversation Sent Gives the list of the last 10 calls sent from the system Received Gives the list of the last 10 calls received on the system Dialing from Navigation Screens When a Bluetooth phone is connected the V Send End Call screen button can be used to dial the associated number Press the Info scree...

Page 109: ...n 104 C Canadian Vehicle Owners Propriétaires des Véhicules Canadiens 4 Canceling Guidance 13 CD DVD Player 23 Change Route 48 Cleaning the Display 14 Clock 84 Configure Menu 80 Coordinates 74 D Database Coverage Explanations 90 Deleting Personal Information 9 Destination Navigation 63 Devices Auxiliary 33 Dialing and Making Calls Using Your Bluetooth Phone 105 Dialing from Navigation Screens 108 ...

Page 110: ...idance Windows 44 H Handling the DVD Map Disc 38 Hard Keys 34 Head Up Display 78 Home 75 I Installing the DVD Map Disc 37 Intersection 69 Introduction 3 M Magnetic Ride Control Vehicles without Enhanced StabiliTrak 87 Map 68 Map Adjustments 38 Map Scales 38 Maps 36 Memory Infotainment Settings and Presets 86 Memory Points 52 73 Memory Settings 85 Menu Configure 80 MP3 30 i 2 INDEX ...

Page 111: ...e Number 70 Playing an Audio CD 24 Playing an Audio or Video DVD 26 Playing the Radio 15 Point of Interest POI 67 Preset Destination 75 Preset Stations 16 Previous Destination 73 Problems with Route Guidance 89 R Radio Personalization 101 Radio Data System RDS 20 Radio Personalization 14 Radios AM FM Radio 14 CD DVD Player 23 Satellite 21 Recall Memory Settings 87 Region 64 INDEX i 3 ...

Page 112: ...our Bluetooth Phone 102 Speed Advisory 88 Store Memory Settings 86 Storing Radio Station Presets 9 Symbols Navigation 39 System Needs Service If 90 T Three Routes 77 Touch Sensitive Screen Buttons 36 Traveling Across Regions 47 U Using an MP3 30 Using Your Home or Preset Destinations 13 V Vehicle 84 Vehicle Positioning 89 Voice Recognition 91 Voice Recognition Commands 93 Voice Recognition Help 92...

Reviews: