Glow-worm Energy7 25c -A Installation And Maintenance Instructions Manual Download Page 33

Start-up 9

0020300875_01 Energy

7

Installation and maintenance instructions

33

Condition

: Gas flow pressure

in the

permissible range

End the check programme

P.01

.

Allow the boiler to cool down allowing pump overrun to
operate for a minimum of two minutes.
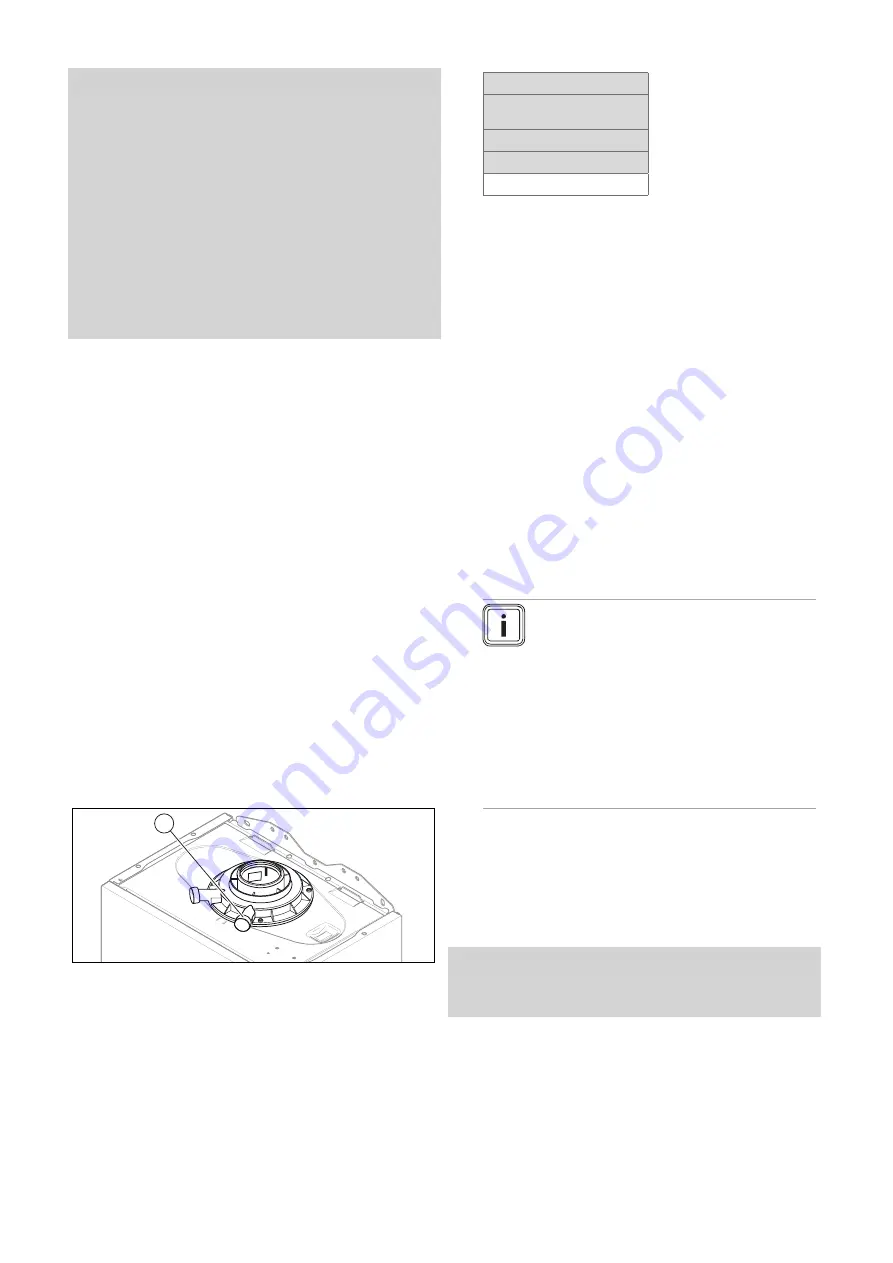
Close the gas stopcock

(1)

.

Remove the pressure gauge and retighten the sealing
screw

(2)

for the measuring nipple.

Open the gas stopcock

(1)

.

Check the test nipple for gas tightness.

Install the front casing. (

Page 21)

Reset boiler controls for normal operation.

Record the appliance gas inlet working pressure (kPa
resp. mbar) in the Benchmark gas boiler commissioning
checklist.

9.11.3 Checking the air/flue pipe/flue gas

recirculation

1.

Check the flue gas installation is intact in accordance
with the latest gas safe technical bulletin and informa-
tion supplied in the installation instructions.

2.

For extended flue gas installations check for flue gas
recirculation using the air analysis point.

3.

Use a flue gas analyser.

4.

If you discover unusual levels of CO or CO

2

in the sup-

ply air, search for the leak in the flue system or for signs
of flue gas recirculation.

5.

Eliminate the damage properly.

6.

Check again whether the supply air contains any un-
usual levels of CO or CO

2

.

7.

If you cannot eliminate the damage, do not start up the
product.

9.11.4 Checking the CO

content

1.

Start up the product with the check programme

(P.01)

and set the value.

Setting value for the programme P.01: 100

Check programmes

Overview

2.

Wait until the value that is read is stable.

Waiting period for reading a stable value: 5 min

1

3.

Unscrew the cover from the flue gas analysis point

(1)

.

4.

Measure the CO

content at the flue gas analysis point

(1)

.

5.

Compare the measured value with the corresponding
value in the table.

Great Britain and Ireland

Removed front casing /
installed front casing

Natural gas

H

9.2

±

1%

The value is OK.

The value is not OK; you cannot start up the
product.

Inform Customer Service.

9.12

Thoroughly flushing the heating installation
("hot")

1.

Operate the appliance until the boiler and the heating
system are up to temperature.

2.

Check the heating system for leaks.

3.

Connect a hose to the drain valve located at the lowest
position of the heating system.

4.

Shut off the boiler, open the drain valve and all purge
valves on the radiators and allow the water to flow out
of the heating system and the boiler quickly and fully.

5.

Close the drain valve.

6.

Fill the heating system again with water as described in
Filling the heating installation and Purging the heating
installation.

7.

Re-fill the system until the system design pressure of
0,1 MPa (1,0 bar) is attained.

Note

The actual reading on the digital pressure
gauge should ideally be 0,05 MPa (0,5 bar)
plus an additional pressure corresponding
to the highest point of the system above the
base of the boiler

10 m head equals an ad-

ditional 1 bar reading on the pressure gauge.
The minimum pressure should not be less
than 0,1 MPa (1 bar) in any installation. If
the system is to be treated with an inhibitor it
should be applied at this stage in accordance
with the manufacturer’s instructions

8.

Install the front casing.

9.13

Checking leak-tightness

Check the gas pipe, the heating circuit and the hot water
circuit for leak-tightness.

Check that the air/flue pipe has been installed correctly.

Condition

: Room-sealed operation

Check whether the vacuum chamber has been closed
tightly.

9.13.1 Checking the heating mode

1.

Activate the heating mode on the user interface.

2.

Turn all thermostatic valves on the radiators until they
are fully open.

3.

Allow the product to operate for at least 15 minutes.

4.

Fill and purge the heating installation. (

Page 31)

Summary of Contents for Energy7 25c -A

Page 1: ...Installation and main tenance instructions Energy7 Energy7 25c A H GB Energy7 30c A H GB Energy7 35c A H GB GB IE...

Page 2: ...oiding danger arising from insufficient water pressure 31 9 8 Switching on the product 31 9 9 Filling and purging the heating installation 31 9 10 Filling the domestic hot water circuit 31 9 11 Checki...

Page 3: ...y7 Installation and maintenance instructions 3 I Pipe lengths for the air flue pipe 60 I 1 Length of the C13 type air flue pipe 60 I 2 Length of the C33 type air flue pipe 60 I 3 Length of the C43 typ...

Page 4: ...Any direct use in industrial or commercial processes Any use other than those described in these instructions and any use that goes beyond what is described here 1 2 Qualification The person carrying...

Page 5: ...are not damaged Instead of grease use only water or com mercially available soft soap to aid installa tion 1 3 3 Air supply Unsuitable or insufficient combustion and room air may lead to material dama...

Page 6: ...the heating water Page 29 If you use non diffusion tight plastic pipes in the heating installation ensure that no air gets into the heat generator circuit 1 3 9 Neutralisation device To prevent contam...

Page 7: ...enquiries vaillant group com Spares Enquiries Telephone 01773 881383 To register your Glow worm appliance visit Glow worm is a licensed member of the Benchmark Scheme Benchmark places responsibilitie...

Page 8: ...Flue gas mass flow rate in do mestic hot water mode at P max 11 6 g s 13 8 g s 16 1 g s Flue gas temperature 80 C 60 C at P max 60 77 82 Flue gas temperature 80 C 60 C at P min 55 55 56 Flue gas tempe...

Page 9: ...25 MPa 2 50 bar Nominal water flow T 20 K 788 l h 1 094 l h 1 102 l h Nominal water flow T 30 K 525 l h 729 l h 876 l h Approximate value for the condensate volume pH value between 3 5 and 4 0 at 50 3...

Page 10: ...al data 10 Installation and maintenance instructions Energy7 0020300875_01 Energy7 25c A H GB Energy7 30c A H GB Energy7 35c A H GB Standby electrical power con sumption 2 W 2 W 3 W IP rating IPX4D IP...

Page 11: ...ating instructions enclosed with the installation components Store these instructions and all other applicable docu ments for further use These instructions apply only to Product article number Articl...

Page 12: ...il For more information visit www centralheating co uk 5 3 Information on the data plate The data plate is mounted on the underside of the product at the factory The data plate keeps record of the cou...

Page 13: ...s designed to recognise the potential for an overheat lockout and will shutdown before this happens To restart the boiler press the reset button on the boiler interface If the boiler fails to resume n...

Page 14: ...et 1 Flexible condensate discharge pipe 6 3 4 seals 4 1 2 seals 1 Service valve 1 Gas stopcock 1 Filling device 2 Connection pipe heating flow and return 1 Cold water connection pipe 1 Domestic hot wa...

Page 15: ...e heat loss from the appliance casing during operation is very low Compartment ventilation is not required as the products are only certified and can only be fitted with a concentric flue system 6 7 A...

Page 16: ...persons could come into con tact with the terminal or the terminal could be subject to dam age If a terminal guard is required it must be positioned to provide minimum of 50 mm clearance from any par...

Page 17: ...learance to noncombustible building material Vertical flue clearance to combustible building material 500 mm 1 500 mm J Above below and either side of an opening door air vent or opening window 300 mm...

Page 18: ...avoid wall staining and nuisance from pluming depending on site conditions Terminals must be positioned so to avoid combustion products entering the building Support the flue at approximately one metr...

Page 19: ...u must install a terminal protection kit Type Max length L Height H 60 100 diameter 10 m 76 mm 80 125 diameter 25 m 169 mm Each time an additional 90 bend is necessary or 2 at 45 the length L must be...

Page 20: ...with reference to the table below and the manu facturer s instructions supplied The appliance maximum flue length must be included when calculating the overall design of the flue system Max Flue Leng...

Page 21: ...Risk of material damage caused by mech anical deformation Removing both side sections may cause mechanical distortion in the product which may cause damage to the piping for ex ample and potentially...

Page 22: ...ll the heating system with water 6 Check that the expansion relief valve of the heating system is functioning correctly by turning the handle on the valve 7 Check the pressure in the heating system an...

Page 23: ...dditional expansion vessel in the heat ing return as close to the product as possible Install a non return valve at the product s outlet heating flow 2 Ensure that the installation has the following c...

Page 24: ...move all burrs from inside of cut pipe work and avoid excessive adhesive which may trap small pockets of water close to the pipe wall which can freeze and build into a larger ice plug For any installa...

Page 25: ...e 5 Limestone chippings 6 Hole depth 400 mm minimum Least preferred option must not terminate in rain water drain 7 7 1 6 Internal termination downstream of sink waste 100mm 32mm 22mm 3 m Open end of...

Page 26: ...being switched back on 7 9 1 Opening the electronics box B B A 7 9 2 Closing the electronics box Follow the instructions in the reverse order 7 9 3 Cable route 1 2 24 V eBUS 230 V 1 24 V eBUS cable ro...

Page 27: ...each pole The fused spur box should be readily accessible and preferably adjacent to the boiler It should be identified as to its use 30 mm N L X1 230V RT N L RT 2 1 6 Connect the cables 7 Screw the s...

Page 28: ...re than 7 seconds S XX is shown on the display followed by the heat ing flow temperature the internal system pressure and the cylinder temperature depending on the ver sion 2 Press the button to exit...

Page 29: ...y system an ac curate calculation of vessel size is given in the current is sue of BS 5449 and BS 7074 Part 1 Example For an initial design pressure of 0 7 bar the minimum total vessel volume required...

Page 30: ...he heating water is between 6 5 and a maximum of 8 5 Caution Risk of material damage if the heating water is treated with unsuitable additives Unsuitable additives may cause changes in the components...

Page 31: ...bar the value flashes in the display If the water pressure falls below 0 03 MPa 0 3 bar the product switches off The display shows 0 0 MPa 0 0 bar Fault F22 will be stored in the fault list Top up th...

Page 32: ...mmissioning checklist 9 11 2 Checking the gas connection pressure gas flow pressure 1 2 1 Ensure that the gas inlet working pressure can be obtained with all other gas appliances in the property worki...

Page 33: ...nding value in the table Great Britain and Ireland Removed front casing installed front casing Natural gas H 9 2 1 The value is OK The value is not OK you cannot start up the product Inform Customer S...

Page 34: ...Page 50 If the product is working correctly the display shows S 04 9 13 2 Checking the domestic hot water generation 1 Activate the domestic hot water mode on the user interface 2 Open a hot water tap...

Page 35: ...pump speed which depends on the operating mode under diagnostics code d 14 Set diagnostics code Page 28 Overview of diagnostics codes Page 47 Flow rate pressure curves for 25 kW pressure measured down...

Page 36: ...plete all relevant sec tions of the Benchmark commissioning checklist located at the rear of this document For IE Complete a Declaration of Conformity to indicate compliance to I S 813 An example of t...

Page 37: ...e parts contact the contact address provided on the back page of these instructions If you require spare parts for maintenance or repair work use only the spare parts that are permitted for the produc...

Page 38: ...you see any damage replace the burner 2 Install the two new burner seals 12 8 Checking the ignition electrode 1 2 3 4 5 1 Disconnect the connection 2 and the earth cable 1 2 Remove the fixing screws...

Page 39: ...Close the service valves of the product 2 Start check programme P 05 Page 28 Check programmes Overview 3 Open the draining cock 12 14 Checking the pre charge pressure of the expansion vessel 1 Measur...

Page 40: ...e the service valve in the cold water pipe 7 Drain the product if you want to replace water bearing components of the product 8 Ensure that water does not drip on live components e g the electronics b...

Page 41: ...acing the pump head 1 2 1 Disconnect the pump cables from the electronics box 2 Undo the four screws 1 3 Remove the pump head 2 4 Replace the O ring 5 Use four screws to secure the new pump head 6 Con...

Page 42: ...CB 3 Undo the clips on the PCB 4 Remove the PCB 5 Install the new PCB in such a way that it clicks into the groove at the bottom and into the clip at the top 6 Plug in the PCB plug 7 Close the electro...

Page 43: ...Troubleshooting 13 0020300875_01 Energy7 Installation and maintenance instructions 43 13 7 Checking the product for leak tightness Check that the product is leak tight Page 33...

Page 44: ...oning the product Switch off the product Disconnect the product from the power grid Close the gas stopcock Close the cold water stopcock 15 Recycling and disposal Disposing of the packaging Dispose of...

Page 45: ...ces specified in these instructions Annually 10 If the gas flow rate lies outside of the tolerances specified in these in structions eliminate the fault in accordance with the regulations and the curr...

Page 46: ...P 03 The product runs in heating mode with the maximum heat input set using diagnostics code d 00 P 04 Chimney sweep function If there is a domestic hot water demand the product runs in domestic hot...

Page 47: ...temperature for the domestic hot water cylinder Current value Not adjustable d 08 Status of the 230 V thermostat Current value 0 Room thermostat open no heat requirement 1 Room thermostat closed heat...

Page 48: ...table d 23 Status of the heat de mand Current value off Heating off Summer mode on Heating on Not adjustable d 24 Status of the pressure monitor 0 1 off Not switched on Switched Not adjustable d 25 St...

Page 49: ...legionella func tion deactivated 3 Domestic hot water activated min target value 60 C 0 Adjustable d 60 Number of blocks by the temperature cut out Current value Not adjustable d 61 Number of unsucces...

Page 50: ...in domestic hot water mode 0 1 0 1 7 l min no delay 1 3 7 l min 2 s delay 0 Adjustable d 90 Status of the eBUS room thermostat Current value off Not connected on Connected Not adjustable d 91 Status D...

Page 51: ...water deficiency flow return spread too large S 54 Waiting period Water deficiency in the circuit flow return spread too large S 76 Maintenance message Check the water pressure S 88 Product purging ac...

Page 52: ...ve Fan speed outside the tolerance values Plug on fan not correctly plugged in multiple plug on PCB not correctly plugged in break in cable harness fan blocked Hall sensor defective elec tronics defec...

Page 53: ...verted flow and return temperature sensors have not been correctly installed F 85 Fault Temperature sensor The flow and or return temperature sensors have been installed on the same pipe incorrect pip...

Page 54: ...N RT 230Vac X35 4 1 3 2 eBUS RT 24V Burner off X106 1 3 4 1 3 3 1 2 M 1 3 4 6 1 2 3 M 5 4 2 1 2 1 2 1 N L L 24V 230V 24V 230V 2 7 8 9 10 12 11 1 4 3 5 6 14 13 1 Main PCB 2 Interface PCB 3 Timer 4 Temp...

Page 55: ...230Vac 4 3 1 2 eBUS RT 24V Burner off X106 X35 1 3 4 1 3 3 1 2 M 1 3 4 6 1 2 3 M 4 3 2 1 5 4 2 1 5 6 7 8 2 1 2 1 N L L X35 24V 230V 24V 230V 2 7 8 9 10 12 11 1 4 5 6 14 13 3 1 Main PCB 2 Interface PCB...

Page 56: ...umer and they should be made aware it is ultimately their responsibility to register with the manufacturer within the allotted time period It is essential that the boiler is serviced in line with the...

Page 57: ...ut left at factory settings Yes No If no what is the maximum central heating output selected kW Dynamic gas inlet pressure mbar C Central heating return temperature C System correctly balanced rebalan...

Page 58: ...ILER delete as appropriate Date Engineer name Company name Telephone No Gas Safe registration No Max rate CO ppm CO CO CO Min rate CO ppm CO CO CO undertaken in accordance with manufacturers instructi...

Page 59: ...ILER delete as appropriate Date Engineer name Company name Telephone No Gas Safe registration No Max rate CO ppm CO CO CO Min rate CO ppm CO CO CO undertaken in accordance with manufacturers instructi...

Page 60: ...y7 30c A H GB 10 m 25 m Energy7 35c A H GB 10 m 25 m I 2 Length of the C33 type air flue pipe Validity C33 type air flue pipe Diameter of the air flue pipe Dia 60 100 L Dia 80 125 L C33 type air flue...

Page 61: ...Number 11 Gas family check 31 Gas flow rate 22 32 Gas setting 32 H Handing over to the end user 36 Heat exchanger cleaning 38 High efficiency pump 35 High efficiency pump output 35 I If you smell gas...

Page 62: ......

Page 63: ......

Page 64: ...9 Technical helpline 0330 100 7679 After sales service 0330 100 3142 www glow worm co uk 0020300875_01 09 11 2020 These instructions or parts thereof are protected by copyright and may be reproduced o...

Reviews: