- 37 -
System Hardware Installation
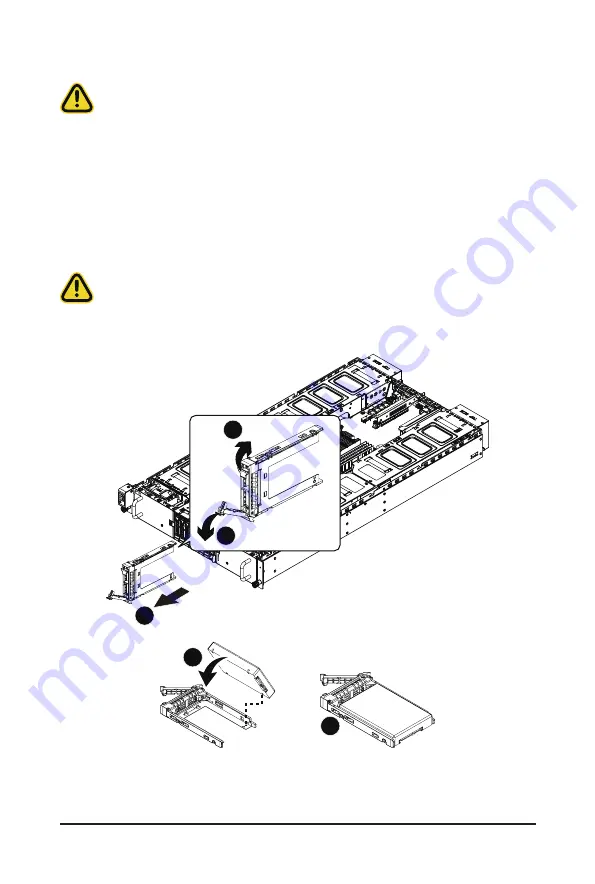
3-7 Installing the Hard Disk Drive
Read the following guidelines before you begin to install the Hard disk drive:
• Take note of the drive tray orientation before sliding it out.
• The tray will not fit back into the bay if inserted incorrectly.
• Make sure that the HDD is connected to the HDD connector on the backplane.
Follow these instructions to install a 2.5" hard disk drive:
1. Press the release button.
2. Extend the locking lever.
3. Pull the locking lever in the direction indicated to remove the HDD tray.
4. Align the hard disk drive with the positioning stud on the HDD tray.
5. Slide the hard disk drive into the HDD tray.
6. Reinsert the HDD tray into the slot and close the locking lever.
CAUTION!
We strongly recommend using enterprise level hard disk drives in the Gigabyte server system. For
more information of recommended HDDs, please visit the Gigabyte website:
https://www.gigabyte.com
and search for the specific product QVL from
Support & Downloads.
3
1
Press
Pull
2
4
5
Summary of Contents for G292-280
Page 1: ...G292 280 HPC Server Intel DP 2U 8 x GPU Server User Manual Rev 1 0 ...
Page 28: ... 29 System Hardware Installation For GPU6 GPU7 1 1 2 2 For GPU2 GPU3 1 2 2 1 ...
Page 29: ... 30 System Hardware Installation 3 4 ...
Page 31: ... 32 System Hardware Installation For GPU0 GPU1 1 2 2 1 3 4 ...
Page 33: ... 34 System Hardware Installation 3 4 5 6 6 ...
Page 35: ... 36 System Hardware Installation 5 6 ...
Page 43: ... 44 System Hardware Installation CPU Power Cable 1 x 3 Power Cable ...
Page 44: ... 45 System Hardware Installation SMD Cable System Fan Power Cable ...
Page 47: ... 48 System Hardware Installation SlimLine SAS to SATA 2 Cable NVMe 0 1 Cable NVME 1 NVME 0 ...
Page 48: ... 49 System Hardware Installation NVMe 2 3 Cable NVME 3 NVME 2 Front Panel IO Cable ...
Page 73: ... 74 BIOS Setup 5 2 12 Intel R X710 Ethernet Network Connection ...
Page 78: ... 79 BIOS Setup 5 3 1 Processor Configuration ...


