


- 33 -
System Hardware Installation
3-5 Installing the Hard Disk Drive
Read the following guidelines before you begin to install the Hard disk drive:
• Take note of the drive tray orientation before sliding it out.
• The tray will not fit back into the bay if inserted incorrectly.
• Make sure that the HDD is connected to the HDD connector on the backplane.
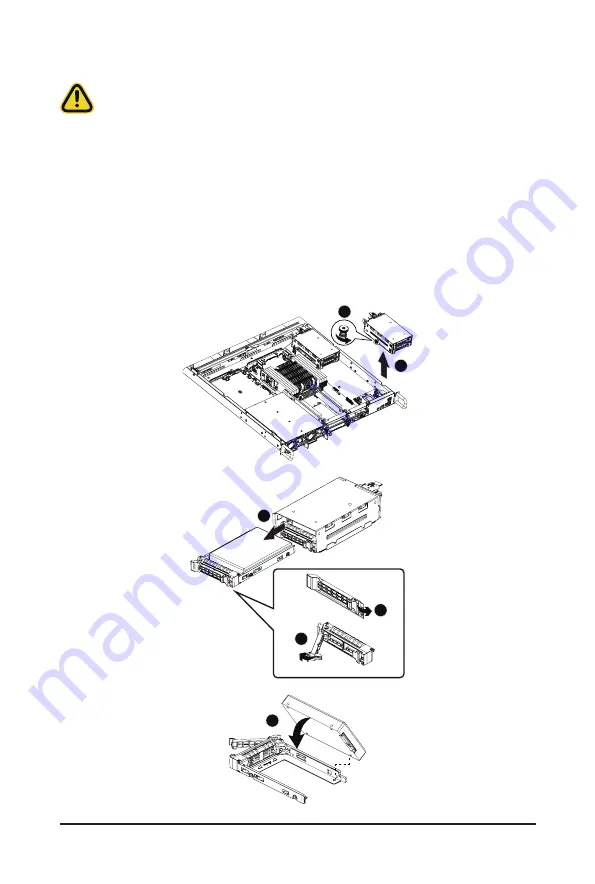
Follow these instructions to install a 2.5" hard disk drive:
1. Loosen the thumbnail screw securing the hard drive cage.
2. Lift up the hard drive cage and remove it from the system.
3. Extend the locking lever.
4. Pull the locking lever to remove the HDD tray.
5. Align the hard disk drive with the positioning stub on the HDD tray.
6. Slide hard disk drive into the blank HDD tray.
7. Reinsert the HDD tray into the slot and close the locking lever.
1
2
3
5
4
6
Summary of Contents for G152-Z12
Page 1: ...G152 Z12 HPC Server 1U UP Gen4 GPU Server User Manual Rev 1 0 ...
Page 10: ... 10 This page intentionally left blank ...
Page 15: ... 15 Hardware Installation 1 3 System Block Diagram ...
Page 38: ... 38 System Hardware Installation Motherboard Power Cable PMBus Cable ...
Page 39: ...System Hardware Installation 39 Management LAN Signal Cable OCP 3 Signal Cable ...
Page 41: ...System Hardware Installation 41 GPU Riser Card Power Cable GPU Signal Cable ...
Page 42: ...System Hardware Installation 42 NVMe 1 2 Cable Top Bottom NVMe 3 4 Cable Top Bottom ...
Page 51: ...BIOS Setup 51 When Boot Mode Select is set to Legacy in the Boot Boot Mode Select section ...
Page 56: ...BIOS Setup 56 5 2 4 1 Serial Port 1 Configuration ...
Page 64: ...BIOS Setup 64 5 2 8 PCI Subsystem Settings ...
Page 75: ...BIOS Setup 75 5 2 17 Intel R Ethernet Controller X550 ...
Page 81: ...BIOS Setup 81 5 3 1 CPU Common Options ...
Page 94: ...BIOS Setup 94 5 3 3 1 1 Enforce POR ...
Page 140: ...BIOS Setup 140 This page intentionally left blank ...