background image


6

. CONTROL PANEL


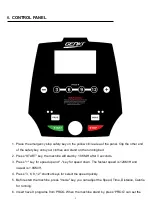
1.  Place the emergency stop safety key on the yellow circle area of the panel. Clip the other end 

of the safety key onto your clothes and stand on the running belt. 

2. 

Press “START” key, the machine will start by 1.0KM/H after 3 seconds. 

3.  Press "+" key for speed up and "-" key for speed down. The fastest speed is 12KM/H and 

lowest is 1.0KM/H. 

4.  Press 

“3, 6, 9, 12” shortcut keys for select the speed quickly. 

5.  Before start the machine, press "mode" key, you can adjust the Speed, Time, Distance, Calorie 

for running. 

6.  Insert have 9 programs from PROG. When the machine stand by, 

press “PROG” can set the 

Summary of Contents for KBR-JK370A

Page 1: ...1 MOTORIZED TREADMILL INSTRUCTION Thank you very much for purchasing our product Please read this instruction carefully before use it and keep the instruction at proper place...

Page 2: ...alcony Sunlight area or near heater Big noisy places Error may be appeared if the power is not stable Please do not use the same socket together with computer air conditioner etc It is suggested to we...

Page 3: ...ll functions and pull out plug after using Please do not stand directly on the belt while starting the machine Do not disassemble the machine without conduct of professional person Please make sure th...

Page 4: ...rews 3 Take out the screws on the left and right frame then fix the panel with the left and right frame by that screws and pads Please also do not fasten the screws 4 Take out 2 short screws and pads...

Page 5: ...ey the machine will start by 1 0KM H after 3 seconds 3 Press key for speed up and key for speed down The fastest speed is 12KM H and lowest is 1 0KM H 4 Press 3 6 9 12 shortcut keys for select the spe...

Page 6: ...slowly If any error codes appear on the screen then please check below Err Without safety key Please make sure the safety key is put on If the safety key is already on but there ERR still shows or the...

Page 7: ...To prevent any injury please make sure you have a firm hold when lifting up or setting down the deck SETTING DOWN Holding the rear end of deck by one hand then use your foot to push the Cylinder A to...

Page 8: ...e die nut to make the screw go 1 4 circle see fig2 Then make the machine running without loading 1 2 minutes Please adjust like this to make the belt till to mid place 3 Running belt logjam If the run...

Page 9: ...ter Board 1 PCS 3 Upper Handrail Bar Q235 1 SET 4 Cross Large Flat Head Tapping Screw ST4 25 4 PCS 5 Cover 2 PCS 6 Self Locking Nut M6 2 PCS 7 Middle Handrail Pipe Q235 1 PCS 8 Arc Gasket 8 2 PCS 9 Ha...

Page 10: ...king Nut M6 2 PCS 27 Outer Hexagonal Screw M8 45 1 PCS 28 Self Locking Nut M8 2 PCS 29 Half Round Head Hexagonal Screw M8 40 2 PCS 30 Latch 2 PCS 31 Adjustment ABS 2 PCS 32 Flange nut M8 6 PCS 33 Left...

Page 11: ...11...

Reviews: