background image

9

ENG

name of eaCh ComPonent

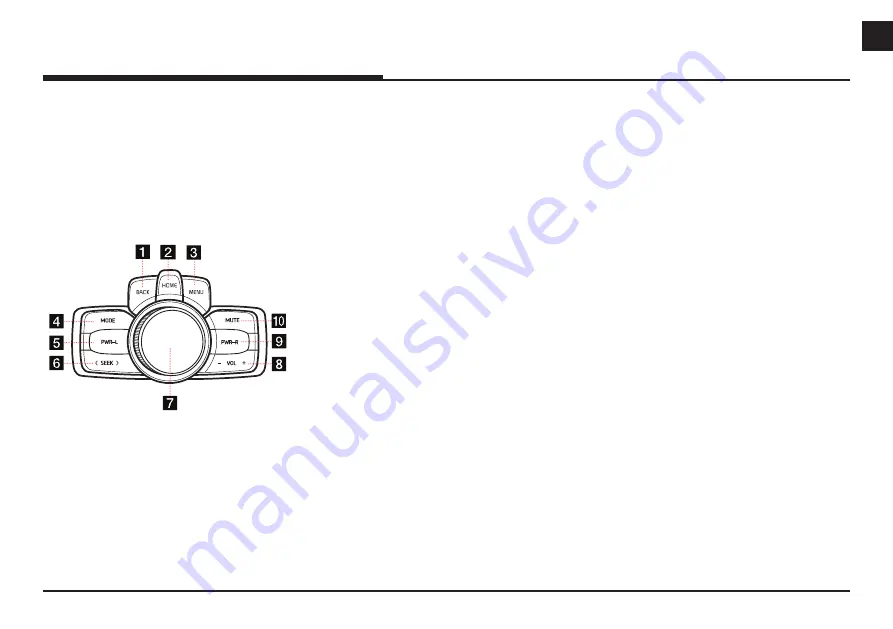
rrC (rear remote Control) 
- oPtion a

The RRC (Rear Remote Control) function keys 

differ depending on the selected option. Option 

A is an operation key that is used with a rear seat 

monitor (optional). 

The image of this product 

may be different from the actual product.

MODE

PWR-L

SEEK

MUTE

PWR-R

VOL

a

  BACK button

Press to move to the previous screen.

b

  HOME button 

Press to move to the [HOME] menu screen.

c

  MENU button 

Press to move to the pop-up menu in each 

mode.

d

  MODE button


Each time this button is pressed, the 

mode is changed.


If the media is not connected, 

corresponding modes will be disabled. 

e

  PWR-L button


Press to turn the left monitor for rear seat 

on/off.


Press and hold this button to turn AV on 

or off.

f


A

 SEEK 

D

 button

When it is pressed shortly;


FM/AM mode: plays previous/next 

frequency.


SiriusXM mode: plays previous/next 

channel.


↟ Media mode: plays previous/next file.

When it is pressed and held;


FM/AM: changes the frequency until the 

button is released.


SiriusXM mode: changes the channel 

until the button is released.


Media mode: rewinds or fast forwards 

the file.

g

 Controller

Tap or rotate to navigate through the menu 

screens.

h

  - VOL + button

Increase or decrease the volume level.

i

  PWR-R button


Press to turn the right monitor for rear 

seat on/off.


Press and hold this button to turn AV on 

or off.

j

  MUTE button

Press to mute the sound.

Summary of Contents for G90

Page 1: ...Gen5 Premium Class Navigation SIMPLE MANUAL GENESIS G90 ENGLISH FRANÇAIS ESPAÑOL KOREAN ...

Page 2: ... purchasing this Gen5 Premium Class Navigation Please scan this QR Code to open the Gen5 Premium Class Navigation Before using the product read the contents of this user s manual carefully and use this product safely ...

Page 3: ...nstall it Open the QR code reader on your android and point it at the code b Scanning QR code Press SETUP System info Web manual Scan the QR code then tap the notification to go to the web page c Access the content You can access directly following URL address http webmanual genesis com PREM_GEN5 AVNT HI USA English index html You can access directly following URL address http webmanual genesis co...

Page 4: ... become distracted by the vehicle while driving and always be fully aware of all driving conditions Do not change settings or any functions Pull over in a safe and legal manner before attempting such operations To promote safety certain functions are disabled unless the parking brake is on To reduce the risk of electric shock do not remove the cover or back of this product There are no user servic...

Page 5: ...ter s receiver s that comply with Innovation Science and Economic Development Canada s licence exempt RSS s Operation is subject to the following two conditions 1 This device may not cause interference 2 This device must accept any interference including interference that may cause undesired operation of the device IC Radiation Exposure State ment For Canada For having wireless function This equip...

Page 6: ...onent 7 Head unit 8 Disc deck 8 CCP Central Controller Panel 9 RRC Rear Remote Control Option A 10 RRC Rear Remote Control Option B 11 Steering wheel remote control 13 Basic operation 13 System ON OFF 13 Turning the system off 13 Resetting the system 14 Using the controller 14 Update 15 Troubleshooting ...

Page 7: ...y the Navigation menu screen d RADIO button Selects the FM AM SiriusXM band Each time the button is pressed the mode is changed in order to FM AM SiriusXM FM e MEDIA button Press this button to move to the media playing screen Press this button again to display the Media menu screen f Custom button Press to move to the Custom button menu After setting a desired function press to use the desired fu...

Page 8: ...P Central Controller Panel The image of this product may be different from the actual product a BACK button Press to move to the previous screen Press and hold to move to the HOME menu screen b HOME button Press to move to the HOME menu screen Press and hold to move to the map screen c MENU button Press to move to the pop up menu in each mode Press and hold to set the split screen d Controller Tap...

Page 9: ...orresponding modes will be disabled e PWR L button Press to turn the left monitor for rear seat on off Press and hold this button to turn AV on or off f A SEEK D button When it is pressed shortly FM AM mode plays previous next frequency SiriusXM mode plays previous next channel Media mode plays previous next file When it is pressed and held FM AM changes the frequency until the button is released ...

Page 10: ...ect the FM band e AM button Press to select the AM band f A SEEK D button When it is pressed shortly FM AM mode plays previous next frequency SiriusXM mode plays previous next channel Media mode plays previous next file When it is pressed and held FM AM changes the frequency until the button is released SiriusXM mode changes the channel until the button is released Media mode rewinds or fast forwa...

Page 11: ... the volume level button Press to mute the sound S W button When it is pressed shortly FM AM mode plays broadcast frequencies saved to favorites SiriusXM mode plays broadcast channels saved to favorites Media mode plays previous next file When it is pressed and held FM AM mode changes the broadcast frequencies saved to presets until the button is released SiriusXM mode changes the broadcast channe...

Page 12: ...oth Hands Free connected state redials the last call When pressed during a Bluetooth Hands Free call switches call back to mobile phone Private When pressed while calling on the mobile phone switches call back to Bluetooth Hands Free Operates only when Bluetooth Hands Free is connected e button When pressed during a call ends the phone call When pressed on the incoming call screen rejects the call...

Page 13: ... The safety warning page is displayed every time the ignition is turned on The displayed warnings are related to safety please closely read and comply with the safety warnings Turning the system off Press and hold 1 on the head unit To turn the system on again press 1 on the head unit Note Check the volume when turning on the system Before turning on the system adjust the volume to a reasonable le...

Page 14: ... addition you need an update 1 Press HOME or Web manual Software Information Or Press HOME or Setup System Info Software Information 2 After inserting the USB with the update file press Update Once updating is complete the system will automatically restart Note This product requires regular updates for software corrections and new functions Updating may require up to 1 hour depending on the data s...

Page 15: ...contrast levels are not set properly Countermeasure Properly adjust the brightness saturation and contrast levels through Display Setup Problem Sound does not work Possible Cause The volume level is set to the lowest level Countermeasure Adjust the volume level Possible Cause The connection is not proper Countermeasure Check to see that the device has been properly connected Possible Cause The dev...

Page 16: ...with the infotainment system on the vehicle Possible Cause A USB which is not a Metal Cover Type USB Memory is being used Countermeasure Use standard USB Memory Possible Cause An HDD type CF SD Memory is being used Countermeasure Use standard USB Memory Possible Cause There are no music files which can be played Countermeasure Only MP3 WMA file formats are supported Please use only the supported m...

Page 17: ......

Page 18: ... MFLXXXXXXXX ...

Reviews: