Maintenance and Repair
4 - 5
CAUTION: Filter bowls may be heavy. Caution should be
taken when removing the bowl.
4.
Remove the bottom bowl by unscrewing it from the
head. A strap wrench may be needed.
5.
Remove the nut from the bottom of the bowl.
6.
Turn the bowl upside down.
7.
Inspect the drain for damage. Replace if necessary
or clean with a mild soap and water. Do not use sol-
vents to clean the drain valve as they may damage
the valve.
8.
Hold the bowl upright and drop in the new or cleaned
drain so that the drain stem is through hole at the bot-
tom of the filter.
9.
Replace the nut and hand tighten.
CAUTION: Do not use a pipe wrench to tighten the
filter bowl to the head.
10. Reattach bowl to head and hand tighten.
11. Reattach drain lines (if applicable).
12. Close service valve.
13. Slowly open the inlet isolation valve to prevent a pres-
sure surge through the filter.
14. Once the filter has been pressurized, slowly open the
outlet isolation valve.
15. After both isolation valves have been opened, close
the system bypass valve. The filter is now in service.
4.5
Automatic Drain Valve
Disassembly and Servicing
Dryer models OP40 and larger have a timer controlled au-
tomatic drain valve.
CAUTION: Do not disassemble the drain valve timer or
attempt to repair electrical parts. Replace timer if defec-
tive.
The automatic drain valve discharges condensate through
a full-port drain opening. The valve body may need to be
cleaned under conditions of gross particulate contamina-
tion.
To disassemble the automatic drain valve body for clean-
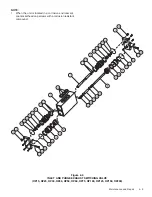
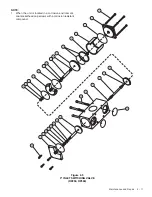
ing or other maintenance (refer to Figure 4.1):
1.
Disconnect main power supply to dryer.
2.
Lock out and tag power supply in accordance with
OSHA requirements.
Figure 4.1
AUTOMATIC DRAIN VALVE COMPONENTS


