background image

49-88060   02-16   GE

Safety Information

  . . . . . . . . . . . . 2

Warranty

  . . . . . . . . . . . . . . . . . . . . . . . 7

Assistance / Accessories

  . . . . . 8

Using The Range

Surface Units  . . . . . . . . . . . . . . . . . . . . . 9
Cookware for Radiant 
      Glass  Cooktop . . . . . . . . . . . . . . . . . . 11
Griddle . . . . . . . . . . . . . . . . . . . . . . . . . . . 12
Oven  Controls . . . . . . . . . . . . . . . . . . . . 13
Special  Features   . . . . . . . . . . . . . . . . . 14
Oven Racks . . . . . . . . . . . . . . . . . . . . . . 16
Aluminum Foil and Oven Liners . . . 16
Cookware . . . . . . . . . . . . . . . . . . . . . . . . 16

Probe . . . . . . . . . . . . . . . . . . . . . . . . . . . . 17

Cooking Modes  . . . . . . . . . . . . . . . . . . 18

Cooking Guide . . . . . . . . . . . . . . . . . . . 19
Lower Oven Drawer . . . . . . . . . . . . . . 20
Adjust the Lower Oven 
      Thermostat   . . . . . . . . . . . . . . . . . . . . 20

Care and Cleaning

Cleaning the Range – Exterior  . . . . 21
Cleaning the Range – Interior . . . . . 22
Cleaning  the  Glass  Cooktop . . . . . . . 23
Maintenance . . . . . . . . . . . . . . . . . . . . . 25

Troubleshooting Tips

  . . . . . . . . 26

Ranges

Electric Slide-In

Write the model and serial  
numbers here:

Model #  __________________

Serial # ___________________

You can find the rating label 

behind the range drawer.

For a Spanish version of this 
manual, visit our website at 
GEAppliances.com.

Para consultar una version 
en español de este manual 
de instrucciones, visite 
nuestro sitio de internet 
GEAppliances.com.

Owner’s Manual

Summary of Contents for Cafe CS980STSS

Page 1: ...ermostat 20 Care and Cleaning Cleaning the Range Exterior 21 Cleaning the Range Interior 22 Cleaning the Glass Cooktop 23 Maintenance 25 Troubleshooting Tips 26 Ranges Electric Slide In Write the model and serial numbers here Model __________________ Serial ___________________ You can find the rating label behind the range drawer For a Spanish version of this manual visit our website at GEApplianc...

Page 2: ...rear leveling leg is engaged in the bracket On some models the storage drawer or kick panel can be removed for easy inspection If visual inspection is not possible slide the range forward confirm the anti tip bracket is securely attached to the floor or wall and slide the range back so the rear leveling leg is under the anti tip bracket If the range is pulled from the wall for any reason always re...

Page 3: ... nearby the surface units or any interior area of the oven allow sufficient time for cooling first Other surfaces of the appliance may become hot enough to cause burns Potentially hot surfaces include the cooktop areas facing the cooktop oven vent opening surfaces near the opening and crevices around the oven door Ŷ R QRW KHDW XQRSHQHG IRRG FRQWDLQHUV 3UHVVXUH could build up and the container coul...

Page 4: ...ire that may spread to surrounding cabinets Use a deep fat thermometer whenever possible to monitor oil temperature Ŷ To avoid oil spillover and fire use a minimum amount of oil when shallow pan frying and avoid cooking frozen foods with excessive amounts of ice Ŷ 8VH SURSHU SDQ VL H VHOHFW FRRNZDUH KDYLQJ flat bottoms large enough to cover the surface heating element The use of undersized cookwar...

Page 5: ...tch fire on the glass cooktop even when it is not being used If the cooktop is inadvertently turned on they may ignite Heat from the cooktop or oven vent after it is turned off may cause them to ignite also Ŷ 8VH 5 0 5 7 ceramic Cooktop Cleaner DQG 5 0 5 7 Cleaning Pad to clean the cooktop Wait until the cooktop cools and the indicator light goes out before cleaning A wet sponge or cloth on a hot ...

Page 6: ... used in or around any part of the oven Ŷ Stand away from the range when opening the oven door Hot air or steam which escapes can cause burns to hands face and or eyes Ŷ Do not use the oven if a heating element develops a glowing spot during use or shows other signs of damage A glowing spot indicates the heating element may fail and present a potential burn fire or shock hazard Turn the oven off i...

Page 7: ... God Ŷ Damage to finish such as surface rust tarnish or small blemishes not reported within 48 hours of delivery Ŷ Incidental or consequential damage caused by possible defects with this appliance Ŷ Damage caused after delivery Ŷ Product not accessible to provide required service Ŷ Service to repair or replace light bulbs except for LED lamps This warranty is extended to the original purchaser and...

Page 8: ...ay any day of the year For greater convenience and faster service you can now download Owner s Manuals order parts or even schedule service on line Accessories Looking For Something More GE offers a variety of accessories to improve your cooking and maintenance experiences To place an order visit us online at www GEApplianceParts com U S or www GEAppliances ca Canada or call 800 626 2002 U S 800 6...

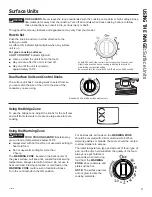
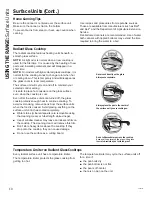
Page 9: ...cating the control is maintaining your desired setting Be sure you turn the control knob to OFF when you finish cooking Using the Bridge Zone To use the bridge zone adjust the knobs for the Left rear and Left front elements to create one large area for even cooking Using the Warming Zone WARNING FOOD POISON HAZARD DFWHULD PD grow in food at temperatures below 140 F Ŷ OZD V VWDUW ZLWK KRW IRRG R QR...

Page 10: ...ppear in a short time NOTE On models with light colored glass cooktops it is normal for the cooking zones to change color when hot or cooling down This is temporary and will disappear as the glass cools to room temperature The surface unit will cycle on and off to maintain your selected control setting It is safe to place hot cookware on the glass surface even when the cooktop is cool Even after t...

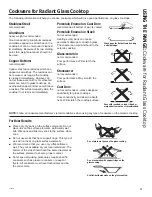
Page 11: ...ermanent damage to cooktop glass The enamel can melt and bond to the ceramic cooktop Glass ceramic not recommended Poor performance Will scratch the surface Stoneware not recommended Poor performance May scratch the surface Cast Iron QRW UHFRPPHQGHG XQOHVV GHVLJQHG specifically for glass cooktops Poor conductivity and slow to absorb heat Will scratch the cooktop surface Check pans for flat bottoms...

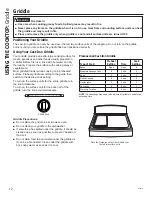
Page 12: ...ghly Prepare the surface with cooking spray or vegetable oil Most griddled foods require cooking on a preheated surface Preheat griddle according to the guide then switch to the desired cook setting To turn on the surface units for the entire griddle turn the knob clockwise To turn on the surface unit for the back half of the griddle turn the knob counterclockwise Griddle Precautions Ŷ R QRW SODFH...

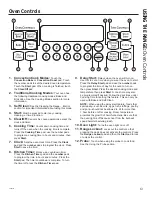
Page 13: ...inutes Press the Start pad The timer countdown is complete To turn the timer off press the Kitchen Timer pad 9 Delay Start Delays when the oven will turn on Use this to set a time when you want the oven to start Press the Delay Start pad and use the number pads to program the time of day for the oven to turn on then press Start Press the desired cooking mode and temperature then press Start A cook...

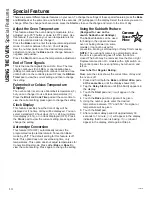
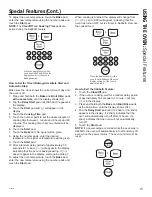
Page 14: ...our military time display 24 hr or no clock displayed OFF Press the Clock pad to view the current setting press again to change the setting Autorecipe Conversion This feature ON OFF automatically reduces the SURJUDPPHG UHFLSH WHPSHUDWXUH LQ RQYHFWLRQ DNH PRGH E 7KH GHIDXOW VHWWLQJ IRU WKLV IHDWXUH LV RII Note This option does not convert baking time only temperatures This option does not adjust te...

Page 15: ...indicating that the oven is baking roasting If doesn t appear in the display start again at Step 7 To adjust the oven temperature touch the Bake pad enter the new temperature using the number pads and touch the Start pad When cooking is finished the display will change from to and 0 00 will appear indicating that the oven has turned OFF but is still set in Sabbath Remove the cooked food How to Exi...

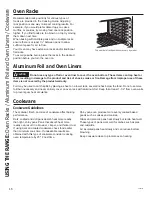
Page 16: ...n a browner crisper and thicker crust If using dark and coated cookware check food earlier than minimum cook time If undesirable results are obtained with this type of cookware consider reducing RYHQ WHPSHUDWXUH E QH W WLPH Shiny pans can produce more evenly cooked baked goods such as cakes and cookies Glass and ceramic pans heat slowly but retain heat well These types of pans work well for dishes...

Page 17: ...e lowest large muscle or joint Ŷ RU FDVVHUROHV RU GLVKHV VXFK DV PHDWORDI LQVHUW WKH probe into the center of the dish Ŷ RU ILVK LQVHUW WKH SUREH IURP MXVW DERYH WKH JLOO LQWR the meatiest area parallel to the backbone Probe Usage To use the probe with preheating 1 Press the desired cook mode Bake Convection Bake or Convection Roast pad and enter the desired cooking temperature with the number pad...

Page 18: ... broiler or by XVLQJ URLO R Broil Hi 7KH 7UDGLWLRQDO URLO L PRGH XVHV LQWHQVH KHDW IURP WKH XSSHU HOHPHQW WR VHDU IRRGV 8VH URLO L IRU WKLQQHU FXWV of meat and or foods you prefer less done on the interior To use this mode press the Broil pad once and then press Start It is not necessary to preheat when using this mode Broil Lo 7KH 7UDGLWLRQDO URLO R PRGH XVHV OHVV LQWHQVH KHDW from the upper elem...

Page 19: ...LQ VLGH GRZQ ILUVW DWFK IRRG FORVHO ZKHQ broiling For best performance when broiling center food below the broil heating element URLO R DNH 1 or 2 RQHOHVV FKLFNHQ EUHDVWV URLO R DNH 1 or 2 I EUHDGHG RU FRDWHG LQ VDXFH DYRLG URLO L PRGHV URLO VNLQ VLGH GRZQ ILUVW DWFK IRRG FORVHO ZKHQ broiling For best performance when broiling center food below the broil heating element Whole turkey DNH 1 or 2 Use...

Page 20: ...Q WKH RQH LW UHSODFHG 8VH RXU QHZ RYHQ IRU D IHZ ZHHNV WR become more familiar with it If you still think your new oven is too hot or too cold you can adjust the thermostat yourself Do not use thermometers such as those found in grocery stores to check the temperature setting of your oven These thermometers may vary 20 40 degrees NOTE This adjustment will not affect the broiling temperatures 1 Pul...

Page 21: ... cleaner and a sponge scrubber for best results Spillage of marinades fruit juices tomato sauces and basting liquids containing acids may cause discoloration and should be wiped up immediately Let hot surfaces cool then clean and rinse Painted Surfaces Painted surfaces include the sides of the range and the door top of control panel and the drawer front Clean these with soap and water or a vinegar...

Page 22: ...ems should all be removed from the oven before initiating a self clean cycle Close the door NOTE If your range has an oven control press the Self Clean pad and a default self clean time is displayed The clean time can be changed to any time between 3 00 and KRXUV E XVLQJ WKH number pads to enter a different time and pressing Start For heavily soiled ovens the PD LPXP KRXU FOHDQ WLPH LV UHFRPPHQGHG...

Page 23: ...urned residue area 8VLQJ WKH LQFOXGHG 5 0 5 7 Cleaning Pad for Ceramic Cooktops rub the residue area applying pressure as needed 4 If any residue remains repeat the steps listed above as needed RU DGGLWLRQDO SURWHFWLRQ DIWHU DOO UHVLGXH KDV EHHQ removed polish the entire surface with CERAMA 5 7 Ceramic Cooktop Cleaner and a paper towel Heavy Burned On Residue 1 Allow the cooktop to cool 2 Use a si...

Page 24: ...ng of the surface of your cooktop not covered by the warranty unless the spill is removed while still hot Special care should be taken when removing hot substances H VXUH WR XVH D QHZ VKDUS UD RU VFUDSHU Do not use a dull or nicked blade 1 Turn off all surface units Remove hot pans 2 Wearing an oven mitt a Use a single edge razor blade scraper CERAMA 5 7 Ceramic Cooktop Scraper to move the spill t...

Page 25: ...ewdriver may be required 3 Firmly grasp both sides of the door at the top 4 Close door to the door removal position which is halfway between the broil stop position and fully closed LIW GRRU XS DQG RXW XQWLO WKH KLQJH DUP LV FOHDU RI the slot To Replace the Door 1 Firmly grasp both sides of the door at the top 2 With the door at the same angle as the removal position seat the indentation of the hi...

Page 26: ...H section in the Cleaning the glass cooktop section Pitting or indentation of the cooktop Hot sugar mixture spilled on the cooktop Call a qualified technician for replacement Frequent cycling off and on of surface units Improper cookware being used Use only flat cookware to minimize cycling My new oven doesn t cook like my old one Is something wrong with the temperature settings Your new oven has ...

Page 27: ...ature is too high to set a self clean operation Allow the oven to cool and reset the controls Oven controls improperly set See the Cleaning the Oven section Excessive smoking during clean cycle Excessive soil or grease Press the Clear Off pad Open the windows to rid the room of smoke Wait until the LOCKED DOOR light goes off Wipe up the excess soil and reset the clean cycle Excessive smoking durin...

Page 28: ...oven to take longer to preheat Remove items to reduce preheat time Number of racks in oven Adding more racks to the oven will cause the oven to take longer to preheat Remove some racks Display flashes Power failure Reset the clock Unable to get the display to show SF Oven control pads were not touched properly The Broil Hi Lo and Bake pads must be touched at the same time and held for 3 seconds Co...

Page 29: ...onda 17 Modos de Cocción 18 Guía de Cocción 19 Cajón Inferior del Horno 20 Ajuste el Termostato del Horno Inferior 20 Cuidado y Limpieza Limpieza de la Cocina Exterior 21 Limpieza de la Cocina Interior 22 Cómo limpiar la estufa de vidrio 23 Mantenimiento 25 Consejos para la Solución de Problemas 26 Cocinas Eléctricas empotrables Escriba los números de modelo y de serie aquí Nº de Modelo___________...

Page 30: ...ar para una fácil inspección Si no es posible realizar una inspección visual deslice la cocina hacia adelante confirme que el soporte anti volcaduras esté ajustado de forma segura al piso o la pared y deslice la cocina hacia atrás de modo que la pata niveladora trasera se encuentre debajo del soporte anti volcaduras Si la cocina es expulsada de la pared por alguna razón siempre repita este procedi...

Page 31: ... KRUQR GHMH SDVDU XQ WLHPSR SUXGHQFLDO para que se enfríen Otras superficies del aparato pueden calentarse lo suficiente como para provocar quemaduras Las superficies potencialmente calientes incluyen la estufa las áreas orientadas hacia la estufa la abertura de ventilación del horno las superficies cercanas a la abertura y las hendiduras ubicadas alrededor de la puerta del horno Ŷ 1R FDOLHQWH UHF...

Page 32: ...asa cuando sea posible para controlar la temperatura del aceite Ŷ 3DUD HYLWDU HO GHUUDPH GH DFHLWH XQ LQFHQGLR XWLOLFH una cantidad mínima de aceite cuando fría en sartenes poco profundas y evite la cocción de alimentos congelados con una cantidad excesiva de hielo Ŷ 8WLOLFH HO WDPDxR GH UHFLSLHQWH DGHFXDGR OLMD recipientes con bases planas lo suficientemente grandes para cubrir el elemento calent...

Page 33: ...a de YLGULR D Q FXDQGR QR OD HVWp XVDQGR 6L OD HVWXID se enciende en forma accidental pueden prenderse fuego El calor proveniente de la estufa o de la ventilación del horno también puede prenderlos fuego D Q VL HO DSDUDWR HVWi DSDJDGR Ŷ Use el limpiador de estufas cerámicas CERAMA BRYTE y la esponjilla de limpieza CERAMA BRYTE para limpiar la estufa Espere hasta que la estufa se enfríe y la luz in...

Page 34: ...DE SEGURIDAD GUARDE ESTAS INSTRUCCIONES Ŷ 0DQWpQJDVH DOHMDGR GHO KRUQR DO DEULU OD SXHUWD GHO mismo El aire caliente o el vapor que sale puede FDXVDU TXHPDGXUDV HQ ODV PDQRV URVWUR X RMRV Ŷ 1R XVH HO KRUQR VL XQ HOHPHQWR GH FDOHQWDPLHQWR genera un punto brillante durante el uso o aparecen otros signos de daños Un punto brillante indica que el elemento para calentar puede fallar y generar una posib...

Page 35: ...R GH IXVLEOHV GH OD FDVD R UHLQLFLR GH disyuntores Ŷ Daños ocasionados sobre el producto por accidente incendio inundaciones o catástrofes naturales Ŷ Daños sobre el acabado tales como óxido sobre la superficie deslustres o manchas pequeñas no LQIRUPDGDV GHQWUR GH ODV KRUDV OXHJR GH OD HQWUHJD Ŷ Daños incidentales o consecuentes causados por posibles defectos sobre este producto Ŷ Daño causado des...

Page 36: ...R 3DUD PD RU FRQYHQLHQFLD XQ VHUYLFLR PiV UiSLGR DKRUD SXHGH GHVFDUJDU HO 0DQXDO GHO 3URSLHWDULR ordenar piezas o incluso programar el servicio técnico a través de Internet Desea realizar una consulta o necesita ayuda con su electrodoméstico Accesorios Busca Algo Más GE ofrece una variedad de accesorios para mejorar sus experiencias de cocción y mantenimiento Para realizar una orden visítenos a tr...

Page 37: ...del utensilio que esté usando Modelos con un elemento superficial de Anillo Doble únicamente Uso del Quemador del Puente en algunos modelos Para usar el área del puente ajuste las perillas para la parte trasera izquierda y los elementos del frente izquierdo para crear un área grande para una cocción pareja Uso del Área para Calentar WARNING RIESGO DE ENVENENAMIENTO CON COMIDA Se pueden desarrollar...

Page 38: ...s de vidrio de color claro es normal que las zonas de cocción cambien de color cuando están calientes o enfriándose Esto es temporal y desaparecerá a medida que el vidrio se enfríe a temperatura ambiente La unidad superficial seguirá un ciclo de encendido y apagado para mantener su configuración de control seleccionada Es seguro colocar utensilios calientes en la superficie de vidrio incluso cuand...

Page 39: ...provocar daños permanentes al vidrio de las estufas El esmalte puede derretirse y adherirse a la estufa cerámica Vidrio cerámico No se recomienda Desempeño pobre Raya la superficie Cerámica No se recomienda Desempeño pobre Puede rayar la superficie Hierro fundido No se recomienda a menos que se encuentre específicamente diseñado para estufas de vidrio Pobre conductividad y lentitud para absorber e...

Page 40: ... cocina o aceite vegetal La mayoría de las comidas a la plancha requieren una cocción en una superficie precalentada Precaliente la plancha siguiendo la guía y luego cambie a la configuración de cocción deseada Para encender las unidades de la superficie de toda la plancha gire la perilla en dirección de las agujas del reloj Para encender la unidad de la superficie de la mitad de la plancha gire l...

Page 41: ...ara programar el tiempo en horas y minutos Presione la tecla Start Iniciar La cuenta regresiva del temporizador se completó Para apagar el temporizador presione la tecla Timer Temporizador 9 Delay Start Inicio Retardado Genera un retraso cuando el horno es encendido Use esta tecla para configurar el momento en que desea que el horno se inicie Presione la tecla Delay Start Inicio Retardado y use la...

Page 42: ...KRUDV OD KRUD PLOLWDU GH KRUDV R TXH QR VH H KLED QLQJ Q UHORM R SDJDGR Presione la tecla Clock Reloj para visualizar la configuración actual y vuelva a presionar la misma para modificar la configuración Conversión de Auto Recipe VWD IXQFLyQ QFHQGHU SDJDU GH IRUPD DXWRPiWLFD UHGXFH la temperatura de la receta programada en el modo Convection DNH RUQHDGR SRU RQYHFFLyQ HQ D FRQILJXUDFLyQ por omisión...

Page 43: ...HVWi KRUQHDQGR asando Si no aparece en la pantalla comience nuevamente en el Paso 7 Para ajustar la temperatura del horno presione la tecla Bake Hornear ingrese la nueva temperatura usando las teclas numéricas y presione la tecla Start Inicio Cuando la cocción haya finalizado la pantalla cambiará de a y aparecerá 0 00 indicando que el horno está en 2 SDJDGR SHUR D Q HVWi HQ 6DEEDWK 6DEiWLFR 5HWLUH...

Page 44: ...y brillantes Al usar ollas que absorben el calor más rápidamente las comidas podrán resultar más doradas crocantes y con una capa más gruesa Si utiliza utensilios oscuros y revestidos controle la comida antes del tiempo mínimo de cocción Si se obtienen resultados no deseados con este tipo de utensilios considere la SRVLELOLGDG GH UHGXFLU OD WHPSHUDWXUD GHO KRUQR HQ OD próxima vez Las ollas brillan...

Page 45: ...R SDVWHO GH carne inserte la sonda en el centro del plato Ŷ 3DUD FRFLQDU SHVFDGR LQVHUWH OD VRQGD MXVWR DUULED GH OD agalla en la zona más carnosa paralela a columna Uso de la Sonda Para usar la sonda con precalentamiento 1 Presione la tecla del modo de cocción deseado Hornear RUQHDU SRU RQYHFFLyQ o RUDU SRU RQYHFFLyQ e ingrese la temperatura de cocción deseada con las teclas numéricas 2 Inserte l...

Page 46: ... superior para soasar las comidas Use OD IXQFLyQ URLO L VDGR OWR SDUD FRUWHV PiV GHOJDGRV GH FDUQH R FRPLGDV TXH SUHILHUD TXH TXHGDQ PHQRV FRFLQDGDV en su interior Para usar este modo presione la tecla Broil Asar una vez y luego presione Start Iniciar No es necesario realizar el precalentamiento al usar este modo Broil Lo Asar Bajo El modo Traditional Broil Lo Asado Tradicional Bajo usa menos calo...

Page 47: ... de la piel hacia abajo primero Preste aten ción a la comida al asarla Para un mejor rendimiento centre la comida debajo del elemento calentador para asar Asado Bajo RUQHDU 1 o 2 Pechugas de pollo deshuesadas Asado Bajo RUQHDU 1 o 2 6L VH HPSDQy R FXEULy FRQ VDOVD HYLWH ORV PRGRV URLO L VDU Alto Ase del lado de la piel hacia abajo primero Preste aten ción a la comida al asarla Para un mejor rendim...

Page 48: ...sible que encuentre que su horno nuevo cocina de forma diferente al que reemplazó Use su horno nuevo durante algunas VHPDQDV SDUD IDPLOLDUL DUVH FRQ HO PLVPR 6L D Q SLHQVD TXH VX KRUQR QXHYR HV GHPDVLDGR FDOLHQWH R GHPDVLDGR IUtR SRGUi ajustar el termostato usted mismo No use termómetros tales como los que se encuentran en tiendas para controlar la temperatura del horno Estos termómetros SXHGHQ YD...

Page 49: ...jugos de fruta salsas de tomate y líquidos para humedecer que contengan ácidos pueden ocasionar descoloración y se deberán limpiar de inmediato Deje que las superficies calientes se enfríen y luego limpie y enjuague Superficies pintadas Las superficies pintadas incluyen los lados de la cocina y la puerta la parte superior del panel de control y el frente del cajón Límpielas con jabón y agua o con ...

Page 50: ...te esponjillas de lana de acero embebidas en jabón o limpiadores tales como Soft Scrub Enjuague bien con agua limpia y seque No limpie la junta El material de fibra de vidrio de la junta de la puerta del horno no resiste productos abrasivos Es esencial que la junta se mantenga intacta Si usted nota que está desgastada reemplácela Verifique que la tapa de la bombilla de luz del horno esté en su lug...

Page 51: ...s pegados 8WLOL DQGR HO SDxR GH OLPSLH D 5 0 5 7 para estufas cerámicas incluido frote el área sucia aplicando SUHVLyQ VHJ Q VHD QHFHVDULR 6L TXHGDQ UHVWRV UHSLWD ORV SDVRV LQGLFDGRV FRQ anterioridad 3DUD SURWHFFLyQ DGLFLRQDO GHVSXpV GH KDEHU TXLWDGR WRGRV los restos pula toda la superficie con limpiador de estufas cerámicas CERAMA BRYTE y una toalla de papel Residuos pegados rebeldes 1 Deje enfri...

Page 52: ...etidos pueden marcar la superficie de la estufa no cubierto por la garantía a menos que el derrame se quite mientras está caliente Debe tenerse mucho cuidado al remover sustancias calientes VHJ UHVH GH XWLOL DU XQ UDVSDGRU QXHYR DILODGR No utilice hojas desafiladas o dañadas 1 Apague todas las unidades de superficie Quite las ollas calientes 2 Utilizando un guante de cocina D 8VH XQ UDVSDGRU GH IL...

Page 53: ... salido de la ranura Para reemplazar la puerta 1 Tome con firmeza ambos lados de la puerta de la parte superior 2 Con la puerta en el mismo ángulo de la posición de remoción introduzca la muesca del brazo de la bisagra dentro del extremo inferior de la ranura de la bisagra La ranura del brazo de la bisagra debe estar bien colocada en la parte inferior de la ranura EUD OD SXHUWD SRU FRPSOHWR 6L OD ...

Page 54: ...recipientes de base plana para minimizar el encendido y apagado Mi horno nuevo no cocina como el anterior Hay DOJ Q SUREOHPD FRQ las configuraciones de temperatura Su horno nuevo cuenta con un sistema de FRFFLyQ GLIHUHQWH FRQ UHODFLyQ DO DQWHULRU por lo tanto es posible que cocine de forma diferente En los primeros usos use los tiempos y temperaturas de VX UHFHWD FRQ FXLGDGR 6L D Q SLHQVD TXH VX K...

Page 55: ...oles Los controles del horno están configurados de forma incorrecta RQVXOWH OD VHFFLyQ GH LPSLH D GHO RUQR Exceso de humo durante un ciclo de limpieza Suciedad o grasa excesiva Presione la tecla Clear Off Borrar Apagado Abra las ventanas para liberar el humo en la habitación Espere hasta que la luz de la función LOCKED DOOR Puerta Bloqueada desaparezca Limpie el exceso de suciedad y reinicie el ci...

Page 56: ...HO KRUQR Agregar más estantes al horno hará que éste tarde más en precalentarse Retire algunos estantes La pantalla destella Corte de energía Reconfigure el reloj La pantalla no muestra SF Los botones de control del horno no se presionaron correctamente Los botones Broil Hi Lo asar alto bajo y Bake hornear deben presionarse al mismo tiempo y VRVWHQHUVH GXUDQWH VHJXQGRV El control emite una señal d...

Reviews: