background image

GE Healthcare 

Vivid

Club


- 5 - 

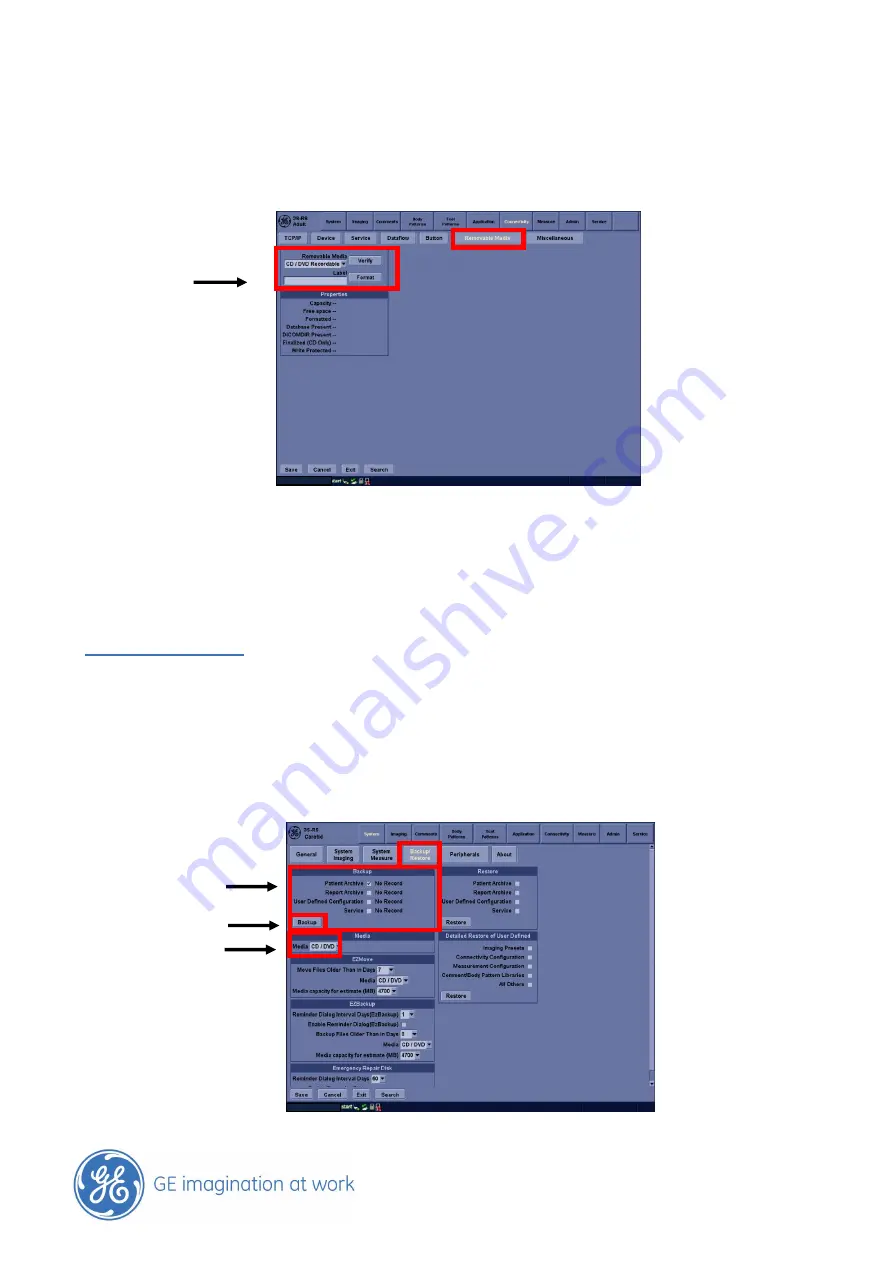
Formatting the CD / DVD or USB Drive


Config


– Connectivity – Removable Media  


Format: 

Enter a name and confirm by pressing the „Format“  button with 

Set

After the formatting was successful you will get a confirmation message on the screen. 
After that 

Backup your patient archive 

Important Notice 

To make sure you can recover old images at every time it is a must to make a backup  
of the patient archive every time after you have done the EZBackup / Move ! 


Config


– System – Backup / Restore 

1.


Choose the Media you want to store 

2.


Make a checkmark at the


„Patient archive”


3.


Select Backup 


                              2 
   
                              3                    
                              1 


Summary of Contents for Vivid P3

Page 1: ...GE Healthcare VividClub Application News How to backup your data on Vivid P3 CD DVD R USB Hard Disk ...

Page 2: ...your image archive 4 Formatting the CD DVD or USB Drive 5 Backup your patient archive 5 Important Notice Patient archive 5 Eject the CD DVD 6 Review images that are already backed up on CD DVD 6 Restore your backup images on your hard drive 7 NOTE This hand out is additional training material For more information please refer to the user manual and or reference manual ...

Page 3: ...VD R the system cannot accept DVD R or DVD RW Have some empty media available they will be formatted automatically during the backup process You can also use an USB Hard Disk For the sake of simplicity we have used the CD DVD in the following examples Notice Every step needs to be confirmed by pressing the SET button Words marked in red are Hard keys on the Control Panel 1 Patient 2 Configuration ...

Page 4: ...ard drive EZ Backup The files will be copied on a CD DVD They are still on the hard drive as well Adjust the size of the media Standard CD 700 Standard DVD 4700 Save Exit Backup your image archive Prepare some unformatted media The system will format them automatically during the process Button Patient EZ Move Follow the menu on the screen Every step needs to be confirmed by pressing the SET butto...

Page 5: ...essful you will get a confirmation message on the screen After that Backup your patient archive Important Notice To make sure you can recover old images at every time it is a must to make a backup of the patient archive every time after you have done the EZBackup Move Config System Backup Restore 1 Choose the Media you want to store 2 Make a checkmark at the Patient archive 3 Select Backup 2 3 1 ...

Page 6: ...nalize the process This needs to be prompted with YES The CD DVD will be ejected automatically after the finalization Review images that are already backed up on CD DVD In the data field Disk of the actual patient you will find the name of the DVD that was used for the backup of the images Insert the DVD Open the examination and click with the Pointer on the image symbol in the Clipboard or go to ...

Page 7: ...ore the images 5 Select Transfer to start the process System message A patient with this ID already exists Some information may be overwritten Want to continue This needs to be confirmed with YES Examinations from this patient whether stored on the system or from the CD DVD will be merged together After this procedure all images and reports of the selected patient are back on the hard drive 1 2 4 ...

Reviews: