15
SETTING UP THE VCR
The VCR will only respond to the compatible remote’s VCR2,
VCR2•LD, or VCR2•DVD button. If the PREFERENCES setting is
changed to VCR2, the remote that came with your VCR will no
longer control it.
To change the setting back to VCR1, so the remote which came
with your VCR can control the unit, use the compatible remote
to display the PREFERENCES menu, press 1, and then VCR on
this VCR’s remote.
Auto Play
This feature allows the VCR to automatically start playing a
tape when inserting a tape with the safety tab removed. In the
PREFERENCES menu, press 2 to switch between ON and OFF.
•
Select ON if you want a tape with its safety tab removed to
start playing automatically when inserted in the VCR.
•
Select OFF if you
do not want a tape with its safety tab
removed to start playing automatically.
Auto TV/VCR
This feature controls whether the TV/VCR switch changes
automatically to the VCR mode. Press 3 to switch between ON
and OFF.
•
Select ON if you want the VCR to switch to the VCR mode
when the VCR is turned on or a cassette is inserted.
This
only applies if you connect the IN (FROM ANT.) and OUT
(TO TV) jacks of your VCR to your TV and watch your VCR
on channel 3 or 4 of your TV.
•
Select OFF if you want the VCR to remain in the TV mode.
This is useful if you watch your VCR on the TV’ s video input
and you don’t want your antenna/cable signal inter rupted
by the VCR. Refer to the
Connections
section, toward the
back of the manual.
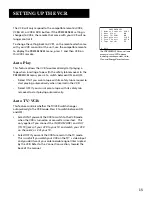
PREFERENCES
1 Remote Control: VCR2
2 Auto Play:
ON
3 Auto TV/VCR:
ON
4 EnergySaver:
2:00
5 Front Panel:
AUTO
6 Tape Speed:
EP
0 Exit
The PREFERENCES menu allows
access to many VCR options
including remote control, Auto
Play, and EnergySaver features.

