GE H
EALTHCARE
PROPRIETARY TO GE
D
IRECTION
5344303-100, R
EVISION
3
VIVID P3 S
ERVICE
M
ANUAL
Chapter 10 Care & Maintenance
10-11
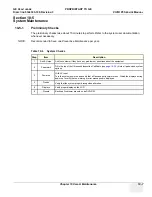
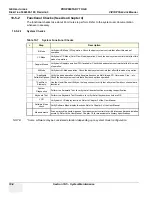
10-5-6
Optional Diagnostic Checks
Optionally you can access the diagnostic software as described in Chapter 5 or 7. View the error logs
and run desired diagnostics.
10-5-6-1
View the Logs
1.) Review the system error log for any problems.
2.) Check the temperature log to see if there are any trends that could cause problems in the future.
3.) Check the Configuration Log; update if needed.
10-5-7
Probe Maintenance
10-5-7-1
Probe Related Checks
10-5-7-2
Basic Probe Care
The system user manuals and various probe handling cards provide a complete description of probe
care, maintenance, cleaning and disinfection. Ensure that you are completely familiar with the proper
care of GE probes.
Ultrasound probes can be easily damaged by improper handling. See the User Manual and probe care
cards for more details. Failure to follow these precautions can result in serious injury and equipment
damage. Failure to properly handle or maintain a probe may also void its warranty.
Any evidence of wear indicates the probe cannot be used.
Do a visual check of the probe pins and system sockets before plugging in a probe.
10-5-7-3
Basic Probe Cleaning
Refer to the User’s Manual for details on probe cleaning.
NOTE:
To help protect yourself from blood borne diseases, wear approved disposable gloves. These are made
of nitrile derived from vegetable starch to prevent allergic latex reactions.
NOTE:
Failure to follow the prescribed cleaning or disinfection procedures will void the probe’s
warranty. DO NOT soak or wipe the lens with any product not listed in the User Manual. Doing
so could result in irreparable damage to the probe. Follow care instructions that came with the
probe.
NOTE:
Disinfect a defective probe before you return it. Be sure to tag the probe as being disinfected.
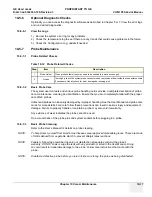
Table 10-12 Probe Related Checks
Step
Item
Description
1
Probe Holder
Clean probe holders (they may need to be soaked to remove excess gel).
2
Probes
Thoroughly check the system probe connectors and remove dust from inside the connector sockets
if necessary. Visually check for bent, damaged or missing pins

