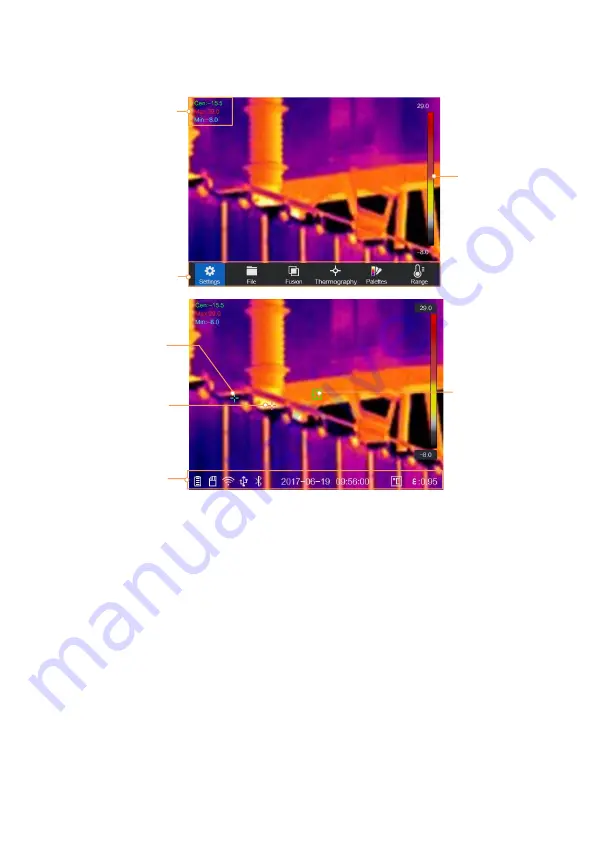
background image


Min. Temperature 

Display

Max. 

Temperature 

Display

Center 

Temperature 

Display

Status Icons

Real- time 

Temperature

Color-Temperature 

Scale

Menu Icons


3


Display Settings   

3.1


Focus Lens 

Before you start: 

Adjust the lens focal length properly before you set any other 
configurations, or it may affect the image display and temperature 
accuracy. 

Steps: 

1.


Power on the device. 

2.


Aim the device lens to the appropriate scene. 

Summary of Contents for G9701

Page 1: ...G9701 Industrial Thermal Imager User Manual ...

Page 2: ...ALITY OR FITNESS FOR A PARTICULAR PURPOSE THE USE OF THE PRODUCT BY YOU IS AT YOUR OWN RISK IN NO EVENT WILL OUR COMPANY BE LIABLE TO YOU FOR ANY SPECIAL CONSEQUENTIAL INCIDENTAL OR INDIRECT DAMAGES INCLUDING AMONG OTHERS DAMAGES FOR LOSS OF BUSINESS PROFITS BUSINESS INTERRUPTION OR LOSS OF DATA CORRUPTION OF SYSTEMS OR LOSS OF DOCUMENTATION WHETHER BASED ON BREACH OF CONTRACT TORT INCLUDING NEGLI...

Page 3: ...e limits for a Class B digital device pursuant to part 15 of the FCC Rules These limits are designed to provide reasonable protection against harmful interference in a residential installation This equipment generates uses and can radiate radio frequency energy and if not installed and used in accordance with the instructions may cause harmful interference to radio communications However there is ...

Page 4: ...ethis info 2006 66 EC battery directive This product contains a battery that cannot be disposed of as unsorted municipal waste in the European Union See the product documentation for specific battery information The battery is marked with this symbol which may include lettering to indicate cadmium Cd lead Pb or mercury Hg For proper recycling return the battery to your supplier or to a designated ...

Page 5: ... l intention des autres utilisateurs il faut choisir le type d antenne et son gain de sorte que la puissance isotrope rayonnée équivalente p i r e ne dépasse pas l intensité nécessaire à l établissement d une communication satisfaisante This equipment should be installed and operated with a minimum distance 20cm between the radiator and your body Cet équipement doit être installé et utilisé à une ...

Page 6: ...ug is properly connected to the power socket DO NOT connect multiple devices to one power adapter to avoid over heating or fire hazards caused by overload Battery Improper use or replacement of the battery may result in explosion hazard Replace with the same or equivalent type only Dispose of used batteries in conformance with the instructions provided by the battery manufacturer Do not charge oth...

Page 7: ...or less This device can only be safely used in the region below 2000 meters above the sea level Avoid equipment installation on vibratory surface or places subject to shock neglect may cause equipment damage Do not aim the lens at the sun or any other bright light Emergency If smoke odor or noise arises from the device immediately turn off the power unplug the power cable and contact the service c...

Page 8: ... Set Screen Brightness 20 3 3 Set Display Mode 20 3 4 Set Palettes 21 3 5 Adjust Digital Zoom 22 3 6 Display Device Status 23 3 7 Display Date and Time 23 4 Temperature Measurement 23 4 1 Set Thermography Parameters 23 4 1 1 Set Units 25 4 2 Set Temperature Difference Range 25 4 3 Set Thermography Rule 26 4 3 1 Set Point Rule 27 4 3 2 Set Line Rule 28 4 3 3 Set Frame Rule 28 4 3 4 Delete Rules 29 ...

Page 9: ...tware Connection 36 8 1 Connect via Wi Fi 36 8 2 Connect via Hot Spot 37 9 Maintenance 38 9 1 View Device Information 38 9 2 Upgrade Device 38 9 3 Restore Device 38 10 Appendix 39 10 1 Common Material Emissivity Reference 39 10 2 Frequently Asked Questions FAQ 39 ...

Page 10: ...iple palettes and alarm types When the detected temperature in the scene does not match with the alarm rules the device alarms by color of the palette mode automatically It helps to find the risky part and lower your property loss The device supports Wi Fi connection live viewing recording and capturing etc The device is easy to use and adopts ergonomic design It is widely applied to substations e...

Page 11: ...iew capture and recording etc on your phone You can connect the device with thermography client to analysis the thermography pictures captured by devices Bluetooth Device can be connected to headset via Bluetooth and you can hear the voice in the recording or capture Digital Zoom Device supports 1 2 and 4 digital zoom LED Light LED light supplement makes the device a torch in required scenarios La...

Page 12: ...cus Knob Thermal Lens Tripod Interface Trigger Component Function Laser Button Hold the button to turn on laser and release the button to turn off laser Navigation Button Menu Button Press and to select parameters Press OK to confirm Non Menu Button Press to turn on off the LED light supplement Hold to digital zoom Lens Sheet Button Cover the lens to perform the correction ...

Page 13: ...t files Warning The laser radiation emitted from the device can cause eye injuries burning of skin or inflammable substances Before enabling the Light Supplement function make sure no human or inflammable substances are in front of the laser lens 2 Preparation 2 1 Charge Device 2 1 1 Charge Device via Charging Base Please charge the device with the cable and power adapter supplied by the manufactu...

Page 14: ...ld the device and press both battery lock catches of the device See figure below Battery Lock Catch Handheld Camera Battery Base 2 Hold the lock catches and draw the battery base to take out the battery See figure below ...

Page 15: ...us via the pilot lamp on the charging base Charging Base Battery Side View Front View 4 When the battery is fully charged draw the battery from the charging base 5 Align the ribbed piece on battery with the notch of the device and insert battery into the device See figure below Ribbed Piece ...

Page 16: ...ect the interface and the power adaptor with Type C cable Type C Interface 2 2 Power On Off Power On Remove the lens cover and hold the button for over three seconds to turn on the device You can observe the target when the interface of the device is stable It may take at least 30 s until the device ready for using when you power on it Power Off ...

Page 17: ...vice Settings Auto Power off Duration Settings to set the automatic shutdown time for device as required 2 3 Operation Methods The device supports both touch screen control and button control Touch screen control Tap on the screen to set parameters and configurations Button control Press the navigation buttons to set parameters and configurations ...

Page 18: ... Press the and to move the cursor up down left right Press OK to confirm 2 4 Menu Description In the observation interface tap the screen or press OK to show the menu bar see figure below ...

Page 19: ...rature Color Temperature Scale Menu Icons 3 Display Settings 3 1 Focus Lens Before you start Adjust the lens focal length properly before you set any other configurations or it may affect the image display and temperature accuracy Steps 1 Power on the device 2 Aim the device lens to the appropriate scene ...

Page 20: ...t 3 2 Set Screen Brightness Go to Local Settings Device Settings Display Brightness to set the screen brightness It can be set as Low Medium or High 3 3 Set Display Mode Purpose You can set the thermal optical view of the device Thermal Fusion PIP and Optical are selectable Steps 1 Select the Thermal Optical Settings from the main menu ...

Page 21: ...ion level Or you can adjust it in Settings Image Settings Fusion Level PIP In PIP Picture in Picture mode the device displays thermal view inside the optical view You can click in live view and press and to adjust PIP proportion Or you can adjust it in Settings Image Settings PIP proportion Optical In optical mode the device displays the optical view 3 Press to exit 3 4 Set Palettes Purpose The pa...

Page 22: ...us temperature difference Ironbow The target is colored as heated iron Red Hot The hot part is red colored in view Fusion The hot part is yellow colored and the cold part is purple colored in view Rain The hot part in the image are colored and the else is blue 3 Press to exit the setting interface 3 5 Adjust Digital Zoom In the live view interface press to adjust the digital zoom to 1 2 or 4 Then ...

Page 23: ...Then you can view the date and time information in live view interface 4 Temperature Measurement Purpose The thermography temperature measurement function provides the real time temperature of the scene and display it on the left of your screen The thermography function is turned on by default 4 1 Set Thermography Parameters Purpose The thermography parameters affect the accuracy of temperature me...

Page 24: ...e can detect the temperature and switch thermography range automatically in Auto Switch mode Emissivity Set the emissivity of your target as the effectiveness in emitting energy as thermal radiation Refer to the 10 1 Common Material Emissivity Reference for Emissivity values Go to Local Settings Image Settings Display Settings to enable disable the emissivity display Distance ...

Page 25: ...ty of current environment Temperature The device may have slight deviation of temperature measuring you can set the Temperature to correct it 3 Return to previous menu to save the settings 4 1 1 Set Units Go to Local Settings Device Settings Unit Settings to set the temperature unit and distance unit You can Go to Local Settings Image Settings Display Settings to enable disable the temperature uni...

Page 26: ...nual 2 Press OK to confirm The color temperature bar displays 3 Press to enlarge the temperature section range e g temperature range changes from 20 C 40 C to 19 C 41 C or press to narrow the temperature range 4 Press to move the temperature section higher e g temperature range changes from 20 C 40 C to 30 C 50 C or press to lower the temperature section 3 Press to exit 4 3 Set Thermography Rule P...

Page 27: ...tom Point Thermography Center Point Thermography System detects the temperature of the center Tap and the temperature center of view displays Cen XX High Temperature Point System locates the point of the highest temperature Tap and the temperature Highest temperature of view displays Max XX Low Temperature Point System locates the point of the lowest temperature Tap and the temperature Lowest temp...

Page 28: ...ints supported 4 3 2 Set Line Rule Steps 1 Choose on the interface 2 Press OK to generate a default line 3 Press the and to move the line up down left right 4 Drag points of the line on the touch screen to extend or shorten the line 5 Press OK The Max Temperature Low Temperature and Average Temperature of line e g L1 displays L1 Max XX Min XX Avg XX The real time temperature trend chart will displ...

Page 29: ...age Temperature of frame e g S1 displays S1 Max XX Min XX Avg XX 6 Repeat step 1 to 5 to set other frames At most three frames supported 4 3 4 Delete Rules Tap and press OK to clear all temperature rules Or tap and choose the single rule you want to delete to delete it 4 4 Set Temperature Alarm Before you start Go to Palettes Settings to set the palette Purpose Set the alarm rules and the device w...

Page 30: ...larm temperature and the device alarms when target temperature is lower than rule temperature Interval Alarm Set the alarm temperature section e g 90 C to 150 C when target temperature is within the section e g 100 C the device alarms Insulation Alarm Set the alarm temperature section e g 90 C to 120 C when target temperature is without the section e g 70 C or 125 C the device alarms 5 Press to ex...

Page 31: ...vice Settings Filename Header you can set the filename header for capturing or recording to distinguish the files recorded in a specify scene 5 1 Capture Picture You can set the Flashlight Setting ON OFF if required Go to Local Settings Image Picture Resolution to set the resolution of optical image if required Steps 1 Select Local Settings from the main menu 2 Go to Local Settings Camera Settings...

Page 32: ...on to stop recording 2 Add thermography data Tap to add thermography rules refer to 4 2 Set Thermography Rule for details 3 Tap or pull the trigger to save the snapshot You can also press to quit the saving 8 Refer to 5 4 Export File to export the snapshots In the menu interface you can pull the trigger to exit and pull the trigger again to capture snapshot 5 2 Record Video Steps 1 Select Local Se...

Page 33: ...finish pull the trigger again to stop recording The recording video will be saved automatically and exit You can also press OK or to stop recording 8 Refer to 5 4 Export File to export the videos In the menu interface you can pull the trigger to exit and pull the trigger again to start recording 5 3 View Recorded Files Steps 1 Select the Files from the main menu 2 Press the and to select the video...

Page 34: ...y client software from the disk packed in box 5 4 Export Files Purpose Connect the device to your PC with supplied cable you can export the recorded videos and captured snapshots Steps 1 Open the cover of cable interface 2 Connect the device to your PC with cable and open the detected disk 3 View the videos and snapshots Select and copy the videos to PC and play the file with the player Select and...

Page 35: ...s or OK to quit pairing Result After pairing you can record and hear the sound via the headsets while recording and playing the video or image 7 Light Settings 7 1 Set LED Light Go to Local Settings Device Settings Light Supplement Tap on to enable LED light or press the in the live view to enable disable the LED light 7 2 Set Laser In the live view interface hold to enable disable the laser light...

Page 36: ...tings Device Settings Wi Fi Settings 2 Tap on Connect to Wi Fi to enable Wi Fi and the searched Wi Fi will be listed below 3 Select your Wi Fi and enter password to show the keypad interface DO NOT tap enter or space or the password may be incorrect 4 Tap Close to hide the keypad 5 Tap OK 6 Launch the app and follow the startup wizard to create and register an account 7 Add the device to online de...

Page 37: ...ot name and password show the keypad interface DO NOT tap enter or space and at least 8 characters or the password may be incorrect 5 Tap Close to hide the keypad 6 Connect your phone to the WLAN Hot Spot of the device 7 Launch the app and follow the startup wizard to create and register an account 8 Select Wi Fi configuration in the software enter the serial number of device to add the device Ref...

Page 38: ...opy the upgrade file and paste it to the root directory of the device 3 Disconnect the device from your PC 4 Reboot the device and then it will upgrade automatically The upgrading process will be displayed in the main interface After the upgrading the device automatically reboot You can view the current version in Local Settings Device Information 9 3 Restore Device Go to Local Settings Device Set...

Page 39: ...k 0 95 Sand 0 90 Soil 0 92 Cotton 0 98 Cardboard 0 90 White Paper 0 90 Water 0 96 10 2 Frequently Asked Questions FAQ Q Why the charge indicator flashes red A Examine the items below 1 Examine whether the device is charged with the standard power adapter 2 Plug and unplug the battery once 3 Make sure the charging temperature is above 0 C 32 F Q Device image is fuzzy How to adjust it ...

Page 40: ...Connect via Wi Fi to turn on Wi Fi Q Capturing or recording fails How to operate A Examine the items below 1 Whether the device is connected to your PC and disabled the capturing and recording 2 Whether the storage space is full 3 Whether the device is low battery Q Why the PC cannot identify the device A Examine whether the device is connected to your PC with standard cable ...

Page 41: ...sales gazelleindustrial com www gazelleindustrial com ...

Reviews: