background image

CPR SUSIE®

 | 

User Guide

26 | Working with the Simulator

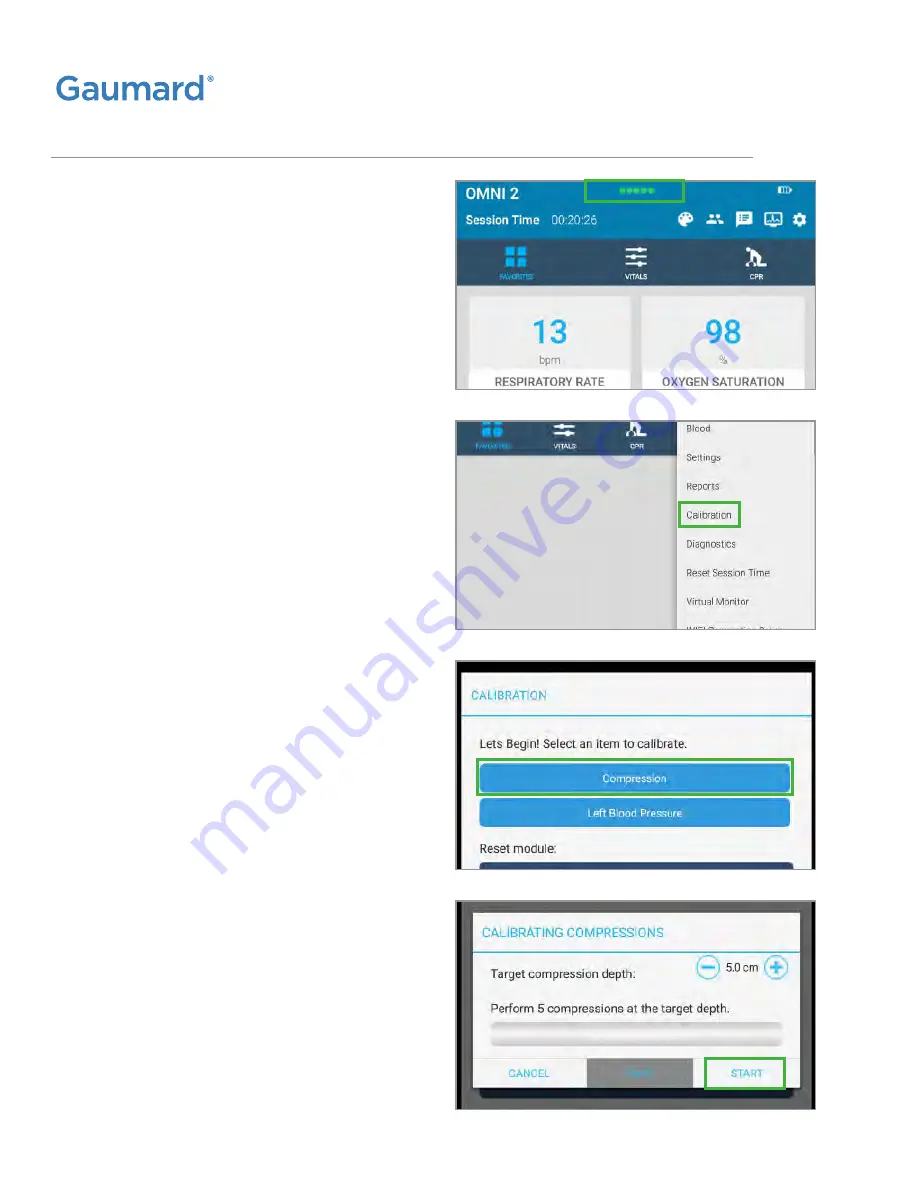
4.6 CHEST COMPRESSION CALIBRATION WITH OMNI® 2 


2. 

Tap the Menu icon in the upper right corner 
of the screen and select “Calibration.”

3. 

Select “Compression”

1. 

Make sure your simulator is connected 
to OMNI 2 by following the steps in 
Section 3.7 “Connecting OMNI 2”.

4. 

Press START and complete 5 chest compressions.

Summary of Contents for CPR SUSIE S306

Page 1: ...certified instructor It is not a substitute for a comprehensive understanding of the subject matter and not intended for clinical decision making User Guide 22 04 1 Gaumard Scientific Company 2022 Al...

Page 2: ......

Page 3: ...BLY 13 3 5 POWERING ON 14 3 6 CONNECTING THE OMNI CONTROLLER TO THE S306 15 3 7 CONNECTING THE OMNI 2 TABLET TO THE S306 250 16 4 WORKING WITH THE SIMULATOR 18 4 1 OPTHALMOLOGIC EXERCISES 18 4 2 AIRWA...

Page 4: ...M 46 7 2 BLOOD PRESSURE LEFT ARM WITH OMNI CODE BLUE PACK FOR THE S306 ONLY 52 7 3 BLOOD PRESSURE LEFT ARM WITH OMNI 2 TABLET FOR THE S306 250 ONLY 57 7 4 GERIATRIC FACE SKIN 61 8 ROUTINE MAINTENANCE...

Page 5: ...ONS 70 9 4 OMNI 2 TAKES TOO LONG TO BOOT UP 70 9 5 CPR IS NOT DETECTED IN OMNI 2 70 10 APPENDIX 71 10 1 CONSUMABLE PARTS LIST 71 10 2 EXCLUSIVE ONE YEAR LIMITED WARRANTY 72 10 3 CONTACT GAUMARD 73 10...

Page 6: ...rkmanship Electronic transmission is warranted to be free from defects at the moment of transmission Your sole and exclusive remedy and Gaumard s sole liability is to replace the defective media or to...

Page 7: ...r medical treatment diagnosis and should never be used for such purposes CAUTION Damage caused by misuse may void the manufacturer s warranty Failure to comply with the following guidelines could resu...

Page 8: ...thout lubricating the airway adjunct with mineral oil lubricant Failure to lubricate the device will make intubation very difficult and is likely to result in damage to the simulator When simulating d...

Page 9: ...the veins in the IV arm The use of needles larger than 22 to 23 gauge will reduce the lifetime of the arm skin and veins Always purge with clean water then drain the vein reservoirs at the end of each...

Page 10: ...Bilateral Carotid pulse Tracheostomy Decubitus ulcers Enema administration Jointed elbows wrists knees and ankles Articulated arms Bilateral IM sites in deltoids quadriceps and left buttock Interchan...

Page 11: ...lator on a bed or clean flat surface capable of supporting the weight of a real adult patient NOTE Remove the legs when transporting the simulator inside the protective case 3 2 PACKAGE CONTENTS 1 Upp...

Page 12: ...he lower torso 2 Unscrew one knob at the end of the rod that passes through the midsection by twisting it counterclockwise 3 Pull the rod out and set it aside 4 Locate the stomach reservoir inside the...

Page 13: ...5 Place the support back into the lower torso 6 Carefully place the lower torso into the upper torso and align the holes on each side of the waist to insert the waist rod 7 Replace the waist knob and...

Page 14: ...rings from the bolts on the hips 2 Remove the IM pad from each leg and slide the leg into the hip joint by inserting the bolt through the orifice in the leg 3 Assemble the fasteners onto the hip bolt...

Page 15: ...User Guide Initial Setup 15 5 Place the IM pad back on the leg 3 5 POWERING ON Connect the power supply to the power input located on the simulator s left side then connect the power supply to the wa...

Page 16: ...omatically proceed to the main screen 3 6 CONNECTING THE OMNI CONTROLLER TO THE S306 1 Connect the controller s communication cable to the port on the side of the simulator WARNING Do not connect the...

Page 17: ...ouch of button Follow the steps below to connect to OMNI 2 1 Turn on OMNI 2 by pressing and holding the ON button on the right side of the tablet Select Allow to turn on Bluetooth for the tablet 2 A s...

Page 18: ...Move on to the next steps in the Tutorial by selecting GOT IT Exit the Tutorial at any time by selecting HOME NOTE Completing the tutorial one time will avoid it from appearing at start up in the fut...

Page 19: ...of foreign bodies Eye irrigation Intubation The simulator s airway can be intubated through the left nasal opening the trachea and the mouth using LMA or endotracheal tubes Lubricate the tools with m...

Page 20: ...o be pierced during a simulation with a real device to observe chest rise Replacing the Trachea Skin 1 Gently lift the chest skin of the simulator to reveal the chest cavity 2 Remove the used trachea...

Page 21: ...rway will result in poor chest rise during ventilation and false intubation readings 2 Select V CAL on the OMNI Press START to begin the calibration procedure Calibrating Ventilations with OMNI Throug...

Page 22: ...ing with the Simulator 4 Perform a ventilation 5 Follow the cues on the screen to perform the remaining four ventilations When the calibration is complete OMNI will display DONE 6 Press SAVE to comple...

Page 23: ...Left ear the interior of the ear contains a simulated ear canal that allows for ear irrigation exercises Nasal oral openings are both connected to the stomach reservoir The nostrils can be pinched fo...

Page 24: ...t C CAL 2 Press START to begin the calibration procedure 3 When OMNI is ready to calibrate it will display COMPRESS Follow the cues on the screen to perform one ventilation at a time until finished Re...

Page 25: ...orm the remaining four compressions When the calibration is complete OMNI will display DONE 6 Press SAVE to complete the calibration procedure NOTE The simulator is pre calibrated to the current CPR g...

Page 26: ...BRATION WITH OMNI 2 2 Tap the Menu icon in the upper right corner of the screen and select Calibration 3 Select Compression 1 Make sure your simulator is connected to OMNI 2 by following the steps in...

Page 27: ...e completed tap on Save CPR with OMNI and OMNI 2 Chest compressions and ventilations are measured and logged showing the facilitator exactly how providers are performing Mouth to mouth resuscitation w...

Page 28: ...carotid pulses manually The pulses are generated manually using the squeeze bulb located on the left side of the simulator 4 7 CONNECTING THE PULSE LINE Connect the pulse line by unscrewing the red ca...

Page 29: ...dder reservoir with up to 1800 mL of fluid Increasing Urinary Flow 1 Remove the stoma from the suprapubic ostomy site and attach the rubber plug to seal the bladder reservoir 2 Use the squeeze bulb lo...

Page 30: ...der pressure Multiple catheterization exercises may be performed with the aid of the dispensing bag on a stand Female Catheterization Make sure to catheterize the simulator while it is on its back The...

Page 31: ...rcises 2 Slide the tube attached to the male genitalia into the opening of the urethra on the simulator and gently press down on the Velcro to secure it in place 3 Lubricate the catheter before insert...

Page 32: ...re for placement practice only Do not inject fluids into the IM sites when simulating intramuscular and subcutaneous injections Draining the Bladder Reservoir Catheterize the simulator and squeeze the...

Page 33: ...Breast Exam The simulator is provided with two breast inserts attached and additional interchangeable male breast inserts The left female breast contains a simulated tumor Changing Breasts for Palpat...

Page 34: ...eding and gastric suctioning 2 When the procedure is complete you may collect any remaining fluid with the same suctioning tool Ileostomy Suprapubic Cystostomy and Transverse Colostomy 1 Ileostomy 2 S...

Page 35: ...stoma port Enema The legs of the simulator articulate and permit enema administration Use a small anal nozzle to fill the enema reservoir with up to 800 mL A non return valve is built into the anal c...

Page 36: ...ad draping exercises Denture Care The simulator is supplied with average size teeth and tongue The upper and lower dentures are removable and the tongue can be moved side by side 1 To remove the teeth...

Page 37: ...eration 2 Suppuration or pus deeply infected stage Amputation Stump The simulator is provided with an amputation stump for wound treatment and care 1 To attach the amputation stump remove the lower le...

Page 38: ...nd logging of compressions and ventilations performed in real time by the user on a PC This software aims to provide additional testing and teaching tools for CPR using an interface to display a wavef...

Page 39: ...E This submenu is for the CPR operational mode Switch between TEST and COACH mode The COACH mode generates audible tones to coach CPR ratio A high pitched beep signals the care provider to perform a c...

Page 40: ...inute Adjust rate using the and buttons Press OK to save changes and return to previous screen The compression rate limit is 50 150 CPM the ventilation rate is 2 60 VPM CALIB This submenu is to calibr...

Page 41: ...bration menu After resetting the sensor OMNI will display DONE RESET PRESSURE SENSOR It is recommended that the OMNI controller s pressure sensor is reset at altitudes greater than 1000 ft to avoid in...

Page 42: ...r serial number BACK LIGHT The default value for OMNI s back light timer is 10 minutes After 10 minutes the back light will turn off To increase the back light duration adjust the back light timer wit...

Page 43: ...ls page CPR page and Blood Pressure page Reference the OMNI 2 user guide provided for more details to navigate each page The session time will run automatically once the tablet is on Reset the session...

Page 44: ...ronome on this page to coach the provider MANAGE PROVIDERS This tab allows the facilitator the ability to add record and evaluate provider actions during a session Add a group of providers to track ac...

Page 45: ...gin and end a CPR session tap on the CPR icon and the START STOP button To reset a CPR session tap the Reset icon To activate an audible rhythm to aid in compression training tap on the metronome butt...

Page 46: ...E User Guide 46 Working with OMNI 2 6 2 TURNING OFF THE SIMULATOR 1 Disconnect the power supply from the simulator and hold the power button on the tablet Select Power Off 2 Tap on OK to shut down the...

Page 47: ...bag on the stand The optional IV right arm can be used for infusion blood collection intravenous injection intramuscular injection TB screening and subcutaneous injection exercises The arm and hand co...

Page 48: ...system without the drain connector in place Always keep the drain port connected when injecting fluids into the system 5 Add water or artificial blood to the blood dispensing bag using the funnel prov...

Page 49: ...e clamp to allow fluid to flow through the system and into the drainage container 7 Close the drainage tube s clamp when there are no more air bubbles in the tube 8 Place the black rubber stopper on t...

Page 50: ...rainage tube Squeeze the bulb to inflate the bag and create the desired pressure in the veins To simulate a clenched fist or bulging veins clamp the drainage tube and apply pressure using the squeeze...

Page 51: ...tube 2 Replace the black rubber stopper with the squeeze bulb 3 Squeeze the bulb to push the remaining fluid out of the venous system 4 Remove the squeeze bulb Using the funnel fill the dispensing bag...

Page 52: ...bulb 6 If it is unnecessary to flush the dispensing bag the syringe and tube from the IV filling kit may be attached to the arm 7 Make sure the drainage tube is open and push the fluid through the ar...

Page 53: ...e Korotkoff Sounds Korotkoff sounds K1 through K4 K5 is silent are audible between systolic and diastolic pressure Depending on the selected heart rate and the rate of cuff deflation the Korotkoff sou...

Page 54: ...to the adapter labeled BP on the control panel 3 Connect the speakers to the port on the shoulder BP Cuff Calibration 1 Follow steps 1 and 2 in section 7 1 BP Arm Setup 2 Select the CALIB menu from th...

Page 55: ...n the top portion of the screen 3 OMNI will display a prompt to set the BP cuff to0mmHg then press NEXT Do not inflate the cuff until prompted OMNI will prompt you to set the BP cuff to 20 mmHg Increa...

Page 56: ...just the beats per minute using the And buttons Press OK to save the changes and return to previous screen FEEDBACK GRAPHICS MENU The feedback graphic displays the BP cuff pressure in real time at the...

Page 57: ...he changes and return to previous screen The default upper and lower limits for the auscultatory gap are 100 mmHg and 90 mmHg Volume Increase or decrease the volume of Korotkoff sounds using the VOLUM...

Page 58: ...ITH OMNI 2 TABLET FOR THE S306 250 ONLY BP Cuff Calibration 1 Follow the instructions in Section 7 2 BP Arm Setup and connect the OMNI 2 tablet 2 Tap the Menu icon then select Calibration 3 The Calibr...

Page 59: ...the display prompts you to inflate the cuff one value at a time Continue to tap SET after setting each increment The OMNI 2 will prompt you to increase the BP cuff pressure from 0 to 300 mmHG 6 Tap SA...

Page 60: ...Blood Pressure 1 To adjust the BP tap the Vitals page 2 Tap Blood Pressure and use the top slide bar or the or sign to increase or decrease the systolic value Use the bottom slide bar to increase or d...

Page 61: ...hen select Auscultatory Gap and slide the ON OFF button to ON 2 To increase or decrease the High Gap and Low Gap slide the top and bottom bars left or right or tap the or buttons 3 Tap APPLY NOW to ap...

Page 62: ...as been built with her standard wig attached using Velcro to be compatible with this Geriatric Face Skin option starting at serial number CPR 22607909 If your simulator s serial number is less than CP...

Page 63: ...can be aligned 5 Zip the back of the Face Skin 6 Fit the elderly wig to the head of the simulator if using it If you would like to simulate an elderly male patient simply forgo the wig RECOMMENDATION...

Page 64: ...the new arm skin gently slide it over the hand and up the arm 3 If needed use more lubricant to ease the skin into place 8 1 REPLACING THE ARM SKIN FOR THE OPTIONAL IV ARM 8 ROUTINE MAINTENANCE 1 Sta...

Page 65: ...er kinks in the tubes use tape to secure them down to the arm 3 Flush the system with water by following the steps in section 4 3 Draining the Venous System 4 Reattach the arm skin NOTE Arm reveining...

Page 66: ...D RESERVOIRS It is good practice to flush the fluid reservoirs periodically to prevent mold from forming 1 To reach the reservoirs loosen the waist knobs and remove the waist rod 2 Remove the support...

Page 67: ...ns Stomach Reservoir 1 Disconnect the white port from the stomach reservoir and make sure the stomach tube is unclamped 2 Squeeze the stomach reservoir to drain the liquid 3 Reconnect the white port t...

Page 68: ...Gently disconnect the ileostomy port and the ileostomy site clips to release the bag 2 Inject a 30 70 mix of isopropyl alcohol to water and squeeze the bag over a container or sink 3 Insert the clips...

Page 69: ...ips to release the bag 2 Inject a 70 30 mix of water to isopropyl alcohol and squeeze the bag over a container or sink 3 Insert the clips to the ports to reattach the bag 4 After flushing the reservoi...

Page 70: ...a few seconds OMNI s data cable is not connected Ensure the Ethernet cable is plugged into OMNI and the simulator Verify the power cable is connected to the simulator OMNI 2 tablet is too far away fr...

Page 71: ...ventilations sensor Tap the menu icon then tap on Reset Ventilations Sensor 9 5 CPR IS NOT DETECTED IN OMNI 2 Review the OMNI 2 user guide for the most common trouble shooting topics regarding the OMN...

Page 72: ...NDIX Product Item Number Arm Injection Sites S306 857 1 S306 250 857 1 Decubitus Ulcers S306 764 S306 250 764 Artificial Blood Concentrate S306 812 S306 250 812 Trachea Tape S306 735 S306 250 735 IM I...

Page 73: ...and this limited warranty does not apply This limited warranty applies only to the products manufactured and produced by Gaumard This limited warranty does not apply to any products provided along wit...

Page 74: ...mulator and user guide readily available Email support gaumard com USA 800 882 6655 INT 01 305 971 3790 10 4 GENERAL INFORMATION E mail sales gaumard com USA 800 882 6655 INT 01 305 971 3790 Fax 305 2...

Page 75: ...sie Krash Kids Premie UNI Omni Omni 2 SmartSkin are trademarks of Gaumard Scientific Company Always dispose of this product and its components in compliance with local laws and regulations www gaumard...

Reviews: