G700CK Instruction Manual
Installation:
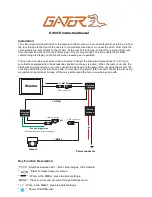
The video signal is transferred from the camera to the monitor via 4 pin cable that will need to be run from
the rear through to the front of the vehicle to the monitors wired loom run under the dash. From there the
video signals are sent directly to the monitor. At the rear of the Vehicle, connect the reverse trigger wire
from the loom and connect to the Positive wire of the reverse tail light. This will enable the Reverse
camera image to display on the monitor when reverse gear is selected.
The monitor has two power wires to be connected. Connect the Red wire (Accessories 12 -24V+) to a
wire that is energised when the accessories position on the key is active ( When the radio is on) and the
black wire to a ground wire or you can connect the back wire to the body of the car using the steel of the
cars body behind the kick trim as an earth. In this case drill a small 1/8th hole and connect the wire using
a suitable O ring terminal. Scrape off the cars paint around the hole to ensure a good earth.
Key Function Description:
“V1/V2” : Switches between AV1 / AV2 video images. (AV2 default)
“ ”Press to rotate image on screen.
“ ” : When in the MENU, press to adjust settings.
“MENU” : Press to enter and circulate through Settings menu.
“ +/-” : When in the MENU, press to adjust settings
“ ”: Power On/Off Monitor.
+
Filter &
fuse box
Monitor
Power connector
F
M
Moulded
splitter
AV1
AV2
Reverse trigger wire
(Positive wire of the reverse tail light)
M
F
M
Moulded
splitter
Camera
1.2 METRES
5 METRES
1 METRE
4 Pin connector
4 Pin connector
6 Pin connectors
Summary of Contents for G700CK
Page 3: ......


