background image

www.gateway.com

23

Using the keyboard

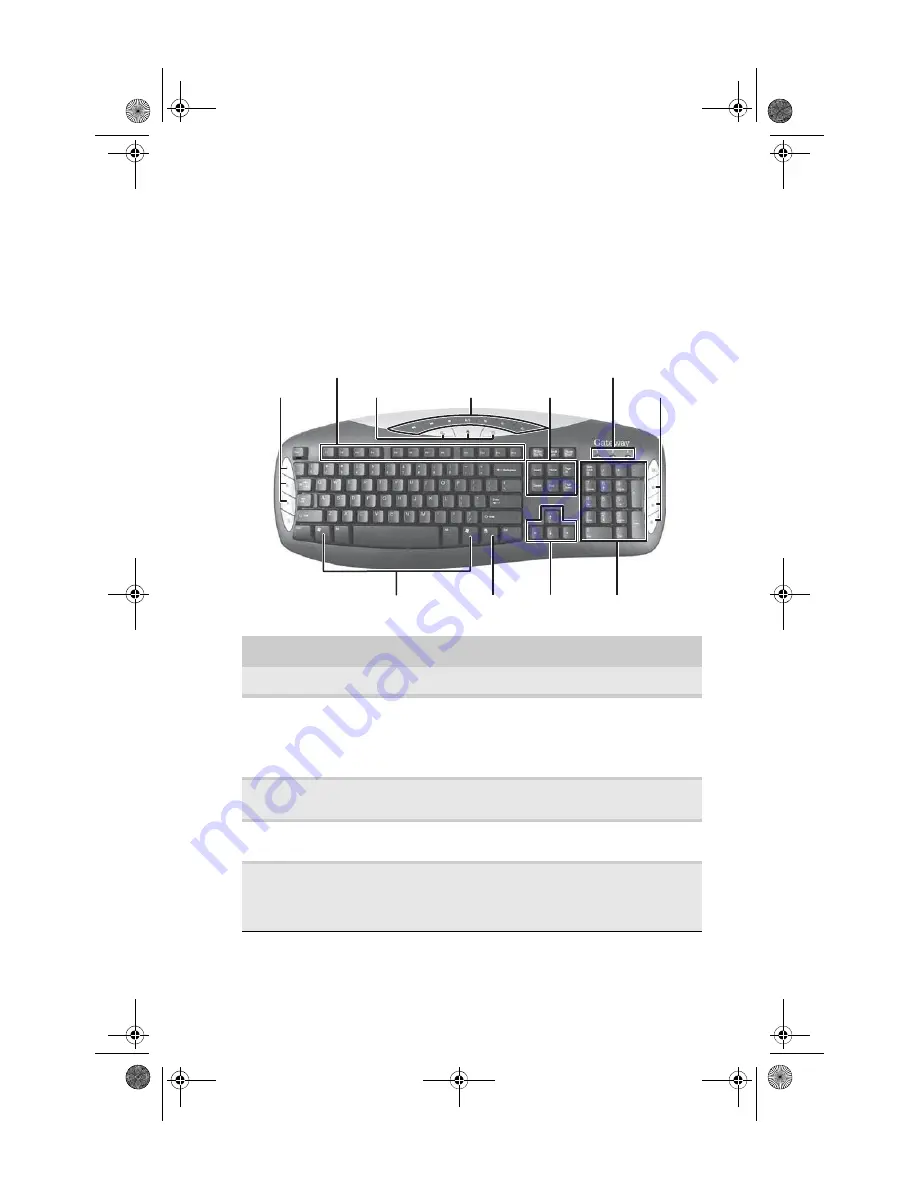
Premium multimedia keyboard features

The keyboard has several different types of keys and buttons. 
Your keyboard also has status indicators that show which 
keyboard feature is active.

Feature

Icon

Description

Editing buttons

Press these buttons to copy, cut, and paste.

Function keys

Press these keys to start program actions. Each 
program uses different function keys for 
different purposes. See the program 
documentation to find out more about the 
function key actions.

Internet buttons

Press these buttons to launch your Internet 
home page, search, or e-mail programs.

Audio playback 
buttons

Press these buttons to play your audio files and 
to adjust the volume.

Navigation keys

Press these keys to move the cursor to the 
beginning of a line, to the end of a line, up the 
page, down the page, to the beginning of a 
document, or to the end of a document.

Function keys

Navigation keys

Indicators

Windows keys

Application key

Directional keys

Numeric keypad

Editing buttons

Internet buttons

Audio playback buttons

Internet buttons

8512032.book  Page 23  Tuesday, January 9, 2007  1:47 PM

Summary of Contents for Profile 6

Page 1: ...REFERENCEGUIDE Gateway Profile 6 8512032 book Page a Tuesday January 9 2007 1 47 PM...

Page 2: ...8512032 book Page b Tuesday January 9 2007 1 47 PM...

Page 3: ...r 18 Avoiding discomfort and injury from repetitive strain 18 Preparing power connections 18 Protecting from power source problems 18 Connecting to a broadband modem or network 19 Connecting a dial up...

Page 4: ...a full height expansion card 48 Replacing the BIOS battery 50 Replacing the system board 51 Chapter 5 Maintaining Your Computer 55 Setting up a maintenance schedule 56 Caring for your computer 56 Clea...

Page 5: ...board 80 Memory card reader 81 Modem cable or DSL 81 Modem dial up 81 Monitor 84 Mouse 85 Networks 86 Passwords 86 Power 86 Printer 87 Sound 88 Recovering your system 89 Recovering pre installed softw...

Page 6: ...Contents iv Training 103 Chapter 7 Legal Notices 105 Index 115 8512032 book Page iv Tuesday January 9 2007 1 47 PM...

Page 7: ...1 About This Reference About this guide Accessing the online User Guide Gateway contact information Microsoft Certificate of Authenticity For more information 8512032 book Page 1 Tuesday January 9 200...

Page 8: ...dress shown on your computer s label The Support page also has links to additional Gateway documentation and detailed specifications Accessing the online User Guide In addition to this guide the User...

Page 9: ...need this information if you call for assistance Microsoft Certificate of Authenticity The Microsoft Certificate of Authenticity label found on the side of your computer includes the product key code...

Page 10: ...CHAPTER 1 About This Reference 4 8512032 book Page 4 Tuesday January 9 2007 1 47 PM...

Page 11: ...CHAPTER2 5 Checking Out Your Computer Front Back 8512032 book Page 5 Tuesday January 9 2007 1 47 PM...

Page 12: ...CHAPTER 2 Checking Out Your Computer 6 Front DVD CD drive Power button power indicator Memory card reader or diskette drive optional 8512032 book Page 6 Tuesday January 9 2007 1 47 PM...

Page 13: ...your user guide Memory card reader optional Insert a memory card from a digital camera MP3 player PDA cellular telephone or other devices into the memory card reader Diskette drive optional Insert a...

Page 14: ...the side ports through this opening Power connector Plug the power cord into this connector Kensington lock slot Attach a cable lock to this slot to prevent unauthorized opening modification and theft...

Page 15: ...www gateway com 9 Right side Headphone jack Microphone jack Volume control USB ports Back panel release latch 2 Display controls Side port cover 8512032 book Page 9 Tuesday January 9 2007 1 47 PM...

Page 16: ...crophone jack Plug a microphone into this jack This jack is color coded red or pink Headphone jack Plug powered analog front speakers an external amplifier or headphones into this jack This jack is co...

Page 17: ...side speaker jack Center subwoofer jack IEEE 1394 FireWire 4 pin port Parallel port Modem jack optional half height PCI card slot Ethernet network jack PS 2 keyboard port PS 2 mouse port VGA in port...

Page 18: ...ave an analog VGA video expansion card installed connect its VGA out port to this VGA in port Parallel port Plug a parallel device such as a printer into this port For more information see Installing...

Page 19: ...modems see Connecting a dial up modem on page 19 Expansion card slots Install a PCI card or graphics card into the riser card slots IEEE 1394 FireWire 6 pin port Plug IEEE 1394 also known as Firewire...

Page 20: ...the following Stereo in Plug an external audio input source such as a stereo into this jack so you can record sound on your computer Default Stereo out Plug your side left and right speakers into thi...

Page 21: ...broadband modem or network Connecting a dial up modem Starting your computer Turning off your computer Restarting rebooting your computer Using the keyboard Using the mouse Adjusting the volume Config...

Page 22: ...llel to the floor Adjust the screen so it is perpendicular to your line of sight and the top of the screen is no higher than eye leve Place your feet flat on the floor or on a footrest Keep ventilatio...

Page 23: ...is the appropriate height and the chair helps you maintain good posture Select a flat surface for your computer desk Adjust the height of the computer desk so your hands and arms are positioned parall...

Page 24: ...o your computer can increase to far above normal levels and cause data loss or system damage Protect your computer and peripheral devices by connecting them to a surge protector which absorbs voltage...

Page 25: ...t to the Internet or fax documents To connect the modem 1 Insert one end of the modem cable into the modem jack on the modem at the right side of your computer To see its location see Side port panel...

Page 26: ...h for files For more information on using your computer s menus see Using Windows Vista and Customizing Windows in the online User Guide Waking up your computer When you have not used your computer fo...

Page 27: ...s a key on the keyboard or press the power button To turn off your computer 1 Click Start click the arrow next to the lock icon then click Shut Down The computer turns off 2 To completely disconnect a...

Page 28: ...your computer To restart your computer 1 Click Start click the arrow next to the lock icon then click Restart Your computer turns off then turns on again 2 If your computer does not turn off press and...

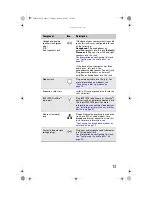
Page 29: ...n to find out more about the function key actions Internet buttons Press these buttons to launch your Internet home page search or e mail programs Audio playback buttons Press these buttons to play yo...

Page 30: ...ndows Start menu These keys can also be used in combination with other keys to open utilities like F Find Search R Run and E Computer Application key Press this key to access shortcut menus and help a...

Page 31: ...r SCROLL LOCK keys are activated Press the corresponding key to activate the function Windows keys Press one of these keys to open the Windows Start menu These keys can also be used in combination wit...

Page 32: ...he computer display This illustration shows the standard mouse As you move the mouse the pointer arrow on the display moves in the same direction You can use the left and right buttons on the mouse to...

Page 33: ...e Select an object on the computer display Position the pointer over the object Quickly press and release the left mouse button This is called clicking Start a program or open a file or folder Positio...

Page 34: ...specific sound devices in your computer To adjust the overall volume using hardware controls Press the or buttons on the right side of your computer OR If you are using external speakers turn the kno...

Page 35: ...estore volume click it again 4 To adjust device volume levels click Mixer The Volume Mixer dialog box opens where you can click and drag sliders for individual devices 5 Click X in the top right corne...

Page 36: ...dio jack s 2 Click Start then click Control Panel The Control Panel window opens 3 Click Hardware and Sound Sound the Playback tab then click Configure OR If your computer has the Realtek Sound Effect...

Page 37: ...you plug it into the appropriate port When you use an IEEE 1394 or USB device for the first time your computer will prompt you to install any software the device needs After doing this you can disconn...

Page 38: ...CHAPTER 3 Setting Up and Getting Started 32 8512032 book Page 32 Tuesday January 9 2007 1 47 PM...

Page 39: ...or fan Installing memory Replacing the power supply Replacing the diskette drive Replacing an optical disc drive Replacing the memory card reader Replacing the hard drive Adding or replacing an expans...

Page 40: ...tistatic bags only when you are ready to use them Do not lay components on the outside of antistatic bags because only the inside of the bags provide electrostatic protection Always hold expansion car...

Page 41: ...power cord and modem network and all peripheral device cables 3 Place your computer face down on a clean soft dry surface Although the photographs show the computer upright you should place your compu...

Page 42: ...ase then lift the back panel away from the case Replacing the back panel To replace the back panel 1 Slide the tabs on the top of the panel into the slots in the top of the case 2 Swing the lower part...

Page 43: ...lace the processor fan 1 Remove the back panel by following the instructions in Opening the case on page 35 2 Slide the processor fan s release lever to the left 3 Swing the top part of the fan away f...

Page 44: ...el by following the instructions in Replacing the back panel on page 36 Installing memory When you upgrade the computer memory make sure that you install the correct type of memory module for your com...

Page 45: ...dule clicks into place The tabs on the sides of the memory module should secure the memory module automatically 6 Replace the processor fan by following the instructions in Replacing the processor fan...

Page 46: ...37 3 Unplug the power supply from the system board 4 Pull the power supply release lever out toward you until the power supply slides freely then slide the power supply out of the computer 5 Slide the...

Page 47: ...floppy drive 1 Remove the back panel by following the instructions in Opening the case on page 35 2 Remove the power supply by following the instructions in Replacing the power supply on page 40 You d...

Page 48: ...omputer then slide the drive release lever forward away from you to lock the drive into place 7 Lay the computer face down then reconnect the cables to the drive 8 Replace the power supply by followin...

Page 49: ...Slide the new drive into the computer from the front until the front of the drive is flush with the front of the computer then slide the drive release lever forward away from you to lock the drive in...

Page 50: ...cable from the drive 5 Return your computer to its upright position then slide the card reader out the front of the computer 6 Slide the new card reader into the computer from the front until the fro...

Page 51: ...following the instructions in Opening the case on page 35 2 Unplug the cables from the hard drive 3 Push the hard drive release lever to the left then pull the lever out toward you as far as the leve...

Page 52: ...in until it is flush with the edge of the hard drive bay 6 Reconnect the cables to the drive 7 Replace the back panel by following the instructions in Replacing the back panel on page 36 8 Reconnect...

Page 53: ...ions in Opening the case on page 35 2 Remove the PCI riser card assembly by pulling on its green handle 3 Slide a half height PCI card into the half height PCI slot You can slightly seesaw the card en...

Page 54: ...pansion card 1 Remove the back panel by following the instructions in Opening the case on page 35 2 Remove the PCI riser card by pulling on its green handle 3 Press the two tabs on the card retention...

Page 55: ...rom the riser card handle and the graphics card slot is the slot closest to the handle 5 Slide a PCI card into the PCI slot or slide a graphics card into the graphics card slot You can slightly seesaw...

Page 56: ...ttery 1 Restart your computer 2 During the restart press and hold the F1 key The main menu of the BIOS Setup utility opens 3 Because changing the BIOS battery will reset the BIOS to factory default se...

Page 57: ...anel by following the instructions in Replacing the back panel on page 36 11 Reconnect all external cables and the power cord 12 Turn on your computer and press F2 during startup to open the BIOS Setu...

Page 58: ...he heat sink The screws are captive screws so they will not fall out of the heat sink 5 Disconnect the power and data cables from the system board noting their locations and orientation You will recon...

Page 59: ...ews you removed previously 9 Replace the heat sink and tighten the four captive screws 10 Replace the processor fan by following the instructions in Replacing the processor fan on page 37 11 Replace t...

Page 60: ...CHAPTER 4 Upgrading Your Computer 54 8512032 book Page 54 Tuesday January 9 2007 1 47 PM...

Page 61: ...ng up a maintenance schedule Caring for your computer Cleaning your computer Updating Windows Using BigFix Managing hard drive space Scheduling maintenance tasks Moving from your old computer 8512032...

Page 62: ...ommend that you put it in the original packaging materials Keep your computer away from magnetic fields Magnetic fields can erase data on hard drives Never turn off your computer when the drive indica...

Page 63: ...ork environments Dust and dirt can clog the internal mechanisms and can lead to permanent damage to the computer Do not block the ventilation fan slots If these slots are blocked your computer may ove...

Page 64: ...narrow straw like extension to remove dust and lint trapped under the keys 2 If you spill liquid on the keyboard turn off your computer and turn the keyboard upside down Let the liquid drain then let...

Page 65: ...e center to the edge not around in a circle using a product made especially for the purpose Updating Windows Windows Update helps you keep your computer up to date Use Windows Update to choose updates...

Page 66: ...ormation about the latest bugs security alerts and updates from BigFix sites on the Internet Whenever BigFix detects a problem it alerts you by flashing the blue taskbar icon To fix the problem click...

Page 67: ...eck hard drive space delete unnecessary files defragment files and back up files Checking hard drive space To check hard drive space 1 Click Start then click Computer The Computer window opens Shortcu...

Page 68: ...nnecessary files Delete unnecessary files such as temporary files and files in the Recycle Bin to free hard drive space To delete unnecessary files 1 Click Start All Programs Accessories System Tools...

Page 69: ...awed areas on the hard drive so Windows does not use them If you use your computer several hours every day you probably want to run Error checking once a week If you use your computer less frequently...

Page 70: ...stored on the drive can improve hard drive performance While Disk Defragmenter is running do not use your keyboard or mouse because using them may continuously stop and restart the defragmenting proce...

Page 71: ...e It also protects you from losing important information if the hard drive fails or you accidentally delete files You should back up your files regularly to a writable optical disc if you have a recor...

Page 72: ...up storage location and the files and folders to back up Scheduling maintenance tasks Task Scheduler lets you schedule maintenance tasks such as running Disk Defragmenter and checking your drives for...

Page 73: ...unt settings such as display Internet and e mail settings from your old computer to your new one using Windows Easy Transfer providing your old computer uses Windows XP or Windows Vista While using Wi...

Page 74: ...able disc an external hard drive a network location or a flash drive Finding your documents Many programs save your personal data files in the Documents or My Documents folder Look in your old compute...

Page 75: ...sheet file might have an XLS extension To find files using Find or Search 1 In Windows Vista click Start then click Search The Search Results window opens OR In Windows XP click Start then click Searc...

Page 76: ...CHAPTER 5 Maintaining Your Computer 70 8512032 book Page 70 Tuesday January 9 2007 1 47 PM...

Page 77: ...CHAPTER6 71 Troubleshooting Safety guidelines First steps Troubleshooting Recovering your system Telephone support 8512032 book Page 71 Tuesday January 9 2007 1 47 PM...

Page 78: ...exact message The message may help Gateway Customer Care in diagnosing and fixing the problem Warning Never remove your computer case cover while your computer is turned on and while the modem cable...

Page 79: ...computer does not recognize a disc or the CD or DVD drive Make sure that the disc label is facing up then try again Try a different disc Occasionally discs are flawed or become scratched and cannot b...

Page 80: ...sure that the mute controls are turned off For more information see Adjusting the volume on page 28 Make sure that the speaker cables are connected correctly and securely Shut down and restart your c...

Page 81: ...iskette or you see the message disk is full or write protected Make sure that the write protection tab on the upper right corner of the diskette is down unprotected Delete unnecessary files on the dis...

Page 82: ...ernet cable is plugged into the Ethernet jack on your computer Make sure that the other end is plugged into a router Make sure that all computers are plugged into a powered electrical outlet and turne...

Page 83: ...thernet 10 Mbps Fast Ethernet 100 Mbps or 10 100 Mbps or Gigabit Ethernet 1000 Mbps or 10 100 1000 Mbps A mixture of Ethernet Fast Ethernet and Gigabit Ethernet components will result in your network...

Page 84: ...age This may be the result of a defective area on the hard drive To fix hard drive problems run the Error checking program For instructions on fixing hard drive problems see Checking the hard drive fo...

Page 85: ...l support for help Make sure that you do not have a problem with your modem For more information Modem dial up on page 81 You see an Unable to locate host message and are unable to browse the Internet...

Page 86: ...nternet service provider ISP is set up correctly Contact your ISP for technical support Keyboard The keyboard does not work Make sure that the keyboard cable is plugged in correctly For more informati...

Page 87: ...ged into the modem jack and not the Ethernet network jack See your setup poster to make sure that the connections have been made correctly Make sure that your computer is connected to the telephone li...

Page 88: ...he modem to connect at a slower rate abort downloads or even disconnect The faster the modem the less line noise it can tolerate and still work correctly Listen to the line using your telephone Dial a...

Page 89: ...eceives faxes at 14 400 bps when you have a 56K modem Current fax technology only supports a maximum send and receive rate of 14 400 bps The modem is not recognized by your computer Make sure that the...

Page 90: ...g sounds when the modems first connect If the handshaking sounds are too loud you can turn down the modem volume To turn down the modem volume 1 Click Start then click Control Panel The Control Panel...

Page 91: ...ings For more information see the Customizing Windows chapter in the online User Guide Move the computer away from sources of electrical interference such as televisions unshielded speakers microwaves...

Page 92: ...asswords Your computer does not accept your password Make sure that CAPS LOCK is turned off then retype the password Power Your computer will not turn on Make sure that the power cord is connected to...

Page 93: ...make sure that you have selected it in the printer setup To set a default printer 1 Click Start then click Control Panel The Control Panel window opens 2 Click Hardware and Sound then click the Chang...

Page 94: ...re not getting sound from the speakers Make sure that the volume controls are turned up For more information see Adjusting the volume on page 28 Make sure that mute controls are turned off For more in...

Page 95: ...stem to its factory condition on page 98 If you upgrade or exchange your hard drive or if your hard drive is completely erased or corrupted your only option for system recovery may be to reinstall Win...

Page 96: ...ivers from your hard drive However if you ever re install Windows from the Windows DVD or install a new hard drive you will need to recover your pre installed software and drivers using a set of softw...

Page 97: ...media then click Next The What would you like to do dialog box opens 3 Click Create system recovery discs then click Next 4 Insert a blank recordable disc into a recordable disc drive then click Next...

Page 98: ...Gateway Recovery Center The Gateway Recovery Center opens Important Use a permanent marker to label each disc Software and Driver Recovery along with a short description of which computer the discs a...

Page 99: ...ick Programs then click Application recovery OR To recover device drivers that were pre installed click Hardware then click Device driver recovery 3 Click the software or driver you want to recover th...

Page 100: ...tware or driver you need to recover try another disc To recover software and drivers using recovery discs 1 Insert a software and driver recovery disc into a CD or DVD drive If an AutoPlay dialog box...

Page 101: ...store Microsoft System Restore periodically takes snapshots of your system settings and saves them as restore points In most cases of hard to resolve software problems you can return to one of these r...

Page 102: ...l Panel System and Maintenance then click Backup and Restore Center The Backup and Restore Center opens 2 On the left side of the window click Repair Windows using System Restore then click Next The C...

Page 103: ...creating a restore point To manually create a restore point 1 Click Start Control Panel System and Maintenance then click Backup and Restore Center The Backup and Restore Center opens 2 On the left si...

Page 104: ...software 1 If you can still run Windows a Click Start All Programs Gateway Recovery Center then click Gateway Recovery Center The Gateway Recovery Center opens b Click Recovery then click Next Your c...

Page 105: ...ur system using the Windows DVD If you install a new hard drive or completely re format your original hard drive you must recover your system using the Windows Vista operating system DVD You will also...

Page 106: ...ot appear to work make sure that all cables are plugged in securely If you have recently installed hardware or software make sure that you have installed it according to the instructions provided with...

Page 107: ...th a detailed description of your problem including the exact text of any error messages and the steps you have taken Make sure that your computer is nearby at the time of your call The technician may...

Page 108: ...d software issues www gateway com answers Gateway Customer Care Talk to a Gateway Customer Care representative about a non tutorial technical support question See Before calling Gateway Customer Care...

Page 109: ...go to www gateway com answers Training Gateway provides the following computer based training Help For more how to information about Windows click Start then click Help and Support Type practice in th...

Page 110: ...CHAPTER 6 Troubleshooting 104 8512032 book Page 104 Tuesday January 9 2007 1 47 PM...

Page 111: ...AppendixA 105 Legal Notices Important safety information Regulatory compliance statements Environmental information Notices 8512032 book Page 105 Tuesday January 9 2007 1 47 PM...

Page 112: ...providedfor ventilation Do not block or cover these openings Make sure you provide adequate space at least 6 inches 15 cm around the system for ventilation when you set up your work area Never insert...

Page 113: ...cables and modem cables from the wall outlets before cleaning the system Unplug the system from the wall outlet and refer servicing to qualified personnel if The power cord or plug is damaged Liquid...

Page 114: ...eparation between the equipment and receiver Connectthe equipmenttoanoutletonadifferentcircuitfromthattowhichthereceiver is connected Consult the dealer or an experienced radio TV technician for help...

Page 115: ...service Connection to party line service is subject to state tariffs Contact the state public utility commission or public service commission for information When programming or making test calls to e...

Page 116: ...mponents are classified as Class 1 Laser Products under a US Department of Health and Human Services DHHS Radiation Performance Standard Should the unit ever need servicing contact an authorized servi...

Page 117: ...ch power lines or circuits Warning When installing or realigning an outside antenna system extreme care should be taken to keep from touching such power lines or circuits Contact with them could be fa...

Page 118: ...nderstanding and using the energy saving features of this product where applicable recycling the inner and outer packaging including shipping containers this product was delivered in and by disposing...

Page 119: ...gistered trademarks of their respective companies Macrovision statement If your computer has a DVD compatible drive and an analog TV Out port the following paragraph applies This product incorporates...

Page 120: ...Appendix A Legal Notices 114 8512032 book Page 114 Tuesday January 9 2007 1 47 PM...

Page 121: ...ing 13 buttons See keys and buttons C cable modem 19 connecting 13 Caps Lock indicator 24 25 cards adding expansion 47 replacing expansion 47 troubleshooting add in card 73 troubleshooting memory card...

Page 122: ...nter 87 defragmenting hard drive 64 deleting files and folders 62 digital camera locating USB port 10 12 serial port 12 digital video camera locating IEEE 1394 port 12 13 DIMM See memory directional k...

Page 123: ...gmenting 64 deleting files and folders 62 replacing 45 scanning for errors 63 troubleshooting 78 headphone jack 10 13 Hibernate mode 7 I i Link port 12 13 IEEE 1394 port 12 13 31 indicators Caps Lock...

Page 124: ...memory card reader replacing 44 microphone jack 10 12 Microsoft Certificate of Authenticity 3 modem cable 19 connecting 19 DSL 19 jack 13 19 troubleshooting 81 monitor troubleshooting 84 mouse button...

Page 125: ...0 12 programs closing unresponsive 22 opening 27 PS 2 port keyboard 12 mouse 12 R RAM See memory rebooting computer 22 recordable drive 7 locating 7 removing files and folders 62 resetting computer 22...

Page 126: ...103 transferring files from old computer 67 68 settings from old computer 67 troubleshooting add in cards 73 automated system 102 cards 73 CD drive 73 diskette drive 75 display 76 DVD drive 73 76 DVD...

Page 127: ...ting 28 adjusting modem 84 controls 28 muting 28 troubleshooting 88 W Windows key 24 25 Windows Product Key Code 3 Windows Update 59 wired Ethernet troubleshooting 76 working safely 16 Z Zip drive 65...

Page 128: ...122 Index 8512032 book Page 122 Tuesday January 9 2007 1 47 PM...

Page 129: ...8512032 book Page 123 Tuesday January 9 2007 1 47 PM...

Page 130: ...MAN PFL6 HW REF V R0 1 07 8512032 book Page 124 Tuesday January 9 2007 1 47 PM...

Reviews: