background image

CHAPTER 3: Using the Internet and Faxing

26

4

Double-click the message you want to read.

For more information about managing and organizing your e-mail messages, see the online help 
in your e-mail program.

Using Windows Fax and Scan

Windows Fax and Scan comes pre-installed with Windows Vista Business, Enterprise, or Ultimate Editions. 
You can connect your notebook to one local fax modem, although you can connect to multiple fax servers 
or devices on a network.
Your fax cover page, on which you can include all required information, is set up when you prepare to 
send the first fax from your notebook.
You cannot send or receive a fax using a cable or DSL modem by following these instructions. Many 
Internet services exist that let you send or receive faxes using a broadband connection.
Your dial-up modem cable must be installed before you can send and receive faxes. You cannot use your 
standard telephone modem to connect to the Internet while sending and receiving faxes.

Sending a Fax

Microsoft Fax lets you send and receive faxes using your dial-up modem.

To send a Fax:


1

Click 


(

Start

), 

All Programs

, then click 

Windows Fax and Scan

. Windows Fax and Scan opens.

2

If Windows Fax and Scan is in Scan view, click 

Fax

 in the lower left corner of the window.

3

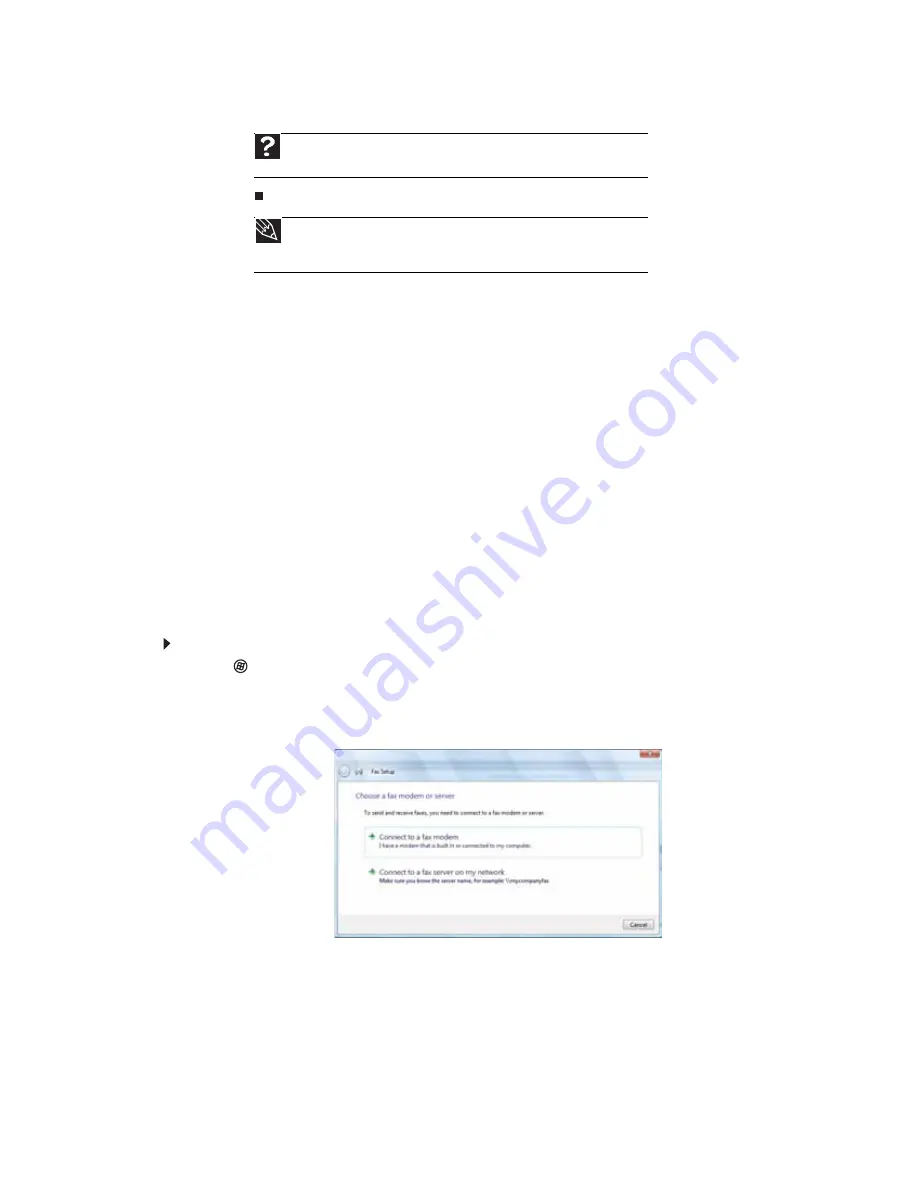
If you have never sent a fax on your notebook before, click 

New Fax

 on the toolbar. The 

Fax Setup 

window opens.

Help

For general information about using e-mail, click 

Start

, then click 

Help and 

Support.

 Type the 

e-mail

 in the 

Search Help 

box, then press E

NTER

.

Tip

To protect your notebook from viruses, check any e-mail attachments using 

McAfee SecurityCenter. For more information, see 

“Protecting your notebook from 

viruses” on page 59

.

Summary of Contents for MT6220b

Page 1: ... GATEWAY NOTEBOOK USERGUIDE ...

Page 2: ......

Page 3: ...ing for files 12 Using the Windows Search 12 Browsing for files and folders 13 Using Tablet PC 14 Calibrating your tablet 14 Using gestures 15 Using the pen 15 Using the Tablet Input Panel TIP 16 Working with documents 17 Creating a new document 17 Saving a document 17 Opening a document 18 Printing a document 18 Shortcuts 19 Chapter 3 Using the Internet and Faxing 21 Learning about the Internet 2...

Page 4: ...g 44 Ethernet Fast Ethernet or Gigabit Ethernet 44 Using a router 44 Setting up wired Ethernet network hardware 46 Wireless Ethernet networking 48 Wireless Ethernet standards 48 Using an access point 48 Setting up wireless Ethernet network hardware 49 Setting up your network connection 50 Naming the computers and the workgroup 50 Configuring the TCP IP protocol 50 Connecting to a wireless Ethernet...

Page 5: ...or pointing device settings 74 Changing mouse settings 74 Changing touchpad or pointing device settings 75 Adjusting tablet pen and input panel settings 75 Adding and modifying user accounts 76 Changing accessibility settings 77 Using the Ease of Access Center 77 Using voice recognition 78 Using the Windows Mobility Center 79 Chapter 8 Maintaining Your Notebook 81 Updating Windows 82 Using BigFix ...

Page 6: ...Contents iv ...

Page 7: ...CHAPTER1 1 Getting Help Using the Gateway Web site Using Help and Support Using online help ...

Page 8: ...hlighted some basic care and safety information to help you keep your notebook in good operating condition Gateway stands behind our value proposition to our customers to provide best of class service and support in addition to high quality brand name components at affordable prices If you ever have a problem our knowledgeable dedicated customer service department will provide you with fast consid...

Page 9: ...pe a word or phrase keyword in the Search Help box located at the top of any Help and Support screen then press ENTER For each search you receive a list of suggested topics To find the answer click the result that most closely matches your question Additional results may be available if the first list does not address your question Getting help for Windows Media Center If your notebook has Home Pr...

Page 10: ...ram You can access most online help information by selecting a topic from a Help menu or by clicking the Help button on the menu bar and selecting Online Support from the list Available information depends on the particular Help site to which you are taken Many provide FAQs Frequently Asked Questions a search feature articles about their software tutorials and forums where problems and issues are ...

Page 11: ...CHAPTER2 5 Using Windows Vista Using the Windows desktop Working with files and folders Searching for files Using Tablet PC Working with documents Shortcuts ...

Page 12: ...ht Other buttons on the taskbar represent programs that are running Click a program s button on the taskbar to open the program s window The Start button provides access to programs files help for Windows and other programs and computer tools and utilities Click the Start button then open a file or program by clicking an item on the menu that opens The Recycle Bin is where files folders and progra...

Page 13: ... Start menu opens showing you the first level of menu items 2 Click All Programs to see all programs files and folders in the Start menu If you click an item with a folder icon the programs files and subfolders appear 3 Click a file or program to open it Help For more information about the Windows Start menu click Start then click Help and Support Type Windows Start menu in the Search Help box the...

Page 14: ...r you double click the Local Disk C icon in the Computer window Every program window looks a little different because each has its own menus icons and controls Most windows include these items Help For more information about the desktop icons click Start then click Help and Support Type desktop icons in the Search Help box then press ENTER Shortcut Start Ö All Programs Ö right click programÖ Send ...

Page 15: ...drive To view the drives folders and files on your computer 1 Click Start then click Computer 2 Double click the drive icon Clicking the minimize button reduces the active window to a button on the taskbar Clicking the program button in the taskbar opens the window again Clicking the maximize button expands the active window to fit the entire notebook display Clicking the maximize button again res...

Page 16: ...uts on page 19 Copying and moving files and folders The skills you need to copy and move files are called copying cutting and pasting When you copy and paste a file or folder you place a copy of the file or folder on the Windows clipboard which temporarily stores it Then when you decide what folder you want the copy to go in the destination folder you paste it there When you cut and paste a file o...

Page 17: ... and put them in a trash can Eventually the trash can is emptied In Windows you throw away files and folders by first moving them to the Windows trash can called the Recycle Bin where they remain until you decide to empty the bin You can recover any file in the Recycle Bin as long as the bin has not been emptied To delete files or folders 1 In the Computer or Windows Explorer window click the file...

Page 18: ...ick Start then click Search The Search Results window opens 2 If you want to search on your notebook by file or folder name type in all or part of the file or folder name in the Search box in the top right of the window If you type all of the name Search will list all files and folders of that name If you type part of the name Search will list all of the file and folder names containing the letter...

Page 19: ...s desktop It is usually on a drive inside a folder that may be inside yet another folder and so on Windows drives folders and files are organized in the same way as a real file cabinet in that they may have many levels usually many more levels than a file cabinet in fact So you usually will have to search through levels of folders to find the file or folder that you need This is called browsing To...

Page 20: ...librate your pen for both portrait and landscape orientations Calibration ensures the accuracy of the pen and adjusts the screen s performance for different users If the on screen pointer does not seem to line up with the tip of the pen for example because someone else has used your tablet PC and adjusted it for their own use recalibrate it to your tapping patterns Recalibrate if you write with th...

Page 21: ...en they are available Tips Hold the pen the same way you hold a writing pen and steady your writing hand by resting it on the display surface Line up the pointer before you tap in cases where the pointer and pen point are out of alignment The screen reads the position of the pointer not the tap Store the pen in the tablet PC s pen holder Store extra pens in a drawer to avoid prolonged pressure on ...

Page 22: ...ss the TIP keyboard and writing pad by tapping or clicking the buttons near the top left of the window TIP tips Open a program for your input for example a word processing program or a Web form before using the writing pad or soft keyboard To adjust writing pad and keyboard settings click or tap the Tools then click or tap Options For security and accuracy when entering masked text such as passwor...

Page 23: ...nt To create a new document 1 Click Start All Programs Accessories then click WordPad Microsoft WordPad starts and a blank document opens 2 Begin composing your document Use the menus and toolbar buttons at the top of the window to format the document Saving a document After you create a document you need to save it if you want to use it later To save a document 1 Click File then click Save The Sa...

Page 24: ...tebook or have access to a network printer For more information about installing or using your printer see the printer documentation To print a document 1 Make sure that the printer is turned on and loaded with paper 2 Start the program and open the document 3 Click File then click Print The Print dialog box opens 4 Set the print options then click Print The document prints Help For more informati...

Page 25: ...window where you want to paste the object then press CTRL V Select multiple items in a list or window Click the first item press and hold down the CTRL key then click each of the remaining items Select multiple adjacent items in a list or window Click the first item in the list press and hold down the SHIFT key then click the last item in the list Permanently delete a file or folder Click the file...

Page 26: ...CHAPTER 2 Using Windows Vista 20 ...

Page 27: ...CHAPTER3 21 Using the Internet and Faxing Learning about the Internet Setting up an Internet account Using the World Wide Web Using e mail Using Windows Fax and Scan ...

Page 28: ... World Wide Web on page 23 An e mail program a program that lets you create send and receive e mail messages over the Internet Microsoft Outlook or Outlook Express was included with your notebook For more information see Using e mail on page 25 Setting up an Internet account Before you can view the information on the World Wide Web you need to set up an Internet account with an Internet service pr...

Page 29: ...sing a Web page display program called a browser You can use any of the commercially available Web browsers like Microsoft Internet Explorer or Netscape Navigator Web pages can contain text animations music and other multimedia features A group of related Web pages is called a Web site You can access Web sites to shop track investments read the news download programs and much more You can explore ...

Page 30: ...e how fast Web pages display Downloading files Downloading is the process of transferring files from a computer on the Internet to your notebook To download files or programs from a Web site 1 Connect to your Internet account 2 In the address bar type the address of the Web site that contains the file or program you want to download then press ENTER OR Click a link on a Web page to navigate to the...

Page 31: ...similar to this one Sending e mail To send e mail using Windows Mail 1 Connect to your Internet service provider 2 Click Start then click E mail Your default e mail program opens 3 Click Create Mail 4 Type the e mail address of the recipient you want to send e mail to in the To box 5 Type the subject of your e mail in the Subject box 6 Type the e mail message 7 When finished click Send Your e mail...

Page 32: ...r receive faxes using a broadband connection Your dial up modem cable must be installed before you can send and receive faxes You cannot use your standard telephone modem to connect to the Internet while sending and receiving faxes Sending a Fax Microsoft Fax lets you send and receive faxes using your dial up modem To send a Fax 1 Click Start All Programs then click Windows Fax and Scan Windows Fa...

Page 33: ...fax server The Choose a modem name screen opens 5 Type the name of the fax modem in the dialog box then click Next The Choose how to receive faxes screen opens 6 Click how you want to receive faxes then click Unblock when the The Security Alert window opens The New Fax window opens ...

Page 34: ...ox opens 8 Type your information in the spaces provided then click OK The New Fax dialog box opens 9 To enter optional dialing rule information click Dialing Rule and select a rule from the menu If you have not set up a dialing rule select New Rule from the menu The Location Information dialog box opens 10 Type your location information then click OK The Dialing Rules dialog box opens ...

Page 35: ...n use in place of the cover page templates that Microsoft Fax provides for you To create a cover page template you use the Fax Cover Page Editor On this template you insert information fields that automatically import values you enter in both the Send Fax Wizard and the Fax Configuration Wizard when you send your fax To set up your fax cover page template 1 Click Start All Programs then click Wind...

Page 36: ...r from programs To fax a scanned document or directly from most programs 1 Scan the document using the program for your scanner or open your document in the program it was created in 2 Click File then click Print The Print dialog box opens 3 Click the arrow button to open the Name list then click the Fax printer 4 Click Print The Send Fax Wizard opens 5 Complete the wizard by following the instruc...

Page 37: ...CHAPTER4 31 Using Multimedia Playing music and movies Creating audio files and music libraries Creating music CDs and video DVDs Creating and copying data discs Using Windows Media Center ...

Page 38: ...AVI WMV and MPEG formats For more information about using Windows Media Player click Help To play a file using Windows Media Player 1 Click Start All Programs then click Windows Media Player Windows Media Player opens 2 Click Library then double click the media file you want to play Shortcut Start Ö Computer Ö find the file Ö double click the file Media library Playback controls ...

Page 39: ...at use a laser to read and write data CDs and DVDs are all optical discs Playing an optical disc using Windows Media Player Use Windows Media Player to listen to CDs or watch movies on DVDs For more information about using Windows Media Player click Help To play an optical disc 1 Make sure that the speakers are turned on or headphones are plugged in and that the volume is turned up 2 Insert an opt...

Page 40: ...with the disc click Play Windows Media Player opens and begins playing the disc If Windows Media Player does not open automatically click Start All Programs then click Windows Media Player Windows Media Player opens 4 If the disc is not already playing click play Video screen Playback controls Playlist ...

Page 41: ...istening enjoyment including WAV MP3 and WMA files Recording audio files Sound recorder is a simple Windows program that lets you record and play audio files For information about playing audio files see Playing audio and video files on page 32 To record an audio file 1 Plug a microphone into the microphone jack on your notebook For the location of the microphone jack see your notebook s Reference...

Page 42: ...y compressing high fidelity music into compact files without noticeably sacrificing quality WMA files end in the file extension WMA and MP3 files end in the file extension MP3 To create WMA or MP3 files 1 Click Start All Programs then click Windows Media Player Windows Media Player opens 2 Insert a music CD into your optical disc drive 3 Click the Rip tab The Rip screen opens 4 Click to clear the ...

Page 43: ...ou are connected to the Internet WMA and MP3 files that you download are automatically added to your music library Editing track information After you add a WMA or MP3 file to your music library you can edit the track s tags informational fields To edit track information 1 Click Start All Programs then click Windows Media Player Windows Media Player opens 2 Click the Library tab 3 Right click the ...

Page 44: ...e Burn tab then click and drag songs that you want to burn to CD from the Library to the Burn List 4 Click Start Burn The music is recorded onto the blank CD Important We recommend that you do not use your notebook for other tasks while creating CDs or DVDs If you record copyrighted material on a CD or DVD you need permission from the copyright owner Otherwise you may be violating copyright law an...

Page 45: ...e Windows DVD Maker introduction window opens 3 Click Choose Photos and Videos The main screen opens Important We recommend that you do not use your notebook for other tasks while creating CDs or DVDs If you record copyrighted material on a CD or DVD you need permission from the copyright owner Otherwise you may be violating copyright law and be subject to payment of damages and other remedies If ...

Page 46: ...box opens 5 Find and select the videos you want to add to the video DVD then click Add The videos are added to the video list and a graphic in the lower left corner of the window shows you how much disc capacity will be used 6 Click Next The Ready to burn disc dialog box opens ...

Page 47: ... compatible with all operating systems The instructions below show you how to burn a disc using the Mastered format which can be read by all personal computers regardless of the operating system installed Creating a data disc To create a data disc 1 Insert a blank writable optical disc into your optical disc drive The Autoplay dialog box opens 2 Click Burn files to disc The Prepare this blank disc...

Page 48: ...click Express setup then click OK The Windows Media Center s main screen opens 3 Use the use the navigation buttons on your keyboard to select a Media Center menu option then press ENTER TV Movies lets you play TV programs you have recorded or play a DVD Online Media lets you play online games Tasks lets you set up your display and media types shut down or restart your notebook burn an optical dis...

Page 49: ...g Your Notebook Introduction to Networking Wired Ethernet networking Wireless Ethernet networking Setting up your network connection Testing your network Adding a printer to your network Sharing resources Using the network ...

Page 50: ...ilable at three different speeds Standard Ethernet runs at 10 Mbps Fast Ethernet runs at 100 Mbps and Gigabit Ethernet runs at 1000 Mbps Most home networks are built using Standard or Fast Ethernet components Business networks are typically built using Fast or Gigabit Ethernet components To create a wired Ethernet network you or your electrician must install special Ethernet cables in your home or...

Page 51: ...f the network equipment When buying your router be sure the model includes everything your network needs including Internet security features such as a firewall to protect your network from unwanted intruders 4 port switch to eliminate the need for additional network hardware DHCP server dynamic IP address assignment to automatically configure network and IP addresses Tip To add the ability to acc...

Page 52: ...5 unshielded twisted pair cable approximately 1 4 inch diameter with a thin outer jacket containing eight color coded wires and equipment compatible with this type of cable This type of cable is equipped with RJ 45 connectors like a large telephone jack connector but with eight pins on each end Category 5 cables are available in two different types straight through cables used to connect computers...

Page 53: ...e router except the WAN port The WAN port is used to connect the router to the DSL or cable modem and is identified by a label or a switch Plug the other end of the cable into the network connector on the computer As each computer is connected to the router the corresponding green indicator should light on the front of the router indicating a good connection 4 Repeat Step 3 for each computer on th...

Page 54: ...s Compatibility can also be an issue Take the following into consideration when you purchase wireless equipment Using an access point An access point is a small electronic device that serves as the central control point for your network You connect your modem to the access point set up a network connection then browse the Internet send e mail share files and folders with other networked computers ...

Page 55: ... wireless Ethernet network sends and receives information through radio waves This means that another computer outside your network can intercept the radio waves and take control of your network If you do not set up security for your network a hacker can gain access to your Internet connection to send spam e mail and to your hard drive to download viruses or view your personal data like credit car...

Page 56: ...no blank spaces The workgroup name must be the same for all computers in your network workgroup and the name must be different than any computer name on your network 7 Click OK When you are prompted to restart your computer click Restart Now Configuring the TCP IP protocol A networking protocol is a language computers use to talk to each other One of several available protocols must be set up on e...

Page 57: ...k and Sharing Center window opens 0 Important Each computer on your network needs a unique Computer Name All the computers on your network need the same Workgroup Name You may have already named your computer and workgroup the first time you turned on your computer Help For more information about connecting to your network click Start then click Help and Support Type the following keywords in the ...

Page 58: ... and Sharing Center Choose Diagnose and Repair on the left of the window Take any actions suggested If you are using a wired Ethernet network check all physical cable connections If you are using a wireless Ethernet network make sure that your access point is plugged in and compare the status lights on the front of the access point with the patterns described in the access point documentation Comp...

Page 59: ...example hard drives and DVD drives and printers among the computers connected to the network After the drives and printers on each network computer are shared you can access them as though they were attached directly to your computer Then you can View a network drive Open and copy files stored on other network computers Print documents on network printers Sharing drives or folders To share drives ...

Page 60: ... or folder that you want to un share then click Share 3 Click Advanced Sharing then click Share this folder or drive to uncheck the box 4 Click Apply then click OK Sharing printers To share printers 1 Click Start then click Control Panel The Control Panel window opens 2 Under Hardware and Sound click Printer The Printers window opens 3 Right click the name and icon of the printer you want to share...

Page 61: ...older can be accessed as if the drive were attached directly to the computer For example a shortcut is created on computer 2 to the Documents folder on computer 1 To access the Documents folder on computer 1 from computer 2 double click shortcut icon To map a network drive 1 Locate the drive or folder by completing the steps in Viewing shared drives and folders on page 55 2 Right click the drive o...

Page 62: ...ant to copy the file to then click Paste Printing files across the network To print files across the network 1 Open the file you want to print then click Print 2 Click the arrow button to open the printer name list then click the network printer 3 Click Print Important Before you can print a file across the network you must install the driver for the printer on the computer you are sending the fil...

Page 63: ...CHAPTER6 57 Protecting Your Notebook Hardware security Data security Security updates Traveling securely ...

Page 64: ... You can buy a cable lock at most electronics stores and many department stores For the location of the Kensington lock slot see your reference guide CompuTrace If someone steals your notebook you may be able to get it back by using tracking software Your notebook may be enabled to take advantage of Computrace Complete a service you can purchase to help find your notebook if it is stolen This prog...

Page 65: ...ount You can assign a password to each account so only the account owner can access files in the Documents folder When you set up a user account you can also limit the programs that a user can install or run Protecting your notebook from viruses A virus is a program that attaches itself to a file on a computer then spreads from one computer to another Viruses can damage data or cause your notebook...

Page 66: ...owing components McAfee VirusScan is an anti virus subscription service You can use VirusScan to protect your notebook from viruses worms Trojan horses and hybrid attacks McAfee Personal Firewall blocks unwanted inbound and outbound Internet traffic to prevent hacker attacks McAfee Privacy Service protects against online identity theft by blocking the transmission of personally identifiable inform...

Page 67: ...o update your virus definitions 1 Make sure that you are connected to the Internet 2 Click Start All Programs McAfee then click McAfee SecurityCenter McAfee SecurityCenter opens 3 Click Update The McAfee SecurityCenter checks for updates Configuring McAfee VirusScan You can configure McAfee VirusScan to perform a virus scan at certain times and on certain drives on your notebook You can also confi...

Page 68: ...s Configuration screen opens 4 Click the grey Virus protection is enabled bar to expand that area then click Advanced 5 Click the type of scan you want to configure then set the options for that scan type 6 Click OK Using McAfee Parental Controls You can use McAfee Parental Controls to restrict your children from accessing specific Web sites or spending too much time on the Internet ...

Page 69: ...tyCenter opens 2 Click Parental Controls then click Configure in the services area The Parental Controls Configuration screen opens 3 Click the grey Parental controls are disabled bar to expand that area then click Advanced 4 Click the control you want to configure then follow the instructions for modifying that control 5 Click OK ...

Page 70: ...y the Windows Update settings Windows Firewall to prevent outsiders from accessing the information on your notebook Windows Defender to scan your notebook for malicious or unwanted software that may have been placed on your notebook either from an Internet web site or from other programs that you have installed Internet Options to prevent certain programs from running on your notebook that might b...

Page 71: ...osoft web site to see if any updates are available 4 Click Install Updates to download and install updates on your notebook These updates include security updates Install Extras to download additional Windows software for your notebook Scheduling automatic updates Use the Windows Security Center to schedule automatic updates Windows can routinely check for the latest updates for your notebook and ...

Page 72: ...ebook for problems and conflicts It automatically gathers information about the latest bugs security alerts and updates from BigFix sites on the Internet Whenever BigFix detects a problem it alerts you by flashing the blue taskbar icon To fix the problem click on that icon to open BigFix Traveling securely For information about traveling securely with your notebook see Traveling with Your Notebook...

Page 73: ...tomizing Windows Changing screen settings Changing system sounds Changing mouse touchpad or pointing device settings Adding and modifying user accounts Changing accessibility settings Using the Windows Mobility Center ...

Page 74: ...such as icons and menu bars can be displayed on the monitor To change the color depth or screen resolution 1 Click Start All Programs Accessories then click Windows Mobility Center The Windows Mobility Center opens 2 Click Change display settings The Display Settings dialog box opens 3 To change the color depth click the Colors list then click the color depth you want Low 8 bit Medium 16 bit Highe...

Page 75: ...ppearance dialog box opens 2 Click one of the color choices and adjust the Color intensity slider then click OK Your new color settings are applied 3 For even more color adjustment options such as color schemes shading effects and screen fonts click Start Control Panel then under Appearance and Personalization click Change the color scheme Change the setting you want then click OK To change the Wi...

Page 76: ...e Screen saver list then click the screen saver you want to use An example of the screen saver plays on the preview screen To change the settings for the screen saver click Settings change the settings then click OK To see a full screen preview of the screen saver click Preview To change the length of computer inactivity time that passes before the screen saver starts change the number of minutes ...

Page 77: ...ock tickers Slide shows and puzzles Calendars and contact lists Sticky notes To add a gadget 1 Click the at the top of the Sidebar or right click in an empty area of the Sidebar and click Add Gadgets The gadget selection window opens 2 Click the gadget you want then drag it to the Sidebar To configure a gadget 1 In the Sidebar right click the gadget then click Options The gadget s configuration wi...

Page 78: ... Click the control you want to operate Configuring the gadget Sidebar You can change the appearance and behavior of the Sidebar To change Sidebar properties 1 Right click in an empty area of the Sidebar then click Properties The Windows Sidebar Properties dialog box opens You can change Whether the Sidebar starts each time Windows starts Whether the Sidebar is always on top of other windows always...

Page 79: ...dows Mobility Center The Windows Mobility Center opens 2 Click Change audio settings The Sound dialog box opens 3 Click the Sound Scheme list then click the sound scheme you want OR Click an event in the Program list then click the Sounds list and click the sound file you want associated with the event If you do not see the sound file in the Sounds list click Browse and find the file in the approp...

Page 80: ... under Hardware and Sound click Mouse The Mouse Properties dialog box opens 2 Change the settings you want You can Switch the left and right buttons Change the double click speed Change the pointer appearance and speed Change the mouse wheel actions 3 Click OK to save your changes Help For more information about mouse settings click Start then click Help and Support Type mouse settings in the Sear...

Page 81: ...ut panel settings 1 Click or tap Start All Programs Accessories then click or tap Windows Mobility Center The Windows Mobility Center window opens 2 Click or tap Change Tablet PC settings The Tablet PC Settings dialog box opens 3 To change the tablet options click or tap a tab then change an option 4 To change a pen option click or tap the Other tab then click or tap Go to Pen and Input Devices Cl...

Page 82: ...are not accessible from other accounts unless the files are stored in the Shared Documents folder The Shared Documents folder is accessible from all accounts on that computer and from other computers on the network To add delete or modify user accounts 1 Click Start Control Panel then under User Accounts and Family Safety click Add or remove user accounts To create a new account click Create a new...

Page 83: ...ick the user account that you want to use Changing accessibility settings Your notebook can be a powerful tool but it may be less useful to you if items on the screen are difficult to see or if the touchpad is difficult to control Windows has several tools that help you use it more easily Using the Ease of Access Center Use the Ease of Access Center to change several system display settings To use...

Page 84: ...r notebook or use the built in microphone available on select notebooks and configure Windows to create typed text from your voice To set up voice recognition 1 Click Start Control Panel Ease of Access then click Speech Recognition Options The Speech Recognition Options window opens 2 Click one of the following settings to start setting up speech recognition Start Speech Recognition turns speech r...

Page 85: ...s for the current power plan For more information about adjusting the power plan see your notebook Reference Guide Slide the brightness slider to adjust the brightness level of the LCD panel Click Change audio settings to open the Sound dialog box and modify your speaker and microphone settings For more information see Changing system sounds on page 73 Click Mute to turn off the sound to your spea...

Page 86: ...x and modify the screen resolution and colors for the LCD panel or a connected monitor For more information see Changing screen settings on page 68 Click Connect display to connect an external display to your notebook Click Change synchronization settings to synchronize your notebook s files with their counterparts on a server or desktop computer For more information about synchronizing your noteb...

Page 87: ...CHAPTER8 81 Maintaining Your Notebook Updating Windows Using BigFix Managing hard drive space Scheduling maintenance tasks Moving from your old computer ...

Page 88: ... and conflicts It automatically gathers information about the latest bugs security alerts and updates from BigFix sites on the Internet Whenever BigFix detects a problem it alerts you by flashing the blue taskbar icon To fix the problem click on that icon to open BigFix To start BigFix 1 Click Start All Programs Accessories System Tools then click BigFix 2 To learn more about BigFix click Help the...

Page 89: ...isk Cleanup dialog box opens 2 Click one of the options My files only cleans only the folders for the currently logged in user Files from all users on this computer cleans all folders The Disk Cleanup dialog box opens 3 Click to select the types of files you want to delete then click OK The types of files you indicated are deleted Shortcut Start Ö Computer Ö right click drive Ö Properties Ö Disk C...

Page 90: ...ormation into pieces and stores them in different places on the hard drive This is called fragmentation and it is normal In order for your notebook to use a file Windows must search for the pieces of the file and put them back together This process slows the hard drive performance Disk Defragmenter organizes the data on the drive so each file is stored as one unit rather than as multiple pieces sc...

Page 91: ...sc if you have a recordable drive Use a backup device such as a recordable disc drive to do a complete hard drive backup To back up files 1 Click Start then click Computer The Computer window opens 2 Right click the drive that you want to back up click Properties then click the Tools tab 3 Click Backup Now then click Run a file backup now 4 Follow the on screen instructions to select a backup stor...

Page 92: ...your old computer uses Windows XP or Windows Vista While using Windows Easy Transfer you will not be able to run other tasks on the computers To move files and settings from your old computer 1 If you want to transfer program settings to your new notebook install those programs on the new notebook before running Windows Easy Transfer Windows Easy Transfer copies only the software s settings not th...

Page 93: ...e or Windows 2000 double click the My Computer icon on the desktop Go to the next step 2 Double click the C drive icon 3 Double click the My Documents folder The My Documents window opens and displays many of your saved personal data files 4 Copy your personal data files to removable media or to another computer on your network Finding other files Use Windows Find or Search to locate other persona...

Page 94: ...arinthismanual Forthelatestproductupdates consulttheGatewayWebsiteatwww gateway com InnoeventwillGatewaybeliablefordirect indirect special exemplary incidental orconsequentialdamagesresultingfromanydefectoromissioninthismanual evenifadvisedofthepossibilityofsuchdamages Intheinterestofcontinuedproductdevelopment Gatewayreservestherighttomakeimprovementsinthismanualandtheproductsitdescribesatanytime...

Page 95: ... shortcuts 8 adjusting settings 68 changing color scheme 69 selecting screen saver 70 using 6 using Start menu 7 DHCP 50 disconnecting from Internet 22 Disk Cleanup 83 Disk Defragmenter 84 display using screen saver 70 documentation Gateway Web site 2 help 3 Help and Support 3 online help 4 documents creating 17 opening 18 printing 18 saving 17 downloading files 24 drivers updating 2 drives backin...

Page 96: ... defragmenting 84 deleting files 83 using Scheduled Task Wizard 86 virus protection 59 mapping network drives 55 maximize button 9 McAfee Personal Firewall Plus 60 McAfee Privacy Service 60 McAfee SecurityCenter 60 scanning for viruses 60 starting 60 updating 61 McAfee Spamkiller 60 McAfee VirusScan 60 Media Center see Windows Media Center Media Player 32 menu bar 9 messages checking e mail 25 sen...

Page 97: ...sk entering 50 support using 2 T Tablet PC Input Panel 16 taskbar 6 TCP IP protocol configuring 50 telephone canceling fax 30 installing Fax 26 receiving and viewing faxes 30 sending fax 30 sending faxes from program 30 sending scanned image fax 30 setting up fax cover page template 30 testing network 53 tips pen 15 title bar 8 transferring files from Internet 24 files from old computer 86 87 sett...

Page 98: ...Index 92 workgroup naming 50 World Wide Web WWW 23 downloading files 24 writing 15 Z Zip drive 85 ...

Page 99: ......

Page 100: ...MAN GW UK PTB USR GDE V R0 1 07 ...

Reviews: