background image

4

Chapter 1: Checking Out Your Gateway E-6100 Computer

www.gateway.com

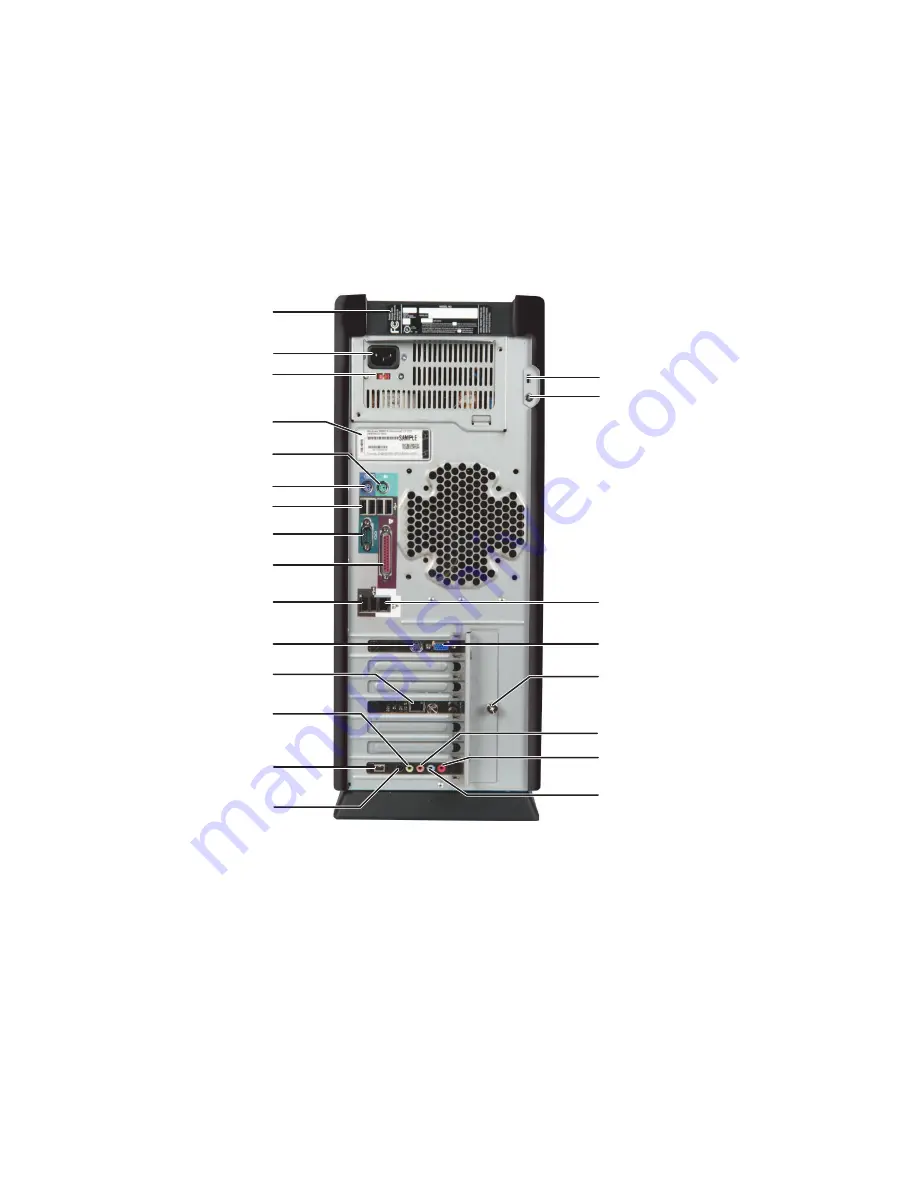
Back

Your computer may contain any of the following components.

Modem jack

(optional)

Rear out

(Line out 2) jack

(optional)

Monitor port

Parallel port

Serial port

USB ports

PS/2 keyboard port

PS/2 mouse port

Voltage switch

Power connector

Audio input (Line in) jack
(optional)

Microphone jack (optional)

Headphone/analog

speakers (Line out 1) jack

(optional)

Case cover 
shipping screw

USB ports

Ethernet 
(network) jack

Add-in card retention 
thumbscrew

Digital speakers (Digital out) 
jack (optional)

IEEE 1394 port

(optional)

Kensington lock slot

TV jack

Product label

Microsoft Certificate

of Authenticity

Summary of Contents for E-6100

Page 1: ...Your Gateway Computer Customizing Troubleshooting E 6100 user s guide ...

Page 2: ......

Page 3: ...our computer 17 Working safely 18 Reducing eye strain 18 Setting up your computer desk and chair 19 Setting up your computer and computer accessories 19 Sitting at your computer 20 Avoiding discomfort and injury from repetitive strain 20 3 Getting Help 21 HelpSpot 22 Searching for a topic 24 HelpSpot videos 25 Do More With Gateway 26 Online help 27 Gateway Web site 28 Using eSupport 29 4 Using Dri...

Page 4: ...eyboard 67 Cleaning the monitor screen 67 Cleaning the mouse 68 Power management 70 Using power saving modes 71 Changing power settings 71 Changing the power scheme 72 Changing advanced power settings 73 Activating and using Hibernate mode 75 Setting up an uninterruptible power supply 76 6 Restoring Software 79 Using the Restoration CDs 80 Reinstalling device drivers 81 Updating device drivers 83 ...

Page 5: ...ion jumper 126 9 Troubleshooting 127 Safety guidelines 128 First steps 129 Software support tools 130 Troubleshooting 131 Add in cards 131 CD or DVD drives 131 Cleaning CDs and DVDs 133 Computer 133 Diskette drive 134 File management 135 Hard drive 136 Internet 138 Keyboard 139 Memory 140 Modem dial up 140 Monitor 145 Mouse 147 Power 148 Printer 148 Sound 150 Telephone support 151 Before calling G...

Page 6: ...echnical Reference 155 Features 156 System board layout 157 Section 1 158 Section 2 159 BIOS configuration jumper settings 160 System board specifications 161 B Safety Regulatory and Legal Information 163 Index 173 ...

Page 7: ...way E 6100 computer Read this chapter to learn How to identify the features of your Gateway computer How to locate your computer s model and serial number How to locate the Microsoft Certificate of Authenticity How to locate the specifications for your computer What accessories are available for your computer ...

Page 8: ...m Front Your computer may contain any of the following components 3 5 inch drive bay cover CD DVD recordable drive CD DVD eject button Diskette eject button Diskette drive Power button USB ports IEEE 1394 port optional 5 25 inch drive bay cover 5 25 inch drive bay cover ...

Page 9: ...rmation see Using the diskette drive on page 32 IEEE 1394 port optional Plug an IEEE 1394 also known as Firewire or i Link device such as a digital video camera into this 4 pin IEEE 1394 port Power button Press this button to turn the power on or off You can also configure the power button to operate in Standby Resume mode or Hibernate mode For more information on changing the power button setting...

Page 10: ...t USB ports PS 2 keyboard port PS 2 mouse port Voltage switch Power connector Audio input Line in jack optional Microphone jack optional Headphone analog speakers Line out 1 jack optional Case cover shipping screw USB ports Ethernet network jack Add in card retention thumbscrew Digital speakers Digital out jack optional IEEE 1394 port optional Kensington lock slot TV jack Product label Microsoft C...

Page 11: ...operating in an environment such as this the voltage switch should be moved to 230 Microsoft Certificate of Authenticity The Microsoft Certificate of Authenticity COA contains your Windows product key PS 2 mouse port Plug a Personal System 2 PS 2 mouse into this port PS 2 keyboard port Plug a PS 2 keyboard into this port USB ports USB 1 1 USB 2 0 Plug USB Universal Serial Bus devices such as a mou...

Page 12: ...ck to this slot Case cover shipping screw Remove this screw before opening the case Ethernet network jack Plug a 10 100 Ethernet network cable or a device such as a DSL or cable modem into this jack Monitor port Plug a monitor into this port Add in card retention thumbscrew Remove this screw when adding or replacing add in cards Microphone jack optional Plug a microphone into this jack This jack i...

Page 13: ...assistance Gateway serial number You can locate the Gateway serial number Printed on a white sticker on the front or top of your computer case Printed on the customer invoice that came with your computer The invoice also contains your customer ID number Displayed in HelpSpot in Windows XP Click Start Help and Support then click View product serial number Important The labels shown in this section ...

Page 14: ... Gateway E 6100 Computer www gateway com Microsoft Certificate of Authenticity The Microsoft Certificate of Authenticity label found on the back or side of your computer case includes the product key code for your operating system ...

Page 15: ...rd drive size go to the My Computer Info link in HelpSpot or visit Gateway s eSupport page at support gateway com The eSupport page also has links to additional Gateway documentation and detailed specifications In Windows XP view your computer s serial number or check your specifications by clicking Start Help and Support then clicking My Computer Info ...

Page 16: ...1 Checking Out Your Gateway E 6100 Computer www gateway com You can also find out more about your computer at the Gateway eSupport site Visit support gateway com For more information see Using eSupport on page 29 ...

Page 17: ...u take pictures that you can view and edit on your computer A digital video camera lets you take videos and pictures that you can view and edit on your computer A scanner copies an image such as a graphic or document then stores the copy in a file You can attach your digital photographs or scanned images to e mail messages or post them on a Web site Printers You can attach almost any type of print...

Page 18: ...back up your entire system you probably need a tape backup TBU drive TBU drives like tape recorders use magnetic tape cartridges to store data Tape drive cartridges can store 2 GB 20 GB 40 GB 130 GB or more of data If you want to increase your internal storage space try adding a second hard drive or replacing your existing hard drive with a larger drive For more information about installing a larg...

Page 19: ...ting Up Your Computer This chapter provides basic information about your Gateway computer Read this chapter to learn how to Use your computer safely Start and turn off your computer Restart reboot your computer ...

Page 20: ...your computer during a power failure Although you cannot run your computer for an extended period of time with a UPS a UPS lets you run your computer long enough to save your work and shut down your computer normally For more information see Setting up an uninterruptible power supply on page 76 Warning High voltages can enter your computer through both the power cord and the modem connection Prote...

Page 21: ...ing the setup poster 2 Turn on the monitor 3 Turn on your computer and speakers 4 If you are starting your computer for the first time follow the on screen instructions to set up your computer 5 Turn on any peripheral devices such as printers or scanners and see the documentation that came with the device for setup instructions ...

Page 22: ...ns off your computer Tips Tricks When you turn off your computer certain components in the power supply and system board remain energized In order to remove all electrical power from your computer unplug the power cord and modem cable from the wall outlets We recommend disconnecting the power cord and modem cable when your computer will not be used for long periods Important If for some reason you...

Page 23: ...operation you may have to restart reboot your computer To close unresponsive programs and restart your computer 1 Press CTRL ALT DEL then click Task Manager The Task Manager window opens 2 Click the Applications tab then click the program that is not responding 3 Click End Task 4 If your computer does not respond turn it off wait ten seconds and turn it on again Important If your computer does not...

Page 24: ...o you can avoid glare on your screen and light shining directly into your eyes Reduce glare by installing shades or curtains on windows and by installing a glare screen filter on your monitor Use soft indirect lighting in your work area Do not use your computer in a dark room Avoid focusing your eyes on your computer screen for long periods of time Look away from your computer occasionally and try...

Page 25: ...the keyboard is at or slightly below the level of your elbow This position lets your shoulders relax while you type Adjust the chair height adjust the forward tilt of the seat or use a footrest to distribute your weight evenly on the chair and relieve pressure on the back of your thighs Adjust the back of the chair so it supports the lower curve of your spine You can use a pillow or cushion to pro...

Page 26: ...ack Sit with your back straight so your knees hips and elbows form right angles when you work Take breaks to stand and stretch your legs Avoid twisting your torso or neck Avoiding discomfort and injury from repetitive strain Vary your activities to avoid excessive repetition Take breaks to change your position stretch your muscles and relieve your eyes Find ways to break up the work day and schedu...

Page 27: ...ing Help This chapter tells you about additional information resources available to help you use your computer Read this chapter to learn how to access HelpSpot Do More With Gateway Online help Gateway Web site ...

Page 28: ...cover and use the many features of your Gateway computer HelpSpot also has an area called Who to contact for help that helps you find the right resource at Gateway to answer your questions or help solve your problems To start HelpSpot in Windows XP Click Start then click Help and Support HelpSpot opens If this is the first time you have started HelpSpot you may experience a brief wait while HelpSp...

Page 29: ...You can find help information by clicking a link performing a search or browsing the index To learn about using your Gateway computer your mouse and other tasks click the Using your Gateway computer link on the HelpSpot main page ...

Page 30: ... Full text Search Matches These topics are located in HelpSpot and contain the words you entered in the Search box Microsoft Knowledge Base These topics are located on the Microsoft Web site and contain the words you entered in the Search box You must be connected to the Internet to search for and access these topics Gateway com Search These topics are located on the Gateway Web site and contain t...

Page 31: ... topic click the topic name in the Search Results list HelpSpot videos HelpSpot contains several short videos to help introduce you to new concepts or show you how to perform various tasks To play a HelpSpot video To watch a video in HelpSpot click Video and online tutorials on the HelpSpot home page then click a video title The video plays ...

Page 32: ...Gateway computer for digital music digital photography digital video gaming and other programs To access Do More With Gateway in Windows XP click Start then click Do More With Gateway Click the topics listed on the left side of the page to learn more about the software already installed on your computer as well as partnerships and special offers available through Gateway ...

Page 33: ...earn how to perform a task while you are using the program You can access most online help information by selecting a topic from a Help menu or by clicking a Help button You can search for information by viewing the help contents checking the index searching for a topic or keyword or browsing through the online help ...

Page 34: ...b site Gateway s online support is available 24 hours per day 7 days per week and provides the most current drivers product specifications tutorials and personalized information about your system Visit the Gateway eSupport Web site at support gateway com ...

Page 35: ...he reference area to locate an article specific to the question you have The Tutorials link lets you access an extensive library of how to articles and videos on topics such as making audio CDs and installing a hard drive Downloads tab The Downloads tab provides the latest software updates for BIOS and driver upgrades By entering your serial number you get drivers specific to your system Click All...

Page 36: ...30 Chapter 3 Getting Help www gateway com ...

Page 37: ...ves and Multimedia This chapter provides information on using the multimedia capabilities of your computer Read this chapter to learn how to Use the diskette drive Use the CD or DVD drive Record your own CDs and DVDs ...

Page 38: ...te drive uses 3 5 inch diskettes sometimes called floppy disks Diskettes are useful for storing files or transferring files to another computer Warning Do not expose diskettes to water or magnetic fields Exposure could damage the data on the diskette Eject button Activity light Diskette drive ...

Page 39: ... To access a file on the diskette in Windows XP click Start then click My Computer Double click the drive letter for example the A drive then double click the file name OR To access a file on the diskette in Windows 2000 double click the My Computer icon the drive letter for example the A drive then double click the file name 3 To remove the diskette make sure that the drive activity light is off ...

Page 40: ...D RW drive Install programs play audio CDs access data and create CDs You can only write to a CD R disc once You can write to and erase CD RW discs multiple times For more information see Creating CDs and DVDs on page 37 DVD drive Install programs play audio CDs play DVDs and access data DVD RAM RW Drive Install programs play audio CDs play DVDs access data and record video and data to DVD RAM DVD...

Page 41: ... Using the CD or DVD drive www gateway com Inserting a CD or DVD Important Some music CDs have copy protection software You may not be able to play these CDs on your computer CD or DVD drive Eject button ...

Page 42: ... DVD drive tray opens 2 Place the disc in the tray with the label facing up 3 Press the eject button again The CD or DVD drive tray closes Important When you place a single sided disc in the tray make sure that the label side is facing up If the disc has two playable sides place the disc so the name of the side you want to play is facing up ...

Page 43: ...r for other tasks while creating CDs or DVDs Important If you record copyrighted material on a CD or DVD you need permission from the copyright owner Otherwise you may be violating copyright law and be subject to payment of damages and other remedies If you are uncertain about your rights contact your legal advisor Important Some CDs have copy protection software You cannot create MP3 files from t...

Page 44: ... 4 Using Drives and Multimedia www gateway com Copying a CD or DVD To copy a music CD data CD or data DVD 1 Click Start All Programs Burn a CD or Data DVD Nero Programs then click Nero Express Nero Express opens ...

Page 45: ...to copy into your recordable drive If you have two drives insert the disc in your non recordable drive 4 Click the arrow to open the Source drive list then click the drive that contains your source disc 5 Click the arrow to open the Destination drive list then click your recordable drive 6 If you have two CD or DVD drives click to select the Quick copy check box ...

Page 46: ...40 Chapter 4 Using Drives and Multimedia www gateway com 7 Click Burn The Nero s Title and CD Database dialog box opens ...

Page 47: ...opies the tracks from the source disc to the blank recordable disc 9 If you are using one drive a message prompts you to insert a CD or DVD Remove the source CD or DVD insert a blank writable CD or DVD then wait for the message box to close Nero Express copies the files from your hard drive to the writable CD or DVD 10 When a message tells you that the recording is complete click OK 11 Click Next ...

Page 48: ...D 1 Click Start All Programs Burn a CD or Data DVD Nero Programs then click Nero Express Nero Express opens 2 Insert a blank writable CD or DVD into your recordable drive 3 If a dialog box opens click Take no action then click OK 4 Move your pointer over Data then click Data Disc The Disc Content screen opens ...

Page 49: ... that contains the files you want to add You can click the arrow to open the Location list then click a drive or folder or you can click folders in the Name list Press and hold the CTRL key to select multiple files 7 Click Add You can continue to select files and click Add 8 After you select all your files click Finished ...

Page 50: ...0 Click the arrow to open the Current recorder list then click your recordable drive 11 Click Burn The Burning Process screen opens and Nero Express burns the files to the CD 12 When a message tells you that the recording is complete click OK 13 Click Next to return the main Nero Express screen 14 Click Exit ...

Page 51: ...rd drive 1 Click Start All Programs Burn a CD or Data DVD Nero Programs then click Nero Express Nero Express opens 2 Insert the music CD that has the tracks you want to copy into your CD drive 3 If an Audio CD dialog box opens click Take no action then click OK 4 Click More The Nero Toolbar opens ...

Page 52: ...46 Chapter 4 Using Drives and Multimedia www gateway com 5 Click the Save Tracks icon The Nero s Title and CD Database dialog box opens 6 Wait until the dialog box closes OR Click Cancel ...

Page 53: ...button to open the Output file format list then click the format you want for the saved tracks 9 To record all the tracks click GO The recording process begins OR To record selected tracks hold down the CTRL key click the tracks you want then click GO The recording process begins 10 After the recording is complete click Close ...

Page 54: ...sic then click one of the following options Audio CD to create a music CD that will play on all CD players Nero Express converts MP3 and WMA files to Audio CD format Audio and Data CD to create a CD that contains tracks and data files You can play the music files in a CD player and you can view all files on your computer MP3 Disc to create a CD using MP3 files You can play the CD on your computer ...

Page 55: ...49 Creating CDs and DVDs www gateway com The screen you use to add files opens ...

Page 56: ...e folder that contains the files you want to add You can click the arrow to open the Location list then click a drive or folder or you can click folders in the Name list Press and hold the CTRL key to select multiple files 7 Click Add You can continue to select files and click Add 8 After you select all your files click Finished ...

Page 57: ...the arrow to open the Current recorder list then click your recordable drive 11 Click Burn The Burning Process screen opens and Nero Express burns the files to the CD 12 When a message tells you that the recording is complete click OK 13 Click Next to return the main Nero Express screen 14 Click Exit ...

Page 58: ...r Designer to create labels for your CDs and DVDs covers for your CD and DVD cases booklets to include with your CDs and DVDs and more Nero DriveSpeed to control CD or DVD drive read speed and spin down time Nero InfoTool to find out about your drive capabilities and your computer configuration To use these programs click Start All Programs Burn a CD or Data DVD Nero Programs then click the progra...

Page 59: ...sic information about maintaining your computer hardware and software Read this chapter to learn how to Care for your computer Create an emergency startup diskette Protect your computer from viruses Manage hard drive space Back up files Clean your computer ...

Page 60: ... and can melt or warp in high temperatures Damage due to either extreme is not covered by your warranty As a general rule your computer is safest at temperatures that are comfortable for you Keep all liquids away from your computer When spilled onto computer components almost any liquid can result in extremely expensive repairs that are not covered under your warranty Avoid dusty or dirty work env...

Page 61: ...o check files and programs that are on diskettes attached to e mail messages or downloaded from the Internet Checking all programs for viruses before installing them Disabling macros on suspicious Microsoft Word and Excel files These programs will warn you if a document that you are opening contains a macro that might have a virus Periodically updating the Norton AntiVirus program to protect again...

Page 62: ...an for viruses 1 Click Start All Programs Norton AntiVirus then click Norton AntiVirus 2003 Norton AntiVirus opens 2 Click Scan for Viruses 3 Click the type of scan you want to make in the Scan for Viruses area then under Actions click Scan Scan for viruses Scan ...

Page 63: ... least 30 seconds 3 Turn on your computer and rescan for the virus To update Norton AntiVirus 1 Make sure that you are connected to the Internet 2 Click Start All Programs Norton AntiVirus then click LiveUpdate Norton AntiVirus The LiveUpdate wizard opens 3 Follow the on screen instructions to update your Norton AntiVirus program with the latest virus protection files 4 When the program has finish...

Page 64: ...d drive Checking hard drive space To check hard drive space 1 In Windows XP click Start then click My Computer The My Computer window opens OR In Windows 2000 double click the My Computer icon The My Computer window opens 2 Right click the drive that you want to check for available file space then click Properties Drive space information appears ...

Page 65: ...gram 1 In Windows XP click Start then click My Computer The My Computer window opens OR In Windows 2000 double click the My Computer icon The My Computer window opens 2 Right click the hard drive that you want to delete files from for example Local Disk C then click Properties The Properties dialog box opens at the General tab 3 Click Disk Cleanup The Disk Cleanup dialog box opens ...

Page 66: ...every day you probably want to run Error checking once a week If you use your computer less frequently once a month may be adequate Also use Error checking if you encounter hard drive problems To check the hard drive for errors 1 In Windows XP click Start then click My Computer The My Computer window opens OR In Windows 2000 double click the My Computer icon The My Computer window opens 2 Right cl...

Page 67: ...nutes After Windows has finished checking the drive for errors it provides a summary of the problems that it found 6 Correct any problems that are found by following the on screen instructions 7 Click OK Help and Support For more information about checking the hard drive for errors in Windows XP click Start then click Help and Support Type the keyword checking for disk errors in the HelpSpot Searc...

Page 68: ...oss different areas of the drive Defragmenting the information stored on the drive can improve hard drive performance While the Disk Defragmenter program is running do not use your keyboard or mouse because using them may continuously stop and restart the defragmenting process Also if you are connected to a network log off before starting Disk Defragmenter Network communication may stop the defrag...

Page 69: ...ess on the computer display When finished Disk Defragmenter asks if you want to quit the program 6 Click Close or Yes then click the X in the top right corner to close the Disk Defragmenter window Help and Support For more information about defragmenting the hard drive in Windows XP click Start then click Help and Support Type the keyword defragmenting in the HelpSpot Search box then click the arr...

Page 70: ...e or tape drive to do a complete hard drive backup For more information see Creating CDs and DVDs on page 37 If you do not have a high capacity backup device and you want to purchase one you can contact Gateway s Add on Sales department or visit the Accessories Store at accessories gateway com Using the Scheduled Task Wizard The Scheduled Task Wizard lets you schedule maintenance tasks such as run...

Page 71: ...d opens 3 Click Next then click the task or program you want to schedule and follow the on screen instructions to customize the task Important Your computer must be on during scheduled tasks If your computer is off scheduled tasks will not run Help and Support For more information about using the Scheduled Tasks Wizard in Windows XP click Start then click Help and Support Type the keyword Schedule...

Page 72: ... of your system Do not use abrasive or solvent cleaners because they can damage the finish on components Your computer is cooled by air circulated through the vents on the case so keep the vents free of dust With your computer turned off and unplugged brush the dust away from the vents with a damp cloth Be careful not to drip any water into the vents Do not attempt to clean dust from the inside yo...

Page 73: ...work after it dries you may need to replace it Cleaning the monitor screen If your monitor is a flat panel display use a soft cloth and water to clean the monitor screen Squirt a little water on the cloth never directly on the screen and wipe the screen with the cloth OR If your monitor is not a flat panel display use a soft cloth and glass cleaner to clean the monitor screen Squirt a little clean...

Page 74: ...ly cleaning the mouse will likely improve its accuracy Clean your optical mouse by wiping the bottom of the mouse with a damp lint free cloth To clean your trackball mouse 1 Turn the mouse upside down 2 Rotate the retaining ring on the bottom of the mouse counter clockwise then remove the retaining ring and mouse ball 3 Remove any dust lint or dirt from the mouse ball with a soft cloth ...

Page 75: ...alcohol 5 Replace the mouse ball and lock the retaining ring into place Help and Support For a video tutorial about cleaning the mouse in Windows XP click Start then click Help and Support Type the keyword Video tutorials in the HelpSpot Search box then click the arrow Click Cleaning the mouse Mouse rollers ...

Page 76: ...tor and drives turn off and the entire system uses less power Always save your work before using Standby mode In Standby mode your computer reduces or turns off the power to most devices except memory However the information in the memory is not saved to the hard drive If power is interrupted the information is lost Hibernate also called save to disk writes all current memory RAM information to th...

Page 77: ...t power saving modes to the power button Ifyourcomputer is and you want to then On Enter Standby mode In Windows XP click Start Turn off computer then click Standby OR In Windows 2000 click Start then click Shut Down Click the arrow button to open the What do you want your computer to do list then click Standby Click OK On Enter Hibernate mode must be activated In Windows XP click Start then click...

Page 78: ...then click Control Panel The Control Panel window opens If your Control Panel is in Category View click Performance and Maintenance OR In Windows 2000 click Start Settings then click Control Panel The Control Panel window opens 2 Click Double click the Power Options or Power Management icon The Power Options Properties dialog box opens ...

Page 79: ...d power management settings 1 In Windows XP click Start then click Control Panel The Control Panel window opens If your Control Panel is in Category View click Performance and Maintenance OR In Windows 2000 click Start Settings then click Control Panel The Control Panel window opens 2 Click Double click the Power Options or Power Management icon The Power Options Properties dialog box opens Help a...

Page 80: ...o open a Power buttons list then click the power setting mode you want to use 5 Click OK Help and Support For more information about changing the power management settings in Windows XP click Start then click Help and Support Type the keyword power management in the HelpSpot Search box then click the arrow ...

Page 81: ...enance OR In Windows 2000 click Start Settings then click Control Panel The Control Panel window opens 2 Click Double click the Power Options or Power Management icon The Power Options Properties dialog box opens 3 Click the Hibernate tab 4 Click the Enable hibernation check box then click Apply Hibernate mode is now an option you can select in the Power Schemes and Advanced tabs and in the Turn O...

Page 82: ...SHIFT then click Hibernate OR In Windows 2000 click Start then click Shut Down Click the arrow button to open the What do you want your computer to do list then click Hibernate Click OK Setting up an uninterruptible power supply To install an uninterruptible power supply UPS 1 In Windows XP click Start then click Control Panel The Control Panel window opens If your Control Panel is in Category Vie...

Page 83: ...tion dialog box opens 5 Click the manufacturer and model of the UPS device 6 Click the serial port where the UPS device is attached 7 Click Finish then click OK Help and Support For more information about setting up an uninterruptable power supply in Windows XP click Start then click Help and Support Type the keyword uninterruptable power supply in the HelpSpot Search box then click the arrow ...

Page 84: ...78 Chapter 5 Maintaining Your Computer www gateway com ...

Page 85: ...6 79 Restoring Software Read this chapter to learn how to Reinstall device drivers Update device drivers Reinstall programs Reinstall Windows ...

Page 86: ... tried these steps first Use the diagnostics and troubleshooting tools found in HelpSpot For more information about diagnostics and troubleshooting tools in Windows XP click Start then click Help and Support Type the keyword troubleshooting in the HelpSpot Search box then click the arrow See the Troubleshooting section of this guide If these steps do not resolve the problem use the Gateway Restora...

Page 87: ...at there is a problem with a device driver reinstall the device drivers by following the instructions in To reinstall device drivers on page 81 If you just reinstalled Windows XP or Windows 2000 the device drivers were automatically reinstalled If you are not comfortable with the procedures covered in this section seek help from a more experienced computer user or a computer service technician To ...

Page 88: ... computer to complete the installation However if a setup wizard opens when you restart your computer follow the on screen instructions 8 To find driver locations for installation on another computer click the E Series Drivers tab select your E Series Model and Operating System then click Search 9 Browse the device types to find the driver location for your other E Series computer then install you...

Page 89: ...ng Continue 3 If you are prompted to select your Gateway computer type click E Series Business Use then click Continue 4 Click the Web Updates tab 5 Click Check Now The Connect window opens 6 Install available updated device drivers by following the on screen instructions Depending on the device driver you are updating you may only need to restart your computer to complete the installation However...

Page 90: ... Programs OR In Windows 2000 click Start Settings Control Panel then double click the Add or Remove Programs icon 3 In the Currently Installed Programs list click the program you want to uninstall then click Change Remove and follow the on screen instructions 4 Insert the yellow Applications CD into the CD or DVD drive 5 If this is the first time you have inserted the CD accept the End User Licens...

Page 91: ...In Windows XP click Start Control Panel then click Add or Remove Programs OR In Windows 2000 click Start Settings Control Panel then double click the Add or Remove Programs icon 3 In the Currently Installed Programs list click the program you want to uninstall then click Change Remove and follow the on screen instructions 4 Insert the program CD into the CD or DVD drive 5 Complete the program rein...

Page 92: ...s and some programs as well You can install any remaining programs by using the program CDs that came with your computer To reinstall your programs follow the instructions in Reinstalling programs on page 84 To reinstall Windows XP or Windows 2000 and the device drivers 1 Insert the red Drivers CD into the CD or DVD drive 2 Restart your computer 3 Select 2 Boot from CD ROM 4 Select a language opti...

Page 93: ...continue 13 When prompted accept the License Agreement by pressing Y 14 Wait while the setup program copies files to your hard drive When your computer restarts do NOT press any key to boot from CD 15 Follow the on screen instructions to set your Regional and Language Options 16 If you are prompted to select your Gateway computer type click E Series Business Use then click Continue 17 When prompte...

Page 94: ...88 Chapter 6 Restoring Software www gateway com ...

Page 95: ...your case style Open the computer case Remove and install drives and components Remove and install add in cards Remove and install system boards Add memory Change the battery You must open the computer case to upgrade or replace components If you are not comfortable with these procedures get help from a more experienced computer user or computer service technician ...

Page 96: ...ical Support The telephone must be directly connected to a telephone jack and cannot be connected to your computer Gathering the tools you need Some tools and supplies that you may need to work on your computer are A Phillips screwdriver A flat head screwdriver A notebook to take notes Small containers to store various types of screws A grounding wrist strap available at most electronic stores Tip...

Page 97: ...ove components from their antistatic bags only when you are ready to use them Do not lay components on the outside of antistatic bags because only the inside of the bags provide electrostatic protection Always hold expansion cards by their edges or their metal mounting brackets Avoid touching the edge connectors and components on the cards Never slide expansion cards or components over any surface...

Page 98: ...odem network and all peripheral device cables 3 Press the power button to drain any residual power from your computer 4 If the case cover has a shipping screw installed on the back of the case remove the screw For information about the location of the screw see Back on page 4 Warning To avoid exposure to dangerous electrical voltages and moving parts turn off your computer then unplug the power co...

Page 99: ...93 Opening the case www gateway com 5 Push in on the cover release handle ...

Page 100: ...94 Chapter 7 Upgrading Your Computer www gateway com 6 Pull the side panel away from the case ...

Page 101: ...way com Closing the case To close the computer case 1 Make sure that all of the internal cables are arranged inside the case so they will not be pinched when you close the case 2 Align the door tabs into the case notches Door tabs ...

Page 102: ...7 Upgrading Your Computer www gateway com 3 Swing the side panel toward the case until the release handle locks 4 If you removed a case cover shipping screw replace the screw 5 Reconnect the cables and power cord ...

Page 103: ...tte drives To add or replace a CD DVD or diskette drive 1 Open the case using the instructions in Opening the case on page 92 2 If you are adding a drive locate an empty drive bay OR If you are replacing a drive disconnect the drive cables noting their locations and orientation You will reconnect the cables after you install the new drive See the drive documentation for further instructions Data r...

Page 104: ...98 Chapter 7 Upgrading Your Computer www gateway com 3 If there is a shipping screw installed next to the release lever remove the screw then slide the release lever toward the rear of the case ...

Page 105: ...ns 6 Slide the new drive into the drive bay until it settles into the indentation and is flush with the front of the computer case then slide the release lever toward the front of the case 7 If you removed a shipping screw replace the screw 8 Reconnect the drive cables using your notes from Step 2 The red striped edge of the data ribbon cable indicates Pin 1 and corresponds with Pin 1 on the drive...

Page 106: ...ve 1 Open the case using the instructions in Opening the case on page 92 2 If you are adding a drive locate an empty drive bay OR If you are replacing a drive disconnect the drive cables noting their locations and orientation You will reconnect the cables after you install the new drive See the drive documentation for further instructions Power cable Data ribbon cable ...

Page 107: ... the release lever toward the open side of the case 4 If you are removing a drive slide the old drive out of the drive bay 5 If you are replacing a drive set any jumpers on the new drive to match the old drive See the drive documentation for further instructions ...

Page 108: ... notes from Step 2 The red striped edge of the data ribbon cable indicates Pin 1 and corresponds with Pin 1 on the drive typically on the side farthest from the power supply connection See the drive documentation for more information OR If you are adding a drive connect the drive cables See the drive documentation for more information 8 Close the case using the instructions in Closing the case on ...

Page 109: ... Open the case using the instructions in Opening the case on page 92 2 For more stability place your computer on its side Place your computer on a towel or other non abrasive surface to avoid scratching the computer case 3 If you are replacing a card disconnect any cables that are attached to the card noting their locations and orientation You will reconnect the cables after you install the new ca...

Page 110: ...104 Chapter 7 Upgrading Your Computer www gateway com 4 Remove the retention thumb screw that secures the card retention cover to the case then swing the add in card retention cover open ...

Page 111: ...deways 6 Insert the new card into the add in slot You can slightly seesaw the card end to end to help insert the card but do not bend the card sideways 7 Push the add in card retention cover inward then secure the add in card retention cover with the retention thumb screw Warning Do not touch the contacts on the bottom part of the add in card Touching the contacts can cause electrostatic damage to...

Page 112: ... Step 3 See the add in card documentation for more information OR If you are adding an add in card see the card documentation for information about connecting cables 9 Close the case using the instructions in Closing the case on page 95 10 See the documentation that came with the add in card for any special software installation instructions ...

Page 113: ...he power supply To replace the power supply 1 Open the case using the instructions in Opening the case on page 92 2 For more stability place your computer on its side Place your computer on a towel or other non abrasive surface to avoid scratching the computer case ...

Page 114: ... www gateway com 3 Disconnect the power supply cables from all components such as hard drives CD or DVD drives and the system board noting their locations and orientation You will reconnect the cables after you install the new power supply ...

Page 115: ...109 Adding or replacing add in cards www gateway com 4 Swing the power supply retention clip out ...

Page 116: ...l the new power supply into the case then swing the power supply retention clip toward the back of the case until it locks into place 7 Reconnect the power supply cables using your notes from Step 3 See the power supply documentation for more information 8 Close the case using the instructions in Closing the case on page 95 ...

Page 117: ...lace your computer on its side Place your computer on a towel or other non abrasive surface to avoid scratching the computer case 3 Remove all of the add in cards using the instructions in Adding or replacing add in cards on page 103 4 Disconnect the power and data cables from the system board noting their locations and orientation You will reconnect the cables after you install the new board ...

Page 118: ...112 Chapter 7 Upgrading Your Computer www gateway com 5 Remove the thumbscrew using a screwdriver coin or your fingers Thumbscrew approximate location ...

Page 119: ... Replacing the system board www gateway com 6 Slide the system board toward the front of the case then up and out of the case The system board standoffs slide out of the keyhole slots Standoff Keyhole slot ...

Page 120: ...from Step 4 See the system board documentation for more information 9 Reinstall the add in cards using the instructions in Adding or replacing add in cards on page 103 10 Close the case using the instructions in Closing the case on page 95 Important The new system board must have special standoffs pem studs mounted on the bottom of the board If necessary use the standoffs from the original system ...

Page 121: ...all the correct type of memory module for your computer Your computer uses DIMM memory The following illustration shows the general location of the memory modules in the system board To install or replace DIMM memory 1 Open the case using Opening the case on page 92 2 Find the memory module banks on your system board ...

Page 122: ...116 Chapter 7 Upgrading Your Computer www gateway com 3 If your system board has single channel memory fill the DIMM 0 memory slot When adding memory fill the DIMM 1 memory slot OR DIMM 0 DIMM 1 ...

Page 123: ...0 memory slot AND the Channel B DIMM 0 memory slot with matching DIMMs Matching DIMMs are the same size density and technology When adding memory fill the Channel A DIMM 1 memory slot AND the Channel B DIMM 1 memory slot with matching DIMMs Channel A DIMM 0 Channel A DIMM 1 Channel B DIMM 0 Channel B DIMM 1 ...

Page 124: ... module bank and press the module firmly into the bank The tabs on the sides of the memory module should secure the memory module automatically When the module is secure you hear a click 6 Close the case using Closing the case on page 95 7 Reconnect the cables and the power cord 8 Turn on your computer Windows starts and the Windows desktop appears 9 In Windows XP click Start Control Panel then cl...

Page 125: ...ing memory www gateway com In Windows 2000 right click the My Computer icon then click Properties The amount of memory in your computer is shown at the bottom of the System Properties dialog box in the General tab ...

Page 126: ... Setup utility using the instructions in Using the BIOS Setup Utility on page 123 2 Write down all the values in the menus and submenus then exit from the utility 3 Shut down your computer 4 Open the case using Opening the case on page 92 5 Locate the old battery on the system board and note its orientation You will need to install the new battery the same way Warning Danger of explosion if batter...

Page 127: ...ake sure that the positive side of the new battery is facing up then press the battery into the socket until it snaps into place 8 Close the case using Closing the case on page 95 9 Reconnect all external cables and the power cord 10 Turn on your computer 11 Open the BIOS Setup utility 12 In the BIOS Setup utility restore any settings that you wrote down in Step 2 13 Save all your settings and exi...

Page 128: ...122 Chapter 7 Upgrading Your Computer www gateway com ...

Page 129: ...3 Using the BIOS Setup Utility This chapter provides information about the BIOS Setup utility Read this chapter to learn how to Open the BIOS Setup utility Update the BIOS Set the BIOS configuration jumper ...

Page 130: ...nd hold the F1 key The main menu of the BIOS Setup utility opens Caution The options in the BIOS Setup utility have been set at the factory for optimal performance Changes to these settings will affect the performance of your computer Before changing any settings write them down in case you need to restore them later Important Your computer starts very quickly If your monitor requires time to warm...

Page 131: ... F1 to get more help about options BIOS Setup Utility Main Advanced Security Power Boot Exit Item Specific Help BIOS Version Processor Type Processor Speed System Bus Speed System Memory Speed Cache RAM Total Memory Memory Bank 0 Memory Bank 1 Language Memory Configuration System Time System Date RG84510A 15A 0009 P03 Intel R Pentium R 3 0 GHz 800 MHz 400 MHz 512 KB 127 MB 128 MB DDR400 Not Instal...

Page 132: ...any custom BIOS settings Follow the detailed instructions for updating the BIOS that are included in the self extracting file that you can download from the technical support area of Gateway s Web site Setting the BIOS configuration jumper The system board has a configuration jumper related to the BIOS Place a jumper on specific pins to clear passwords or recover the BIOS For more information on t...

Page 133: ...s chapter to learn how to Troubleshoot typical hardware and software problems Get telephone support Use automated troubleshooting systems Get tutoring and training If the suggestions in this chapter do not correct the problem see Getting Help on page 21 for more information about how to get help ...

Page 134: ...stored in the monitor components can be dangerous Also opening the monitor voids the warranty Make sure that you are correctly grounded before opening your computer case For more information about preventing damage from static electricity see Preventing static electricity discharge on page 91 Warning To avoid bodily injury do not attempt to troubleshoot your computer problem if Power cords or plug...

Page 135: ... computer components before the problem started review the procedures you performed and make sure that you followed each instruction Make sure that your hard drive is not full If an error message appears on the screen write down the exact message The message may help Gateway Technical Support in diagnosing and fixing the problem If an error occurs in a program see the program s printed documentati...

Page 136: ...nd fix problems PC Doctor is a comprehensive hardware diagnostic and system information tool that can test your computer and determine its configuration PC Doctor provides 85 professional diagnostic tests directly from your computer This support tool is available from HelpSpot or by clicking Start All Programs then clicking Gateway Utilities ...

Page 137: ...ve a DVD drive To identify your drive type see Identifying drive types on page 34 Your computer may be experiencing some temporary memory problems Shut down and restart your computer Some music CDs have copy protection software You may not be able to play these CDs on your computer Clean the disc For more information see Cleaning CDs and DVDs on page 133 Restart your computer then enter the BIOS S...

Page 138: ...re turned up Make sure that the mute controls are turned off Make sure that the speaker cables are connected correctly and securely Shut down and restart your computer Clean the disc For more information see Cleaning CDs and DVDs on page 133 Reinstall the audio device drivers For more information see Reinstalling device drivers on page 81 A DVD movie will not play Make sure that you have a DVD dri...

Page 139: ... regional code for the disc is on the disc disc documentation or disc packaging If the DVD movie does not play the disc s regional code and your DVD drive s regional code may not match Cleaning CDs and DVDs Clean discs by wiping from the center to the edge not around in a circle using a product such as a soft cloth made especially for cleaning CDs and DVDs Computer The computer will not start Make...

Page 140: ...ted Make sure that the write protection tab on the upper right corner of the diskette is down unprotected The diskette may be full Delete unnecessary files on the diskette and try again Not all diskettes are IBM compatible Make sure that the diskette you are using is IBM compatible Try a different diskette Occasionally diskettes are flawed and cannot be read by the diskette drive Run Error checkin...

Page 141: ...se and make sure that the cables are connected correctly to the diskette drive and the system board The red striped edge of the data ribbon cable indicates Pin 1 and corresponds with Pin 1 on the diskette drive typically on the side farthest from the power supply connection If necessary reverse one end of the cable so the red striped edge of the data ribbon cable faces Pin 1 on the diskette drive ...

Page 142: ...ror message This may be the result of a defective area on the hard drive To fix hard drive problems run the Error checking program For more information see Checking the hard drive for errors on page 60 The hard drive cannot be accessed or you see a General failure reading drive C error message If a diskette is in the diskette drive eject it and restart your computer Press CTRL ALT DEL to restart y...

Page 143: ...ion see Reinstalling device drivers on page 81 Open the computer case and make sure that the IDE cable is connected to the system board IDE connector and the hard drive connector For more information see Adding or replacing a hard drive on page 100 The computer does not recognize a SCSI drive Reinstall the device driver For more information see Reinstalling device drivers on page 81 Open the compu...

Page 144: ...e Internet This problem can occur when you have typed a URL Web address incorrectly you have lost your Internet connection or your ISP is having technical difficulties Double check the URL or try a different URL If the error message still appears disconnect from the ISP connection and close your browser then reconnect and open the browser If you still get the error your ISP may be having technical...

Page 145: ...oxes Clean the keyboard by using an aerosol can of air with a narrow straw like extension to remove dust and lint trapped under the keys Try a keyboard that you know works to make sure that the keyboard port works Reinstall the keyboard device driver For more information see Reinstalling device drivers on page 81 A keyboard character keeps repeating or you see a keyboard stuck or key failure error...

Page 146: ... to the telephone line and the telephone line has a dial tone Use the setup poster to make sure that the connections have been made correctly Make sure that the modem cable is less than 6 feet 1 8 meters long Remove any line splitters or surge protectors from your telephone line then check for a dial tone by plugging a working telephone into the telephone wall jack If you have additional telephone...

Page 147: ...erties The Dialing Properties dialog box opens 3 Make sure that all settings are correct Disconnect any answering machine fax machine or printer that is on the same line as the modem Do not connect these devices to the same telephone line as the modem Make sure that you are not using a digital rollover or PBX line These lines do not work with your modem Check for line noise scratchy crackling or p...

Page 148: ...ving technical difficulties Contact your ISP technical support for help See if the modem works with a different communications program The problem may be with just one program Your 56K modem does not connect at 56K Current FCC regulations restrict actual data transfer rates over public telephone lines to 53K Other factors such as line noise telephone service provider equipment or ISP limitations m...

Page 149: ...e line connected to the modem is working and plugged into the appropriate jack on the modem Use the setup poster to make sure that the connections have been made correctly If the modem shares the telephone line with another device make sure that the telephone line is not in use for example someone is on the telephone or another modem is in use Use the modem cable that came with your computer Some ...

Page 150: ...dems Properties dialog box opens 4 Click the Diagnostic tab click the COM port next to the name of the modem then click More Info The Modem Info dialog box opens If information about the modem appears the modem passed diagnostics If no modem information is available if a white screen appears with no data or if you get an error such as port already open or the modem has failed to respond the modem ...

Page 151: ...ntrol Panel is in Category View click Printers and Other Hardware 2 Click Double click the Phone and Modem Options icon then click the Modems tab 3 Click the modem you want to adjust then click Properties 4 Click the Modem tab then adjust the Speaker volume control 5 Click OK twice to close the Phone and Modem Options dialog box To turn down the modem volume in Windows 2000 1 Click Start Settings ...

Page 152: ...ot placed too close to the monitor The monitor is not positioned too close to another monitor electric fan fluorescent light metal shelf or laser printer You demagnetize the screen using the monitor s degauss feature For more information on degauss see your monitor s documentation There is a horizontal line or wire visible across the monitor screen Your monitor may use a thin damper wire located a...

Page 153: ...ugged in correctly Shut down and restart your computer Remove all extension cables and switch boxes Try a mouse that you know is works to make sure that the mouse port works Reinstall the device driver For more information see Reinstalling device drivers on page 81 The mouse works erratically If the mouse pointer begins moving erratically across the computer display or becomes difficult to control...

Page 154: ...AC power source Make sure that the electrical outlet is working by plugging a working device such as a lamp into the outlet then turning it on to test the outlet Printer is on but will not print Make sure that the printer is online Many printers have an online offline button that you may need to press If the printer you want to print to is not the default printer make sure that you have selected i...

Page 155: ...message Make sure that the printer is not set to work offline To make sure that the printer is not set to work offline in Windows XP 1 Click Start then click Control Panel The Control Panel window opens If your Control Panel is in Category View click Printers and Other Hardware 2 Click Double click the Printers and Faxes icon The Printers and Faxes window opens 3 Right click the name of the printe...

Page 156: ...ation for more information about adding additional memory You see a Printer is out of paper error message After adding paper make sure that the printer is online Many printers have an online offline button that you need to press after adding paper Sound You are not getting sound from the speakers Make sure that the speakers are turned on Make sure that the volume controls are turned up Make sure t...

Page 157: ...rom Gateway see the manufacturer s documentation and technical support resources If you have how to questions about using a program check Online Help Printed documentation The Microsoft Windows documentation The program publisher s Web site See the troubleshooting section of this chapter Have your client ID serial number and order number available along with a detailed description of your problem ...

Page 158: ...utorial assistance for software issues billed by the minute 800 229 1103 charged to your credit card 900 555 4695 charged to your telephone bill Gateway Technical Support Talk to a Gateway Technical Support representative about a non tutorial technical support question See Before calling Gateway Technical Support on page 151 before calling TDD Technical Support for hearing impaired is available We...

Page 159: ...any cases additional product information and online documents for Gateway supplied hardware can be found in our Web site s Documentation Library This user s guide The software publisher s Web site The hardware manufacturer s Web site Tutoring For help on using hardware or software that came with your Gateway computer contact Gateway s fee based tutorial hotline 800 229 1103 rate charged per minute...

Page 160: ...rams including Microsoft Word Excel and PowerPoint www gateway com country Gateway Learning Libraries A variety of courses and tutorials are available on CD Select from several easy to use learning libraries www gateway com training Online Training from Learn Gateway More than 450 online courses are available from Learn Gateway All you have to do is go online and log in You select the subject matt...

Page 161: ...ence This Technical Reference covers information about your system board and its features Read this Technical Reference to learn about system board Features Connectors and jumpers BIOS configuration jumper settings Specifications ...

Page 162: ...nt Side Bus FSB processors Support for Intel Celeron processors with an mPGA478 socket with 400 MHz system bus Support for as much as 4 gigabytes GB of 400 MHz DDR SDRAM Memory configurations that can use Dual Channeling and Dynamic mode for optimizing the memory bandwidth Integrated Serial ATA IDE interface 10 100 1000 Ethernet LAN capability ...

Page 163: ...157 System board layout www gateway com System board layout The following illustration shows the system board divided into two sections 1 2 ...

Page 164: ...r Main power connector Primary IDE cable connector Secondary IDE cable connector Memory expansion slots Intrusion detection header BIOS configuration jumper Front panel header USB front panel header Standby power indicator LED Serial ATA connectors Battery Diagnostic LED ...

Page 165: ...on 2 PS 2 keyboard port PS 2 mouse port Network jack Parallel LPT connector Serial COM connector Processor socket USB ports AGP expansion slot PCI expansion slots USB ports Auxiliary power connector Processor fan connector Auxiliary fan connector ...

Page 166: ...on of this jumper see Section 1 on page 158 Setting Jumper placement When used Normal For normal operation The BIOS uses current configuration information and passwords 1 2 position Configure For clearing passwords The BIOS Setup utility runs automatically and the Maintenance menu is displayed 2 3 position Recover For recovering the BIOS configuration A BIOS recovery diskette is required no jumper...

Page 167: ...ch as 4 GB of system memory Chipset Intel 875P Chipset consisting of Intel 82875P Memory Controller Hub MCH Intel 82801ER I O Controller Hub ICH5 R Intel 82802AC 8Mbit Firmware Hub FWH Video Universal 0 8 1 5 V AGP 3 0 connector with integrated retention mechanism supporting 1X 4X and 8X AGP cards USB Support for USB 2 0 devices LBA Support for 48 bit Logical Block Addressing LBA Peripheral interf...

Page 168: ...may vary from similarly marketed products BIOS Intel AMI BIOS resident in the Intel 82802AC FWH Support for Advanced Configuration and Power Interface ACPI Plug and Play and SMBIOS Instantly available PC technology Support for PCI Local Bus Specification Revision 2 2 Suspend to RAM support Wake on PCI ES 232 front panel PS 2 devices and USB ports ...

Page 169: ...the latest standards for safety of information technology equipment However to ensure safe use of this product it is important that the safety instructions marked on the product and in the documentation are followed Warning Always follow these instructions to help guard against personal injury and damage to your Gateway system ...

Page 170: ...over these openings Make sure you provide adequate space at least 6 inches 15 cm around the system for ventilation when you set up your work area Never insert objects of any kind into the computer ventilation openings Some products are equipped with a three wire power cord to make sure that the product is properly grounded when in use The plug on this cord will fit only into a grounding type outle...

Page 171: ...o avoid electrical shock always unplug all power cables and modem cables from the wall outlets before cleaning the system Unplug the system from the wall outlet and refer servicing to qualified personnel if The power cord or plug is damaged Liquid has been spilled into the system The system does not operate properly when the operating instructions are followed The system was dropped or the cabinet...

Page 172: ...tenna Increase the separation between the equipment and receiver Connect the equipment to an outlet on a different circuit from that to which the receiver is connected Consult the dealer or an experienced radio TV technician for help Compliance Accessories The accessories associated with this equipment are shielded video cable when an external monitor is connected These accessories are required to...

Page 173: ...any may request that you disconnect the equipment until the problem is resolved The telephone company may make changes in its facilities equipment operations or procedures that could affect the operation of this equipment If this happens the telephone company will provide advance notice in order for you to make necessary modifications to maintain uninterrupted service This equipment cannot be used...

Page 174: ...g associated with a single line individual service may be extended by means of a certified connector assembly The customer should be aware that compliance with the above conditions may not prevent degradation of service in some situations Repairs to certified equipment should be made by an authorized Canadian maintenance facility designated by the supplier Any repairs or alterations made by the us...

Page 175: ... static charges Article 810 of the National Electrical Code ANSI NFPSA 70 provides information with regard to proper grounding of the mast and supporting structure grounding of the lead in wire to an antenna discharge unit size of grounding conductors location of antenna discharge unit connection to grounding electrodes and requirements for the grounding electrode Lightning protection For added pr...

Page 176: ...n outside antenna system extreme care should be taken to keep from touching such power lines or circuits Contact with them could be fatal Reference Grounding component 1 Electric service equipment 2 Power service grounding electrode system NEC Art 250 Part H 3 Ground clamps 4 Grounding conductors NEC Section 810 21 5 Antenna discharge unit NEC Section 810 20 6 Ground clamp 7 Antenna lead in wire 2...

Page 177: ...ed trademarks and black and white spotted box logo GATEWAY Gateway Astro Gateway Work Gateway Connected touch pad Gateway Connected music player Gateway Cyber Ware Gateway Education Ware Gateway Flex Case Gateway Gaming Ware Gateway GoBack Gateway Gold Gateway Learning Ware Gateway Magazine Gateway Micro Server Gateway Money Ware Gateway Music Ware Gateway Networking Solutions Gateway Online Netwo...

Page 178: ...172 Appendix B Safety Regulatory and Legal Information www gateway com ...

Page 179: ...e lock 6 camera 11 card retention thumbscrew 6 slots 159 cards installing 103 reinstalling 103 removing 103 replacing 103 troubleshooting 131 case back view 4 closing 95 front view 2 opening 92 CD cleaning 133 copying 38 creating audio 48 creating data 42 creating label 52 creating music 48 drive 34 eject button 3 35 troubleshooting 131 CD drive adding 97 eject button 3 35 identifying 34 location ...

Page 180: ...use 5 159 network 6 159 parallel 5 159 power 5 power cord 5 PS 2 keyboard 5 159 PS 2 mouse 5 159 rear out 6 serial 5 159 speaker out 6 TV 5 USB 3 5 158 159 copying data CD 38 data DVD 38 music CD 38 music tracks 45 creating CD label 52 DVD label 52 music CD 48 Customer Service Accounting 152 Sales 152 Warranty 152 D default printer 148 defragmenting hard drive 62 deleting files and folders 59 devi...

Page 181: ...es 34 DVD copying 38 creating data 42 creating label 52 drive 34 eject button 35 inserting 35 troubleshooting 131 DVD drive adding 97 eject button 3 35 identifying 34 location 3 replacing 97 testing 52 testing speed 52 troubleshooting 131 using 34 DVD RW drive eject button 35 identifying 34 using 34 DVD CD RW drive 3 adding 97 eject button 3 location 3 replacing 97 troubleshooting 131 DVD RAM RW d...

Page 182: ...canning for errors 60 troubleshooting 136 headphone jack 6 help online 27 using 22 HelpSpot 22 playing video 25 searching 24 starting 22 Using your computer link 23 Hibernate mode 3 70 75 I i Link port 3 6 IDE cable connector 158 IEEE 1394 port 3 6 inkjet printer 11 installing add in cards 103 battery 120 cards 103 CD drive 97 CD RW drive 97 diskette drive 97 drivers 81 drives 97 100 DVD drive 97 ...

Page 183: ...ested schedule 54 using Scheduled Task Wizard 64 virus protection 55 memory 12 adding 115 installing 115 replacing 115 slots 158 troubleshooting 140 microphone jack 6 Microsoft Certificate of Authenticity 5 8 model number 5 7 modem jack 5 protecting from power surge 14 troubleshooting 140 monitor cleaning 67 port 6 troubleshooting 145 mouse cleaning 68 port 5 159 troubleshooting 147 multimedia usi...

Page 184: ... mouse 5 159 R RAM See memory rebooting computer 17 recordable drive 3 12 adding 97 eject button 3 35 identifying drive 34 location 3 replacing 97 troubleshooting 131 using 34 reinstalling drivers 81 programs 84 software 84 Windows 86 removing files and folders 59 resetting computer 17 restarting computer 17 Restoration CDs 80 S safety avoiding repetitive strain 20 caring for computer 54 general p...

Page 185: ... 153 Learn Gateway 153 troubleshooting add in cards 131 audio 150 automated system 152 cards 131 CD drive 131 CD RW drive 131 cleaning CD 133 cleaning DVD 133 computer startup 133 diskette drive 134 DVD drive 131 DVD CD RW drive 131 expansion card 131 faxed answers 152 faxes 143 files 135 gateway your way dial up server 142 general guidelines 129 hard drive 136 Internet connection 138 142 keyboard...

Page 186: ... 158 159 V virus protecting against 55 removing with Norton AntiVirus 55 voltage switch 5 volume adjusting modem 145 troubleshooting 150 W Web site Gateway 28 Windows installing 86 product key 5 Product Key Code 8 reinstalling 86 reinstalling drivers 81 updating drivers 83 working safely 18 Z Zip drive 12 64 ...

Page 187: ......

Page 188: ...MAN E6100 SYS GDE R0 6 03 ...

Reviews: