background image

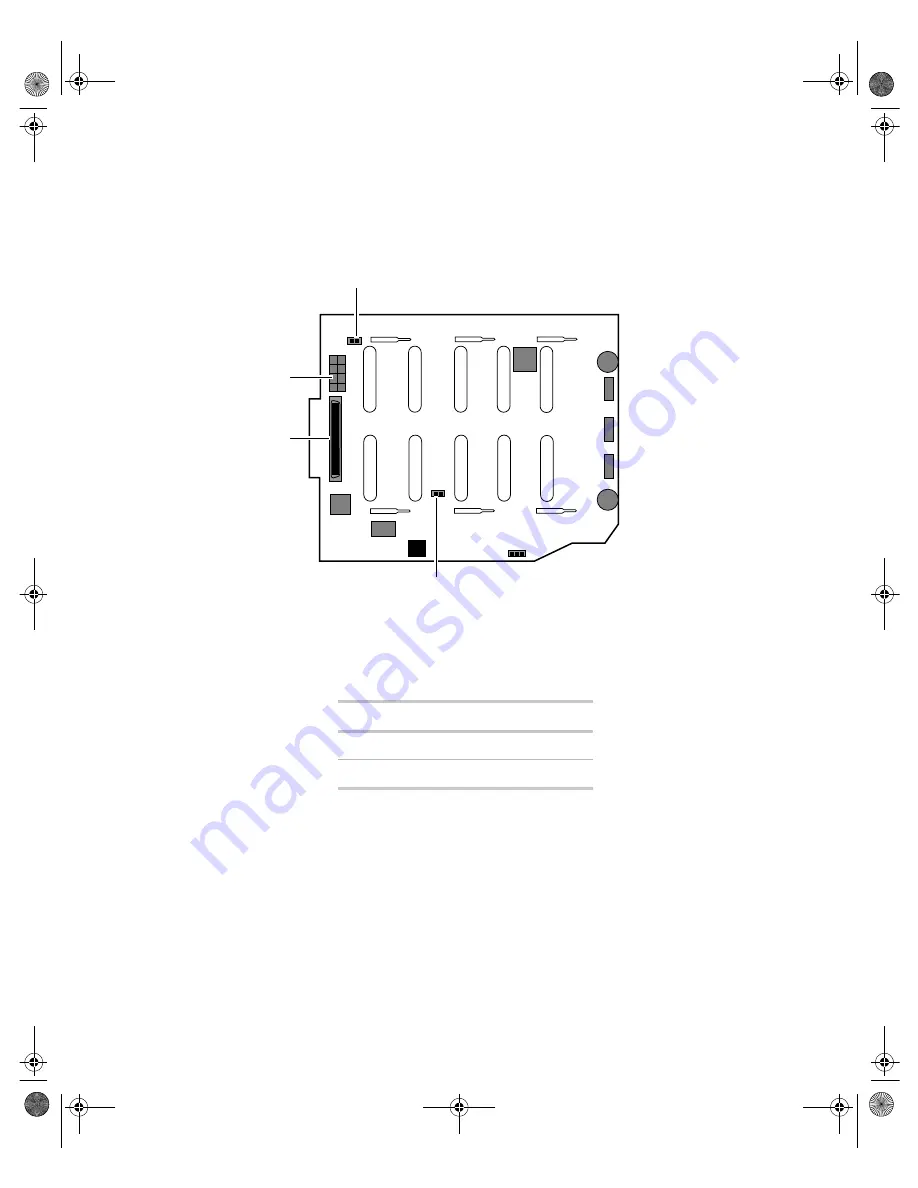
Hot-plug backplane          

11

Hot-plug backplane

JP5: Delay start jumper

 controls the spin-up sequence of the drives attached 

to the backplane. If you enable delay start, the drives spin up one at a time 
in order of their SCSI ID. If you disable delay start, all drives spin up 
simultaneously. Set the jumper according to the table below.

Position

Description

On (default)

Enables delay start

Off

Disables delay start

JP5: Delay start jumper

Power connector

SCSI connector

JP6: Termination jumper

Back of the hot-plug backplane board

8505945.book  Page 11  Thursday, March 9, 2000  2:13 PM

Summary of Contents for 7210

Page 1: ...7210 Server System Manual ...

Page 2: ...On Self Test 18 Setting up the operating system 18 Turning off the server 19 Resetting the server 20 3 Case Access 21 Preventing static electricity discharge 22 Opening the case 23 Opening the bezel door 24 Removing the front bezel 25 Removing the side panel 26 Closing the case 27 Replacing the side panel 27 Replacing the front bezel 29 Closing the bezel door 30 4 Replacing and Adding Internal Dev...

Page 3: ...cing the back panel and hot plug cage fans 72 Replacing the control panel board 74 Replacing the hot plug backplane 75 Replacing the system board 78 5 Using the BIOS Setup Utility 83 About the BIOS Setup utility 83 Updating the BIOS 85 Setting the system board jumpers 86 The CMOS Clear jumper 86 Password Clear jumper 86 Recovery Boot jumper 87 BIOS Boot Block Write Enable jumper 88 BMC Boot Block ...

Page 4: ...panion CD 104 7 Troubleshooting 105 Introduction 105 Troubleshooting checklist 105 Verifying your configuration 105 Troubleshooting guidelines 106 CD problems 106 Hard drive problems 108 Memory and processor problems 109 Modem problems 110 Peripheral Adapter problems 110 Printer problems 112 System problems 113 Video problems 115 Error messages 118 A Safety Regulatory and Notices 123 B System Spec...

Page 5: ...iv 8505945 book Page iv Thursday March 9 2000 2 13 PM ...

Page 6: ...d messages that appear on your monitor are printed in bold User s Guide Names of publications are printed in italic Viewpoint All references to front rear left or right on the computer are based on the computer being in a normal upright position as viewed from the front Important A note labeled important informs you of special circumstances Caution A caution warns you of possible damage to equipme...

Page 7: ...her Gateway products Some types of information you can access are Hardware driver and program updates Technical tips Service agreement information Technical documents and component information Frequently asked questions FAQs Documentation for peripherals or optional components Online technical support 8505945 book Page vi Thursday March 9 2000 2 13 PM ...

Page 8: ...hics RAM SGRAM Six PCI slots and one ISA slot for expansion cards ATX form factor system board and convertible tower rack mount chassis One 3 5 inch 1 44 MB diskette drive one CD drive and at least one hard drive Integrated voltage regulator modules VRMs for both processors Integrated Adaptec AIC 7896 dual function controller providing both low voltage differential LVD Ultra2 small computer system...

Page 9: ...ty LED that glows green whenever any of the hard disks is actively reading or writing data Reserved LED this LED is reserved for future use 5 25 drive bay 5 25 drive bay 5 25 drive bay CD drive Diskette drive Reserved Hot plug drive bay Front panel door Chassis lock Power LED Disk activity LED Reserved LED Reset button Power button Hot plug drive activity LED Hot plug drive lock Outriggers Castors...

Page 10: ...the power button to enter sleep mode rather than turning the system off Reserved LEDs these LEDs are reserved for future use Hot plug drive lock secures the drive in place to prevent unauthorized or accidental removal The outriggers provide support for the castors Castors let you roll the server around for ease of service 5 25 inch drive bays 3 to let you install additional 5 25 inch devices such ...

Page 11: ...appable power supply modules that can independently support the server s power requirements Parallel port Mouse port Power supply module Power supply module Expansion card retention clips Expansion card slots Power connector Module power switch Module power switch Keyboard port Serial port A Serial port B Network port Video port USB ports Redundant power supply Power supply module LED Kensington l...

Page 12: ...llation Kensington lock slot lets you install a security cable and lock Video port connects the first or only monitor interface cable The video controller is integrated in the system board USB ports connect external Plug and Play devices such as printers and pointing devices that are automatically configured when they are plugged into the computer through one of these ports USB keyboards and mice ...

Page 13: ...5 inch drives A diskette drive comes standard with the system and occupies one 3 25 inch drive bay A hard drive is typically installed in the second drive bay Hot plug bays support up to six 1 inch high 3 25 inch SCA SCSI hard drives Empty drive bays contain empty carriers to control airflow and EMC characteristics Outriggers provide support for the castors Castors let you move the unit easily for...

Page 14: ...e hot plug drives and other internal components System board tray supports the system board and makes it easier to remove and install System board see System board on page 8 Back panel fan provides cooling for system board components and additional cooling for the power supply 8505945 book Page 7 Thursday March 9 2000 2 13 PM ...

Page 15: ...ondary processor connector C Primary processor fan connector D Primary processor connector E DIMM slots 4 F Main power connector 24 pin A C B D E F G H N O P Q T Z X Y AA AB AC AD AE AF AG AH AI AK J S U W AL I K M L R V AJ 8505945 book Page 8 Thursday March 9 2000 2 13 PM ...

Page 16: ...write enable R Jumper block jumper J3J1 S Jumper block jumper J2J1 T Fan connector hot plug drive bay fan U Server monitor module SMM feature connector V Ultra wide SCSI connector W Ultra2 SCSI connector X Hard drive LED connector Y ISA connector Z Intelligent chassis management bus ICMB connector not used AA Chassis intrusion connector not used chassis intrusion is communicated through the front ...

Page 17: ...AF Video connector AG Dual USB connectors AH RJ 45 Ethernet LAN connector and LEDs AI Serial Port A AJ Parallel port AK Serial port B AL Stacked keyboard and mouse ports 8505945 book Page 10 Thursday March 9 2000 2 13 PM ...

Page 18: ... at a time in order of their SCSI ID If you disable delay start all drives spin up simultaneously Set the jumper according to the table below Position Description On default Enables delay start Off Disables delay start JP5 Delay start jumper Power connector SCSI connector JP6 Termination jumper Back of the hot plug backplane board 8505945 book Page 11 Thursday March 9 2000 2 13 PM ...

Page 19: ...r Power connector provides the point of connection for the power cable from the power supply Reserved LED 6 reserved for future use Drive activity LED 6 glows green when the drive is actively reading or writing data SCA SCSI drive connector 6 provides the single point of connection for the six SCA SCSI drives Position Description On Termination is disabled Off default Termination is enabled Drive ...

Page 20: ...rved LED this LED is reserved for future use PS1 fault LED that flashes green whenever the first power supply module fails or one of its power levels goes out of bounds PS2 fault LED that flashes green whenever the second power supply module fails or one of its power levels goes out of bounds Reset button lets you reset the server if it has become nonresponsive Power LED Disk activity LED Reserved...

Page 21: ...ontinues to glow until the failed power supply module is replaced The alarm is only active on systems using the N 1 redundant power supply NMI button allows a technician servicing the server to generate a non maskable interrupt NMI to help debug server errors Chassis intrusion detection switch sends a message to the system management hardware logging an event when the front bezel is removed Front ...

Page 22: ...ions that may damage the server Protect the server from extreme temperature and humidity Do not expose it to direct sunlight heater ducts or other heat generating objects Keep the computer away from equipment that generates magnetic fields such as unshielded stereo speakers Even a telephone placed too close to the computer may cause interference Plug the computer into a wall outlet power strip or ...

Page 23: ...p However if you intend to place the chassis on the floor you may find it easier to maintain the system if it has castors and can be rolled out for easier access To install the outriggers and castors 1 Gently turn the chassis upside down placing it on the top panel 2 Align the outriggers and castors with the slots on the bottom panel of the chassis 8505945 book Page 16 Thursday March 9 2000 2 13 P...

Page 24: ...modules in the redundant power supply are turned on The PS 2 power supply does not need to be turned on separately Make sure the computer and monitor are plugged into an AC outlet power strip or UPS and that the power strip or UPS is turned on To start the system 1 If you have connected the system components to a power strip or UPS make sure all the system components are turned off then turn on th...

Page 25: ...nt The system displays an error message if POST finds any problems Write down any error messages that you see If you continue to have problems these error messages may help you or Gateway technical support diagnose the cause Setting up the operating system The first time you start the server the operating system takes a few minutes to set up Refer to your operating system documentation for specifi...

Page 26: ... message saying It is now safe to turn off your computer turn off the computer by pressing the power button 3 Turn off the monitor and peripherals Important For other operating systems such as Windows 2000 or Novell Netware refer to the appropriate operating system software manual Important For other operating systems such as Windows 2000 or Novell Netware refer to the appropriate operating system...

Page 27: ...ns that lets you close a program that is not responding 2 Click Task Manager then select the program that is not responding 3 Close the program by clicking End Task 4 If the computer does not respond press the reset button to restart the computer As a part of the regular startup process a program to check the disk status runs automatically When the checks are finished Windows starts Important For ...

Page 28: ... tool may make the job easier The various clips tabs thumbscrews and other devices that allow toolless construction are color coded in green to show you where they are Most of these devices are either self explanatory or very easy to figure out When in doubt the steps and illustrations provided in this manual show you the way to remove any device you may need to replace 8505945 book Page 21 Thursd...

Page 29: ...c and packing foam in your work area Remove the parts from their antistatic bags or containers only when you are ready to use them Do not lay parts on the outside of an antistatic bag or container because only the inside provides antistatic protection Always hold cards by their edges and their metal mounting brackets Avoid touching components on the cards and the edge connectors that connect to ex...

Page 30: ...remely sensitive to static electricity make sure you follow the precautions at the beginning of this chapter to avoid static electricity damage Only qualified personnel should open the system for maintenance If you are qualified to maintain the system yourself make sure you are properly grounded before opening the system chassis Important All references to front back left or right on the computer ...

Page 31: ...e front panel controls To access these components you must open the bezel door To open the bezel door 1 If the bezel door is locked unlock it 2 Grip the bezel door handle next to the front panel indicator lights and pull the door open Chassis lock Front panel door 8505945 book Page 24 Thursday March 9 2000 2 13 PM ...

Page 32: ...To remove the front bezel 1 Power down turn off and disconnect all power to the server 2 Observe all safety and static electricity precautions see Preventing static electricity discharge on page 22 3 Unlock the front bezel if it is not already unlocked 4 Press the tabs at the sides of the bezel and pull the top of the bezel away from the server 5 Lift the bezel away from the chassis 8505945 book P...

Page 33: ...afety and static electricity precautions see Preventing static electricity discharge on page 22 3 Remove the front bezel as described in Removing the front bezel on page 25 4 Loosen the three thumbscrews from the left side of the front panel 5 Slide the side panel to the front disengaging the retaining tabs on the top edge of the panel from the top of the chassis 6 Lift the panel out and away from...

Page 34: ...s logged by the system management hardware Be careful not to pinch any cables in the panel as you replace it To replace the side panel 1 Hold the side panel at an angle to the chassis and 3 4 inch forward Engage the retaining tabs on the bottom edge of the panel with the slots at the bottom edge of the chassis 2 Swing the top of the panel toward the chassis engaging the retaining tabs on the top e...

Page 35: ...28 Case Access 4 Tighten the thumbscrews 8505945 book Page 28 Thursday March 9 2000 2 13 PM ...

Page 36: ...logged by the system management hardware To replace the front bezel 1 Holding the bezel at an angle to the front of the chassis place the hinge slot on the bottom of the bezel over the flange on the bottom edge of the chassis 2 Swing the top of the bezel toward the chassis until the retaining tabs snap into place 3 Lock the front panel lock if necessary 8505945 book Page 29 Thursday March 9 2000 2...

Page 37: ...ent accidental or unauthorized access to the server controls hot plug drives and removable media drives To close the bezel door 1 Swing the bezel door to the left and press it firmly into place 2 Lock it if necessary 8505945 book Page 30 Thursday March 9 2000 2 13 PM ...

Page 38: ...ery tightly a tool may make the job easier The various clips tabs thumbscrews and other devices that allow toolless construction are color coded in green to show you where they are Most of these devices are either self explanatory or very easy to figure out When in doubt the steps and illustrations provided in this manual show you the way to remove any device you may need to replace 8505945 book P...

Page 39: ...an antistatic bag or container Before you install a drive see the drive documentation for information on configuring the drive setting any jumpers on the drive and attaching cables to the drive If you are installing a drive that uses an add in controller install the expansion card before you install the drive IDE hard drives can be configured as single master or slave IDE CD drives can be configur...

Page 40: ...e to connect the hot plug backplane to the integrated SCSI controller on the system board Replacing the diskette drive The diskette drive is near the bottom of the stack of drive bays If the diskette drive included with the system fails replace the drive To replace the diskette drive 1 Turn off the system and disconnect the power cord and all other external peripheral devices 2 Open the case See O...

Page 41: ...rails with the appropriate open bay then slide the drive into the bay until the locking tabs snap into place 9 Connect the power and data cables making sure the cables are in their original positions See your drive documentation for proper drive jumper settings and cable orientation 10 Close the case See Closing the case on page 27 11 Reconnect the power cord and all other external peripheral devi...

Page 42: ... on page 23 and Preventing static electricity discharge on page 22 3 Locate the 3 5 inch hard drive at the bottom of the drive stack 4 Remove the power and data cables from the hard drive 5 Grip the mounting rails firmly with thumb and index finger and pull the drive carefully straight out of the drive stack 6 Remove the mounting rails from the hard drive 7 Place the old drive in an antistatic bag...

Page 43: ...k then slide the drive into the stack until the locking tabs snap into place make sure that the data and power connectors on the drive face the inside of the server 10 Connect the power and data cables to the drive See the drive documentation for proper cable orientation 11 Close the case See Closing the case on page 27 12 Reconnect the power cord and all other external peripheral devices then tur...

Page 44: ...The backplane assigns SCSI IDs to the other drives in order up to SCSI ID 5 at the far right side of the hot plug bay Install drive in the left most drive bay first and in increasing order by SCSI ID number thereafter Important Gateway tests and verifies the operation and compatibility of the drives we sell Additional or replacement drives must conform to Gateway standards especially in a RAID or ...

Page 45: ...re are provided by the software manufacturer 2 Use the utilities to determine which drive needs to be replaced 3 If the drive carrier is locked use the hex key to unlock the carrier Locked drive carriers show a red flag in the slot on the carrier handle 4 Remove the drive from the drive bay by pressing down on the carrier handle and rotating the handle out and down from the front of the server 850...

Page 46: ...Drives 39 5 Continue pulling outward until the drive is entirely out of the system 8505945 book Page 39 Thursday March 9 2000 2 13 PM ...

Page 47: ... with the slots at the top and bottom of the drive bay Leave the handle in the down position 9 Push the drive all of the way into the drive bay until the handle starts to close because of contact with the front of the chassis Make sure the hooks on the bottom of the handle latch over the edge of the drive bay and firmly close the handle 10 Lock the drive carrier with the hex key 8505945 book Page ...

Page 48: ...nch SCA LVD SCSI hard drives The hot plug drives are assigned SCSI ID numbers by the hot plug backplane with the drive at the far left side of the hot plug bay assigned SCSI ID 0 The backplane assigns SCSI IDs to the other drives in order up to SCSI ID 5 at the far right side of the hot plug bay Install drive in the left most drive bay first and in increasing order by SCSI ID number thereafter SCS...

Page 49: ... the system make sure it slides straight into place until the plastic handle begins to move upward then close the handle To remove an empty drive carrier 1 If the drive carrier is locked use the hex key to unlock the carrier Locked drive carriers show a red flag in the slot on the carrier handle 2 Remove the drive carrier from the drive bay by pressing down on the carrier handle and rotating the h...

Page 50: ...Drives 43 3 Continue pulling outward until the drive carrier is entirely out of the system 8505945 book Page 43 Thursday March 9 2000 2 13 PM ...

Page 51: ...er 1 Remove the empty drive carrier as described in Removing an empty drive carrier on page 42 2 Remove the four screws that secure the support bracket and front assembly to the rails The two screws that secure the front assembly are threaded through small nuts The nuts are not used when you install a drive Nuts Front assembly Support bracket Rails 8505945 book Page 44 Thursday March 9 2000 2 13 P...

Page 52: ... 3 Install the drive into the carrier using the four screws you removed in Step 2 4 Align the drive rails with the slots at the top and bottom of the drive bay 8505945 book Page 45 Thursday March 9 2000 2 13 PM ...

Page 53: ...handle 7 Secure the drive by locking the drive carrier with the hex key Replacing the CD drive The CD drive is located in one of the 5 25 inch drive bays at the top of the drive stack in the front of the chassis To replace the CD drive 1 Turn off the system and disconnect the power cord and all other external peripheral devices 2 Open the case See Opening the case on page 23 and Preventing static ...

Page 54: ...ils are labeled Make sure the front rail extensions are towards the front of the drive 8 Align the rails with the open bay then slide the drive into the bay until the locking tabs snap into place 9 Connect the power and data cables making sure the cables are in their original positions See your drive documentation for proper cable orientation 10 Close the case See Closing the case on page 27 11 Re...

Page 55: ...ee Opening the case on page 23 and Preventing static electricity discharge on page 22 3 Remove the filler tray from the front of the drive bay by pressing in on both front rail extensions then move the tray slightly out of the bay by pushing on the back of the tray 4 Snap the rails onto the drive making sure the front rail extensions are towards the front of the device The rails are labeled 5 Alig...

Page 56: ...ons See the drive documentation for proper cable orientations 7 Close the case See Closing the case on page 27 8 Reconnect the power cord and all other external peripheral devices then turn on the system 9 Run the configuration software if required 8505945 book Page 49 Thursday March 9 2000 2 13 PM ...

Page 57: ...combined with unbuffered DIMMs Memory should be added in order from DIMM 1 to DIMM 4 There can be no empty slots between installed DIMMs No jumper settings are required for the memory size or type because the BIOS automatically detects this information To replace DIMMs 1 Turn off the system and disconnect the power cord and all other external peripheral devices 2 Open the case See Opening the case...

Page 58: ...cket 5 Gently press the DIMM into the socket until it is firmly seated Inserting the DIMM automatically locks the socket clamps on each end of the DIMM 6 Close the case See Closing the case on page 27 7 Reconnect the peripherals and the power cord then turn on the system 8505945 book Page 51 Thursday March 9 2000 2 13 PM ...

Page 59: ...from DIMM 1 to DIMM 4 There can be no empty slots between installed DIMMs No jumper settings are required for the memory size or type because the BIOS automatically detects this information To add DIMMs 1 Turn off the system and disconnect the power cord and all other external peripheral devices 2 Open the case See Opening the case on page 23 and Preventing static electricity discharge on page 22 ...

Page 60: ...g a processor order a processor upgrade kit from Gateway The kit includes the processor a fansink or heatsink and a disposable grounding wrist strap To replace a processor 1 Turn off the system and disconnect the power cord and all external peripheral devices 2 Open the case by following the instructions on page 23 See Preventing static electricity discharge on page 22 3 Disconnect the processor f...

Page 61: ...oward the processor When the tab that locks the processor in place opens lift up slightly on the side of the processor 6 Repeat the previous two steps for the other side of the processor 7 Pull the processor up and out of the slot 8505945 book Page 54 Thursday March 9 2000 2 13 PM ...

Page 62: ...ct the processor fan cable to the processor fan connector on the system board 10 Close the case See Closing the case on page 27 11 Reconnect the power cord and all other cords you removed then turn on the system Important Gateway recommends that you run a processor retest from the BIOS Setup utility whenever you replace or add a processor 8505945 book Page 55 Thursday March 9 2000 2 13 PM ...

Page 63: ...e kit includes the processor a fansink or heatsink and a disposable grounding wrist strap To add a second processor 1 Turn off the system and disconnect the power cord and all external peripheral devices 2 Open the case See Opening the case on page 23 and Preventing static electricity discharge on page 22 3 Remove the terminator card from the second processor slot to make room for the additional p...

Page 64: ...le to the second processor fan connector on the system board See System board on page 8 for location 6 Close the case See Closing the case on page 27 7 Reconnect the power cord and all other cords you removed then turn on the system Important Gateway recommends that you run a processor retest from the BIOS Setup utility whenever you replace or add a processor 8505945 book Page 57 Thursday March 9 ...

Page 65: ...e the battery For more information about the BIOS Setup utility see About the BIOS Setup utility on page 83 Warning Danger of explosion if battery is incorrectly replaced Replace only with the same or equivalent type recommended by manufacturer Dispose of used batteries according to manufacturer s instructions Warnung Explosionsgefahr bel falsch eingebautter batterie Ersetzen der batterien nur mit...

Page 66: ...the case as described in Closing the case on page 27 9 Reconnect the peripherals and the power cord then turn on the system 10 If the CMOS data is not correct change the information in the BIOS Setup utility using the data you recorded in Step 2 Troubleshooting the battery installation If you have problems after installing the new battery try each of the items listed below restarting the computer ...

Page 67: ...reconnect the cables Close the case as described in Closing the case on page 27 reconnect the modem and power cords then turn on the computer Turn off the computer remove the cover and if you have the proper test equipment make sure that the new battery has power Although unlikely your new battery may be defective Close the case as described in Closing the case on page 27 reconnect the power cord ...

Page 68: ...nnect the power cord and all external peripheral devices 3 Open the case See Opening the case on page 23 and Preventing static electricity discharge on page 22 4 Disconnect any cables attached to the card 5 Remove the existing card by pressing gently on the expansion card retention clip and sliding the retention clip back through the back panel and pressing upwards on the card guide release tab fo...

Page 69: ...to secure the card 9 Connect any cables to the card see card documentation for proper cable orientation 10 Close the case See Closing the case on page 27 11 Reconnect the peripherals and the power cord then turn on the system You may need to reconfigure the server after replacing an expansion card You may also need to install upgrade software that came with the card Check the card documentation fo...

Page 70: ...on card retention clip back through the back panel 5 Pull out the slot cover 6 Press the card guide release tab upward to release the cards and allow the new card to be inserted into the card guide for full length expansion cards 7 Insert the bottom edge of the expansion card the keyed edge with the contacts into the slot on the system board and push in firmly to seat the card Important The card g...

Page 71: ...s to the card see card documentation for proper cable orientation 10 Close the case See Closing the case on page 27 11 Reconnect the peripherals and the power cord then turn on the system You may need to reconfigure the server after installing some expansion cards You may also need to install software that came with the card Check the card documentation for additional information Expansion card re...

Page 72: ... offers fault tolerance and hot swap capabilities If one of the two modules fails the other module can support the system while the failed module is replaced A failed module is indicated by an audible alarm and the corresponding power supply status LED will begin to flash See Front panel on page 2 for the location and complete information on the function of the power supply status LEDs You do not ...

Page 73: ...lly pulling the failed module out of the power supply 4 Carefully insert the new power supply module into the vacant slot pressing firmly to seat the connector at the back 5 Tighten the thumbscrew to secure the new module in position A B Locking tab Thumbscrew 8505945 book Page 66 Thursday March 9 2000 2 13 PM ...

Page 74: ...stem will fail to power up To replace the redundant power supply 1 Turn off the system and disconnect the power cord and all peripherals 2 Open the case See Opening the case on page 23 and Preventing static electricity discharge on page 22 3 Disconnect the power supply connectors from all internal devices including the 3 5 inch diskette drive the CD drive and all hard drives 4 Disconnect the main ...

Page 75: ...dle attached to the power supply Move the power supply forward to clear the support bracket then tilt the left side of the power supply down to clear the side cover mounting rail as you pull it out 7 Make sure that the new power supply matches the one you removed The mounting holes should line up correctly and the specifications and power output connectors should be the same Handle 8505945 book Pa...

Page 76: ...assis 9 Replace the screws securing the power supply to the back panel 10 Reconnect the power connectors to the system board and to all internal devices 11 Close the case See Closing the case on page 27 12 Reconnect the power cord and all external peripherals then turn on the system Handle 8505945 book Page 69 Thursday March 9 2000 2 13 PM ...

Page 77: ...ge 23 and Preventing static electricity discharge on page 22 3 Disconnect the power supply connectors from all internal devices including the 3 5 inch diskette drive the CD drive and all hard drives 4 Disconnect the main power supply connector to the system board by pressing on the tab to release the connector then gently pull the connector from the board 5 While supporting the power supply with o...

Page 78: ...nd power output connectors should be the same 8 Place the new power supply in the proper position in the chassis and line up the mounting holes with the holes in the chassis 9 Replace the screws securing the power supply to the back panel and top panel 10 Reconnect the power connectors to the system board and to all internal devices 11 Close the case See Closing the case on page 27 12 Reconnect th...

Page 79: ...he system board See the illustration on page 6 for more information To remove the back panel fan 1 Turn off the system and disconnect the power cord and external peripherals 2 Open the case See Opening the case on page 23 and Preventing static electricity discharge on page 22 3 Depress the two locking tabs on the fan bracket then disengage the two retaining tabs from the back panel of the chassis ...

Page 80: ...an bracket unit into the chassis by engaging the two retaining tabs with the tabs on the back panel of the chassis and the release tabs with the slots in the back panel 7 Connect the fan power cable to the appropriate connector on the system board 8 Close the case See Closing the case on page 27 9 Reconnect the power cord and external peripherals then turn on the system 8505945 book Page 73 Thursd...

Page 81: ... 3 Disconnect the front panel connector from the control panel board 4 Remove the screw that secures the board to the front of the chassis 5 Lift the control panel board off of the hooks on the front panel and remove it 6 Install the new control panel board by placing the mounting slots of the control panel board on the tabs on the front of the chassis then slide the board down until it locks into...

Page 82: ...ides activity LEDs for each drive If the backplane fails you must replace it To replace the hot plug backplane 1 Turn off the system and disconnect the power cord and all external peripheral devices 2 Open the case See Opening the case on page 23 and Preventing static electricity discharge on page 22 3 Disconnect all cables to the hot plug backplane noting the connectors so you can reconnect them ...

Page 83: ...en toward the back of the system to remove it from the retention hooks 7 Lift the backplane out of the chassis 8 Set any jumpers on the new backplane that are required for your SCSI configuration See Hot plug backplane on page 11 for instructions 8505945 book Page 76 Thursday March 9 2000 2 13 PM ...

Page 84: ... place tighten the two captive thumbscrews 11 Reconnect all cables on the backplane to the correct connectors 12 Replace all hot plug drives Be careful to replace them in the same slots that they were in before you removed them 13 Close the case See Closing the case on page 27 14 Reconnect all peripherals and the power cord then turn on the system 8505945 book Page 77 Thursday March 9 2000 2 13 PM...

Page 85: ...e case on page 23 and Preventing static electricity discharge on page 22 3 Place the chassis gently on its right side 4 Remove all expansion cards from the system see Replacing an expansion card on page 61 5 Remove the back panel fan see Replacing the back panel and hot plug cage fans on page 72 6 Disconnect all cables from the system board including the power cables from the power supply Note whe...

Page 86: ...ew securing the board support tray to the right side of the chassis 8 Slide the board support tray toward the front of the chassis slightly to disengage it from the stand off retention hooks Retaining thumbscrew 8505945 book Page 79 Thursday March 9 2000 2 13 PM ...

Page 87: ...d the edge against the back panel out of the chassis 10 Remove the system board from the support tray by removing the seven screws and snapping it off of the two snap on standoffs then place the board in an anti static bag or container 11 Install the replacement system board on the tray 8505945 book Page 80 Thursday March 9 2000 2 13 PM ...

Page 88: ...the retaining screw on the right edge of the board support tray 14 Replace the back panel fan see Replacing the back panel and hot plug cage fans on page 72 15 Replace any expansion cards that you removed in Step 4 see Replacing an expansion card on page 61 16 Reconnect all cables on the system board to the correct connectors 17 Close the case See Closing the case on page 27 18 Reconnect all perip...

Page 89: ...82 Replacing and Adding Internal Devices 8505945 book Page 82 Thursday March 9 2000 2 13 PM ...

Page 90: ...g the startup process The Main BIOS Setup utility screen opens It may not look exactly like the screen shown below BIOS Setup Utility Main Advanced Security Server Boot Exit Item Specific Help System Time System Date Legacy Diskette A Legacy Diskette B Hard Disk Pre Delay Primary IDE Master Primary IDE Slave Secondary IDE Master Secondary IDE Slave Processor Settings Language xx xx xx xx xx xxxx e...

Page 91: ...lity F9 opens a screen that lets you return all values to their default settings F10 opens a screen that lets you save all settings then exit the BIOS Setup utility The main screen has the following menu selections at the top of the screen Main gives you access to basic information and settings related to your system hardware and configuration Advanced gives you access to information and settings ...

Page 92: ...IOS update diskette Update the BIOS Restore the BIOS settings Follow the detailed instructions for updating the BIOS that are included in the self extracting file that you can download from the technical support area of Gateway s Web site Important Whenever the BIOS is updated the microcode table is returned to the default setting To update the table to the proper settings for your processor you m...

Page 93: ...ke sure you turn off the computer and unplug the power cord before moving the jumper Password Clear jumper The Password Clear jumper on the system board pins 5 through 7 of jumper J2J1 lets you clear the passwords See the figure on page 8 for the location of the jumper Mode Jumper Setting Action When Set CMOS protected Pins 1 2 Normal operation default Clear CMOS Pins 2 3 Causes computer to clear ...

Page 94: ...to perform this task Make sure you turn off the computer and unplug the power cord before moving the jumper Mode Jumper Setting Action When Set Protect Pins 5 6 Normal operation default Clear Pins 6 7 Clears all passwords at bootup Caution Moving the jumper while the power is on can damage the server Always turn off the server and unplug the power cord before changing the jumper Mode Jumper Settin...

Page 95: ...am the BMC boot block using the correct utilities You can download these utilities from the Gateway Web site along with the latest version of the BMC firmware See the figure on page 8 for the location of the jumper Caution Incorrect programming of the boot block may leave the system unbootable Mode Jumper Setting Action When Set Normal Pins 13 14 BIOS boot block is write protected default BIOS upd...

Page 96: ...able shows the settings required to enable FRB Make sure you turn off the computer and unplug the power cord before moving the jumper Mode Jumper Setting Action When Set Normal Pins 1 2 BMC boot block is write protected default Writes enabled Pins 2 3 Allows BMC boot block to be programmed through the correct utilities Caution Moving the jumper while the power is on can damage the server Always tu...

Page 97: ...mper on the system board pins 9 through 11 on jumper J3J1 lets you update the BMC firmware during system boot See the figure on page 8 for the location of the jumper The following table shows the settings required to let you update the BMC Make sure you turn off the computer and unplug the power cord before moving the jumper Mode Jumper Setting Action When Set Enable Pins 5 6 Intrusion detection i...

Page 98: ... Setting Action When Set Normal Pins 9 10 Normal boot default Update BMC Pins 10 11 System updates BMC Caution Moving the jumper while the power is on can damage the server Always turn off the server and unplug the power cord before changing the jumper Mode Jumper Setting Action When Set Disabled Pins 1 2 Disables wake on LAN Enabled Pins 2 3 Enables wake on LAN default Caution Moving the jumper w...

Page 99: ...92 Using the BIOS Setup Utility 8505945 book Page 92 Thursday March 9 2000 2 13 PM ...

Page 100: ...ng your computer When purchasing a surge suppressor Make sure the surge suppressor meets the appropriate product safety certification for your location such as Underwriters Laboratories UL or Conformite European CE Check the maximum amount of voltage the suppressor allows to pass through the line The lower the voltage that the suppressor allows to pass through the better the protection for the ser...

Page 101: ...ork and shut down your computer You cannot run your computer for an extended period of time while using only the UPS Maintain and manage your hard drive Regular maintenance can keep your hard drive operating efficiently and good file management can keep the server free of unwanted files while making important files secure and easier to find Hard drive maintenance utility If you are using the Windo...

Page 102: ...or completing the scan Hard drive management practices By deleting unneeded files from your hard drive and managing the space that is automatically allocated for saving certain files you can help maintain the performance of the hard drive We suggest that you first check your hard drive for available space then back up important files prior to deleting unneeded files in case you delete important fi...

Page 103: ...rd drive you free up space on the hard drive and help improve hard drive performance The following sections give you some simple ways to delete unneeded files Deleting Windows temporary files During normal operation Windows constantly creates new temporary tmp files You can safely delete all but the most recent tmp files To delete tmp files 1 Open Windows Explorer then select Tools Find then Files...

Page 104: ...oved from the hard drive Instead the file is moved into the Recycle Bin Because files are stored in the Recycle Bin and not deleted from the hard drive immediately you can retrieve a file that you accidentally delete from the hard drive To delete all the files from the Recycle Bin right click the Recycle Bin icon on the desktop then click Empty Recycle Bin You can save space on the hard drive by d...

Page 105: ...he Internet After you run the anti virus program you can back up your files to diskettes a separate hard drive or a high capacity storage drive Keeping your anti virus program updated Obtaining all software from reputable sources and checking the software for viruses before installing it Disabling macros on suspicious Microsoft Word and Excel files These programs will warn you if a document that y...

Page 106: ...variances in a number of ways from an entry in the event log to a displayed message or audio alarm or even a complete server shutdown ISC also provides a system hardware inventory SCSI controller status LAN adapter status and BIOS and system slot information You can find additional information about Intel Server Control under Documentation on the 7210 Companion CD which came with the system Manage...

Page 107: ...includes a chassis intrusion switch When the access cover is opened the switch transmits an alarm signal to the system board where server management software processes the signal You can program a response to an intrusion for example the system may power down or lock the keyboard Software locks through the BIOS Setup utility The BIOS Setup utility provides several security features to prevent unau...

Page 108: ...re and enable the secure boot mode by using the BIOS Setup When secure mode is in effect you Can boot the system and run the OS but you must enter the user password to use the keyboard or mouse Cannot turn off system power or reset the system from the front panel switches Taking the system out of secure mode does not change the state of system power That is if you press and release the power switc...

Page 109: ...drive or a diskette in drive A it requests a password When you enter the password the system boots from CD or diskette and disables secure mode If you have not installed a CD ROM drive or if there is no CD in the drive or diskette in drive A the system boots from drive C and automatically enters secure mode All enabled secure mode features go into effect at bootup To leave secure mode enter the co...

Page 110: ... option using the BIOS Setup utility Once set passwords can be disabled by deleting the password or by changing the Password Clear jumper See Password Clear jumper on page 86 Boot without keyboard The system can boot with or without a keyboard During POST and before the system boots the BIOS automatically detects and tests the keyboard if present and displays a message Do not plug in a keyboard wh...

Page 111: ...ndows NT you are prompted to create a startup diskette If you did not choose to create a startup diskette at that time you may create one later by running the Windows NT upgrade installation program Perform this process by going to the DOS Command Prompt changing to the C I386 subdirectory and typing winnt32 ox Press ENTER and follow the prompts Using your 7210 Companion CD The 7210 Companion CD i...

Page 112: ... make sure that The power cord is connected to the AC power in connector and an AC outlet The AC outlet is supplying power If a power strip is used it is turned on setting the circuit breaker The voltage selection switch on the system power supply reflects the proper voltage Verifying your configuration If the server is not operating correctly the BIOS may contain an invalid configuration paramete...

Page 113: ... sure you are properly grounded before opening the system chassis See Chapter 3 Case Access for more information on preventing electrostatic damage to the system CD problems An audio CD produces no sound Probable cause Solution The CD is loaded incorrectly Make sure that the label is facing up then try again The speakers are not connected Make sure that the speaker cables are connected properly an...

Page 114: ... again The CDD is scratched or dirty Try cleaning the CD with a lint free cloth Make sure the disk is not scratched The CD drive needs to be added as new hardware In the Control Panel window Start Settings Control Panel double click Add New Hardware Follow the on screen instructions for adding the drive If you are not experienced with this procedure call Gateway Client Care The secondary IDE devic...

Page 115: ...d properly Probable cause Solution The primary IDE device may be configured incorrectly Restart your computer then press F1 to open the BIOS Setup utility From the Advanced IDE Configuration menu set the IDE Controller to Both and the Primary IDE Master to Auto The drive may not be configured properly Consult the hard drive user s guide for instructions on how to configure the drive The drive cabl...

Page 116: ...faulty chip Third party diagnostic programs can help determine which chip or memory segment is failing Probable cause Solution The processor was installed incorrectly Check the installation The processor should be recognized automatically if it was installed correctly The processor speed was not set correctly in the BIOS Setup utility If the server BIOS lets you select the processor speed make sur...

Page 117: ...dem is in use The modem is not configured with a valid interrupt or address Check the system settings for possible conflicts If one exists correct the problem by selecting an available interrupt and address Probable cause Solution The device needs to be added as new hardware From the Control Panel window Start Settings Control Panel double click Add New Hardware Follow the on screen instructions f...

Page 118: ... Some systems do not have a floppy controller card because the floppy controller is built into the system board Probable cause Solution The diskette is not IBM formatted Make sure that the diskette you are trying to format is IBM compatible If it is try reformatting it If not get another diskette The disk is write protected Make sure that the write protection window on the upper right corner of th...

Page 119: ...re that the power switch is depressed or set to the On position If power is applied to the printer the green power LED should be illuminated The printer is not plugged in Make sure that the power cable is plugged into a live power source The printer is defective Try another printer if one is available Probable cause Solution The printer is not connected to the system Make sure the data cable betwe...

Page 120: ...system is not connected to an AC outlet Make sure that the power cable is connected to an operating AC power source Voltage selection switch not set correctly Make sure that the voltage selection switch is set to the correct power source Power supply alarm buzzes and power supply status LED blinks indicating a failed power supply module Replace the indicated power supply module You can turn off th...

Page 121: ...obable cause Solution Keyboard is locked out when the password is set Enter the password A key was depressed while the system was starting up Clear the sticking key then turn off the system wait for a few seconds then turn the system back on The keyboard is not plugged in or connected properly Make sure the cable is properly connected Something spilled into the keyboard Turn off the system Turn th...

Page 122: ...second processor is not seated properly Open the system and reseat the terminator card or the second processor The monitor is not turned on Make sure that the monitor is plugged in and turned on If power is applied to the monitor the green power LED should illuminate The monitor data cable is not connected Make sure that the monitor data cable is connected to the video controller on the back of th...

Page 123: ...ideo adapter to remove and replace Probable cause Solution The monitor brightness and contrast controls are turned down Adjust the brightness and contrast knobs until the text becomes clear Sunlight is glaring off the display Position the monitor away from the sun or a window The monitor may be old Replace the monitor Probable cause Solution The system was turned on before the monitor Make sure th...

Page 124: ...e your monitor documentation for more information The connector or cable is damaged Check the connector and cable for bent or damaged pins The surge protector or UPS is damaged Disconnect the monitor power cable then connect it directly to the power source The monitor is too close to a source of electrical interference Move the monitor away from sources of electrical interference such as televisio...

Page 125: ...ansion This is an informational message only No action is required Checking RAM on disk controller Your BIOS configuration is incorrect Open the BIOS Setup utility then make sure the settings are correct CD ROM is not recognized See The system does not recognize the CD drive on page 107 for a possible solution Data error Use ScanDisk on the drive with the error Decreasing available memory Your BIO...

Page 126: ...r failure Make sure that the hard disk cable is properly connected Open the BIOS Setup utility then make sure that the correct drive type is selected Hard disk controller failure press F1 to try reboot The drive controller may be defective Press F1 to try to restart the computer Try running Fdisk and DOS Format For more information refer to your DOS documentation Insert bootable media device See T...

Page 127: ...ard controller failure Try a working keyboard Make sure that the keyboard is compatible with the system You may have to change the switch setting to AT Keyboard not detected See The keyboard does not work on page 114 for a possible solution Turn off the system then check the keyboard cable Keyboard stuck key failure Remove any objects that may be resting on the keyboard then restart the system Che...

Page 128: ...Required parameter missing Make sure that you entered the right command If you are trying to exit MS DOS to return to Windows type exit then press ENTER Syntax error Make sure that you entered the right command If you are trying to exit MS DOS to return to Windows type exit then press ENTER Time and date not set Open the BIOS Setup utility then set the system date and time Write protect error Move...

Page 129: ...122 Troubleshooting 8505945 book Page 122 Thursday March 9 2000 2 13 PM ...

Page 130: ...n the documentation are followed Setting up your system Read and follow all instructions marked on the product and in the documentation before you operate your system Retain all safety and operating instructions for future use Do not use this product near water or a heat source such as a radiator Make sure you set up the system on a stable work surface The product should only be operated from the ...

Page 131: ...ng to rest on it Do not spill anything on the system The best way to avoid spills is to avoid eating and drinking near your system Some products have a replaceable CMOS battery on the system board There is a danger of explosion if the CMOS battery is replaced incorrectly Replace the battery with the same or equivalent type recommended by the manufacturer Dispose of batteries according to the manuf...

Page 132: ...o cable These accessories are required to be used in order to ensure compliance with FCC rules FCC Part 68 applicable to products fitted with USA modems Your modem complies with Part 68 of the Federal Communications Commission FCC rules On the computer or modem card is a label that contains the FCC registration number and Ringer Equivalence Number REN for this device If requested this information ...

Page 133: ...uirement Canadian users ICES 003 This digital apparatus does not exceed the Class A limits for radio noise emissions from digital apparatus as set out in the radio interference regulations of Industry Canada Le présent appareil numérique n émet pas de bruits radioélectriques dépassant les limites applicables aux appareils numériques de Classe A prescrites dans le règlement sur le brouillage radioé...

Page 134: ...quivalence Numbers of all the devices does not exceed 5 European users European directives This Information Technology Equipment has been tested and found to comply with the following European directives EMC Directive 89 336 EEC amending directive 92 31 EEC 93 68 EEC as per EN 55022 1995 Class A EN 55024 1998 according to EN 61000 4 2 1995 EN 61000 4 3 1996 EN 61000 4 4 1995 EN 61000 4 5 1995 EN 6...

Page 135: ... the approval does not of itself give an unconditional assurance of successful operation on every PSTN termination point In the event of problems you should contact Gateway customer support Japanese users VCCI statement This equipment is in the Class A category Information Technology Equipment to be used in a residential area or an adjacent area thereto and conforms to the standards set by the Vol...

Page 136: ...ent shall not be set up to make automatic calls to the Telecom 111 Emergency Service Some parameters required for compliance with Telecom s Telepermit requirements are dependent on the equipment PC associated with this device The associated equipment shall be set to operate within the following limits for compliance with Telecom s Specifications a There shall be no more than 10 calls to the same n...

Page 137: ...ge unit size of grounding conductors location of antenna discharge unit connection to grounding electrodes and requirements for the grounding electrode Lightning protection For added protection of any Gateway product during a lightning storm or when it is left unattended or unused for long periods of time unplug the product from the wall outlet and disconnect the antenna or cable system Power line...

Page 138: ...Power service grounding electrode system NEC Art 250 Part H 3 Ground clamps 4 Grounding conductors NEC Section 810 21 5 Antenna discharge unit NEC Section 810 20 6 Ground clamp 7 Antenna lead in wire 1 3 4 5 6 7 2 Antenna and satellite grounding 8505945 book Page 131 Thursday March 9 2000 2 13 PM ...

Page 139: ...ial damages resulting from any defect or omission in this manual even if advised of the possibility of such damages In the interest of continued product development Gateway reserves the right to make improvements in this manual and the products it describes at any time without notices or obligation Trademark acknowledgments AnyKey black and white spot design CrystalScan Destination EZ Pad EZ Point...

Page 140: ...ort as many as two ATAPI IDE devices each hard drives or CDs for a total of as many as four IDE devices Diskette drive interface Diskette drive controller is integrated on the system board I O ports One parallel port two serial ports two USB ports one PS 2 keyboard port one PS 2 mouse port one RJ 45 network port Power supply 320 W PS 2 power supply or 350 W redundant power supply SCSI interfaces I...

Page 141: ...ied by diskette drive one 3 5 inch internal drive bay occupied by optional hard drive and six hot plug bays at least one is occupied by a 1 inch high hot plug drive Temperature operating 10 to 35 Celsius or 50 to 95 Fahrenheit Humidity operating 20 to 80 Altitude 200 feet to 10 000 feet Voltage AC input 90 to 135 VAC 180 to 265 VAC Frequency 47 to 63 Hz Certification FCC Class B ETL Listed to UL 1...

Page 142: ...4h Keyboard Controller 0061h NMI Status and Control Register 0063h NMI Status and Control Register 0065h NMI Status and Control Register 0067h NMI Status and Control Register 0070h NMI Mask bit 7 and RTC Address bits 6 0 0072h NMI Mask bit 7 and RTC Address bits 6 0 0074h NMI Mask bit 7 and RTC Address bits 6 0 0076h NMI Mask bit 7 and RTC Address bits 6 0 0071h RTC Data 0073h RTC Data 0075h RTC D...

Page 143: ...r 2 00C0h 00DFh DMA Controller 2 00F0h Clear NPX error 00F8h 00FFh x87 Numeric Coprocessor 0102h Video Display Controller 0170h 0177h Secondary Fixed Disk Controller IDE 01F0h 01F7h Primary Fixed Disk Controller IDE 0200h 0207h Game I O Port 0220h 022Fh Serial Port A 0238h 023Fh Serial Port B 0278h 027Fh Parallel Port 3 02E8h 02Efh Serial Port B 02F8h 02FFh Serial Port B 0338h 033Fh Serial Port B ...

Page 144: ...ary 0400h 043Fh DMA Controller 1 Extended Mode Registers 04D0h 04D1h Interrupt Controllers 1 and 2 Control Register 0678h 067Ah Parallel Port ECP 0778h 077Ah Parallel Port ECP 07BCh 07BEh Parallel Port ECP 0CA0 CA3h BMC Registers 0CF8h PCI CONFIG_ADDRESS Register 0CF9h NBX Turbo and Reset control 0CFCh PCI CONFIG_DATA Register 46E8h Video Display Controller Address Resource 8505945 book Page 137 T...

Page 145: ...eo or SMM memory 0C0000h and 0DFFFFh 128 KB Expansion card BIOS and buffer area 0F0000h to 0FFFFFh 128 KB System BIOS 0E0000h to 0EFFFFh 64 KB Extended system BIOS FC000000h to FFFFFFFFh 64 MB PCI memory space Important If you disable either IDE controller to free the interrupt for that controller you must physically unplug the IDE cable from the system board Simply disabling the drive by configur...

Page 146: ...ed by ACPI compliant operating system IRQ10 INT10 IRQ11 INT11 IRQ12 INT12 Mouse interrupt IRQ13 INT13 Co processor interrupt IRQ14 INT14 Compatibility IDE interrupt from primary channel IDE devices 0 and 1 IRQ15 INT15 SMI_L System management interrupt general purpose indicator sourced through the PID to the processors DMA Resource 0 Cascade 1 Available 2 Floppy Controller 3 Available 4 Redirect Ca...

Page 147: ...140 System Specifications 8505945 book Page 140 Thursday March 9 2000 2 13 PM ...

Page 148: ...4 backing up files 96 backplane hot plug features 11 replacing 75 battery replacing 58 troubleshooting 59 bezel removing 25 replacing 29 bezel door closing 30 opening 24 BIOS Setup utility 83 updating 85 BIOS Boot Block Write Enable jumper setting 88 BMC Boot Block Write Enable jumper setting 88 BMC Firmware Update jumper setting 90 Boot menu Setup utility 84 boot sequence setting 103 buttons disa...

Page 149: ...33 troubleshooting LED always on 111 not recognized 111 will not read write format 111 write protection summary 102 DMA usage 139 DPC direct platform control 100 drive carrier removing 42 unlocking 38 42 drives 5 25 inch device installing additional 48 cabling 33 CD drive replacing 46 checking available space 95 disk activity LED 2 13 diskette replacing 33 hard drive replacing non SCSI 35 hot plug...

Page 150: ...tures 13 replacing 74 G getting additional information vi guidelines troubleshooting 106 H hard drive maintenance 94 maintenance utilities 94 management 95 troubleshooting 108 hardware status 99 hot plug backplane features 11 backplane replacing 75 delay start jumper setting 11 drive activity LEDs 3 12 drive locks 3 fan replacing 72 replacing the cage fan 72 reserved LEDs 12 termination jumper set...

Page 151: ...sword Clear setting 86 system board 9 Recovery Boot setting 87 system board 9 setting 86 delay start hot plug 11 termination hot plug 12 system board location 8 Wake on LAN Enable setting 91 system board 9 K keyboard booting without one 103 port location 5 troubleshooting 114 L LAN 100 Mbit speed LED 5 activity LED 5 port location 5 LEDs 100 Mbit speed 5 disk activity 2 13 drive activity 12 front ...

Page 152: ...mouse 5 network 5 parallel 5 serial 5 USB 5 video 5 POST power on self test explained 18 power alarm speaker reset button 14 button 17 button location 3 14 disabling power button 102 indicator LED 2 13 input specifications 134 LED 17 module switches 4 replacing a power supply module 65 replacing N 1 power supply 67 replacing PS 2 power supply 70 replacing redundant power supply 67 source problems ...

Page 153: ... 35 memory 50 N 1 power supply 67 power supply module 65 processor 53 PS 2 power supply 70 redundant power supply 67 side panel 27 system board 78 reserved LED 2 3 13 reset alarm speaker button location 14 button location 3 13 button disabling 102 resetting the system Windows NT 20 resources DMA usage 139 I O addresses 134 interrupts 138 memory map 138 S safety accessories 124 general precautions ...

Page 154: ...erating system 18 safety precautions 123 server 15 setting up Windows NT 18 Setup utility Advanced menu 84 BIOS 83 Boot menu 84 Exit menu 84 Main menu 84 menus 84 navigating through 84 Power menu 84 Security menu 84 shut down procedures 19 side panel removing 26 replacing 27 software security features 102 space hard drive 95 specifications altitude 134 CPU 133 environmental 134 humidity 134 input ...

Page 155: ...10 add in cards 112 battery 59 CD drive 106 checklist 105 CPU 109 diskette drive LED always on 111 diskette drive will not read write format 111 diskette drive not recognized 111 error messages 118 expansion cards 112 guidelines 106 hard drive 108 IDE drives 108 keyboard 114 memory 109 modem 110 mouse 114 peripheral devices 110 printer 112 processor 109 SCSI device 110 SCSI drives 108 system 113 v...

Page 156: ...Index 149 Windows NT setup 18 shut down procedures 19 8505945 book Page 149 Thursday March 9 2000 2 13 PM ...

Page 157: ...A MAN US 7210 SYS GDE R0 2 00 ...

Reviews: