background image

CHAPTER 3: Using Your Gateway Notebook

18

Starting your notebook

Warning

Do not work for long

periods with the

notebook resting on

your lap. If the air vents

are blocked, the

notebook may

become hot enough to

harm your skin.

Caution

Provide adequate

space around your

notebook so air vents

are not obstructed. Do

not use the notebook

on a bed, sofa, rug, or

other similar surface.

Tips & Tricks

For more information

about changing the

power button mode,

see 

“Changing

notebook power

settings” on page 47

.

To start your notebook:


1

Lift the LCD panel.

2

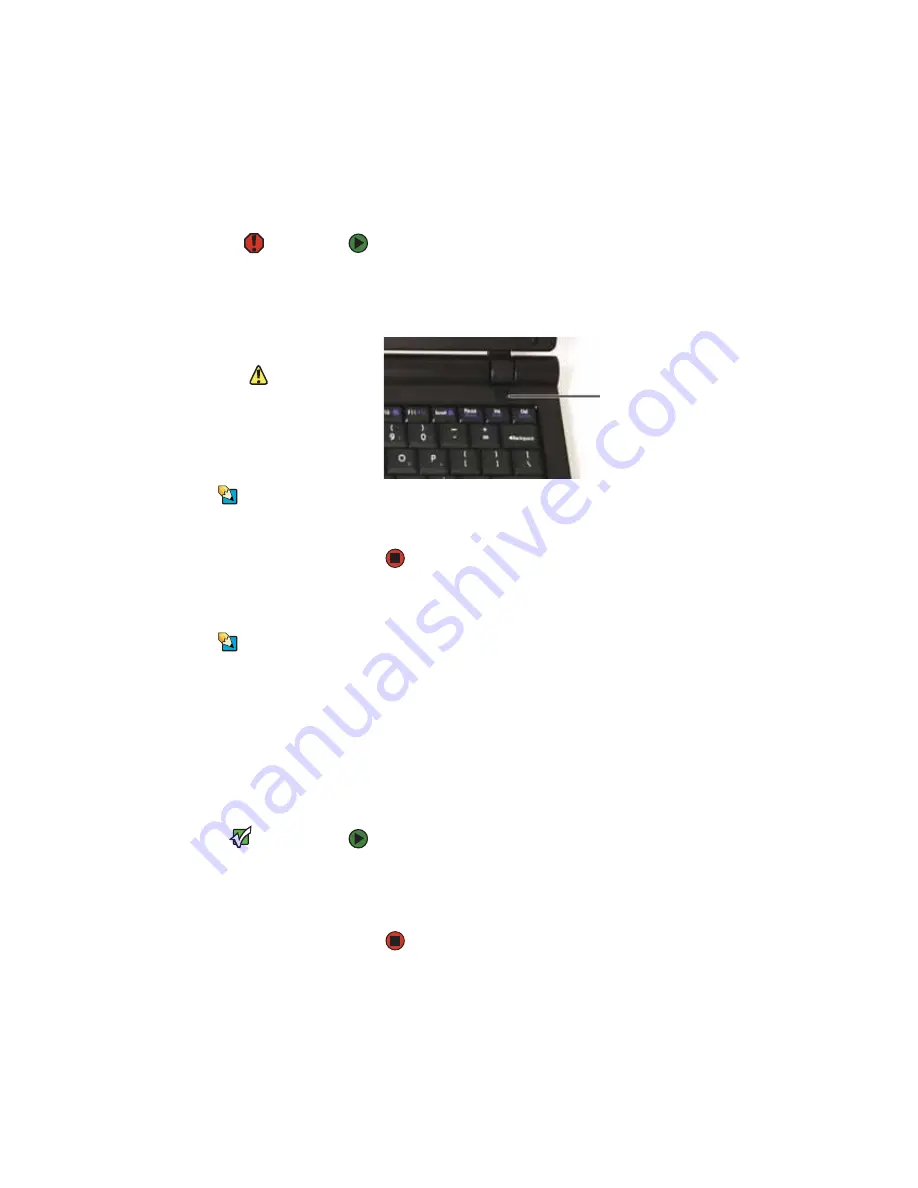
Press the power button located above the 
keyboard.

3

If you are starting your notebook for the 
first time, follow the on-screen instructions 
to set up your notebook.

Waking up your notebook

Tips & Tricks

For more information

about Standby mode,

see 

“Changing

notebook power

settings” on page 47

.

When you have not used your notebook for 
several minutes or if you close the LCD panel 
without turning off your notebook, it may enter 
a power-saving mode called 

Standby

. While in 

Standby, the power indicator flashes. If your 
notebook is in Standby mode, press the power 
button to “wake” it up.

Turning off your notebook

Important

If for some reason you

cannot use the Turn

Off Computer option

in Windows to turn off

your notebook, press

and hold the power

button for about five

seconds, then release

it.

To turn off your notebook:


1

Click 

Start

,


then click 

Turn Off Computer

The 

Turn Off Computer 

dialog box opens.

2

Click 

Turn Off

. Windows shuts down and 

turns off your notebook.

Power button

Summary of Contents for 200ARC

Page 1: ...REFERENCEGUIDE...

Page 2: ......

Page 3: ...k 13 Connecting the AC adapter 14 Protecting from power source problems 15 Connecting the dial up modem 16 Connecting to a cable or DSL modem or to a network 17 Starting your notebook 18 Waking up you...

Page 4: ...Chapter 5 Managing Power 41 Monitoring the battery charge 42 Recharging the battery 42 Changing batteries 43 Replacing the battery 43 Recalibrating the battery 44 Extending battery life 45 Conserving...

Page 5: ...lectricity discharge 66 Adding or replacing memory modules 67 Replacing the hard drive kit 70 Chapter 9 Troubleshooting 73 Safety guidelines 74 First steps 74 Troubleshooting 75 Audio 75 Battery 75 CD...

Page 6: ...g Gateway Customer Care 103 Telephone numbers 104 Self help 105 Tutoring 105 Training 106 Appendix A Safety Regulatory and Legal Information 107 Important safety information 108 Regulatory compliance...

Page 7: ...CHAPTER 1 1 Aboutthisreference About this guide Accessing the online User Guide Gateway contact information Microsoft Certificate of Authenticity For more information...

Page 8: ...guide the online User Guide has been included on your hard drive The User Guide is an in depth easy to read manual that includes information on the following topics Help and technical support Using an...

Page 9: ...tion The label on the bottom of your notebook contains information that identifies your notebook model and its features Gateway Customer Care will need this information if you call for assistance Micr...

Page 10: ...information For more information about your notebook visit Gateway sSupportpageatwww gateway comor the Web address shown on your notebook s label The Support page also has links to additional Gateway...

Page 11: ...CHAPTER 2 5 CheckingOutYourNotebook Front Left Right Bottom Keyboard area...

Page 12: ...ndby mode LED off notebook is off Battery charge indicator LED blue battery is fully charged LED purple battery is charging LED blinking red battery charge is very low LED solid red battery is malfunc...

Page 13: ...t block or insert objects into these slots If these slots are blocked your notebook may overheat resulting in unexpected shutdown or permanent damage to the notebook Caution Provide adequate space aro...

Page 14: ...ck For more information see Connecting to a cable or DSL modem or to a network on page 17 Modem jack Plug a dial up modem cable into this jack For moreinformation see Connecting the dial up modem on p...

Page 15: ...ee Replacing the hard drive kit on page 70 Speakers Provide audio output when headphones or amplified speakers are not plugged in Memory bay Install a memory module into this bay For more information...

Page 16: ...or insert objects into these slots If these slots are blocked your notebook may overheat resulting in unexpected shutdown or permanent damage to the notebook Caution Provide adequate space around your...

Page 17: ...see Changing notebook power settings on page 47 Keyboard Provides all the features of a full sized computer keyboard For more information see Using the keyboard on page 21 Touchpad Provides all the fu...

Page 18: ...CHAPTER 2 Checking Out Your Notebook 12...

Page 19: ...dial up modem Connecting to a cable or DSL modem or to a network Starting your notebook Turning off your notebook Restarting rebooting your notebook Using the status indicators Using the keyboard Usin...

Page 20: ...al cord or your notebook may be damaged Important If the battery is not fully charged before you use your notebook on battery power for the first time the battery life may be much shorter than you exp...

Page 21: ...f your notebook and leave your notebook connected to AC power until the battery charge indicator turns blue Protecting from power source problems Warning High voltages can enter your notebook through...

Page 22: ...s a built in 56K modem that you can use to connect to a standard telephone line To connect the modem 1 Insert one end of a modem cable into the modem jack on the right side of your notebook 2 Insert t...

Page 23: ...hat you can use to connect to a cable or DSL modem or to a wired Ethernet network To connect to a cable or DSL modem or to a wired Ethernet network 1 Insert one end of a network cable into the network...

Page 24: ...on screen instructions to set up your notebook Waking up your notebook Tips Tricks For more information about Standby mode see Changing notebook power settings on page 47 When you have not used your...

Page 25: ...losing unresponsive programs does not restore your notebook to normal operation you may have to restart reboot your notebook To close unresponsive programs and restart your notebook 1 Press CTRL ALT D...

Page 26: ...escription Wireless network optional LED on wireless IEEE 802 11 radio is turned on LED off wireless IEEE 802 11 radio is turned off Hard drive LED blinking hard drive is being accessed LED off hard d...

Page 27: ...rd Your notebook features a full size keyboard that functions the same as a desktop computer keyboard Many of the keys have been assigned alternate functions including shortcut keys for Windows functi...

Page 28: ...ctions For more information see System key combinations on page 23 FN key Press the FN key in combination with a colored system key to perform a specific action Windows key Press this key to open the...

Page 29: ...ned off while traveling in an airplane IEEE 802 11g IEEE 802 11b and IEEE 802 11a communication devices are examples of devices that provide wireless communication Enter Standby mode Press the power b...

Page 30: ...uch as outside in bright sunlight Press a second time to decrease the brightness below the normal lowest brightness setting Use this feature in dim lighting situations Press a third time to return the...

Page 31: ...ad touchpad set to only accept clicking by using the touchpad buttons You can change this feature to allow tapping on the touchpad to simulate clicking the leftbutton For more information see Changing...

Page 32: ...on the screen Position the pointer over the object Quickly press andreleasethe left button once This action is called clicking Start a program or open a file or folder Position the pointer over the o...

Page 33: ...using hardware controls If you are using external speakers turn the knob on the front of the speakers OR Use the mute and volume control buttons onthekeyboard Formoreinformation see System key combin...

Page 34: ...cted or eliminated Airports hospitals and oxygen or flammable gas laden atmospheres are limited examples where use of wireless devices may be restricted or eliminated When in environments where you ar...

Page 35: ...t using your notebook ona wireless network see Wireless Networking in the online User Guide Tips Tricks For more information about using Bluetooth click Start All Programs My Bluetooth Places When the...

Page 36: ...CHAPTER 3 Using Your Gateway Notebook 30...

Page 37: ...APTER 4 31 UsingAccessories Using the memory card reader Adding and removing a PC Card Installing a printer or other peripheral device Viewing the display on a projector or monitor Ordering accessorie...

Page 38: ...gital cards require the use of an adapter that is available with the media The memory card reader supports Memory Stick Memory Stick Pro Mini Secure Digital MultiMediaCard RS MultiMediaCard and Secure...

Page 39: ...a memory card 1 Push the memory card into your notebook The memory card pops out slightly 2 Pull the memory card out of your notebook Adding and removing a PC Card Your notebook has a PC Card slot al...

Page 40: ...our notebook To remove a PCCard Important If the remove hardware icon does not appear on the taskbar click the show hidden icons button 1 Click the remove hardware icon in the taskbar the PC Card name...

Page 41: ...umentation and installation instructions Help and Support For more information about installing peripheral devices click Start then click Help and Support Type the keyword installing devices in the Se...

Page 42: ...1 Connect one end of the USB cable to your device 2 Connect the other end of the cable to a USB port on your notebook Connecting an IEEE 1394 video camera or MP3 player Important For more information...

Page 43: ...aneous display lets you control the presentation from your notebook and at the same time face your audience To use a projector or external monitor 1 Turn off your notebook 2 Plug the projector or moni...

Page 44: ...oes not have a built in CD or DVD drive You can purchase an external drive to install programs play audio CDs play DVDs access data and record music video and data See the user guide for the disc driv...

Page 45: ...ort replicator with your notebook Printers You can attach almost any type of printer to your notebook The most common types are inkjet and laser printers which print in color or black and white Inkjet...

Page 46: ...CHAPTER 4 Using Accessories 40...

Page 47: ...CHAPTER 5 41 ManagingPower Monitoring the battery charge Recharging the battery Recalibrating the battery Extending battery life Changing notebook power settings...

Page 48: ...to AC power balanced with optimized battery life when on battery power Closely monitor the battery charge When the battery charge gets low change the battery or connect to AC power immediately to prev...

Page 49: ...is turned on If your notebook is not plugged into an AC outlet you must turn the notebook off while changing the battery or you will lose any unsaved data To replace the battery 1 If your notebook is...

Page 50: ...ry gauge To recalibrate the battery 1 Connect your notebook to AC power and let the battery charge completely 2 Disconnect the AC power and restart your notebook 3 Completely discharge the battery by...

Page 51: ...on about traveling with your notebook see Traveling with Your Notebook on page 55 To conserve power while using the battery to power your notebook Dim the display as low as is comfortable Remove PC Ca...

Page 52: ...not use a power adapter To find AC power outlets in airports look for them next to support pillars in large areas such as boarding gates and under banks of telephones Changing power modes You can use...

Page 53: ...hanging notebook power settings You can change the function of your notebook s power button Standby system key and power saving timers by changing power settings on your notebook You can customize pow...

Page 54: ...is automatically turned off You can select one of the defined power schemes or create a custom power scheme The processor installed in your notebook may use Intel SpeedStep technology to conserve batt...

Page 55: ...your Control Panel is in Category View click Performance and Maintenance 2 Click Double click the Power Options icon The Power Options Properties dialog box opens 3 Click the arrow button to open the...

Page 56: ...box then click the arrow Alarms can alert you when the battery charge is low To change the alarm options 1 Click Start then click Control Panel The Control Panel window opens If your Control Panel is...

Page 57: ...r button and Standby system key You can also select which power saving mode is activated when you close the LCD panel To change advanced power management settings 1 Click Start then click Control Pane...

Page 58: ...ime you turn on your notebook it reads the memory information from the hard drive and opens the programs and documents that were open when you activated Hibernate mode To activate Hibernate mode 1 Cli...

Page 59: ...ns Properties dialog box then click the Power Schemes tab Click the arrow button to open a System hibernates list then click the time you want to use OR Open the Power Options Properties dialog box th...

Page 60: ...CHAPTER 5 Managing Power 54...

Page 61: ...CHAPTER 6 55 TravelingwithYourNotebook Packing your notebook Traveling by air Dial up modem Radio frequency wireless connections Files Security Power Additional tips...

Page 62: ...ng around in overhead bins and car trunks Traveling by air Do not check your notebook as luggage Charge the battery in case airport security asks you to start your notebook Have your notebook hand ins...

Page 63: ...the local radio approval authorities prior to your trip for any restrictions on the use of a wireless device in the destination country If your notebook came equipped with an internal embedded wireles...

Page 64: ...r your notebook so you can attach a cable lock and leave your notebook in your hotel room while you are away Always keep your notebook with you while waiting in airports train stations or bus terminal...

Page 65: ...r plug adapters Take a portable surge protector to protect your notebook from power surges To get the best performance from your notebook avoid using the battery whenever possible monitor the battery...

Page 66: ...nally Consult your insurance company and credit card company to learn about emergency travel assistance if your notebook is lost or damaged Take an external optical drive and your recovery discs see D...

Page 67: ...CHAPTER 7 61 MaintainingYourNotebook Caring for your notebook Cleaning your notebook Cleaning CDs or DVDs...

Page 68: ...ittle and easy to break in cold temperatures and can melt or warp in high temperatures Damage due to either extreme is not covered by your warranty As a general rule your notebook is safest at tempera...

Page 69: ...d network cable from the wall outlets Tips Tricks You may want to occasionally open the memory bay door and remove dust and lint usinganaerosolcanof air Always turn off your notebook and other periphe...

Page 70: ...again Ifthekeyboard does not work after it dries you may need to replace it A replacement keyboard may not be covered by your warranty Cleaning the notebook screen Caution A notebook LCD screen is mad...

Page 71: ...CHAPTER 8 65 UpgradingYourNotebook Preventing static electricity discharge Adding or replacing memory modules Replacing the hard drive kit...

Page 72: ...sitive to static electricity also known as electrostatic discharge ESD Before installing or replacing components follow these guidelines Avoid static causing surfaces such as carpeted floors plastic a...

Page 73: ...ies and any module can be placed in any slot To add or replace memory modules 1 Follow the guidelines under Preventing static electricity discharge on page 66 2 Turn off your notebook 3 Disconnect fro...

Page 74: ...grading Your Notebook 68 7 Loosen the captive memory bay cover screw this screw cannot be removed 8 Gently press outward on the clip at each end of the memory module until the module tilts upward Scre...

Page 75: ...an only be inserted in one direction If the module does not fit make sure that the notch in the module lines up with the tab in the memory bay 11 Gentlypushthemoduledownuntilitclicks in place 12 Repla...

Page 76: ...ne number shown on the label on the bottom of your notebook for more information 1 Create a Drivers and Applications Recovery disc For more information see Creating Drivers and Applications Recovery d...

Page 77: ...mation see Changing batteries on page 43 10 Remove the two hard drive bay cover screws 11 Slidethe hard drivebay cover thenremove it The hard drive is attached to the back of the cover 12 Remove the s...

Page 78: ...to the drive 17 Slide the new hard drive into your notebook then replace the cover screws 18 Insert the battery then turn your notebook over 19 Connect the optional port replicator OR Connect the powe...

Page 79: ...CHAPTER 9 73 Troubleshooting Safety guidelines First steps Troubleshooting Telephone support...

Page 80: ...reyouremovethememorybayorhard drive bay cover make sure that you replace the cover reinstall any screws then replace the battery before you start your notebook First steps Help and Support For more in...

Page 81: ...help Troubleshooting Audio Audiotroubleshootingiscoveredunder Sound on page 101 Battery Battery troubleshooting is covered under Power on page 98 CD drives CD drive troubleshooting is covered under E...

Page 82: ...ist for a resource conflict A resource conflict appears as a black exclamation point in a yellow circle 2 Remove the device you are trying to install then determine which one of the existing devices o...

Page 83: ...on is normal and inherent in the TFT technology used in active matrix LCD screens Gateway s inspection standards keep these to a minimum If you feel these pixels are unacceptably numerous or dense on...

Page 84: ...may be experiencing some temporary memory problems Shut down and restart your notebook Clean the disc For more information see Cleaning CDs or DVDs on page 64 An audio CD does not produce sound Make...

Page 85: ...in the online User Guide A DVD movie will not play Make sure that the label or side you want to play is facing up then try again Make sure that you have a DVD drive and not a CD drive Shut down and r...

Page 86: ...nstructions on deleting unnecessary files see Deleting unnecessary files in the online User Guide Caution All deleted files will be lost when you empty the Recycle Bin Help and Support For more inform...

Page 87: ...port For more information about troubleshooting Internet connections click Start then click Help and Support Type the keyword troubleshooting connections in the Search box then click the arrow You can...

Page 88: ...f users accessing those computers The complexity of graphics and multimedia on Web pages Having multiple Web browsers open performing multiple downloads and having multiple programs open on your noteb...

Page 89: ...For more information about using your keyboard see Using the keyboard on page 21 You are pressing a letter key and a number appears on the screen The numeric keypad is turned on Media Center To view...

Page 90: ...tter quality than an antenna Type of connection used You can connect the Media Center computer video output to a TV However the connection type has an affect on the video quality If your TV includes a...

Page 91: ...00 or 640 480 Size of display device Small computer monitors for standard computer applications are generally not optimized for motion videoplayback Althoughtheyoffer excellent resolutions and refresh...

Page 92: ...without the odd even interlacing This results in a fuller sharper picture and better display quality for viewing and using the Media Center computer functions The progressive scan picture is also brig...

Page 93: ...th Service Pack SP 1 or 2 Windows Media Player 9 or later and the Windows patch Q810243 Update You want to know whether you can play recorded videos on your home DVD player Yes you can DVDs recorded w...

Page 94: ...net network jack Make sure that your notebook is connected to the telephone line and the telephone line has a dial tone Make sure that the modem cable is less than 6 feet 1 8 meters long Remove any li...

Page 95: ...Make sure that you are not using a digital rollover or PBX line These lines do not work with your modem Check for line noise scratchy crackling or popping sounds Line noise is a common problem that c...

Page 96: ...r 56K modem does not connect at 56K Current FCC regulations restrict actual data transfer rates over public telephone lines to 53K Other factors such as line noise telephone service provider equipment...

Page 97: ...m troubleshooting in the Search box then click the arrow To run modem diagnostics 1 Close all open programs 2 Click Start then click Control Panel The Control Panel window opens If your Control Panel...

Page 98: ...rt then click Control Panel The Control Panel window opens If your Control Panel is in Category View click Printers and Other Hardware 2 Click Double click the Phone and Modem Options icon then click...

Page 99: ...modem Make sure that all computers are plugged into a powered electrical outlet and turned on Make sure that the router is plugged into a powered electrical outlet and turned on Most routers have ligh...

Page 100: ...cess point This reestablishes communication between your Internet Service Provider and your modem and between your modem and your access point If you previously accessed the Internet through a dial up...

Page 101: ...you expect The speed of a wireless network is related to signal strength Signal strength is affected by the distance between your wireless network devices by radio interference and by interference fr...

Page 102: ...o available networks are listed in the Windows XP Wireless Networking utility Ifthenetwork you are attemptingto access does not broadcast its SSID you need to request the SSID from the administrator a...

Page 103: ...aming your computers and workgroup in the online User Guide Ifyournotebookwaspreviouslyconnected directly to your cable or DSL modem and your ISP requires you to use a static IP address your notebook...

Page 104: ...u have correctly installed required software for thePC Card Formore information see your PC Card s documentation Make sure that the PC Card you installed is not causing a system resource conflict For...

Page 105: ...rged For more information see Recharging the battery on page 42 Make sure that the battery is calibrated correctly Let the battery return to room temperature Printer Help and Support For more informat...

Page 106: ...d Faxes window opens 3 Right click the name of the printer you want to be the default printer then click Set as Default Printer Reinstall the printer driver See the guide that came with your printer f...

Page 107: ...ound Tips Tricks For more information about using your volume control see Adjusting the volume on page 27 Help and Support For more information about troubleshooting sound issues click Start then clic...

Page 108: ...settings see Changing touchpad settings in the online User Guide The pointer moves unexpectedly Clean the touchpad with a damp cloth water only and wipe it dry Adjust the touchpad settings For instruc...

Page 109: ...eyboard or mouse does not appear to work make sure that all cables are plugged in securely If you have recently installed hardware or software make sure thatyou have installed it according to the inst...

Page 110: ...m and your telephone keypad to find answers to common problems 800 846 2118 Resource Service description How to reach Answers by Gateway Get tutorial assistance for hardware and software issues Thisis...

Page 111: ...ional product information and online documentation for Gateway supplied hardware can be found in our Web site s Documentation Library This user guide The software publisher s Web site Tutoring Answers...

Page 112: ...are available on CD Select from several easy to use learning libraries www gateway com training Online Training from Learn With Gateway More than 450 online courses are available from Learn With Gate...

Page 113: ...APPENDIX A 107 Safety Regulatory andLegalInformation Important safety information Regulatory compliance statements Environmental information Notices...

Page 114: ...d on the notebook and in the documentation before you operate your notebook Retain all safety and operating instructions for future use Do not use this notebook near water or a heat source such as a r...

Page 115: ...uildup of static charges Care during use Do not walk on the power cord or allow anything to rest on it Do not spill anything on the notebook The best way to avoid spills is to avoid eating and drinkin...

Page 116: ...ing Radio frequency wireless communication can interfere with equipment on commercial aircraft Current aviation regulations require wireless devices to be turned off while traveling in an airplane 802...

Page 117: ...y the Radio Approval Marks on the system rating label If the country you willbeusing the wireless device in is not listed please contact your local Radio Approval agency for requirements Wireless devi...

Page 118: ...re not user serviceable Do not modify them in any way Modification to a wirelessdevice will void the authorization to use it Contact Gateway for service Caution The transmitting device embedded in thi...

Page 119: ...harmful interference and 2 this device must accept any interferencereceived including interferencethatmaycauseundesiredoperation of the device Unintentional emitter per FCC Part 15 This device has bee...

Page 120: ...ebook Caution Recycle or dispose of the used notebook properly according to federal state and local laws Responsible party Gateway Companies Inc 610 Gateway Drive North Sioux City SD 57049 605 232 200...

Page 121: ...a telephone line may result in the devices not ringing in response to an incoming call In most areas thesum of RENs should not exceedfive 5 To be certain of the number of devices that may be connecte...

Page 122: ...achine or suchbusiness otherentity orindividual Refer to your fax communication software documentation for details on how to comply with the fax branding requirement Canada Industry Canada IC Intentio...

Page 123: ...conditions 1 Thisdevicemaynot cause harmful interference and 2 this device must accept any interferencereceived including interferencethatmaycauseundesiredoperation of the device Unintentional emitter...

Page 124: ...ical shock or equipment malfunction do not attempt to make electrical ground connections by yourself Contact the appropriate inspectionauthority or an electrician as appropriate Users should make sure...

Page 125: ...fied as Class 1 Laser Products under a US Department of Health and Human Services DHHS Radiation Performance Standard Should the unit ever need servicing contact an authorized service location Environ...

Page 126: ...ck to your local or regional waste collection administration for recycling In some cases your end of life product may be traded in for credit towards the purchase of new Gateway equipment Call Gateway...

Page 127: ...e information in this manual has been carefully checked and is believed to be accurate However changes are made periodically These changes are incorporated in newer publication editions Gateway may im...

Page 128: ...ration All other product names mentioned herein are used for identification purposes only and may be the trademarks or registered trademarks of their respective companies Macrovision statement If your...

Page 129: ...ons 42 installing main 43 latch 9 locating 9 managing power 45 monitoring charge 42 purchasing 38 recalibrating 44 recharging 14 42 release latch 9 replacing 43 battery alarm options 50 bays battery 4...

Page 130: ...udio 8 external diskette drive 8 36 external speakers 8 Firewire 8 35 flash drive 8 36 headphone 8 i Link 8 35 IEEE 1394 8 35 keyboard 8 microphone 8 modem dial up 8 16 monitor VGA 7 37 mouse 8 networ...

Page 131: ...r 20 installing 70 purchasing 38 replacing 70 troubleshooting 80 headphone jack 8 Hibernate mode 46 52 hot swapping 33 35 I i Link port 8 35 IEEE 1394 port 8 35 IEEE 802 11 using while traveling 57 in...

Page 132: ...ock cable 58 Kensington cable 8 M maintenance cleaning 63 64 Media Center troubleshooting 83 memory bay 9 installing 67 purchasing 38 removing 67 replacing 67 troubleshooting 87 memory card reader loc...

Page 133: ...pointer identifying 25 moving 26 port replicator docking port 7 using 39 power AC adapter 14 46 advanced settings 47 51 alarms 50 automobile airplane adapter 46 battery 42 43 44 45 button 11 23 changi...

Page 134: ...ting 26 scroll zone 25 security features Kensington cable lock 8 security while travelling 58 serial number 3 58 setting up safety precautions 108 shortcut menus accessing 26 shortcuts opening menu 26...

Page 135: ...106 travel tips 55 troubleshooting audio 101 automated system 104 device installation 75 display 76 DVD drive 78 faxes 90 files 80 general guidelines 74 hard drive 80 Internet connection 81 90 IRQ co...

Page 136: ...27 adjusting modem 92 controls 27 muting 24 27 system keys 24 troubleshooting 101 W waking up notebook 18 Windows key 22 Product Key Code 3 wired Ethernet troubleshooting 93 wireless Ethernet using wh...

Page 137: ......

Page 138: ...MAN CYCLOPS REF GDE XP R2 8 07...

Reviews: