background image

Installing Garmin Express

The Garmin Express application is available for Windows

®

 and Mac

®

 computers.

On your computer, go to 

garmin.com/express

.

Select an option:

• To view the system requirements and verify the Garmin Express application is compatible with your 

computer, select System Requirements.

• To install on a Windows computer, select Download for Windows.
• To install on a Mac computer, select Download for Mac.

Open the downloaded file, and follow the on-screen instructions to complete the installation.

Device Care

NOTICE

Avoid dropping your device.
Do not store the device where prolonged exposure to extreme temperatures can occur, because it can cause 
permanent damage.
Never use a hard or sharp object to operate the touchscreen, or damage may result.
Do not expose the device to water.

Cleaning the Outer Casing

NOTICE

Avoid chemical cleaners and solvents that can damage plastic components.

Clean the outer casing of the device (not the touchscreen) using a cloth dampened with a mild detergent 

solution.

Wipe the device dry.

Cleaning the Touchscreen

Use a soft, clean, lint-free cloth.
If necessary, lightly dampen the cloth with water.
If using a dampened cloth, turn off the device and disconnect the device from power.
Gently wipe the screen with the cloth.

Avoiding Theft

• Remove the device and mount from sight when not in use.
• Remove the residue left on the windshield by the suction cup.
• Do not keep your unit in the glove compartment.
• Register your device using the Garmin Express software (

garmin.com/express

).

Resetting the Device

You can reset your device if it stops functioning.

Hold the power key for 12 seconds.

Removing the Device, Mount, and Suction Cup

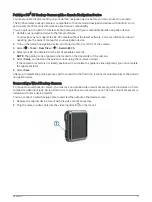
Removing the Mount from the Suction Cup

Loosen the nut that secures the magnetic powered mount to the suction cup ball.
Turn the device mount to the right or left.
Apply pressure until the socket on the mount releases the ball on the suction cup.

Device Maintenance

53

Summary of Contents for RV 890

Page 1: ...RV890 CAMPER890 RV1090 CAMPER1090 Owner sManual...

Page 2: ...its subsidiaries These trademarks may not be used without the express permission of Garmin Android is a trademark of Google Inc Apple and Mac are trademarks of Apple Inc registered in the U S and othe...

Page 3: ...tination 15 Changing Your Active Route 15 Adding a Location to Your Route 15 Shaping Your Route 15 Taking a Detour 16 Changing the Route Calculation Mode 16 Stopping the Route 16 Using Suggested Route...

Page 4: ...the Trip Log 29 Resetting Trip Information 29 Viewing Upcoming Traffic 29 Viewing Traffic on the Map 29 Searching for Traffic Incidents 30 Customizing the Map 30 Customizing the Map Layers 30 Changing...

Page 5: ...a Station as a Preset 41 Selecting a Preset from a List 41 Removing Presets 41 Audio Settings 41 Speaker Zone Settings 41 Logging Service History 42 Adding Service Categories 42 Deleting Service Cate...

Page 6: ...ng Considerations 55 Mounting the Device 56 Opening the Front Cover 57 Connecting Accessories 58 Connecting a Control Input 59 Connecting the Device to Vehicle Power 59 Pairing with a Garmin Navigatio...

Page 7: ...re Using a Wi Fi Network page 51 Mount the device in your vehicle and connect it to power Mounting and Powering the Device in Your Vehicle page 3 Adjust the volume Adjusting Sound and Notification Vol...

Page 8: ...ew Microphone for hands free calling and voice command Volume control Power key Micro USB power and data port Map and data memory card slot Magnetic mount interface with 14 pin connector Speaker 2 Get...

Page 9: ...ronic devices including pacemakers insulin pumps or hard drives in laptop computers Keep the device away from medical devices and electronic devices Before you use your device on battery power you sho...

Page 10: ...he thumbscrew on the suction cup arm and the nut on the ball mount 5 Place the device onto the magnetic mount 6 Plug the other end of the vehicle power cable into a power outlet in your vehicle 4 Gett...

Page 11: ...illing pilot holes and attaching the mount to the vehicle Garmin is not responsible for any damages or consequences arising from the installation NOTICE Garmin recommends professional installation of...

Page 12: ...ing the Device On or Off To turn the device on press the power key or connect the device to power To put the device in power saving mode press the power key while the device is on While in power savin...

Page 13: ...ng Location Services page 49 3 If necessary go to an open area with a clear view of the sky away from tall buildings and trees Acquiring Satellites appears at the top of the navigation map until the d...

Page 14: ...of notifications appears 2 Select an option To launch the action or app mentioned in the notification select the notification To dismiss a notification swipe the notification to the right Status Bar...

Page 15: ...ding restricted or impassable areas in routes based on the dimensions weight and other characteristics you entered for your vehicle Adding a Vehicle Profile You should add a vehicle profile for each c...

Page 16: ...your vehicle profile the device avoids routing through areas with propane tank restrictions that may affect your route The device also alerts you when you approach areas that require you to shut off...

Page 17: ...ature Traffic page 34 Risk of grounding The device plays a tone and displays a message when you approach a road where your vehicle could become grounded Lateral wind The device plays a tone and displa...

Page 18: ...he recommended route select Go To choose an alternate route select and select a route Alternate routes appear to the right of the map To edit the course of the route select Edit Route and add shaping...

Page 19: ...ion and the lane in which you should travel if available Name of the street or exit associated with the next action Route highlighted on the map Next action in the route Arrows on the map indicate the...

Page 20: ...elect a turn or direction optional Detailed information appears An image of the junction may appear for junctions on major roadways if available Viewing the Entire Route on the Map 1 While navigating...

Page 21: ...eduled stops you can use the trip planner to plan schedule and save a trip Planning a Trip page 36 1 From the map select Where To 2 Search for a location Finding and Saving Locations page 18 3 Select...

Page 22: ...es Before you can use this feature you must save at least one location and enable the travel history feature Navigation Settings page 47 Using the myTrends feature your device predicts your destinatio...

Page 23: ...re toll stickers select Avoid To always allow roads that require toll stickers select Allow Avoiding Road Features 1 Select Settings Navigation Avoidances 2 Select the road features to avoid on your r...

Page 24: ...device select Search Finding a Location Using the Search Bar page 20 To find an address select Address Finding an Address page 20 To browse or search pre loaded points of interest by category select C...

Page 25: ...national parks appears with the nearest park at the top 2 Select Search and enter all or part of the park name to narrow the results optional 3 Select a national park A list of categories for location...

Page 26: ...g the text you entered select 6 If necessary select a location Finding an Address NOTE The order of the steps may change depending on the map data loaded on your device 1 Select Where To 2 If necessar...

Page 27: ...g the recommended route Changing the Search Area By default the device searches for locations near your current location You can also search other areas such as near your destination near another city...

Page 28: ...ing trends NOTE Detailed parking data is not available in all areas or for all parking locations Garmin is not responsible for the accuracy or timeliness of live parking data Finding Parking Near Your...

Page 29: ...o your Foursquare account using the Garmin Drive app the search provides the most up to date results from the online Foursquare database and customized results from your Foursquare user account Connec...

Page 30: ...o the location select Go To view the phone number and other location details select Getting Directions to Your Current Location If you need to tell another person how to get to your current location y...

Page 31: ...Edit the information 8 Select Done Assigning Categories to a Saved Location You can add custom categories to organize your saved locations NOTE Categories appear in the saved locations menu after you...

Page 32: ...isplays elevation changes ahead Traffic Displays traffic conditions along your route or in your area Viewing Upcoming Traffic page 29 This feature is not available in all areas or for all device model...

Page 33: ...ighway the Cities Ahead tool provides information about upcoming cities along the highway For each city the map tool shows the distance to the highway exit and the services available similar to the in...

Page 34: ...eight Trailer length Trailer width No boat trailers allowed No campers allowed No trailers allowed No propane No left turn No right turn No U turn Road Condition Warnings Risk of grounding Lateral win...

Page 35: ...ll to reset every data field except the speedometer on the first page Select Reset Overall Data to reset Trip A and total data Select Reset Max Speed to reset the maximum speed Select Reset Trip B to...

Page 36: ...op Select 3 D to display the map in three dimensions Live Services Traffic and Smartphone Features The Garmin Drive app allows your device to receive smart notifications and live information such as l...

Page 37: ...her 2 On your device enable Bluetooth wireless technology 3 On your headset or phone enable Bluetooth wireless technology and ensure it is visible to other Bluetooth devices 4 On your device select Se...

Page 38: ...eadsets are supported and can be used a particular phone or headset cannot be guaranteed to be compatible All features may not be available for your phone Using Bluetooth wireless technology your devi...

Page 39: ...n the Garmin Drive app 2 Select Smart Notifications A list of smartphone app categories appears 3 Select a category to enable or disable notifications for that type of app Showing or Hiding Notificati...

Page 40: ...ing a Traffic Receiver NOTICE Heated metallized windshields could degrade the performance of the traffic receiver A traffic receiver receives traffic data from an over the air broadcast signal where a...

Page 41: ...ts to search for locations and addresses start routes with turn by turn directions place hands free phone calls and more Say OK Garmin and make a spoken request For example you can say phrases like th...

Page 42: ...ct 4 Select Select Destination 5 Choose a location for a destination and select Select 6 Select Add Location to add more locations optional 7 After you have added all the necessary locations select Ne...

Page 43: ...stinations in order Editing and Saving Your Active Route If a route is active you can use the trip planner to edit and save your route as a trip 1 Select Navigation Trip Planner Saved Trips My Active...

Page 44: ...within 10 m 33 ft of the stereo 3 On your RV Camper device select Settings Wireless Networks Bluetooth 4 Select your Fusion stereo from the list of available devices Connecting to a Stereo Using a Wi...

Page 45: ...Select to increase the volume for the current zone Select to decrease the volume for the current zone Gain On the AUX source move the slider to increase or decrease the gain Audio Control Adjusting th...

Page 46: ...ns are available for all zones To limit the maximum volume level of this zone select VOLUME LIMIT and adjust the level To set the subwoofer level for this zone select SUB LEVEL and adjust the level To...

Page 47: ...cable source selected select 2 Select 3 Select each preset you want to remove 4 After you have finished removing presets select Audio Settings Select Tools Fusion Link Music Enables you to configure t...

Page 48: ...ral 2 Select Internal Amplifiers Logging Service History You can log the date and odometer reading when service or maintenance is performed on your vehicle The device provides several service categori...

Page 49: ...places you have stopped on the map Select Navigation Trip History Viewing the Weather Forecast Before you can use this feature your device must be receiving weather data You can connect your device to...

Page 50: ...Garmin PowerSwitch device Displays the device name Displays Garmin PowerSwitch device tabs and custom layout tabs Activating a Power Switch Before you can use the Garmin PowerSwitch app to activate a...

Page 51: ...a control input 4 Select 5 Select Done Assigning a Switch to a Control Input Before you can use control input functions you must connect a control input to your Garmin PowerSwitch device Connecting a...

Page 52: ...on to activate with one touch select Normal To set the button to activate only while touching the button select Momentary To set the button to turn on and off repeatedly select Strobe and select time...

Page 53: ...n on the map Voice Language Sets the language for navigation voice prompts Driving Map View Sets the perspective on the map Map Detail Sets the level of detail on the map More detail may cause the map...

Page 54: ...f day Wallpaper Sets the wallpaper background on your device Sleep Allows you to set the amount of idle time before your device enters sleep mode while using battery power Daydream Enables or disables...

Page 55: ...antenna that provides the most accurate location data while navigating Setting the Text Language You can select the language for text in the device software 1 Select Settings Personal Language Input L...

Page 56: ...ly Battery type Rechargeable lithium ion Charging the Device NOTE This Class III product shall be powered by an LPS power supply You can charge the battery in the device using any of these methods Ins...

Page 57: ...fication when an update is available 3 Select an option When an update notification appears swipe down from the top of the screen and select An update is available To manually check for updates select...

Page 58: ...e and serial number 6 Click Add Device and follow the on screen instructions to add your device to the Garmin Express application When setup is complete the Garmin Express application displays the upd...

Page 59: ...amage plastic components 1 Clean the outer casing of the device not the touchscreen using a cloth dampened with a mild detergent solution 2 Wipe the device dry Cleaning the Touchscreen 1 Use a soft cl...

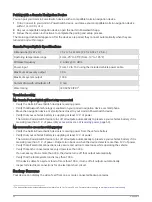
Page 60: ...e allows Positioning the device closer to the windshield reduces the effect of jarring and vibration from the road My device is not acquiring satellite signals Verify the location services feature is...

Page 61: ...process Appendix Garmin PowerSwitch WARNING Garmin strongly recommends having an experienced installer with the proper knowledge of electrical systems install the device Incorrectly wiring the power c...

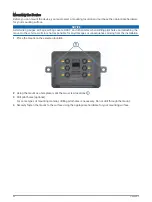
Page 62: ...g the mount to the vehicle Garmin is not responsible for any damages or consequences arising from the installation 1 Place the mount on the selected location 2 Using the mount as a template mark the t...

Page 63: ...Opening the Front Cover You must open the front cover to make electrical connections 1 Lift the front cover latch and rotate it counter clockwise 2 Pull the front cover off of the device Appendix 57...

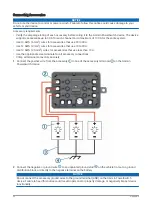
Page 64: ...o 20 A Use 14 AWG 2 5 mm2 wires for accessories that use less than 10 A Use the appropriate size terminals for all accessory connections Crimp all terminal connectors securely 1 Connect the positive w...

Page 65: ...evice to vehicle power you must remove the warning tag from the 12V terminal on the device You should always confirm all electrical connections are secure and will not come loose while operating the d...

Page 66: ...werSwitch device Verify that your vehicle s battery is supplying at least 12 V of power The Garmin PowerSwitch device turns off all outputs automatically to preserve your vehicle s battery if it is re...

Page 67: ...ur BC 35 camera from the list of available cameras NOTE The pairing code or password is located on the transmitter of the camera 5 Select Setup and position the guidance lines using the on screen arro...

Page 68: ...select Tools Rear View to manually view the camera 2 Select an option to resume normal device operation If the camera is connected to a reverse lamp recommended take the vehicle out of reverse The de...

Page 69: ...c OS 10 4 and newer Mac computers may require additional third party software to read and write files on Android devices About Memory Cards You can purchase memory cards from an electronics supplier o...

Page 70: ...removable volume Transferring Data From Your Computer 1 Connect the device to your computer Connecting the Device to Your Computer page 64 Depending on your computer operating system the device appear...

Page 71: ...Exporting GPX Files with a Memory Card You can share data such as waypoints and routes in GPX file format to a compatible microSD card 1 Insert a compatible microSD card into the memory card slot on y...

Page 72: ...vices 19 FM 41 Foursquare 23 fuel stations 24 G gain 40 Garmin Connect 30 Garmin Express 53 updating software 52 going home 12 GPS 7 simulator 49 H hands free phone calls 33 headset pairing 31 home ed...

Page 73: ...fer 40 suction cup 54 T theft avoiding 53 time settings 49 tolls avoiding 17 tone 39 tools maps 26 touchscreen 8 TracBack 37 traffic 29 34 48 alternate route 16 incidents 30 34 map 29 34 receiver 34 s...

Page 74: ...support garmin com GUID 9FC76615 A91B 4AAA A205 B2EAA899321A v6 August 2021...

Reviews: