background image

Quest Owner’s Manual

U

NIT

 O

VERVIEW

 > 

V

EHICLE

 I

NSTALLATION

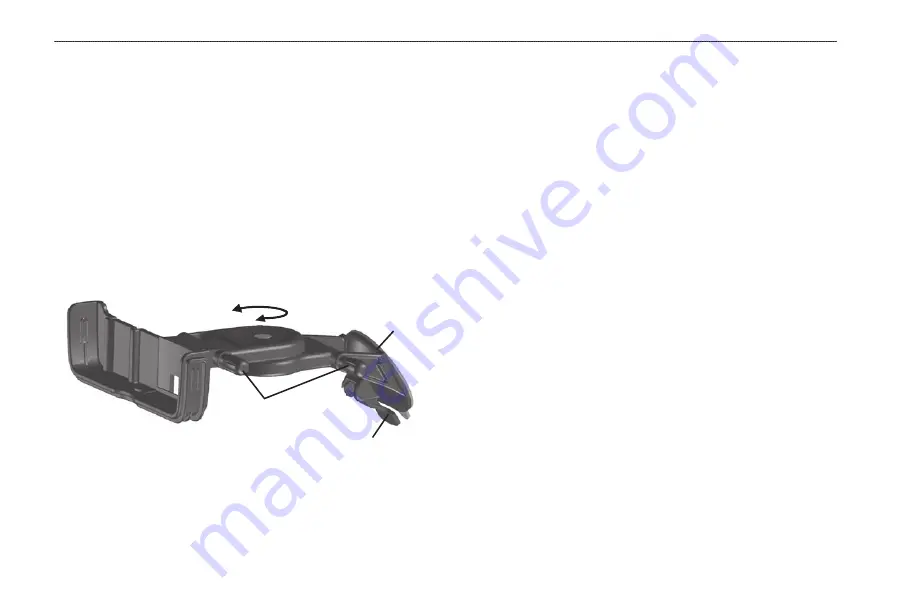
To mount the extending vehicle suction mount:

1.  Loosen the two adjustment knobs on the right side of the 

mount and extend the mount assembly as shown. Retighten 

the knobs to keep the mount in place. 

2.  To ensure a tight grip, clean and dry your windshield and 

the inside of the suction cup. 

3.  Flip the suction lever on the suction cup toward you.
4.  Place the suction mount in the selected location on your 

windshield. 

5.   Push the suction lever toward the windshield to tighten 

the suction cup to the glass. Apply gentle pressure to the 

suction mount to make certain the grip is secure.

Suction lever pushed down 

toward the windshield

Mount

Adjustment 

knobs

Suction cup 

To position the mount for maximum viewing, loosen the 

adjustment knobs and position the bracket. Tighten the adjustment 

knobs when you are done. You can also adjust the bracket’s 

horizontal angle by twisting the mount left or right. 
To remove the suction cup from the windshield, flip the suction 

lever toward you to release the suction cup’s grip. To help release 

the grip, pull the rubber tab on the suction cup toward you.

Connecting the Vehicle Adapter to Your Vehicle

The Quest’s suction mount vehicle adapter includes a 12/24-Volt 

DC adapter with an external speaker system. Plug the cigarette 

lighter portion of the vehicle adapter into an available receptacle in 

your vehicle. Make sure the cable does not interfere with vehicle 

operation in any way. 
Increase or decrease the volume by adjusting the volume control 

knob on the side of the speaker.

Using the Mounting Disk

California drivers, use the enclosed mounting disk as an alternative 

to using the suction cup mount on your windshield. See page 52 for 

more information 

Summary of Contents for Quest TM

Page 1: ...Quest andQuest 2 pocket sized navigator owner s manual...

Page 2: ...edium to be viewed and to print one copy of this manual or of any revision hereto provided that such electronic or printed copy of this manual must contain the complete text of this copyright notice a...

Page 3: ...bes the Map page and other main pages of your Quest Customizing your Quest Explains how to change your Quest s settings to meet your speci c needs Understanding GPS Describes the basics of GPS navigat...

Page 4: ...d Entering Data 9 Using the On screen Keyboard 9 Basic Operation 10 Finding Places and Routing to Them 10 Advanced Search Methods and Tips 11 Finding an Address or Intersection 12 Finding a City 13 Fi...

Page 5: ...e Units Settings 40 Changing the Time Settings 40 Changing the Track Setup 41 Customizing the Welcome Page 42 Viewing Software and Unit Information 42 Understanding GPS 43 The GPS Information Page 43...

Page 6: ...quiring prolonged use of the unit s controls while driving Pull over before attempting such operations When navigating carefully compare information displayed on the Quest to all available navigation...

Page 7: ...misused or misinterpreted and therefore become unsafe Important Information MAP DATA INFORMATION One of the goals of Garmin is to provide customers with the most complete and accurate cartography that...

Page 8: ...ft To avoid theft take your Quest with you or remove it from view when you leave your vehicle Using the Quest Responsibly The Quest is equipped with a Safe Mode feature to improve driver safety When y...

Page 9: ...ST UNIT OVERVIEW Introducing the Quest Power Speaker connector External antenna connector Back View USB connector Power Key Flip up GPS antenna Position the antenna parallel to the surface of the road...

Page 10: ...the sky Step 1 If you have not already done so ip up the antenna and snap your Quest into the vehicle suction mount Plug the cable end of the 12 Volt adapter into your vehicle s cigarette lighter See...

Page 11: ...press the OK key Information about the restaurant appears on a page similar to the one shown below Highlight Route To to create a route to this restaurant Then press the OK key Step 5 To create a rout...

Page 12: ...one of two types of vehicle suction mounts a compact mount or an extending mount Use the images to identify which mount you have and follow the appropriate directions for your mount type Compact Vehi...

Page 13: ...the rubber tab on the bottom of the suction cup toward you to loosen the suction cup s grip Extending Vehicle Suction Mount The extending vehicle suction mount can be identi ed by the rotating arm us...

Page 14: ...he adjustment knobs and position the bracket Tighten the adjustment knobs when you are done You can also adjust the bracket s horizontal angle by twisting the mount left or right To remove the suction...

Page 15: ...o press and hold the Speak key to open the volume slider Press the Rocker pad right to raise the volume or left to lower it You can quickly press the Speak key to adjust the volume to a pre set level...

Page 16: ...e data entry and restore the previous value Rocker pad press to move the highlight and map pointer any direction OK press to select items Press OK to reveal information pages when panning the Map page...

Page 17: ...letters to lower case and numbers to symbols The on screen keyboard opens when you need to enter data such as entering an address or changing the name of a saved location The on screen keyboard is use...

Page 18: ...the highway Find Menu Press down on the Rocker pad to see more Find categories To nd a place and route to it 1 Press the FIND key The Find Menu appears 2 Highlight a category to help you nd your dest...

Page 19: ...nd places that are beyond your current location by panning to a particular area on the map Open the Map page and pan the map to the location Press the FIND key and all nd options appear that are near...

Page 20: ...ormation To nd an address or intersection 1 Press FIND highlight Addresses or Intersections and press OK 2 A Wizard opens Highlight the state and press OK 3 Highlight Search All Cities and press OK 4...

Page 21: ...d interstates To nd an exit 1 Press the FIND key highlight Exits and press OK All exits on the highway or interstate that are closest to your current location are listed 2 To search for a particular r...

Page 22: ...route to this place highlight Route To and press OK The Quest only stores places that you actually view For example suppose you search for a restaurant by name and ve names appear If you view informat...

Page 23: ...en press OK In our example Bed and Breakfast Kansas City is the lodging place 4 From the Bed and Breakfast information page highlight Find Near and press OK Then highlight Food Drink and press OK 5 A...

Page 24: ...n Item from the Find Menu As discussed in the previous sections you can save items you have found using the Find Menu To save a place from the Find Menu 1 Press FIND Highlight the search category and...

Page 25: ...e on screen OK button and press the OK key when you are nished Entering a Location s Coordinates You can manually enter location coordinates to create a location This method can be useful for creating...

Page 26: ...ed Vacation locations by pushing a few buttons To create a saved location category 1 Press the FIND key Highlight My Locations and press OK 2 Highlight the saved location you want to edit and press OK...

Page 27: ...en deleting by category highlight the category you want to delete and press OK 5 Highlight Yes and press the OK key to con rm Highlight No and press OK to exit without deleting Finding My Locations Wh...

Page 28: ...A Route Options menu appears 2 Highlight Set Home Location and press OK 3 Highlight one of the three options and press OK 4 Find your Home location using the selected option Your Home location is set...

Page 29: ...e FIND key highlight Where Am I and press OK 2 Highlight TracBack and press OK 3 If you want to travel to the beginning of your track highlight Yes and press OK To select a spot along your track to tr...

Page 30: ...pear in the top text bar Rotating compass ring Bug indicator Data elds Bearing pointer Text bar If the arrow points up you are going in the correct direction If the arrow points any direction other th...

Page 31: ...t your starting location 4 From the Route Planner page highlight Select your destination and press OK Highlight one of the options and press OK Select your ending location Highlight Navigate to start...

Page 32: ...ur saved routes appears 3 Highlight the name of the route and press OK An information page for your selected route appears 4 To activate the route highlight Navigate and press OK 5 If you want to chan...

Page 33: ...ht Route Options and press OK 2 Highlight Detour and press OK 3 Highlight a detour distance and press OK Your Quest makes every possible attempt to get you back on the original route at your requested...

Page 34: ...the route 1 Press MENU highlight Route Options and press OK 2 Highlight Route Planner and press OK 3 Highlight the route you want to arrange and press OK 4 Press MENU highlight Optimal Via Order and p...

Page 35: ...e Avoid box Avoidances Page To avoid a road 1 Press and hold MENU to open the Route Options menu 2 Highlight Avoidances and press OK 3 Highlight the Add button and press OK 4 Highlight Road Avoidance...

Page 36: ...avoid 7 A map of the avoided area appears Press OK The Avoidances page shown to the right lists the avoided area with a default name Area 000 After you enter the avoid areas and roads your Quest avoi...

Page 37: ...text bar indicates that the Quest is attempting to locate satellites After the Quest locates satellites and establishes a x on your location the text bar reads Ready to Navigate Data elds Text bar Pos...

Page 38: ...pointer appear in the distance bar The map pointer s location coordinates also appear in the bar When you zoom while panning the map the map pointer stays centered on the screen Distance bar Position...

Page 39: ...change the map orientation settings see page 35 North Up Track Up Data Fields The Map page displays data elds on the right hand column of the page Information in these elds changes depending on whethe...

Page 40: ...ge opens and announces the same instructions for an upcoming turn up to three times Immediately after you make a turn the Next Turn page announces the next turn and the distance to the turn So if the...

Page 41: ...provides step by step route instructions from start to nish Press Page to open the Current Route page The Current Route page displays directions for your entire route You can look beyond the next turn...

Page 42: ...unit is connected to an external power source and is fully charged Trip Information Page To reset the trip data or the maximum speed 1 Press Page to open the Trip Information page 2 Highlight the Tri...

Page 43: ...ections Layout Tab Navtext displays or hides the navigational text Turn Pointer displays or hides the turn pointer that appears on the Map page when you are navigating Data elds displays or hides data...

Page 44: ...splayed on the Map page The Line Point City and Area tabs contain two common settings Text Size and Hide Above Text Size speci es how large or small the names of items appear on the map If you do not...

Page 45: ...shows a bright and lighter background Nighttime shows a black background for easier viewing during the night Auto allows the Quest to automatically switch between the two at sunrise and sunset Custom...

Page 46: ...igation as described above It does not give chimes Button Only The unit only speaks when the Speak key is pressed External Power Lost if Turn Off is set the unit shuts down after 30 seconds when the Q...

Page 47: ...ime Routes are faster to drive but may be longer in distance Shorter Distance Routes are shorter in distance but may take more time to drive Off Road The route is a direct line from your current locat...

Page 48: ...Format Vertical Speed displays vertical speed in feet minute meters minute or meters second Elevation displays elevation in feet or meters Datum allows you to select from over 100 different map datum...

Page 49: ...w track points to replace the oldest track points once the log is full If set to Off no new tracks are added until the Track log is cleared Record Interval sets the interval at which track points are...

Page 50: ...n the Quest again your message appears Default Welcome Page Customized Welcome Page To use the default Welcome page again repeat the above process and clear the text you entered previously Viewing Sof...

Page 51: ...receiver must be locked on to at least three satellites to calculate a 2D location latitude and longitude and track movement With four or more satellites in view the receiver can determine your 3D loc...

Page 52: ...speed by selecting and using the best satellites in view Sky View and Signal Strength Bars The sky view and signal strength bars indicate which satellites are currently visible and which satellites ar...

Page 53: ...satellites with good geometry have been found a two dimensional position x latitude and longitude is being calculated You might need to enter your elevation if the receiver only has a 2D x Displays 2D...

Page 54: ...ontinue to search for the satellites Updating your approximate location ensures that the Quest is searching for the correct satellites and is useful if you have traveled over 500 miles with the unit t...

Page 55: ...ring compass direction from your location to your destination Appears only on the Compass page Course direction from your starting location to a destination Appears only on the Compass page Distance D...

Page 56: ...To Course direction of travel to get back on course Appears only on the Compass page Trip Odometer running total of distance traveled since the Trip Computer was last reset Trip Time Moving length of...

Page 57: ...see page 54 NOTE When you transfer additional maps to your Quest the existing maps you previously downloaded are automatically deleted Therefore you must transfer them at the same time through the Ma...

Page 58: ...s so that you can view detail from the other one Changing Map Families when Finding Places If your Quest contains map families that have overlapping information you may need to specify a different map...

Page 59: ...curacy Position3 3 5 meters 10 16 feet 95 typical Velocity 0 05 m s steady state Dynamics Performs to speci cations to 6 g s Interface USB Data Storage Inde nite no memory battery required Map Storage...

Page 60: ...s view of the road or obstruct any controls in the vehicle WARNING The mounting disk af xes to your dashboard with permanent adhesive that is extremely dif cult to remove after it is installed To mou...

Page 61: ...tending Suction Mount 2 Remove the suction cup from the rest of the mount 3 Rotate the suction cup 180 degrees 4 Reconnect the suction cup to the rest of the mount 5 Replace the adjustment knob and ti...

Page 62: ...ftware License Agreement BY USING THE QUEST YOU AGREE TO BE BOUND BY THE TERMS AND CONDITIONS OF THE FOLLOWING SOFTWARE LICENSE AGREEMENT PLEASE READ THIS AGREEMENT CAREFULLY Garmin grants you a limit...

Page 63: ...used in accordance with the instructions However there is no guarantee that interference will not occur in a particular installation If this equipment does cause harmful interference to radio or tele...

Page 64: ...ND EXCLUSIVE REMEDY FOR ANY BREACH OF WARRANTY To obtain warranty service contact your local Garmin authorized dealer or call Garmin Product Support for shipping instructions and an RMA tracking numbe...

Page 65: ...18 Recent Finds 14 Route 24 Saved Location 19 Via Point 26 Detours 25 Directions to Me 11 Display Setup 37 E Edit a Saved Location 18 Elevation 40 Entering Data 9 Exits Finding 13 External Power Lost...

Page 66: ...n Off 7 Satellite Status Bar 45 Saved Location Categories 18 Edit 18 Searching for Satellites 45 Select Exit Road 13 Select Map Set 50 Serial Number 54 Shortcuts for the Quest 47 Shorter Distance 39 S...

Page 67: ......

Page 68: ...armin com Copyright 2005 Garmin Ltd or its subsidiaries Garmin International Inc 1200 East 151st Street Olathe Kansas 66062 U S A Garmin Europe Ltd Unit 5 The Quadrangle Abbey Park Industrial Estate R...

Reviews: