Ice Fishing Kit
Installation Instructions
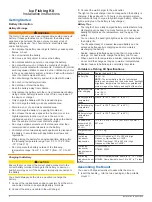
Getting Started
Battery Information
Battery Warnings
WARNING
The Garmin
®
device uses a user-replaceable, sealed, lead-acid
battery. If these guidelines are not followed, the battery may
experience a shortened life span or may present a risk of
damage to the device, fire, chemical burn, electrolyte leak,
and/or bodily injury.
• Do not place the battery near objects that may cause sparks,
flames, or heat.
• Do not incinerate the battery.
• Do not use a sharp object to remove the battery.
• Do not disassemble, puncture, or damage the battery.
• Do not swallow, touch, or inhale the contents of an open
battery. Avoid contact with internal acid. Contact with internal
acid may cause irritation or severe burns. Irritation may occur
to the eyes, respiratory system, and skin. Flush with water at
once if contact is made with acid.
• Do not submerge the battery and avoid contact with water.
• Do not short the battery terminals.
• Do not drop or throw the battery.
• Keep the battery away from children.
• Only replace the battery with the correct replacement battery.
Using another battery presents a risk of fire or explosion of
the device or charger.
• Only charge the battery with the included charger.
• Do not charge the battery in an unventilated area.
• Store in a cool, dry, and well-ventilated area.
• Do not charge the battery in a gas-tight container.
• Do not leave the device exposed to a heat source or in a
high-temperature location, such as in the sun in an
unattended vehicle. To prevent damage, remove the device
from the vehicle or store it out of direct sunlight.
• Do not use organic solvents or other cleaners other than
recommended chemical cleaners on the battery.
• Contact your local waste disposal department to dispose of
the battery in accordance with applicable local laws and
regulations.
• When storing the battery for an extended time, store within
the following temperature range: from 5° F to 104°F (from
-15° C to 40° C).
• Do not operate the battery outside of the following
temperature range: from 5° F to 122° F (from -15° C to 50°
C).
Charging the Battery
CAUTION
Ensure that you connect the correct spade connector to the
correct battery terminal. Damage to the battery or device, or
bodily harm may occur if the device is improperly connected to
the battery.
You should always use the all-in-one cable to charge the
battery.
1
Connect the red and black spade connectors from the all-in-
one cable onto the corresponding battery terminals.
2
Connect the all-in-one cable to the wall charger.
3
Connect the wall charger to the wall outlet.
The light on the wall charger is solid orange when the battery is
charging. It takes about 8 to 10 hours in a room-temperature
environment to fully charge a fully discharged battery. When the
light is solid green, the battery is fully charged.
Battery Tips
• The length of time a fully charged battery will last before fully
discharging varies based on many factors, such as device
backlight brightness, the temperature, and the age of the
battery.
• You can lower the backlight brightness level to help extend
the battery life.
• The life expectancy of a sealed, lead-acid battery can be
extended by frequently recharging and not completely
discharging the battery.
• Sealed, lead-acid batteries slowly lose their charge while in
storage. For best results, charge the battery prior to use.
• When used in cold temperatures, sealed, lead-acid batteries
do not hold the charge as long as in warmer temperatures.
• Sealed, lead-acid batteries are completely recyclable.
Portable Ice Fishing Kit Specifications
Battery type
Sealed, lead acid, 7 Ah
Battery life
Up to 11 hr.
NOTE:
The actual battery life of a fully charged
battery can vary based on the device used, backlight
brightness, temperature the battery is operated and
stored in, age of the battery, and depth of the water.
Battery shelf life
after charging
1 mo.: 92%
3 mo.: 90%
6 mo.: 80%
Battery operating
temperature
range
From 5° to 122°F (from -15° to 50°C)
Battery charging
temperature
range
From 5° to 104°F (from -15° to 40°C)
Battery storage
temperature
range
From 5° to 104°F (from -15° to 40°C)
Physical size,
assembled kit
with device (L ×
W × H)
10.5 in. × 9.5 in. × 10.5 in. (267 mm × 229 mm ×
267 mm)
Weight without
device
9 lb. (4.1 kg)
Ice fishing
transducer
frequencies
GT10HN Traditional: 130 to 300 kHz (High
Frequency, Narrow Beam, CHIRP)
GT8HW Traditional: 150 to 240 kHz (High
Frequency, Wide Beam, CHIRP)
Ice fishing
transducer
transmit power
(RMS)
GT10HN: 500 W
GT8HW: 250 W
Ice fishing
transducer beam
width
GT10HN: User adjustable, from 8 to 16°, in 1° steps
GT8HW: User adjustable, from 16 to 24°, in 1° steps
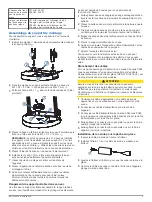
Assembling the Mount
You need a Phillips screwdriver to assemble the mount.
1
Insert the handle
À
into the two openings on the portable
mount
Á
.
2
Installation Instructions

