background image

Mariner’s Eye 3D

: Shows a detailed, three-dimensional view 

from above and behind the boat (according to your course) 

and provides a visual navigation aid. This view is helpful 

when navigating tricky shoals, reefs, bridges, or channels, 

and when trying to identify entry and exit routes in unfamiliar 

harbors or anchorages.

NOTE: 

Mariner's Eye 3D and Fish Eye 3D chart views are 

available with premium charts, in some areas.

Fish Eye 3D

: Provides an underwater view that visually 

represents the sea floor according to the chart information. 

When a sonar transducer is connected, suspended targets 

(such as fish) are indicated by red, green, and yellow 

spheres. Red indicates the largest targets and green 

indicates the smallest.

Fishing Chart

: Provides a detailed view of the bottom contours 

and depth soundings on the chart. This chart removes 

navigational data from the chart, provides detailed 

bathymetric data, and enhances bottom contours for depth 

recognition. This chart is best for offshore deep-sea fishing.

NOTE: 

The offshore Fishing chart is available with premium 

charts, in some areas.

Radar Overlay

: Superimposes radar information on the 

Navigation chart or the Fishing chart, when the chartplotter is 

connected to a radar. This feature is not available with all 

models.

Navigation Chart and Offshore Fishing Chart

NOTE: 

The offshore Fishing chart is available with premium 

charts, in some areas.
The Navigation and Fishing charts allow you to plan your 

course, view map information, and follow a route. The Fishing 

chart is for offshore fishing.
To open the Navigation chart, select 

Charts

 > 

Nav. Chart

.

To open the Fishing chart, select 

Charts

 > 

Fishing Chart

.

Zooming In and Out Using the Touchscreen

You can quickly zoom in and out of many screens, such as the 

charts and sonar views.
• Pinch two fingers together to zoom out.
• Spread two fingers apart to zoom in.

Selecting a Map

If your product has both BlueChart

®

 g2 and Garmin LakeVü

 HD 

built-in maps, you can select which map to use. Not all models 

have both types of built-in maps.

1

From the Navigation chart, select 

Menu

 > 

Built-In Map

.

2

Select an option:
• When you are on an inland lake, select 

LakeVü™ HD

.

• When you are offshore, select 

BlueChart® g2

.

Measuring a Distance on the Chart

1

From a chart or the Radar overlay, select a location.

2

Select 

Measure Distance

.

A push pin appears on the screen at your present location. 

The distance and angle from the pin is listed in the upper-left 

corner.

TIP: 

To reset the pin and measure from the current location of 

the cursor, select Set Reference.

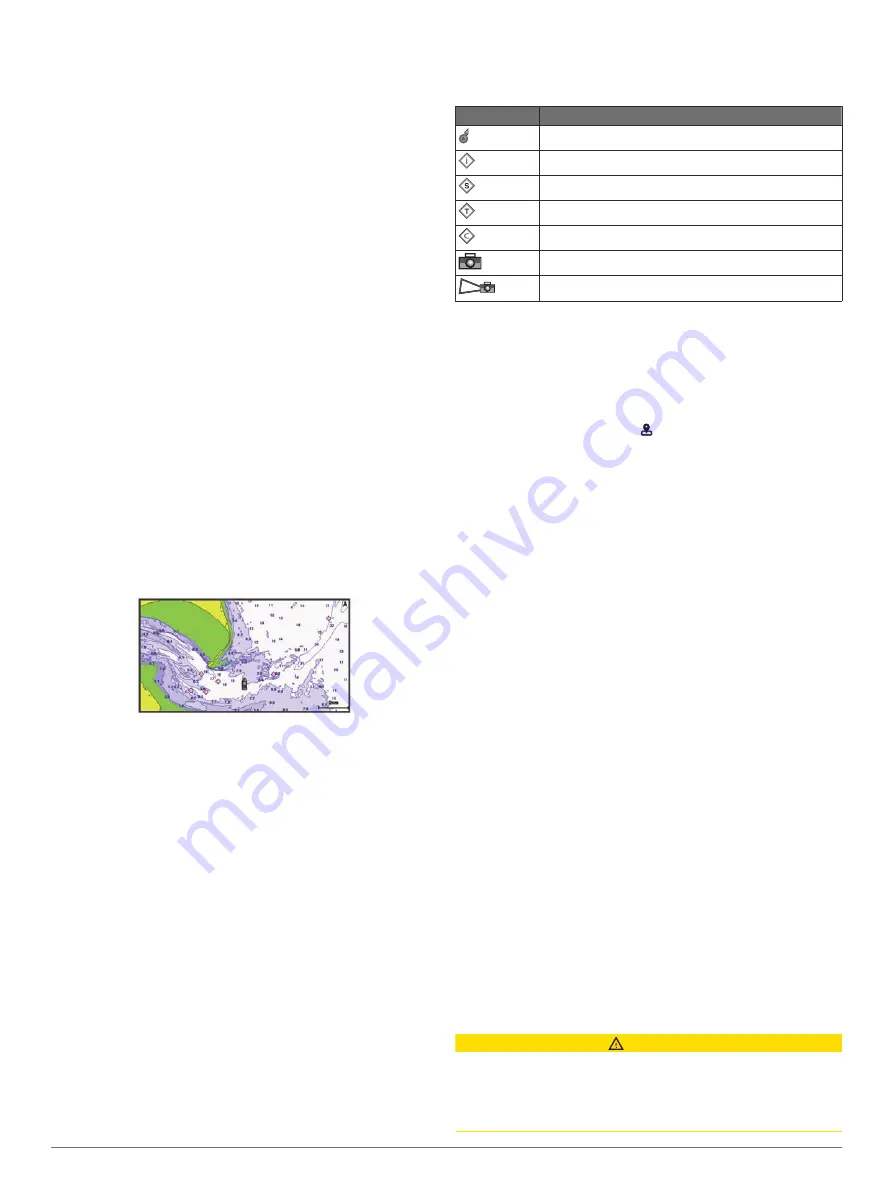
Chart Symbols

This table contains some of the common symbols you might see 

on the detailed charts.

Icon

Description

Buoy

Information

Marine services

Tide station

Current station

Overhead photo available

Perspective photo available

Other features common to most charts include depth contour 

lines, intertidal zones, spot soundings (as depicted on the 

original paper chart), navigational aids and symbols, 

obstructions, and cable areas.

Creating a Waypoint on the Chart

1

From a chart or a 3D chart view, select a location or object.

2

Select 

Create Waypoint

 or  .

Viewing Location and Object Information on a Chart

You can view information about a location or an object on the 

Navigation chart or the Fishing chart.

NOTE: 

The offshore Fishing chart is available with premium 

charts, in some areas.

1

From the Navigation chart or Fishing chart, select a location 

or object.
A list of options appears along the right side of the chart. The 

options that appear vary based on the location or object you 

selected.

2

Select an option:
• To navigate to the selected location, select 

Navigate To

.

• To mark a waypoint at the cursor location, select 

Create 

Waypoint

.

• To view the distance and bearing of the object from your 

current location, select 

Measure Distance

.

The distance and bearing appear on the screen. Select 

Select

 to measure from a location other than your current 

location.

• To view tide, current, celestial, chart notes, or local 

services information near the cursor, select 

Information

.

Viewing Details about Navaids

From the Navigation chart, Fishing chart, Perspective 3D chart 

view, or Mariner’s Eye 3D chart view, you can view details about 

various types of navigation aids, including beacons, lights, and 

obstructions.

NOTE: 

The offshore Fishing chart is available with premium 

charts, in some areas.

NOTE: 

Mariner's Eye 3D and Fish Eye 3D chart views are 

available with premium charts, in some areas.

1

From a chart or 3D chart view, select a navaid.

2

Select the name of the navaid.

Navigating to a Point on the Chart

 CAUTION

The Auto Guidance feature is based on electronic chart 

information. That data does not ensure obstacle and bottom 

clearance. Carefully compare the course to all visual sightings, 

and avoid any land, shallow water, or other obstacles that may 

be in your path.

4

Charts and 3D Chart Views

Summary of Contents for GPSMAP 8012

Page 1: ...GPSMAP 8000 Series Owner s Manual ...

Page 2: ...red in the USA and other countries Fantom FUSION Link Garmin Helm Garmin LakeVü Garmin Nautix Garmin Quickdraw GCV GMR GRID GXM HomePort MotionScope Panoptix quatix Shadow Drive and SmartMode are trademarks of Garmin Ltd or its subsidiaries These trademarks may not be used without the express permission of Garmin iPod is a trademark of Apple Inc registered in the U S and other countries Android is...

Page 3: ...ng Off AIS Reception 7 Chart and 3D Chart View Settings 7 Navigation and Fishing Chart Setup 8 Waypoints and Tracks Settings on the Charts and Chart Views 8 Chart Appearance Settings 8 Other Vessels Settings on the Charts and Chart Views 8 Laylines Settings 9 Fish Eye 3D Settings 9 Garmin Quickdraw Contours Mapping 9 Mapping a Body of Water Using the Garmin Quickdraw Contours Feature 9 Adding a La...

Page 4: ...g the Scroll Speed 21 Sonar Frequencies 21 Selecting Frequencies 21 Creating a Frequency Preset 21 Customizing the Panoptix Sonar Views 21 Adjusting the Appearance of the LiveVü Sonar Views 21 Setting the LiveVü Transducer Transmit Angle 22 Adjusting the RealVü Viewing Angle and Zoom Level 22 Adjusting the Appearance of the RealVü Sonar Views 22 Adjusting the RealVü Sweep Speed 22 Turning On the A...

Page 5: ...ng the Number of Engines Shown in Gauges 32 Customizing the Engines Shown in Gauges 32 Enabling Status Alarms for Engine Gauges 32 Enabling Some Engine Gauge Status Alarms 32 Setting the Fuel Alarm 32 Setting the Fuel Capacity of the Vessel 32 Synchronizing the Fuel Data with the Actual Vessel Fuel 32 Viewing the Wind Gauges 32 Configuring the Sailing Wind Gauge 32 Configuring the Speed Source 33 ...

Page 6: ... 40 Configuring the PC Display 41 Exiting PC Display Mode 41 Controlling the VIRB Action Camera with the Chartplotter 41 VIRB Action Camera Settings 41 VIRB Action Camera Video Setup Settings 41 Adding the VIRB Action Camera Controls to Other Screens 41 Controlling the VIRB Action Camera Video Playback 41 Deleting a VIRB Video 41 Starting a VIRB Video Slideshow 41 Device Configuration 42 Turning O...

Page 7: ...enshots to a Computer 48 Troubleshooting 48 My device will not acquire GPS signals 48 My device will not turn on or keeps turning off 48 My device is not creating waypoints in the correct location 48 Contacting Garmin Support 48 NMEA 2000 PGN Information 48 NMEA 0183 Information 49 Software License Agreement 49 Index 50 Table of Contents v ...

Page 8: ......

Page 9: ...age or function Tips and Shortcuts Press to turn the chartplotter on Select Home from any screen to return to the Home screen Select Menu to access additional settings about that screen Select Menu to close the menu when finished Press to open additional options such as adjusting the backlight and locking the touchscreen Press and select Power Off to turn the chartplotter off Locking the Touchscre...

Page 10: ...an save items you commonly access to the Favorites category All of the options along the bottom of the home screen are visible on all other screens except for the Settings button The Settings button is accessible only from the home screen When viewing another screen you can return to the home screen by selecting Home When multiple displays are installed on the Garmin Marine Network you can group t...

Page 11: ...esets to optimize groups of settings for your activity For example some settings might be optimal for when you are fishing and others might be optimal for when you are cruising Presets are available on some screens such as charts sonar views and radar views To select a preset for a compatible screen select Menu and select the preset When you are using a preset and you make changes to the settings ...

Page 12: ...pin appears on the screen at your present location The distance and angle from the pin is listed in the upper left corner TIP To reset the pin and measure from the current location of the cursor select Set Reference Chart Symbols This table contains some of the common symbols you might see on the detailed charts Icon Description Buoy Information Marine services Tide station Current station Overhea...

Page 13: ...obstacles that may be in your path NOTE Not all models support all charts Optional premium charts such as BlueChart g2 Vision allow you to get the most out of your chartplotter In addition to detailed marine charting premium charts may contain these features which are available in some areas Mariner s Eye 3D Provides a view from above and behind the boat for a three dimensional navigation aid Fish...

Page 14: ...he AIS vessel is moving Target is selected Target is activated The target appears larger on the chart A green line attached to the target indicates the heading of the target The MMSI speed and direction of the vessel appear beneath the target if the details setting has been set to Show If the AIS transmission from the vessel is lost a message banner appears Target is lost A green X indicates that ...

Page 15: ...time at which the alarm will sound if a target is determined to intersect the safe zone For example to be notified of a pending intersection 10 minutes before it will likely occur set Time To to 10 and the alarm will sound 10 minutes before the vessel intersects the safe zone AIS Distress Signals Self contained AIS distress signal devices transmit emergency position reports when activated The char...

Page 16: ...s page 14 Tracks Display Sets which tracks to display on the chart based on track color Chart Appearance Settings You can adjust the appearance of the different charts and 3D chart views Each setting is specific to the chart or chart view being used NOTE Not all settings apply to all charts and 3D chart views and chartplotter models Some options require premium maps or connected accessories From a...

Page 17: ...ph You can view Garmin Quickdraw Contours in a combination screen or as a single view on the map The amount of saved data depends on the size of your memory card your sonar source and the speed of your boat as you record data You can record longer when you use a single beam sonar It is estimated that you might be able to record about 1 500 hours of data onto a 2 GB memory card When you record data...

Page 18: ...osition and a speed above 32 km h 20 mph Depth Shading Specifies the upper and lower limits of a depth range and a color for that depth range Navigation with a Chartplotter CAUTION If your vessel has an autopilot system a dedicated autopilot control display must be installed at each steering helm in order to disable the autopilot system The Auto Guidance feature is based on electronic chart inform...

Page 19: ...int using a chart select Use Chart select the location and select Select Marking an SOS Location You can mark an SOS location When a Garmin VHF radio is connected using NMEA 2000 you can select different SOS types such as Man Overboard and Piracy 1 Hold SOS for one second 2 Select the SOS type 3 If necessary select OK to navigate to the man overboard location If you selected OK the chartplotter se...

Page 20: ...oute and all the waypoints in it The starting point can be your present location or another location 1 Select Info User Data Routes Auto Guidance Paths New Route Using Chart 2 Select the starting location of the route 3 Select Add Turn 4 Select the location of the next turn on the chart 5 Select Add Turn The chartplotter marks the location of the turn with a waypoint 6 If necessary repeat steps 4 ...

Page 21: ...3 Select a destination and select Next 4 Select an option To view a hazard and adjust the path near a hazard select Hazard Review To adjust the path select Adjust Path and follow the on screen instructions To delete the path select Cancel Auto Guidance To save the path select Done Adjusting a Saved Auto Guidance Path 1 Select Info User Data Routes Auto Guidance Paths 2 Select a path and select Rev...

Page 22: ...cted Nearest or Farthest in step 8 review the placement of the Auto Guidance line and determine whether the line safely avoids known obstacles and the turns enable efficient travel Auto Guidance maintains a wide clearance from obstacles in open water even if you set the Shoreline Distance setting to Near or Nearest As a result the chartplotter may not reposition the Auto Guidance line unless the d...

Page 23: ...uctions Converting a Route to a Boundary Before you can convert a route to a boundary you must create and save at least one route Creating and Saving a Route page 12 1 Select Info User Data Routes Auto Guidance Paths 2 Select a route 3 Select Review Edit Route Save as Boundary Converting a Track to a Boundary Before you can convert a track to a boundary you must record and save at least one track ...

Page 24: ...ace Timer page 16 Starting the Race Timer The race timer is added to the Sail Racing combination screen by default 1 From the Sail Racing combination screen select Start NOTE You can also access this from the Sailing SmartMode screen and the navigation chart 2 When necessary select Sync to synchronize with the official race timer Stopping the Race Timer From the Sail Racing combination screen sele...

Page 25: ...you must have a wind sensor installed 1 Engage wind hold Engaging Wind Hold page 17 2 Select Menu Tack Gybe 3 Select Tack or Gybe The autopilot steers your boat through a tack or gybe and information about the progress of the tack or gybe appears on the screen Setting a Tack and Gybe Delay The tack and gybe delay allows you to delay steering a tack and gybe after you initiate the maneuver 1 From t...

Page 26: ...Water between the vessel and the bottom SideVü Scanning Technology Instead of a more common conical beam the SideVü transducer uses a flat beam to scan the water and bottom to the sides of your boat Split Zoom Sonar View The split zoom sonar view shows a full view graph of sonar readings and a magnified portion of that graph on the same screen Split Frequency Sonar View In the split frequency sona...

Page 27: ...situational awareness by showing obstructions under the water up to 91 meters 300 feet in front of the boat The ability to effectively avoid forward collisions with FrontVü sonar decreases as your speed rises above 8 knots To see the FrontVü sonar view you must install and connect a compatible transducer such as a PS21 transducer You may need to update the transducer software Changing the Sonar Vi...

Page 28: ...s the Appearance settings are not synchronized and should be configured on each individual device In addition the scroll rates of the various traditional and Garmin ClearVü sonar views are synchronized to make the split views more cohesive NOTE Using multiple transducers simultaneously can create cross talk which can be removed by adjusting the Interference sonar setting Selecting a Sonar Source T...

Page 29: ...tting To use a very fast scroll speed select Ultrascroll The Ultrascroll option quickly scrolls new sonar data but with a reduced image quality For most situations the Fast option provides a good balance between a quickly scrolling image and targets that are less distorted Sonar Frequencies NOTE The frequencies available depend on the chartplotter sounder modules and transducer being used Adjustin...

Page 30: ...for detecting fish that are close to the bottom From a sonar view select Menu Sonar Setup Appearance A Scope On Selecting the Transducer Type Before you can select the transducer type you must know what kind of transducer you have This chartplotter is compatible with the Garmin ClearVü transducer as well as a range of accessory transducers including Garmin GT transducers which are available at www...

Page 31: ...on the screen per sounder return The 2 1 setting draws two columns of information on the screen per sounder return and so on for the 4 1 and 8 1 settings Sonar Alarm Settings NOTE Some settings require external accessories Select Settings Alarms Sonar Shallow Water Sets an alarm to sound when the depth is less than the specified value Deep Water Sets an alarm to sound when the depth is greater tha...

Page 32: ...stall the HomePort application and record sonar data onto a memory card 1 Remove the memory card from the device 2 Insert the memory card into a card reader attached to a computer 3 Open the HomePort application 4 Select a sonar recording from your device list 5 Right click the sonar recording in the lower pane 6 Select Playback Radar WARNING The marine radar transmits microwave energy that has th...

Page 33: ... help you avoid potential collisions find flocks of birds and track weather formations The Doppler effect is the frequency shift in the radar echo due to the relative motion of the target This allows for instant detection of any targets moving toward or away from the radar The MotionScope feature highlights the moving targets on the radar display so you can navigate around other boats or severe we...

Page 34: ...ect an option To indicate the distance from your location within which AIS vessels appear select Display Range and select a distance To show details about AIS activated vessels select Details Show To set the projected heading time for AIS activated vessels select Proj Heading and enter the time To show the tracks of AIS vessels select Trails and select the length of the track that appears VRM and ...

Page 35: ...gain until the boats land or other targets appear steadily lit on the Radar screen 6 Minimize the appearance of nearby large objects if necessary 7 Minimize the appearance of side lobe echoes if necessary Minimizing Nearby Large Object Interference Nearby targets of significant size such as jetty walls can cause a very bright image of the target to appear on the Radar screen This image can obscure...

Page 36: ...t which the radar rotates The High Speed option can be used to increase the refresh rate In some situations the radar automatically rotates at the normal speed to improve detection for example when a longer range is selected or when MotionScope or Dual range is used Appearance Sets the color scheme look ahead speed and navigation appearance Installation Allows you to configure the radar for the in...

Page 37: ...reduces rudder activity and heading performance The higher the percentage the more the course deviates before the autopilot corrects it TIP In choppy conditions at low speeds increasing the Power Saver percentage reduces rudder activity Enabling Shadow Drive NOTE The Shadow Drive feature is available only on hydraulic steering systems From the autopilot screen select Menu Autopilot Setup Shadow Dr...

Page 38: ...g Pattern Physically steer the boat NOTE Shadow Drive must be enabled to cancel a steering pattern by physically steering the boat Select or to cancel a pattern using step steering mode Select Standby Digital Selective Calling Networked Chartplotter and VHF Radio Functionality If you have a NMEA 0183 VHF radio or a NMEA 2000 VHF radio connected to your chartplotter these features are enabled The c...

Page 39: ...ct Trail To select a color for the trail line select Trail Line Deleting a Position Report Call 1 Select Info DSC List 2 Select a position report call 3 Select Review Clear Report Viewing Vessel Trails on the Chart You can view trails for all tracked vessels on some chart views By default a black line indicates the path of the vessel a black dot indicates each previously reported position of a tra...

Page 40: ...shown in the gauges you must manually select the number of engines Selecting the Number of Engines Shown in Gauges page 32 1 From the engine gauges screen select Menu Installation Engine Selection Edit Engines 2 Select First Engine 3 Select the engine to display in the first gauge 4 Repeat for the remaining engine bars Enabling Status Alarms for Engine Gauges You can enable the chartplotter to dis...

Page 41: ...me and the range of depth that appear in the depth and water temperature graphs 1 From a graph select Graph Setup 2 Select an option To set a time elapsed scale select Duration The default setting is 10 minutes Increasing the time elapsed scale allows you to view variations over a longer period of time Decreasing the time elapsed scale allows you to view more detail over a shorter period of time T...

Page 42: ...u can play media from sources connected to the media player and sources connected to the NMEA 2000 network Opening the Media Player Before you can open the media player you must connect a compatible device to the chartplotter Select A V Gauges Controls Media Icons NOTE Not all devices have these icons Icon Description Saves or deletes a channel as a preset Repeats all songs Repeats one song Search...

Page 43: ...t from the list 3 Select Remove Current Channel DAB Playback When you connect a compatible Digital Audio Broadcasting DAB module and antenna such as the FUSION MS DAB100A to a compatible stereo you can tune in to and play DAB stations To use the DAB source you must be in a region in which DAB is available and select the tuner region Setting the DAB Tuner Region page 35 Setting the DAB Tuner Region...

Page 44: ...Add Current Channel Unlocking SiriusXM Parental Controls 1 From the media screen select Browse Parental Unlock 2 Enter your passcode The default passcode is 0000 Setting Parental Controls on SiriusXM Radio Channels Before you can set parental controls the parental controls must be unlocked The parental control feature allows you to limit access to any SiriusXM channels including those with mature ...

Page 45: ...ed the weather radar frame currently displayed on the screen Cloud Cover Shows cloud cover data Waypoints Shows waypoints Legend Shows the weather legend Storm Cell and Lightning Information Storm cell are represented by on the weather precipitation chart They indicate both the present position of a storm and the projected path of that storm in the immediate future Red cones appear with a storm ce...

Page 46: ...tions for the next 36 hours in 12 hour increments select Next Forecast multiple times To view the forecasted sea conditions for the previous 36 hours in 12 hour increments select Previous Forecast multiple times Viewing Fishing Information The weather Fishing chart shows present water temperature present surface pressure conditions and fishing forecasts Select Charts Fishing Surface Pressure and W...

Page 47: ...y data Buoys Shows weather buoys Legend Shows the weather legend Weather Overlay Settings on the Fishing Chart From the Fishing chart select Menu Chart Setup Weather Precipitation Shows precipitation radar Sea Temperature Shows sea temperature data Buoys Shows weather buoys Legend Shows the weather legend Viewing Weather Subscription Information You can view information about the weather services ...

Page 48: ...Movement Control NOTICE Do not aim the camera at the sun or extremely bright objects Damage to the lens may occur Always use the chartplotter controls or buttons to pan and tilt the camera Do not manually move the camera unit Manually moving the camera may damage the camera NOTE This feature is available only when a compatible camera is connected You may need to update the camera software to use t...

Page 49: ...mera Recording Starts and stops recording Take Photo Takes a still photograph Sleep Puts the VIRB action camera into a low power mode to conserve battery power VIRB Action Camera Video Setup Settings Select A V Gauges Controls VIRB Menu Video Setup Aspect Sets the video aspect ratio Video Mode Sets the video mode For example you can select the Slow Mo option to shoot slow motion videos Video Size ...

Page 50: ...ws you to pair a GRID remote input device with this station Display Order Sets the order of the displays which is important when using a GRID remote input device Autopilot Enabled Allows you to control the autopilot from this device Reset Layouts Restores the factory default view for the layouts in this station Reset Stations Restores the factory default layouts for all displays in the station Vie...

Page 51: ... have navigated to previously 4 Select Navigate To Auto Guidance 5 Review the placement of the Auto Guidance line and determine whether the line safely avoids known obstacles and the turns enable efficient travel 6 Select an option If the placement of the Auto Guidance line is satisfactory select Menu Navigation Options Stop Navigation and proceed to step 10 If the Auto Guidance line is too close ...

Page 52: ...he alarm 3 Select Set Radius and select a distance on the chart 4 Select Back System Alarms Alarm Clock Sets an alarm clock Unit Voltage Sets an alarm to sound when the battery reaches a specified low voltage GPS Accuracy Sets an alarm to sound when the GPS location accuracy falls outside the user defined value Sonar Alarm Settings NOTE Some settings require external accessories Select Settings Al...

Page 53: ... negative number if the sensor connected to the chartplotter measures the water temperature as being warmer than it actually is 4 Select Settings My Vessel Temp Offset 5 Enter the temperature offset calculated in step 3 Calibrating a Water Speed Device If you have a speed sensing transducer connected to the chartplotter you can calibrate that speed sensing device to improve the accuracy of water s...

Page 54: ...f your chartplotter wireless network Setting Up the Wi Fi Wireless Network page 46 3 Enter the network password Changing the Wireless Channel You can change the wireless channel if you have trouble finding or connecting to a device or if you experience interference 1 Select Settings Communications Wi Fi Network Advanced Channel 2 Enter a new channel You do not need to change the wireless channel o...

Page 55: ...he memory card Appendix Registering Your Device Help us better support you by completing our online registration today Go to http my garmin com Keep the original sales receipt or a photocopy in a safe place Digital Switching Your chartplotter can be used to monitor or control circuits when a compatible system is connected For example you can control the interior lights and navigation lights on the...

Page 56: ...d Check the fuse to make sure there is still a connection inside of the fuse You can test the fuse using a multimeter If the fuse is good the multimeter reads 0 ohm Check to make sure the device is receiving is at least 10 V but 12 V is recommended To check the voltage measure the female power and ground sockets of the power cable for DC voltage If the voltage is less than 10 V the device will not...

Page 57: ...formation DSE Expanded digital selective calling HDG Heading deviation and variation HDM Heading magnetic MWD Wind direction and speed MDA Meteorological composite MWV Wind speed and angle VDM AIS VHF data link message You can purchase complete information about National Marine Electronics Association NMEA format and sentences from NMEA Seven Riggs Avenue Severna Park MD 21146 USA www nmea org Sof...

Page 58: ...tal switching 47 distress call 30 31 distress signal device 7 DSC See digital selective calling E EBL 26 adjusting 26 measuring 26 showing 26 EGNOS 42 engine gauges 32 configuring 32 status alarms 32 EPIRB 7 event log 42 F factory settings 46 stations 3 favorites 2 Fish Eye 3D sonar cone 9 suspended targets 9 tracks 9 fishing chart 4 39 boundary line 7 setup 8 FM 35 fuel capacity 32 fuel gauges 32...

Page 59: ...re updates 2 36 updating 2 software license agreement 49 sonar 17 20 23 a scope 22 23 alarms 23 44 appearance 23 bottom lock 21 color gain 20 color rejection 23 cone 9 depth 21 depth scale 21 frequencies 21 FrontVü 19 gain 20 Garmin ClearVü 18 interference 23 measuring distances 20 noise 20 numbers 3 Panoptix 18 19 21 22 recording 24 scroll speed 22 sharing 20 SideVü 18 source 20 surface noise 23 ...

Page 60: ...formation 38 winds 38 Wi Fi technology 46 wind angle graph 33 wind gauges 32 33 wind hold 17 adjusting 17 wind speed graph 33 wireless devices 41 46 connecting a wireless device 46 network configuration 46 Z zoom chart 4 radar 25 sonar 21 52 Index ...

Page 61: ......

Page 62: ...1 55 69 33 99 39 02 36 699699 52 001 855 792 7671 0800 427 652 0800 0233937 47 815 69 555 00800 4412 454 44 2380 662 915 35 1214 447 460 386 4 27 92 500 0861 GARMIN 427 646 27 0 11 251 9800 34 93 275 44 97 46 7744 52020 886 2 2642 9199 ext 2 0808 238 0000 44 870 850 1242 49 0 89 858364880 zum Ortstarif Mobilfunk kann abweichen 913 397 8200 1 800 800 1020 January 2017 190 01557 00_0J ...

Reviews: