Garmin GPSMAP 64SX Owner'S Manual Download Page 15

Altimeter Settings

NOTE: 

The altimeter is available only with GPSMAP 

64s/sc/st/sx/csx devices.
Select 

Setup

 > 

Altimeter

.

Auto Calibration

: Automatically calibrates the altimeter each 

time the device is turned on.

Barometer Mode

: Variable Elevation allows the barometer to 

measure changes in elevation while you are moving. Fixed 

Elevation assumes the device is stationary at a fixed 

elevation, so the barometric pressure should only change 

due to weather.

Pressure Trending

: Sets how the device records pressure 

data. Save Always records all pressure data, which can be 

helpful when you are watching for pressure fronts.

Plot Type

: Records elevation changes over a period of time or 

distance, records barometric pressure over a period of time, 

or records ambient pressure changes over a period of time.

Calibrate Altimeter

: Calibrates the altimeter.

Routing Settings

The device calculates routes optimized for the type of activity 

you are doing. The available routing settings vary based on the 

activity selected.
Select 

Setup

 > 

Routing

.

Activity

: Sets an activity for routing. The device calculates 

routes optimized for the type of activity you are doing.

Route Transitions

: Sets how the device routes from one point 

on the route to the next. This setting is available only for 

some activities. Distance routes you to the next point on the 

route when you are within a specified distance of your current 

point.

Lock On Road

: Locks the blue triangle, which represents your 

position on the map, onto the nearest road.

Profiles

Profiles are a collection of settings that optimize your device 

based on how you are using it. For example, the settings and 

views are different when you use the device for hunting than 

when geocaching.
When you are using a profile and you change settings, such as 

data fields or units of measurement, the changes are saved 

automatically as part of the profile.

Creating a Custom Profile

You can customize your settings and data fields for a particular 

activity or trip.

1

Select 

Setup

 > 

Profiles

 > 

Create Profile

 > 

OK

.

2

Customize your settings and data fields.

Editing a Profile Name

1

Select 

Setup

 > 

Profiles

.

2

Select a profile.

3

Select 

Edit Name

.

4

Enter the new name.

Deleting a Profile

NOTE: 

Before you can delete the active profile, you must 

activate a different profile. You cannot delete a profile while it is 

active.

1

Select 

Setup

 > 

Profiles

.

2

Select a profile.

3

Select 

Delete

.

Device Information

Product Updates

On your computer, install Garmin Express

 (

www.garmin.com

/express

). On your smartphone, install the Garmin Connect app.

This provides easy access to these services for Garmin devices:
• Software updates
• Map updates
• Data uploads to Garmin Connect
• Product registration

Setting Up Garmin Express

1

Connect the device to your computer using a USB cable.

2

Go to 

www.garmin.com/express

.

3

Follow the on-screen instructions.

Registering Your Device

Help us better support you by completing our online registration 

today. Keep the original sales receipt, or a photocopy, in a safe 

place.

1

Go to 

www.garmin.com/express

.

2

Sign in to your Garmin account.

Viewing E-label Regulatory and Compliance 

Information

The label for this device is provided electronically. The e-label 

may provide regulatory information, such as identification 

numbers provided by the FCC or regional compliance markings, 

as well as applicable product and licensing information.

1

Select 

Setup

.

2

Select 

About

.

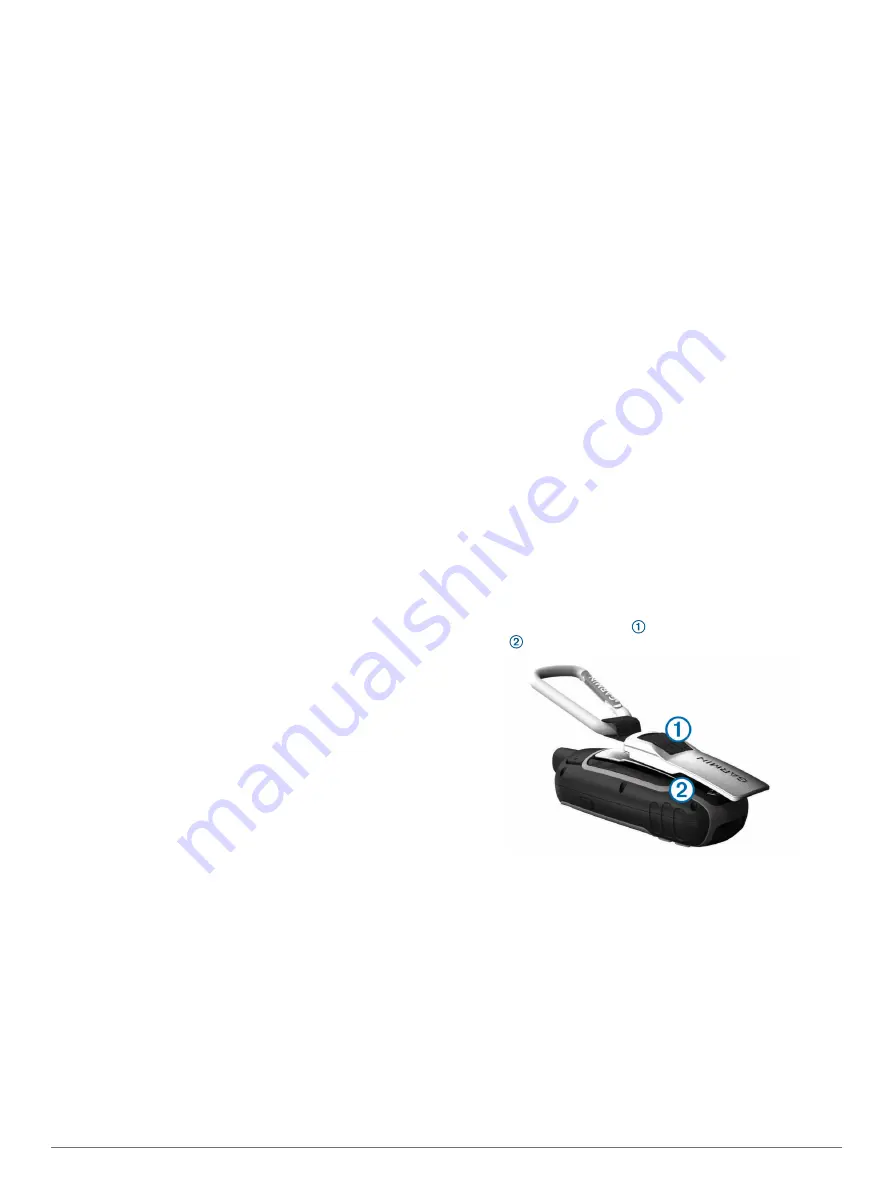
Attaching the Carabiner Clip

1

Position the carabiner clip   in the slots on the mounting 

spine   of the device.

2

Slide the carabiner clip up until it locks in place.

Removing the Carabiner Clip

Lift up on the bottom of the carabiner clip, and slide the 

carabiner clip off the mounting spine.

Attaching the Wrist Strap

1

Insert the loop of the wrist strap through the slot in the 

device.

Device Information

11

Summary of Contents for GPSMAP 64SX

Page 1: ...GPSMAP 64SERIES GPSMAP64X SERIES Owner sManual...

Page 2: ...s BaseCamp chirp Garmin Connect Garmin Express HomePort and tempe are trademarks of Garmin Ltd or its subsidiaries These trademarks may not be used without the express permission of Garmin The Bluetoo...

Page 3: ...6 Downloading Geocaches Using a Computer 6 Navigating to a Geocache 6 chirp 6 Sending and Receiving Data Wirelessly 6 Setting a Proximity Alarm 6 Selecting a Profile 6 Area Calculation 6 Calculating...

Page 4: ...urning On the Backlight 13 Optional Accessories 13 tempe 13 Pairing Your ANT Sensors 13 Troubleshooting 13 Restarting the Device 13 Viewing Device Information 13 Restoring All Default Settings 13 Inde...

Page 5: ...zing Battery Life You can do several things to extend the life of the batteries Reduce the backlight brightness Adjusting the Backlight Brightness page 10 Reduce the backlight timeout Display Settings...

Page 6: ...D ring clockwise 4 Hold 5 Select Setup System AA Battery Type 6 Select Alkaline Lithium Traditional NiMH or Precharged NiMH Turning On the Device Hold Keys FIND Select to open the search menu MARK Sel...

Page 7: ...pass You can use the compass to navigate an active route 1 Select PAGE 2 Hold the device level 3 Follow to your destination Course Pointer The course pointer is most useful when you are navigating on...

Page 8: ...ing or where you have been You can add details about the location such as name elevation and depth You can add a gpx file that contains waypoints by transferring the file to the GPX folder Transferrin...

Page 9: ...Current Track Select Track Manager Current Track Clear Current Track Deleting a Track 1 Select Track Manager 2 Select a track 3 Select Delete Navigating a Saved Track 1 Select FIND Tracks 2 Select a s...

Page 10: ...ption To stop logging select Done To begin navigation to the geocache nearest you select Find Next Closest To enter a comment about looking for the cache or about the cache itself select Add Comment e...

Page 11: ...adventure from BaseCamp to your device Sending Files to BaseCamp page 7 1 Select Adventures 2 Select an adventure 3 Select Start VIRB Remote NOTE The VIRB Remote feature is available only with GPSMAP...

Page 12: ...th The depth of the water Your device must be connected to a NMEA 0183 or NMEA 2000 device capable of acquiring the water depth Descent Average The average vertical distance of descent since the last...

Page 13: ...determined altitude You must be navigating for this data to appear Waypoint At Dest The last point on the route to the destination You must be navigating for this data to appear Waypoint At Next The n...

Page 14: ...You can reset trip data delete all waypoints clear the current track or restore default values 1 Select Setup Reset 2 Select an item to reset Changing the Page Sequence 1 Select Setup Page Sequence 2...

Page 15: ...of measurement the changes are saved automatically as part of the profile Creating a Custom Profile You can customize your settings and data fields for a particular activity or trip 1 Select Setup Pr...

Page 16: ...D ring counter clockwise and pull up to remove the cover 2 Remove the batteries 3 Slide the card holder to and lift up 4 Place the memory card with the gold contacts facing down 5 Close the card hold...

Page 17: ...You must pair the tempe with your device to display temperature data from the tempe Pairing Your ANT Sensors Before you can pair you must put on the heart rate monitor or install the sensor The device...

Page 18: ...ating 11 zoom 3 marine alarms setup 10 settings 10 measuring distances 3 memory card 12 microSD card See memory card N navigating 3 navigation 3 stopping 5 notifications 7 8 P pairing ANT sensors 13 s...

Page 19: ......

Page 20: ...support garmin com GUID DCC27A96 DAFF 41CD A556 B2F7DBF296A4 v9 February 2020...

Reviews: