background image

3.  To display the welcome message when you turn on your 

GPSMAP 278, highlight the 

Show at Power-up

 check 

box, and press 

ENTER

 to select it. To hide the welcome 

information at start-up, clear the check mark.

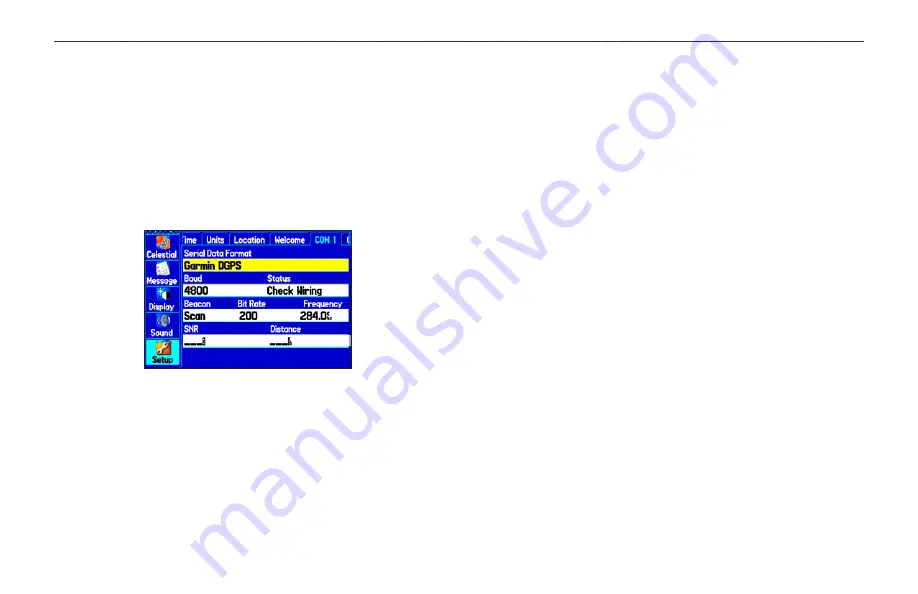
COM 1 and COM 2 Sub Tabs

Use the COM 1 and COM 2 sub tab to change the data format and 

control the input/output format used when connecting your unit to 

external devices. 

COM 1 Sub Tab

Serial Data Format

—sets the data format to one of the following:

• 

Garmin Data Transfer

—provides the proprietary format 

used to exchange data with a computer or another Garmin 

unit. Garmin Data Transfer is disabled when the USB is 

connected, and the unit automatically switches to USB format. 

When the USB is disconnected, the USB field changes to 

Transfer Mode. 

• 

GARMIN DGPS

—connects the GPSMAP 278 with a 

Garmin DGPS beacon receiver.

• 

Garmin Remote Sonar

—connects the GPSMAP 278 with a 

GSD 21 or GSD 20 Sounder Module and transducer.

• 

NMEA In/NMEA Out

—supports the input/output of 

standard NMEA 0183 version 3.01 data and sonar NMEA 

input support for the DBT, DSE, DPT, MTW, and VHW 

sentences. 

• 

RTCM In

—allows DGPS input using a standard RTCM 

format.

• 

RTCM In/NMEA Out

—allows DGPS input using a standard 

RTCM format and also provides NMEA 0183 version 3.01 

output.

• 

RTCM In/Text Out

—allows Differential GPS (DGPS) input 

using a standard RTCM format and also outputs simple text 

data that includes data, time, location, and velocity. 

86 

GPSMAP 278 Owner’s Manual

M

AIN

 M

ENU

 > 

S

ETUP

 T

AB

Summary of Contents for GPSMAP 278 - Marine GPS Receiver

Page 1: ...Owner s Manual GPSMAP 278...

Page 2: ...um to be viewed and to print one copy of this manual or of any revision hereto provided that such electronic or printed copy of this manual must contain the complete text of this copyright notice and...

Page 3: ...ews the main pages in Marine Mode The Automotive Mode section provides you with information about navigating with the GPSMAP 278 in Automotive Mode The Automotive Mode Pages section reviews in detail...

Page 4: ...avigating to a Destination 14 Finding an Item 17 Creating and Using Routes 22 Creating and Using Waypoints 28 Managing Your Tracks 38 Marine Mode Pages 42 Map Page 42 Compass Page 49 Highway Page 52 A...

Page 5: ...02 Speci cations 102 Optional Accessories 103 Installation Information 104 What is EGNOS WAAS MSAS 109 LORAN TD Setup 109 Map Datums and Location Formats 111 Digital Selective Calling DSC 112 Declarat...

Page 6: ...e the screen with the moistened cloth Storage Do not store the GPSMAP 278 where prolonged exposure to temperature extremes may occur such as in the trunk of a car as permanent damage may result User i...

Page 7: ...tion from street signs visual sightings and maps For safety always resolve any discrepancies or questions before continuing navigation The GPSMAP 278 contains a replaceable rechargeable lithium ion ba...

Page 8: ...government s system is subject to changes which could affect the accuracy and performance of all GPS equipment including the GPSMAP 278 Although the GPSMAP 278 is a precision navigation device any nav...

Page 9: ...278 accepts customized points of interest such as school zones and safety cameras and includes proximity alerts to warn you of upcoming POIs External power connector under weather cap USB connector u...

Page 10: ...turn on the GPSMAP 278 power source indicator on the GPS tab shows the unit is operating off battery power that the unit is charging or that an external power source is in use Using Charge Mode If you...

Page 11: ...warning and then press ENTER to continue 3 To turn off the GPSMAP 278 press and hold the POWER key again Adjusting the Backlight and Volume You can adjust the backlight to see the display better If yo...

Page 12: ...r and whether they are being tracked As the receiver locks onto satellites a signal strength bar appears for each satellite in view with the appropriate satellite number underneath each bar The number...

Page 13: ...ng for and collecting data from satellites visible at its last known or initialized location but has not acquired a x 2D GPS Location At least three satellites were acquired and a two dimensional posi...

Page 14: ...a new location automatically or using the map GPS Tips While the receiver is gathering information your location on the map might appear different from where you are actually located As soon as the re...

Page 15: ...a waypoint NAV MOB Key Press to show the navigation menu In Marine Mode press and hold to activate the MOB function In Automotive Mode press and hold to show the Next Turn page and announce the next...

Page 16: ...an option can be shown and entered Select highlight a eld using the ROCKER to begin entering data or selecting options On screen button use the ROCKER to highlight a button and press ENTER to select t...

Page 17: ...ENTER again To exit a menu or return to the previous setting Press QUIT The QUIT key moves backward through your steps Press QUIT repeatedly to return to the starting page To select an on screen butto...

Page 18: ...s You can restore factory defaults for the following Main Menu tabs Track Alarms Display Sound and Setup For more information about the Main Menu see the Main Menu section beginning on page 66 To rest...

Page 19: ...CKER to highlight a tab The information for the highlighted tab automatically appears on the right To highlight a sub tab press left or right on the ROCKER and then press up or down to select individu...

Page 20: ...or Mode 1 Press MENU twice to open the Main Menu 2 Highlight the GPS tab 3 Press MENU to open the GPS tab options menu 4 Highlight Start Simulator and press ENTER GPS tab Starting Simulator Mode from...

Page 21: ...phy Marine Mode Pages Marine Mode has ve main pages Map Compass Highway Active Route and Position Data An optional Sonar Page is available when a GSD 21 or GSD 20 is connected See the Setting Up and U...

Page 22: ...k page 24 Press the FIND key to search for a particular item and create a route to it see page 17 Marine Mode and Automotive Mode are similar Most of the features discussed here also apply to Automoti...

Page 23: ...t name and press ENTER Follow the magenta line created on the Map Page To stop navigation While navigating to a point press NAV Highlight Stop Navigation and press ENTER Highlight Resume Navigation an...

Page 24: ...e NAV MOB key twice 2 Press ENTER to con rm and begin navigating to the MOB location When a MOB is activated a MOB waypoint with an international MOB symbol is created and the unit begins actively nav...

Page 25: ...Exits Transportation and Data just to name a few Additional categories appear depending on the optional BlueChart or MapSource data card in the unit To nd an item and go to it Press FIND to open the...

Page 26: ...e Find feature to center your search from any waypoint route list entry map item or POI To nd an item near another item 1 Follow the steps on page 17 to nd an item 2 Press FIND to open the Find menu 3...

Page 27: ...m To nd an item near another location 1 Press FIND 2 Press MENU to open the options menu 3 Highlight Near Other and press ENTER 4 Select a reference location on the map and press ENTER The list shows...

Page 28: ...d press ENTER to open the list of recently found items 3 Press MENU to open the options menu 4 Select Show Find History to view the list of items you have searched for recently OR Select Show Goto His...

Page 29: ...d press ENTER Find Menu Options To view additional Find menu options press FIND and then press MENU Enable Auto Arrange automatically arranges the Find menu When selected Disable Auto Arrange and Rest...

Page 30: ...ting waypoints or map items from the Map Page To create a route using the Find menu Highlight the Route tab on the Main Menu Press MENU once to open the Route options menu Highlight New Route and pres...

Page 31: ...press ENTER Repeat step 5 to de ne additional route points NOTE If you select an area of the map that is not a feature or waypoint a new waypoint is created for that location Press ENTER on the New W...

Page 32: ...t a route from list To navigate a new route using the Find menu 1 Press the NAV key 2 Highlight Go To Point and press ENTER to open the Find menu 3 Highlight Waypoints and press ENTER 4 Select a waypo...

Page 33: ...nu Highlight the Route tab 2 From the Route List Page use the ROCKER to highlight the name of the route and press ENTER 3 From the Route Review Page highlight a point and press ENTER 4 On the Point Re...

Page 34: ...ess ENTER to add the new point to the route To edit the route on the map 1 Press MENU twice to open the Main Menu Highlight the Route tab 2 Select a route and press ENTER Press MENU to open the Route...

Page 35: ...or your vehicle such as the operator s manual or performance speci cations and make note of the units of measure gallons or liters Manually Transitioning to the Next Waypoint From the Route tab option...

Page 36: ...key to capture your present location to create a new waypoint You must have a valid position 2D or 3D x to mark your present location To mark your present location 1 Press and hold the ENTER MARK key...

Page 37: ...o capture the arrow location Pressing and holding ENTER MARK marks your current location not the arrow s location If you have highlighted a map feature an information page appears after you press ENTE...

Page 38: ...ER when nished To change any of the other information on the New Waypoint Page highlight the appropriate eld and press ENTER After entering your changes highlight OK and press ENTER Reviewing a Waypoi...

Page 39: ...the selected waypoint to the end of a route This option is available only when you are not navigating When you are navigating to a destination Add to Current Route appears The selected waypoint is ad...

Page 40: ...location of the waypoint 3 Press ENTER to save the location Projecting a Waypoint You can create a new waypoint by projecting the distance and bearing from a speci c location to a new location To cre...

Page 41: ...e name or symbol highlight OK and press ENTER Editing a Waypoint The User sub tab shows a master list of all waypoints stored in memory From the User list you can review edit rename or delete individu...

Page 42: ...ll the waypoints in that category You can create up to 15 categories To create a category 1 From any of the waypoint pages or the Points tab press MENU to open the options menu 2 Select Edit Categorie...

Page 43: ...e Waypoint Page use the ROCKER to highlight the on screen Delete button and press ENTER NOTE When you delete a waypoint from the list it cannot be recovered from the unit Back up important waypoints t...

Page 44: ...menu select a location and press ENTER When OK is highlighted press ENTER 5 Highlight Delete and press ENTER to delete all waypoints within the set location Choose Cancel or press QUIT to exit without...

Page 45: ...Press ENTER to begin entering the proximity radius 4 Use the ROCKER to enter a distance value up to 99 99 units and press ENTER To clear one or all proximity waypoints from the list 1 Highlight the Po...

Page 46: ...ng Up and Saving Your Tracks You must save the track log before you can use the Navigate Track feature The Save feature allows you to store up to 15 track logs from certain times and dates To access t...

Page 47: ...ht the Active sub tab 2 Select Save and press ENTER A message appears asking if you want to save the entire track 3 To save the entire track highlight Yes and press ENTER To save a portion of the trac...

Page 48: ...1 Highlight the Track tab on the Main Menu and then select the Saved sub tab 2 Select a track to edit and press ENTER 3 Highlight the Name eld and press ENTER Use the ROCKER to change the name and pr...

Page 49: ...created to mark the most signi cant features of the track in order to duplicate your exact path as closely as possible To get the most out of the TracBack feature remember these tips Always clear the...

Page 50: ...ities and highways Use the zoom keys IN and OUT to adjust the Map Page scale Map Page Data elds Map scale Current location Map Page Options Menu Press MENU to open the options menu Declutter On Off hi...

Page 51: ...ions menu 2 Highlight Set Up Page Layout and press ENTER 3 Select a page layout option and press ENTER To change a data eld display 1 Press MENU to open the options menu 2 Highlight Change Data Fields...

Page 52: ...p Information page to view the data loaded on your GPSMAP 278 unit and data card To review change map information 1 On the Map Page press MENU 2 Highlight Map Information and press ENTER The rst page...

Page 53: ...the direction of navigation is always up When using Track Up or Course Up the North arrow indicates the orientation To change the map orientation press MENU to open the Map Page Press MENU again Selec...

Page 54: ...w to pan the map to view other map areas As you pan past the edge of the current map display the screen moves to provide continuous map coverage The position icon stays in your present location and mi...

Page 55: ...on 2 Press ENTER to view more information about the point The information and on screen buttons shown vary depending on the type of item selected In some cases additional information tabs appear at th...

Page 56: ...t 3 Move the arrow to the reference point the starting point that you want to measure from and press ENTER A push pin icon marks the starting point 4 Move the arrow to the point want to measure to The...

Page 57: ...in the middle of the compass ring and a course to steer bug on the outside of the compass ring The course to steer represents the direction to steer to get back to the course line If the arrow points...

Page 58: ...ing Change Data Fields change onscreen data elds Using the Marine Timer The Marine Timer speci cally designed for sail boat racing allows you to easily count up or down by speci ed time increments As...

Page 59: ...viously the timer is set to count down ve minutes If you want to change the length of time and the behavior or the timer open the Timers Setup tab on the Main Menu NOTE You can set the timer countdown...

Page 60: ...enu 2 Highlight the Highway Page eld and press ENTER 3 Select Off to hide or On to show and press ENTER Using the Highway Page To stay on course steer toward the violet bar or arrows until it lines up...

Page 61: ...us types of useful data Press MENU to open the Highway Page options menu Set Up Page Layout select the page layout Change Data Fields change onscreen data elds Set Up Highway shows an options menu wit...

Page 62: ...of the same features and options Active Route Page Active Route Page Options Press MENU to open the Active Route Page options menu Deactivate stop route navigation Edit on Map edit the route on the ma...

Page 63: ...eer toward the violet bar or arrows until it is aligned with the red bar Position Data Page Options Press MENU to open the Position Data Page options menu Change Nearest Type specify the type of item...

Page 64: ...d more Automotive Mode Pages Automotive Mode has two main pages Map and Trip Computer that are always available Optional Highway and Compass pages can be turned on in Automotive Mode When you are acti...

Page 65: ...NAV key to navigate a new route using the Find Menu or activate a saved route or track Press the FIND key to search for a particular item and create a route to it Navigate Options Menu Press NAV to o...

Page 66: ...avigation When navigating to a point you can stop navigation For example if you are on a long car trip but you want to stop for dinner you can stop navigation and resume after dinner To stop navigatio...

Page 67: ...To button and press ENTER to begin navigation To go to a destination using the Find menu 1 Press FIND to open the Find menu 2 Using the ROCKER highlight a category such as Food Drink and press ENTER 3...

Page 68: ...to open the Navigate menu 2 Highlight Navigate Route and press ENTER 3 Highlight the route you want to navigate and press ENTER 4 Press MENU to open the options menu 5 Highlight Follow Roads and pres...

Page 69: ...ou can add custom avoids while you are navigating a route or before you navigate To enter a custom avoid 1 Press NAV while navigating to a destination OR Open the Map Page and press MENU 2 Select Cust...

Page 70: ...e the ROCKER to select Edit Vias and press ENTER The Add Edit Vias window opens 3 Highlight Add Via Point and press ENTER Add Edit Vias Page Showing the original route without Via Points 4 From the po...

Page 71: ...can be con gured to display any one of the possible data options The top of the screen shows the GPS status or the route leg You can also add data elds to the page or select a full screen map without...

Page 72: ...down Highlight any of the turns on the list and press ENTER to view the Next Turn Page for that turn The Current Route and Next Turn Page display similar information using a different layout The Next...

Page 73: ...r selectable data elds For de nitions of data eld options see to page 120 Trip Computer Page Options Menu Press MENU to open the options menu Highlight an option and press ENTER Set Up Page Layout cho...

Page 74: ...ain Menu Tabs GPS view satellite information page 67 Route create and store routes page 67 Points view stored waypoints page 68 Track record and save tracks page 68 DSC set up digital select calling f...

Page 75: ...more information about GPS see pages 4 6 Main Menu GPS Tab Route Tab The Route tab shows all the routes currently stored in memory along with a descriptive name for each route Use the Route tab creat...

Page 76: ...de ne an alarm circle around a stored waypoint location See page 36 for more information Track Tab Use the Track tab to specify whether or not to record a track log de ne how it is recorded or save th...

Page 77: ...SC Call List The Call List sub tab shows the 50 most recent calls even if the unit is left unattended The Call List only shows the most recent call from a vessel If a second call is received it replac...

Page 78: ...ny comments 4 When nished highlight OK and press ENTER New Directory Item Page Enter the MMSI number name and a comment if needed in the elds Highlight OK and press ENTER to save the Directory Entry A...

Page 79: ...alarm message appears on the GPSMAP 278 and the unit emits ve 5 beeps Main Menu Alarms tab To set an alarm 1 Highlight the Alarms tab on the Main Menu 2 Select an alarm to set and press ENTER 3 Chang...

Page 80: ...to sound when off course Select On and then enter a distance Anchor Drag set an alarm to sound when you exceed a speci ed drift distance Select On and then enter a distance Custom POI set an alarm to...

Page 81: ...work Drift set an alarm to sound when you exceeded a speci ed drift distance Select On and then enter a speci c distance Fish set an alarm to sound when sh are detected with sonar Calendar Tab Use th...

Page 82: ...isible Days with added points or routes are shown highlighted in green Icons for the points and routes assigned to the date are shown along the bottom of the screen Month View Sub Tab The Month View s...

Page 83: ...view a tide chart for a different tide station 1 From the Tide sub tab highlight the At eld and press ENTER The Find menu opens showing the tide stations 2 Press MENU and select Near Current Location...

Page 84: ...lso appears You can view Sun Moon information for any date or location You can also use the play fast forward and stop buttons to view an animation of the Sun Moon sub tab To view sun and moon informa...

Page 85: ...nt Fish sub tab provides you with predictions of the best times to hunt and sh in a selected location on a speci c date To display the Hunt Fish information 1 Highlight the Celestial tab on the Main M...

Page 86: ...location To use the current location 1 Highlight the From eld and press ENTER 2 Highlight Current Location and press ENTER Message Tab The Message tab shows a list of messages generated by the GPSMAP...

Page 87: ...ow in the main page sequence and how long the backlight stays on Main Menu Display Tab Main Menu indicates whether the Main Menu tabs to contain text and icons default or text tabs only Color Mode set...

Page 88: ...intensity or left to decrease Sound Tab Use the Sound tab to customize the sounds made by your GPSMAP 278 Main Menu Sound Tab Beeper set the beeper to chime during key presses and alarms Key and Alarm...

Page 89: ...age speed readings Choose from Off Auto automatically controls ltering or On allows you to enter a value in seconds Text Language sets the unit s on screen language EGNOS allows you to enable or disab...

Page 90: ...quality route but uses a longer calculation time Best Route generates the most optimal route but takes the longest time to calculate Calculate Routes for sets route calculation for the particular vehi...

Page 91: ...u can also Reset the timer and turn it Off Enter a time to use when counting up or down Marine appears on the Compass Page in Marine Mode Since Midnight shows the time the unit was turned on since mid...

Page 92: ...location formats and map datums Also visit the National Imagery and Mapping Agency at www nima mil for more information on grids and datums Changing the Location Format When you change the Location F...

Page 93: ...n the variation you enter Enter the magnetic variation of your current location in the Magnetic Variation eld if you selected User Mag Var for the heading WARNING If User Mag Var is selected the unit...

Page 94: ...ed and the unit automatically switches to USB format When the USB is disconnected the USB eld changes to Transfer Mode GARMIN DGPS connects the GPSMAP 278 with a Garmin DGPS beacon receiver Garmin Rem...

Page 95: ...y turned off To have the unit automatically scan for a frequency 1 Set the unit to GARMIN DGPS or RTCM In NMEA Out 2 Highlight the Beacon eld and press ENTER 3 Highlight Scan and press ENTER The numbe...

Page 96: ...is responsible for their accuracy and maintenance For DGPS transmitter problems or to nd the most updated list of frequencies and coverage areas contact your local USCG or see their Web site at www n...

Page 97: ...Lat Lon minutes set Waypoint IDs to names or numbers and turn on and off the GPS status the Garmin Proprietary sentences and Waypoint Route WPL RTE GPSMAP 278 NMEA Sentence Output NMEA version 3 01 c...

Page 98: ...ge the layout of the Map Page to show a split screen to show the sonar on the Map Page You must be in Marine Mode to use sonar To show the Sonar Page on the Map Page 1 On the Map Page press MENU 2 Hig...

Page 99: ...erature Sonar Page The sonar returns show as red strongest then orange strong yellow medium green weaker and blue weakest The Fish Symbols option allows you to view the actual sonar data a sh symbol o...

Page 100: ...ckly change to commonly used settings and values Press ENTER to accept the new setting or press QUIT to cancel and return to the Sonar Page Sonar Adjustment Options Range sets the display depth range...

Page 101: ...d colors shown on the sonar display A lower percentage results in more weaker signaled colors shown on the sonar display This setting does not increase or decrease the unit Gain Whiteline controls how...

Page 102: ...ump for a future shing location When using this feature the Sonar Page pauses The depth continues to update while the display is paused but the unit does not show any new sonar data until the Sonar Pa...

Page 103: ...wide variety of depths If the unit is unable to track the bottom for any reason the digits in the depth window ash on and off to alert you that the unit is not tracking the bottom Map Split Sonar Det...

Page 104: ...r speeds are shown at the bottom of the calibration window Note your top speed then stop the boat and press ENTER Calibrating the Water Speed 3 By default the top ground speed is automatically shown I...

Page 105: ...right side of the sonar display This graphic Flasher shows structure and bottom returns much the same as a true Flasher You might nd this feature useful when using Fish Symbols Temperature Graph sele...

Page 106: ...eratures changes according to the Temperature Scale and Time Duration settings Temperature Scale select a degree span from the list Select Auto to have the unit automatically determine the best range...

Page 107: ...de the detailed data Stronger returns appear in darker colors with red being the strongest return Understanding the Sonar Display One of the rst things to understand about sonar is that the transducer...

Page 108: ...diameter circle at a 30 foot depth The narrow cone angles 10 associated with high frequencies 200 kHz provide better bottom resolution and crisper detail but cannot show a large coverage area for ndi...

Page 109: ...ier to distinguish Whiteline Off Whiteline On Thick Whiteline Hard bottom Thermoclines A rough de nition of a thermocline is a break in water where the water temperature changes faster than the water...

Page 110: ...rgeable lithium ion Battery Life 7 15 hours Source 11 35 VDC Fuse 3AG 1 5 Amp Performance Receiver Differential ready 12 parallel channel receiver Acquisition Times Approx 15 seconds warm start Approx...

Page 111: ...cts the unit to a serial port on your PC Power Data Cable Allows you to connect the unit to the electrical system using bare wires Programmable Data Cards Blank data cards available in 16 MB 32 MB 64...

Page 112: ...ions Replacement fuse is a 3AG 1 5 Amp fuse Power Data Connector on the GPSMAP 278 Unit Data Out 1 Blue Ground Black Voice Orange Alarm White Power Red Voice Brown Data In 1 Yellow Data In 2 Green Dat...

Page 113: ...le connect the larger end of the cable to an available USB data port see the illustration on the left When using a PC Interface Cable connect the larger end of the cable to a serial communications por...

Page 114: ...Help le for complete instructions about using xImage Custom POIs Points of Interest Your GPSMAP 278 accepts custom POI databases available from various companies on the Internet Some custom POI databa...

Page 115: ...t of the unit 2 Firmly push the card into the unit It is not necessary to force the card The handle is still exposed when it is properly inserted 3 If the unit is on a con rmation tone sounds The rst...

Page 116: ...y communication protocol is available from the Web site www garmin com Removing the GPS Antenna You can remove the GPS antenna to use an external antenna After the antenna is removed the BNC connector...

Page 117: ...le EGNOS WAAS see to page 6 LORAN TD Setup LORAN C is a radio navigation aid operated and maintained in the United States by the United States Coast Guard LORAN LOng RAnge Navigation system covers the...

Page 118: ...e Location sub tab 2 Highlight the Location Format eld and press ENTER 3 Highlight Loran TD and press ENTER 4 Highlight the Setup button located on the right side of the Location Format eld and press...

Page 119: ...ion What is a Location Format Your current location can be viewed on the GPS in the form of coordinates Because different maps and charts use different location formats Garmin GPS units allow you to c...

Page 120: ...ion using a Go To This makes DSC a time saver especially in an emergency situation To use DSC users must rst register their VHF radio with the FCC and receive a Maritime Mobile Service Identity MMSI n...

Page 121: ...Page DSC Call List The Call List shows the 50 most recent calls even if the unit is left unattended The Call List only shows the most recent call from a vessel If a second call is received it replaces...

Page 122: ...MENU from this page allows you to add a New Item Delete a highlighted entry or Delete All entries DSC Directory list DSC Directory entries Press ENTER to open the entry review page Blank entry Press E...

Page 123: ...ke a Distress Call press the MayDay button on your VHF radio The call transmits on an emergency channel with the MMSI number attached to the call if you have DSC support Any DSC equipped mariner on se...

Page 124: ...ue21 links mmsi htm or http wireless fcc gov marine Non Federal Users in the United States Commercial users or those who travel outside the United States or Canada must apply for a ship station licens...

Page 125: ...on sea or land within range can receive the call When the GPSMAP 278 is connected to a VHF with DSC support the GPSMAP 278 shows a call list log and a directory Basic wiring is required for the Garmin...

Page 126: ...ter depth has changed by the amount entered in the Drift Alarm setup Fish Alarm a sh was detected The unit shows an icon and beeps if enabled This alarm does not display a message banner Lost Satellit...

Page 127: ...saved track with the same name already exists Track Log Full the track log is full and track recording was turned off To record more track points you need to clear the track log and turn track recordi...

Page 128: ...ted time you will reach the next point on your route ETE Destination Estimated Time Enroute The estimated time required to reach your destination ETE Next Estimated Time Enroute The estimated time req...

Page 129: ...trip computer was reset Ttl Avg Spd see Trip Avg Speed Total Turn the distance between Bearing BRG and Track TRG L indicates you should turn left R indicates you should turn right The degrees indicate...

Page 130: ...reduce to human readable form the Software or any part thereof or create any derivative works based on the Software You agree not to export or re export the Software to any country in violation of th...

Page 131: ...g instructions and an RMA tracking number The unit should be securely packed with the tracking number clearly written on the outside of the package The unit should then be sent freight charges prepaid...

Page 132: ...o guarantee that interference will not occur in a particular installation If this equipment does cause harmful interference to radio or television reception which can be determined by turning the equi...

Page 133: ...endar tab 73 calibrate water speed 96 cards data 107 carpool lanes 82 categories nd menu 17 waypoint 34 35 caution vi CDI See Course Deviation Indicator celestial tab 74 hunt sh sub tab 77 sun moon su...

Page 134: ...iding showing 52 options menu 53 setup 53 hunt sh sub tab 77 I icons 79 identi er 116 information page 21 47 initialize 3 installation 104 interval 41 invert 54 item details 21 K keypad 7 L language 8...

Page 135: ...t waypoint location 32 proximity 36 alarms 36 points tab 36 waypoint 37 R recalculating 82 receiver not usable 5 receiver status 5 receive satellite signals 3 receiving a DSC call 70 114 record tracks...

Page 136: ...ck up 6 45 transducer 95 100 trip computer page 55 65 options menu 65 page layout 65 trip planning 27 73 turn by turn route 60 turn off recalculation announcement 83 turn unit on and off 3 U u turns 8...

Page 137: ......

Page 138: ...garmin com Copyright 2006 Garmin Ltd or its subsidiaries Garmin International Inc 1200 East 151st Street Olathe Kansas 66062 USA Garmin Europe Ltd Unit 5 The Quadrangle Abbey Park Industrial Estate R...

Reviews: