background image

GPSMAP 176/176C Owner’s Manual 

39

B

ASIC

 O

PERATION

 > 

F

IND

Active Route Page

Whenever you have activated a route in the GPSMAP 176/176C, 

the Active Route page shows each point (waypoint or map feature) 

of the active route. It also shows the point name, Distance, Course, 

ETA, Fuel to point, Leg Distance, Leg Fuel, Leg Time, Sunrise and 

Sunset at point location, and Time To point for each point from your 

present location. The current destination point, the “active” point, is 

marked with an arrow icon. As you navigate a route, the waypoint 

list automatically updates to indicate the next active point first. The 

Active Route and Route Review pages share many of the same 

features and options.
The following route options are available from the Active Route page:

  • Use Map—see pages 35 for instructions.
  • Insert/Add Waypoint—see page 36-37 for instructions.
  • Remove Waypoint—see page 38 for instructions.
  • Reverse Route—see page 38 for instructions.
  • Plan Route—see page 38 for instructions.

Find

FIND

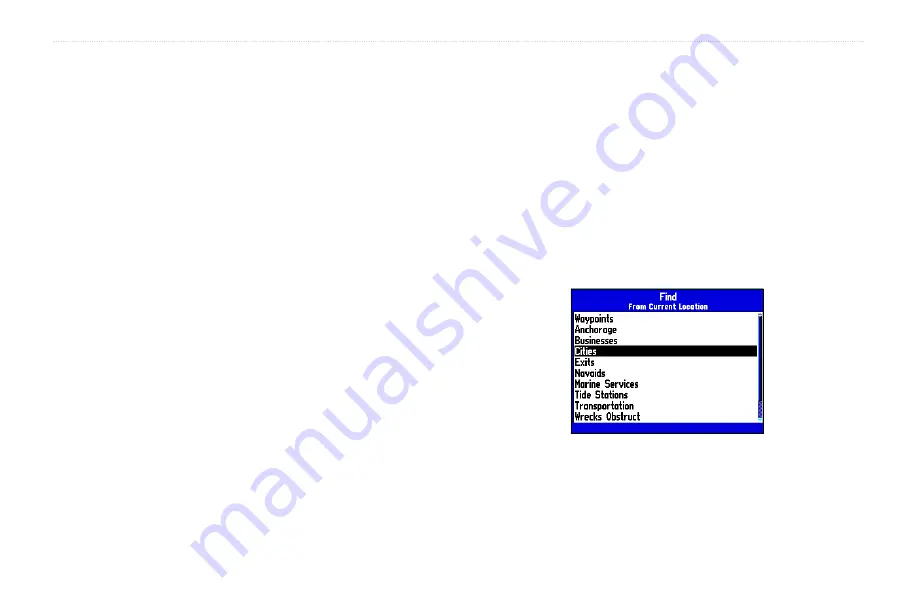
 allows you to search the unit for user waypoints, map items 

and any optional BlueChart or MapSource information loaded on 

a data card. The unit searches for items from your current location 

or from another location on the map. When you press 

FIND

, a 

list of available items to search from appears. The default items 

are Waypoints, Cities, Exits, Tide Stations, and Transportation. 

Additional items are displayed depending on the optional BlueChart 

or MapSource data card inserted into the unit. Your location or 

the map pointer must be within the map outline area to search for 

information from the BlueChart or MapSource data.

Find Menu

Summary of Contents for GPSMAP 176

Page 1: ...GPSMAP 176 176C chartplotting receiver owner s manual...

Page 2: ...medium to be viewed and to print one copy of this manual or of any revision hereto provided that such electronic or printed copy of this manual must contain the complete text of this copyright notice...

Page 3: ...of unit features to help you get acquainted with your new GPSMAP 176 176C The Basic Operation chapter provides you with information about features such as using the Find Menu navigating a route and u...

Page 4: ...oatings and a clean lint free cloth Storing the GPSMAP 176 176C Do not store the GPSMAP 176 176C where prolonged exposure to temperature extremes may occur such as in the trunk of a car as permanent d...

Page 5: ...oints 15 Waypoint Menu Options 16 Reviewing and Editing Waypoints 17 Waypoint Lists 19 User Waypoint List 20 User Waypoints List Options 21 Proximity Waypoint List 22 Recent Waypoint List 23 Going to...

Page 6: ...d Tab 67 Other Tab 68 Setup Map Menu Options 68 Setup Tab 69 System Tab 69 Time Tab 70 Units Tab 71 Location Tab 71 Interface Tab 74 Appendix 78 Speci cations 78 Connecting the Power Data 79 Interfaci...

Page 7: ...Port Antenna R o t a t e A n t e n n a t o D o w n P o s i t i o n f o r S t o r a g e External Power and Computer Data Port 12 Level Gray scale LCD Display with Backlight GPSMAP 176 16 color Trans ec...

Page 8: ...at the same time Do NOT mix new and used batteries Do NOT mix Alkaline batteries with Lithium or Ni Cad rechargeable batteries When installing new batteries observe the polarity markings in the case...

Page 9: ...the external power cable from the connector on the back of the GPSMAP 176 176C 2 Rotate the antenna to approximately a seven o clock position The alignment notches in the casing must line up with the...

Page 10: ...location as a waypoint MENU Key Press and release to view options for a page Press twice to view the Main Menu POWER Key Press and hold to turn unit On Off Press and release to adjust backlighting IN...

Page 11: ...er valid and your unit may take longer to lock on to satellites while updating the Almanac GPS Information Page To initialize the GPS receiver 1 Take the unit outside where it has an unobstructed view...

Page 12: ...state province or country and are having trouble locking on to satellites select New Location Another menu is displayed with the options Automatic or Use Map If Automatic is selected the unit switche...

Page 13: ...ew map data Position the pointer over an item on the map to highlight it As you move the pointer the distance and bearing from your present location to the pointer are displayed in the data window alo...

Page 14: ...e If the item is a map feature or a feature of BlueChart or MapSource data an Information page appears In some cases additional information tabs and option buttons appear Use the ROCKER to highlight t...

Page 15: ...m no additional data The GPSMAP 176 176C has a built in worldwide database More detailed coverage is available through optional BlueChart or MapSource data The GPSMAP 176 176C displays cartography as...

Page 16: ...by looking at the GPS tab on the Main Menu Refer to page 50 for more information on the Main Menu GPS tab To mark your present location 1 Press and hold ENTER MARK until the New Waypoint window appea...

Page 17: ...and press ENTER MARK 4 To change the name symbol location or enter comments elevation or depth highlight the appropriate eld and press ENTER MARK Make your changes and press ENTER MARK when done After...

Page 18: ...1 Press MENU twice to display the Main Menu Highlight the Points tab and press MENU 2 Highlight Create Waypoint and press ENTER MARK The New Waypoint page appears with the next available waypoint numb...

Page 19: ...oint using one of the methods previously described The New Waypoint page is now on your screen 2 Verify the eld to the right of the word From reads Current Location If it does not highlight the eld an...

Page 20: ...s for a more accurate location reading Average Location Screen To calculate the average location 1 Select Average Location from the options menu 2 The Average Location screen appears Watch as the elds...

Page 21: ...he desired waypoint from the User or Proximity lists 2 Press ENTER MARK to display the Waypoint Edit page If the waypoint is located on a map feature or MapSource or BlueChart feature the Waypoint Edi...

Page 22: ...ocation and press ENTER MARK 2 Highlight the distance and or bearing eld and use the ROCKER to edit the data Press ENTER MARK when nished See Projecting Waypoints page 15 You may also use the Waypoint...

Page 23: ...the move process press QUIT 4 With the pointer at the desired location press ENTER To return to the Waypoint Edit Waypoint Review page press the QUIT button On the Show Map display two additional opt...

Page 24: ...ght the Points tab on the Main Menu then highlight User 2 Use the ROCKER to scroll through the list 3 Press ENTER to review the highlighted waypoint on the Waypoint Edit page See page 17 for detailed...

Page 25: ...to backup important waypoints to a computer using the optional PC cable and interface software or write them down by hand To delete an individual waypoint from the User list 1 Use the ROCKER to highl...

Page 26: ...alerts for one of the overlap points use caution when navigating in these areas If you enter an alarm circle overlap you are only alerted to the closest proximity waypoint Proximity Waypoint List Pro...

Page 27: ...Use the ROCKER to highlight the proximity waypoint to clear and press MENU 2 To clear a single alarm highlight the Remove Point option and press ENTER 3 To clear all proximity waypoints select the Re...

Page 28: ...sets a direct course from your present location When you press NAV Go To point name appears in addition to Go To Point Choose a waypoint from either the By Name or Nearest tab list To activate a Go To...

Page 29: ...he map item but the point is not stored in the waypoint list See page 13 for creating waypoints using map features If you are selecting a new map point as the Go To destination the GPSMAP 176 176C aut...

Page 30: ...og before you of your current trip Refer to the Track Tab on page 55 for more information Default Track name Total Distance Total number of points Check this box to display track Changes the display c...

Page 31: ...MENU on this page activates the options to Measure Distance see page 43 and Point to on Main Map which exits the Save Track dialog Press QUIT to return to the Save Track dialog 4 Highlight OK and pre...

Page 32: ...receiver then assigns the 50 waypoints to the most signi cant points of your track and simpli es segments with fewer changes in direction To stop TracBack navigation press NAV Highlight Stop Navigati...

Page 33: ...ng you to see a list of the route points as you create the route Access the Main Menu to start creating a route Route Tab and Route Options Menu To create a route graphically 1 Press MENU twice to dis...

Page 34: ...ompleted leg and a dotted line appears to indicate the distance and bearing from the last route waypoint to the map pointer location 5 Repeat steps 3 and 4 until you nish adding all route points 6 Whe...

Page 35: ...List page Following a Route The NAV key activates the route for navigation You can navigate the route in the same sequence as it was originally created or inverted and navigated from the end waypoint...

Page 36: ...ions appear Navigate Go To Point Navigate Route Navigate Track and Stop Navigation If you highlight a route name from the Route List and press NAV the name automatically appears as a navigation option...

Page 37: ...e name with an additional number at the end of the route name or creates a new route name based on names of the rst and last route points To delete all routes 1 From the Route List press MENU 2 Highli...

Page 38: ...nts or map items one at a time from the list To review individual route points 1 Highlight the desired point and press ENTER 2 On the Point Review window you may choose Next to highlight the next poin...

Page 39: ...ou to insert a waypoint or point from the Find Menu before a waypoint that is highlighted on the route list or add a point s onto the end of the route Remove Waypoint allows you to remove a point wayp...

Page 40: ...esired route waypoint on the map and press MENU 2 Highlight the eld you wish to change press ENTER make the desired changes and press ENTER again To add points to the beginning or end of the route 1 W...

Page 41: ...to return to the Route Review page Drag the route leg to an existing waypoint shown map item or a blank spot on the map to create a new route point To insert a point into the route or add a point to...

Page 42: ...for units of measure statute nautical or metric do not affect the fuel ow measure You should enter fuel ow rates based upon available information from your vehicle s operator s manual performance spec...

Page 43: ...are available from the Active Route page Use Map see pages 35 for instructions Insert Add Waypoint see page 36 37 for instructions Remove Waypoint see page 38 for instructions Reverse Route see page...

Page 44: ...from the list and press ENTER The Find option also supports a nd from feature which allows you to center your search around an item which you have just found For example you search for Restricted Area...

Page 45: ...he optional BlueChart data or MapSource software the map display shows your location on a digital chart complete with geographic names map items navaids and a host of other chart features It also plot...

Page 46: ...vailable if MapSource data is loaded Highlight the Show Next Street option and press ENTER to show the next street Highlight the Hide Next Street option and press ENTER to hide the next street window...

Page 47: ...e point the point that you want to measure from and press ENTER 3 Move the pointer to the point you want to measure to The bearing and distance from the reference point and pointer coordinates are dis...

Page 48: ...R 3 Move up or down on the list using the ROCKER Select the data you want to display and press ENTER To exit press QUIT Choose the type of data you wish to display To change a map setup feature 1 From...

Page 49: ...n to your destination For instance if the arrow points up you are going directly to the waypoint If the arrow points any direction other than up turn toward the arrow until it points up NOTE The beari...

Page 50: ...direction you should steer to stay on course If you are navigating a route the Highway page shows each route waypoint in sequence connected by a black road with a white line down the middle which is...

Page 51: ...th two tabs Line and Waypoint Each tab has On Off settings for several options The Line tab determines if the Active Leg Active Route Track Log or Saved Tracks are displayed on the Highway page The Wa...

Page 52: ...information about the Active Route page see page 39 Numbers Page The Numbers page provides a quick reference for important data you want to display The default page displays four large user selectabl...

Page 53: ...ded into categories by function Main Menu Page Main Menu Tabs Submenu Tabs To select a menu tab from the Main Menu page 1 Press the ROCKER Up or Down to highlight the tab you want to view The informat...

Page 54: ...pdates the position date and time You can use the sky view to help determine whether any satellites are being blocked and whether you have a current position x indicated by a 2D 2D Differential 3D or...

Page 55: ...ears in the receiver status To learn more about the WAAS system its satellite positions and current state of development visit the FAA Web site http gps faa gov Since WAAS requires CPU resources of th...

Page 56: ...ars when you are receiving DGPS corrections in 3D mode and a D shows on the strength bar of satellites being corrected Lost Satellite Reception the receiver is no longer tracking enough satellites for...

Page 57: ...your DGPS receiver and the distance from the DGPS transmitting station GPS Info tab features an options page that provides access to functions and features relating to the GPS Info tab To display the...

Page 58: ...ime Moving Time Total Time and Odometer To reset the trip data press MENU then select the desired option and press ENTER Trip Tab Route Tab The Route tab contains a list of available routes For detail...

Page 59: ...rding options Off No track log is recorded Note that turning recording Off prevents you from using the TracBack feature Fill A track log is recorded until the track memory is full Wrap A track log is...

Page 60: ...ons are available Review On Map displays the saved track on a Track Map page Delete Track deletes highlighted saved track from memory Delete All deletes all saved tracks from memory Track Menu Saved T...

Page 61: ...e radius or time for sounding the alarm Off Course sets an alarm to sound when you are off your desired course by a speci ed distance Enter a distance in the distance eld and use the control eld to tu...

Page 62: ...d then enter a distance To set an alarm 1 Use the ROCKER to highlight the eld to the right of the alarm name you wish to activate and press ENTER 2 Change the mode to On Dist or Time for the Arrival a...

Page 63: ...ft displaying depth indicates the current tide height The Mean Lower Low Water MLLW appears as a solid horizontal line near the bottom of the chart this line only appears if the tide ranges to zero or...

Page 64: ...s ENTER to view the chart Tide Tab Menu Options To nd the chart for a tide station nearest to a location on the map 1 Press FIND select Tide Stations and press ENTER 2 Press MENU select Nearest to Oth...

Page 65: ...t Move Cursor 2 Press the ROCKER key Right or Left to view the chart at another time 3 To return to the current time press MENU and select Stop Moving Cursor Sun Moon Tab The Sun Moon tab displays cel...

Page 66: ...he ROCKER to highlight the date or time eld and press ENTER 2 Enter a new date or time and press ENTER To use current date and time from the Celes tab press MENU then use the ROCKER to highlight Use C...

Page 67: ...or Mode Water Mode or Land Mode when in Water Mode land appears dark and water is light In Land Mode land appears light and water is dark If using optional BlueChart data Water Mode is recommended Aut...

Page 68: ...ntrol how Businesses Facilities Geo and Exit features are displayed on the Map page Text Off Small Medium and Large controls the screen size of the name Zoom Auto Off 20 ft 800 mi sets the maximum ran...

Page 69: ...ntrols the screen size of the name Light Sectors Off Auto On controls the display of lighted navigation aids Line Tab Heading Line On Off turns the Heading Line on or off The Heading Line projects you...

Page 70: ...are displayed on the Map page Text Off Small Medium and Large controls the screen size of the name Zoom Auto Off 20 ft 800 mi sets the maximum range at which the feature appears on the screen Some ty...

Page 71: ...0 mi sets the maximum range at which the cities appear on the screen Some types of data are only displayed at certain zoom ranges Road Tab The Road tab contains Text and Zoom settings that control how...

Page 72: ...loaded When the feature is active the triangle icon locks to the road that you are traveling Map Outlines On Off toggles the coverage boxes for BlueChart MapSource data On and Off Setup Map Menu Optio...

Page 73: ...ncheck the box OR Press MENU select one of the options Show All Show None or Show MapSource product name and press ENTER 4 To view details about a map highlight the map name and press ENTER Highlight...

Page 74: ...ttery power or shows that an external power source is in use Press MENU for the following options Defaults restores settings on System page to default values All Unit Defaults restores all settings to...

Page 75: ...eric Degrees or Cardinal Letters This setting is used in all elds that relate to direction throughout the unit Location Tab The Location tab de nes settings for Location Format Map Datum Heading and M...

Page 76: ...ead MGRS New Zealand Qatar Grid RT 90 Swedish Grid Swiss Grid Taiwan Grid Loran TD User Grid W Malayan RSO For additional information on Loran TD setup see the Appendix Map Datum allows you to manuall...

Page 77: ...based upon the variation you enter Enter a magnetic variation To enter a user de ned magnetic variation 1 With the Heading eld set to User Mag Var highlight the Magnetic Variation eld and press ENTER...

Page 78: ...r another Garmin GPSMAP 176 176C When you select Garmin Data Transfer there are 11 Transfer Modes to choose from Host Request Almanac Request Proximity Request Routes Request Tracks Request Waypoints...

Page 79: ...ght Defaults and press ENTER If Garmin DGPS or RTCM In NMEA Out format is selected additional elds are provided to control a Garmin differential beacon receiver directly from your GPSMAP 176 176C You...

Page 80: ...and bit rate Scanning unit is automatically scanning through the frequencies and bit rates Receiving unit is receiving DGPS signal and ready for operation Check Wiring unit is not making connection wi...

Page 81: ...p The GPSMAP 176 176C NMEA data transmission can be customized to keep the output rate at two seconds If the unit is set up to output all of the available NMEA sentences the output rate may exceed two...

Page 82: ...prox 15 seconds warm start Approx 45 seconds cold start Approx 5 minutes First Time AutoLocate Update Rate 1 second continuous GPS Accuracy 15 meters 49 feet RMS 95 typical DGPS USCG Accuracy 3 5 mete...

Page 83: ...s 2 3 ASCII Text Output RTCM SC 104 input version 2 0 The following are the sentences for NMEA 0183 version 2 3 output Approved sentences GPRMC GPGGA GPGSA GPGSV GPGLL GPBOD GPRTE and GPWPL Proprietar...

Page 84: ...te location with North or your current track at the top of the display Satellite Strength Indicator Bars The Satellite Strength Indicator Bars not only show the strength of the signal being received t...

Page 85: ...ortions of Alaska For more information go to http gps faa gov Programs WAAS waas htm NOTE If you are using the GPSMAP 176 176C outside of the U S we recommend that you turn off WAAS for the most accur...

Page 86: ...uxembourg Netherlands Norway Portugal Spain Sweden Switzerland European 1979 European 1979 Austria Finland Netherlands Norway Spain Sweden Switzerland Finland Hayfrd Finland Hayford Finland Gandajika...

Page 87: ...n 63 So Chilean 63 S Chile Ptcairn Ast 67 Pitcairn Astro 67 Pitcairn Puerto Rico Puerto Rico Virgin Isl Qatar National Qatar National Qatar South Greenland Qornoq Qornoq South Greenland Reunion Reunio...

Page 88: ...time you will reach your destination waypoint based on current speed and track ETA at Destination The estimated time you will reach a Goto destination or the nal waypoint in a route ETA at Next The es...

Page 89: ...relative to a ground position Also referred to as ground track Trip Odometer A running tally of distance travelled since last reset See also Odometer Total Average Speed Average speed of unit for bot...

Page 90: ...t is unable to continue receiving satellite signals Memory Full Unit memory is full no further data can be saved Near Proximity Point You are nearing a proximity waypoint No Diff GPS Location RTCM is...

Page 91: ...f To record more track points you need to clear the track log and turn track recording on This is only displayed when the track recording setting is set to Stop When Full Track Truncated A complete up...

Page 92: ...as a TD or enter waypoints as TDs The accuracy to be expected from this conversion is approximately thirty meters When the unit is placed in the LORAN TD format mode it simulates the operation of a L...

Page 93: ...red setting then press ENTER 6 When done highlight Save and press ENTER If the active GRI Chain secondary stations or offsets have been changed since the waypoint was created the waypoint now referenc...

Page 94: ...street level map detail points of interest business addresses and phone numbers marine data topographical information and more from MapSource CD ROMs to a data card either directly through your GPSMA...

Page 95: ...emble reverse engineer or reduce to human readable form the Software or any part thereof or create any derivative works based on the Software You agree not to export or re export the Software to any c...

Page 96: ...OUR SOLE AND EXCLUSIVE REMEDY FOR ANY BREACH OF WARRANTY To obtain warranty service contact your local Garmin authorized dealer or call Garmin Product Support for shipping instructions and an RMA trac...

Page 97: ...use undesired operation This equipment generates uses and can radiate radio frequency energy and may cause harmful interference to radio communications if not installed and used in accordance with the...

Page 98: ...t messages displayed to the consumer Virtually all data sources contain inaccurate or incomplete data to some degree This is particularly true outside the United States where complete and accurate dig...

Page 99: ...58 City Tab 67 Cleaning ii Color Mode 63 Land Mode 63 Water Mode 63 Compass Page 45 Options 45 Correction Signals 81 Course Line 65 Course Up 63 Creating Routes 29 D Data Card 63 69 Data Fields 42 Da...

Page 100: ...y 6 Overzoom 11 P Page Key 6 Page Layout 43 47 Plan Route 35 Points Tab 54 Point Tab 64 Power Key 6 Proximity Waypoint 22 Q Quit Key 6 R Restoring Defaults 70 Road Tab 67 Rocker Key 6 Route Append Way...

Page 101: ...ii Waypoints Append to Route 16 Average Location 16 Creating 12 Creating Graphically 13 Delete 21 Editing 17 Entering Coordinates 14 Find 40 Insert 35 Lists 19 Menu Options 16 Move 19 Naming 17 Projec...

Page 102: ......

Page 103: ......

Page 104: ...min com Copyright 2002 2005 Garmin Ltd or its subsidiaries Garmin International Inc 1200 East 151st Street Olathe Kansas 66062 U S A Garmin Europe Ltd Unit 5 The Quadrangle Abbey Park Industrial Estat...

Reviews: