background image

Powerboat Autopilot Operation

GHC 10 Owner’s Manual

adjusting the step steering Increments

1.  From the heading screen, select 

Menu

 > 

Steering Mode

 > 

Step Turn 

Size

.

2.  Select 

 or 

 to set the step turn size.

3.   Select 

Done

.

steering with the soft Keys

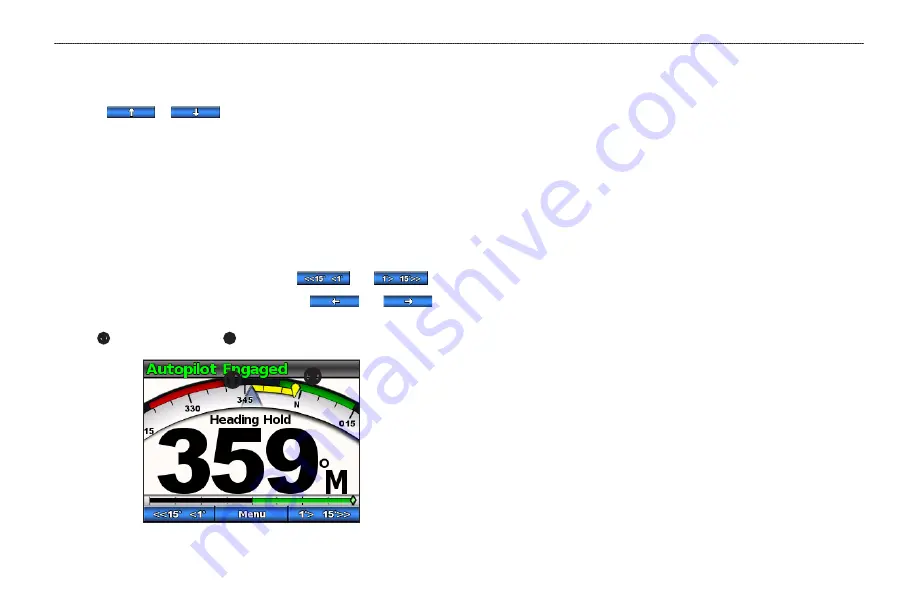
With the autopilot engaged, you can manually adjust the heading from the 

heading screen.

NoTe:

 If the autopilot is steering a pattern (

page 5

), manually adjusting the 

heading cancels the pattern.

Select an option:
•  If you have step steering enabled, select 

 and 

.

•  If you have rudder steering enabled, select 

 and 

.

The autopilot steers the boat, and the heading screen shows your actual 

heading 

 and intended heading 

.

Direction Control

When your boat is properly equipped, you can control the drive direction of 

the boat (forward or reverse) using the autopilot. 

Using Direction Control

From the Heading screen, select an option:
•  When traveling forward in standby mode, select 

Direction

 to engage 

reverse.
The autopilot engages reverse drive and the message “Rev” appears 

in orange on the heading screen.

•  When traveling in reverse in standby mode, select 

Direction

 to 

engage forward. 
The autopilot engages forward drive and the message “Rev” is 

removed from the heading screen.

Summary of Contents for GHP 10V

Page 1: ...GHC 10 owner s manual...

Page 2: ...ovided further that any unauthorized commercial distribution of this manual or any revision hereto is strictly prohibited Information in this document is subject to change without notice Garmin reserv...

Page 3: ...opilot system using the GHC 10 control unit Through the GHC 10 control unit you engage and steer set up and customize the GHP autopilot system To install the GHP autopilot system including the GHC 10...

Page 4: ...ng Patterns 5 Zigzag Pattern 5 Circles Pattern 6 U Turn Pattern 7 Man Overboard Pattern 7 Cancelling a Steering Pattern 8 GPS Steering Patterns 8 Route To 9 Orbit Pattern 9 Cloverleaf Pattern 10 Searc...

Page 5: ...ff the autopilot Adjusting the Display Adjusting the Color Mode 1 From any screen select 2 Select Color Mode 3 Select Select to switch between night or day color modes Adjusting the Backlight 1 From a...

Page 6: ...dby mode and displays the heading screen on the GHC 10 Item Description Autopilot status Actual heading Rudder position indicator sailboat and rudder sensor equipped powerboats only Soft key functions...

Page 7: ...engaged The autopilot does not steer the boat while you have the helm and the message You Have the Helm flashes at the top of the screen in yellow If you manually maintain a specific heading for a few...

Page 8: ...If you have rudder steering enabled select and The autopilot steers the boat and the heading screen shows your actual heading and intended heading Direction Control When your boat is properly equipped...

Page 9: ...board and back over a specified time and angle across your current heading Setting Up the Zigzag Pattern You can modify the amplitude and period of the zigzag pattern The default values are 30 and 1 5...

Page 10: ...es Time 2 Select or to set the time 3 Select Done Following the Circles Pattern 1 From the heading screen select Menu Pattern Steering Circles 2 Select Engage 3 Select an option Select to begin a cloc...

Page 11: ...you make a heading adjustment with the helm or the soft keys page 3 select the center soft key twice Man Overboard Pattern The man overboard pattern turns the boat around with the intent of running al...

Page 12: ...y adjust the heading Select STBY GPS Steering Patterns caution You are responsible for the safe operation of your boat Do not begin a GPS pattern until you are certain that the water is clear of obsta...

Page 13: ...ilot steers your boat according to the route defined on your chartplotter and the heading screen shows the distance to the next turn and distance off course Orbit Pattern The orbit pattern steers the...

Page 14: ...ing the Cloverleaf Pattern 1 From the heading screen select Menu GPS Steering Cloverleaf Engage 2 Select an option Select to begin a starboard turn Select to begin a port turn The autopilot steers you...

Page 15: ...to begin a port turn The autopilot follows the search pattern around the active waypoint and the heading screen shows the spacing of the search pattern Cancelling a GPS Steering Pattern While followin...

Page 16: ...the current heading Heading Adjustment You can adjust the heading using the soft keys on the autopilot when the autopilot is engaged You must set the autopilot to standby to adjust the heading using...

Page 17: ...eading screen changes to include new information related to wind hold Autopilot status Compass displaying current heading Wind type true or apparent Bearing relative to wind angle Wind gauge current w...

Page 18: ...d Gybe You can set the autopilot to perform a tack or gybe while heading hold or wind hold is engaged Tack and Gybe Settings Settings that define how the autopilot performs a tack or gybe are set up d...

Page 19: ...min recommends using route to only under motor power Using route to while under sail can cause an unexpected gybe risking damage to your sailboat Unattended sails and rigging can be damaged or cause i...

Page 20: ...ice makes sounds when you select a key or when an alarm sounds Alarms Only beeps only when an alarm sounds On Keys Alarms beeps when you select a key and when an alarm sounds Auto Power enables the de...

Page 21: ...ng if the Shadow Drive is being falsely tripped or not activating properly If the autopilot disengages while the helm is steady decreasing the sensitivity value can help alleviate unwanted disengaging...

Page 22: ...er slows the rate of turn as the wind direction approaches the stern If the rate of turn is too slow decrease the wind limiter value If the rate of turn is too fast increase the wind limiter value Pow...

Page 23: ...REFULLY Garmin Ltd and its subsidiaries Garmin grant you a limited license to use the software embedded in this device the Software in binary executable form in the normal operation of the product Tit...

Page 24: ...connection with CCU N A Lost wind data The autopilot is no longer receiving valid wind data Alarm sounds for 5 seconds Autopilot transitions to heading hold Low GHC supply voltage The supply voltage l...

Page 25: ...ard 7 Messages Error Warning 20 N Network Sharing 1 North Magnetic True setting 16 Variance 16 O Orbit 9 P Power Mode 18 Product Support 19 R Remote 16 Configuring 17 Connecting 16 Route To Powerboat...

Page 26: ......

Page 27: ......

Page 28: ...2011 Garmin Ltd or its subsidiaries Garmin International Inc 1200 East 151st Street Olathe Kansas 66062 USA Garmin Europe Ltd Liberty House Hounsdown Business Park Southampton Hampshire SO40 9LR UK G...

Reviews: