background image

Foretrex 301/401 Owner’s Manual

Timer

Timer

The timer page is not one of the 

default main pages.

To display the timer:

1.  From the main menu, select 

SETUP

 > 

TIMER

.

2.  Select 

SHOW TIMER PAGE?

 > 

YES

.

To set the timer:

1.  From the main menu, select 

SETUP

 > 

TIMER

.

2.  Select 

COUNT DOWN FROM

.

3.  Select a time increment from the 

menu or select custom.

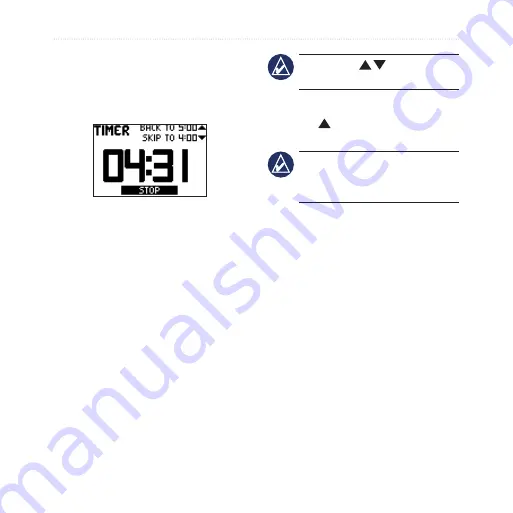
To use the timer:

1.  On the timer page, press 

enter

 to 

start the timer.


NoTe: 

Use 

 to change the 

countdown time. 

2.  Press 

enter

 to stop the timer.

3.  Press   to reset the timer to the 

original countdown time.


NoTe: 

When the timer is at 

0:00, press 

enter

 to start the timer 

counting up from 0:00.

Timer Options

From the main menu, select 

SeTUP


TIMeR

. The following options 

appear:

WHeN eXPIReD

—set the 

timer to stop, count up, or repeat 

when the timer expires.

eXPIReD ToNe

—select the 

tone alert that sounds when the 

timer expires.

INTeRVAL ToNe

— select the 

tone alert that sounds when the 

interval time expires.

Summary of Contents for Foretrex 301 - Hiking GPS Receiver

Page 1: ...foretrex 301 and 401 owner s manual PERSONAL NAVIGATOR ...

Page 2: ...hereto provided that such electronic or printed copy of this manual must contain the complete text of this copyright notice and provided further that any unauthorized commercial distribution of this manual or any revision hereto is strictly prohibited Information in this document is subject to change without notice Garmin reserves the right to change or improve its products and to make changes in ...

Page 3: ...ple Press page enter select TRACKS Product Registration Help us better support you by completing our online registration today Go to http my garmin com Keep the original sales receipt or a photocopy in a safe place Contact Garmin Contact Garmin Product Support if you have any questions while using your Foretrex In the USA go to www garmin com support or contact Garmin USA by phone at 913 397 8200 ...

Page 4: ...o Yes Barometer No Yes Cadence optional accessory required No Yes Electronic compass No Yes Heart rate optional accessory required No Yes Timer Yes Yes Waterproof Yes Yes Wireless transfer No Yes Optional Accessories For a list of available accessories and maps refer to the Garmin Web site at http buy garmin com ...

Page 5: ...ing GPS Satellite Signals 3 Using the Backlight 3 Using the Main Pages 4 Map Page 5 Compass Page 6 Elevation Page 7 Trip Computer 7 Main Menu 7 Waypoints Tracks and Routes 8 Waypoints 8 Editing Waypoints 8 Hunt and Fish 10 Sun and Moon 10 Recording your Tracks 10 Creating and Navigating Routes 11 Settings 12 Map Menu Options 12 Compass Menu Options 12 Elevation Menu Options 13 Trip Computer Option...

Page 6: ...reless Data Transfers 23 Connecting Your Foretrex to a Computer 24 Jumpmaster 25 Storing the Foretrex 25 Battery Information 25 Optimizing Battery Life 26 Resetting the Foretrex 26 Clearing User Data 26 Replacing the Wristband 27 Cleaning the Unit and Wristband 27 Specifications 28 Software License Agreement 29 Declaration of Conformity DoC 29 FCC Compliance 30 Index 31 ...

Page 7: ...Foretrex 301 401 Owner s Manual Getting Started Getting Started Mini USB under weather cap page goto enter mark up down GPS antenna Power backlight Battery cover serial number inside ...

Page 8: ...to a specific destination or waypoint enter mark Press to select options and to acknowledge messages Press and hold to mark a waypoint Press to access an options menu when on a main page up down Press to scroll through menus and pages Press to select options on menus and pages Press to zoom out and in on the map Installing Batteries 1 Carefully lift up on the battery door until it comes off 2 Inse...

Page 9: ...gate a route you must acquire GPS signals 1 Go outdoors to an open area away from tall buildings and trees 2 Turn on the Foretrex and hold it level Acquiring satellite signals can take a few minutes The flashes while the Foretrex determines your location When satellites are acquired the remains solid Using the Backlight While the Foretrex is on press and quickly release The backlight stays on for ...

Page 10: ...rex is found on the following five main pages the map page the compass page the elevation page 401 only the trip computer page and the main menu Press the page button to navigate through the main pages Press enter to access the option menus for these pages Elevation page 401 only Trip computer Main menu Compass page Map page ...

Page 11: ... appear above your position The heading indicator shows the direction you are heading To view the map with north up 1 From the map page press enter 2 Select MAP DETAIL MAP ORIENTATION NORTH UP To clear a track log 1 From the map page press enter 2 Select CLEAR TRACK LOG YES To measure distance 1 From the map page press enter 2 Select MEASURE DISTANCE 3 Select the FROM field then select a starting ...

Page 12: ... data fields that display distance to final destination and speed by default and a direction arrow in the compass ring Follow the arrow to navigate The electronic compass used in the 401 is similar to a magnetic compass when you are stationary or walking If you maintain a higher speed such as traveling in automobile the compass uses GPS signals to determine your direction note Hold the compass lev...

Page 13: ...ER CALIBRATE 2 Follow the on screen instructions Trip Computer The trip computer displays your current speed average speed maximum speed trip odometer and other helpful statistics Use to scroll to see more fields To customize data fields press enter See page 15 for more information Main Menu The main menu gives you access to setup screens including waypoints tracks and routes The main menu display...

Page 14: ...navigate to a waypoint 1 Press and hold goto 2 Select the waypoint from the list Editing Waypoints Waypoint page After you have marked a waypoint you can edit the name the symbol the elevation and the latitude longitude from the waypoint page note Use to select the letters and numbers Press enter to edit To edit existing waypoints 1 Select WAYPOINTS LIST ALL 2 Select the waypoint you want to edit ...

Page 15: ...ary To change the elevation 1 From the waypoint page select the elevation The ENTER CORRECT ELEVATION page appears 2 Press enter to access the number menu Select a number from the list 3 Press enter to advance to the next field 4 Repeat steps 2 and 3 as necessary 5 Select OK to save and exit To change the latitude longitude 1 From the waypoint page select the latitude longitude field The Edit Loca...

Page 16: ...un and Moon page shows sunrise time sunset time moonrise time moonset time and moon phase for a specified date To view the sun and moon page 1 From the main menu select WAYPOINTS LIST ALL 2 Select the waypoint you want to view 3 Select OPTIONS SUN MOON note Press enter to view the sun and moon information for a different date Recording your Tracks The Foretrex records a track log while you are mov...

Page 17: ...o navigate to a saved track 1 From the tracks menu select LIST SAVED 2 Select the track 3 Select NAVIGATE Creating and Navigating Routes 1 From the main menu select ROUTES CREATE NEW 2 Press enter to access your saved waypoints 3 Select a waypoint for the first field Repeat in each field until the route is complete 4 Select FOLLOW ...

Page 18: ... waypoints See page 5 for instructions on measuring distance MAP DETAIL set map preferences MAP ORIENTATION select how the map is shown on the page NORTH UP shows North at the top of the page TRACK UP shows your current direction of travel at the top of the page TRACKS show or hide tracks on the map WAYPOINTS show or hide waypoints on the map STOP NAVIGATION stop the current route Compass Menu Opt...

Page 19: ...ge press enter to access the trip computer menu CHANGE FIELDS change the data fields on the trip computer page See page 15 for more information on changing data fields RESET TRIP DATA select YES to reset the trip data and the altimeter data Main Menu Options WAYPOINTS create a new waypoint list all waypoints or view the nearest waypoint to your location See page 8 for more information TRACKS manag...

Page 20: ...ht and display contrast UNITS set position format and map datum Select units of measurement for distance speed elevation vertical speed and pressure HEADING customize compass settings and calibrate the compass SYSTEM set preferences for the GPS mode the beeper the battery the language and the interface You can also enter owner information such as your name and set it to appear when the unit powers...

Page 21: ... view See page 21 JUMPMASTER enter the Jumpmaster setting Set the jump type and information See page 25 Data Field Options The following table lists all of the Foretrex data fields and descriptions Only available on the Foretrex 401 Data Field Description AMB PRESS ambient pressure The uncalibrated current pressure AVG ASCENT The average vertical distance of ascent AVG DESCNT average descent The a...

Page 22: ...final destination FINAL ETA estimated time of arrival The estimated time of day you will reach your final destination Data Field Description FINAL ETE estimated time en route The estimated time needed to reach your final destination GLIDE RATIO The ratio of horizontal distance traveled to the change in vertical distance GR DEST glide ratio destination The glide ratio required to descend from your ...

Page 23: ...evation reached MOV N AVG moving average Average speed of the unit while moving Data Field Description MOV N TIME moving time A running tally of movement time elapsed since the last reset NEXT DEST destination The next waypoint on your route NEXT DIST distance The remaining distance to the next waypoint on the your route NEXT ETA estimated time of arrival The estimated time of day you will reach t...

Page 24: ... travel OVER L SPD overall speed Your average speed SPEED Display rate of current speed STOP TIME Time spent stopped Data Field Description SUNRISE Time of sunrise based on your GPS position SUNSET Time of sunset based on your GPS position TIME Current time of day based on your time settings format time zone and daylight saving time TO COURSE The direction you must travel to return to the route TO...

Page 25: ...e last the reset TURN The angle difference in degrees between the bearing to your destination and your current line of travel L means turn left R means turn right Data Field Description VERT SPEED vertical Your rate of altitude gain loss over time VMG velocity made good The speed at which you are closing on a destination along a route VSPD DEST vertical speed destination The measurement of your ra...

Page 26: ...mer page press enter to start the timer note Use to change the countdown time 2 Press enter to stop the timer 3 Press to reset the timer to the original countdown time note When the timer is at 0 00 press enter to start the timer counting up from 0 00 Timer Options From the main menu select SETUP TIMER The following options appear WHEN EXPIRED set the timer to stop count up or repeat when the time...

Page 27: ...n GPS accuracy satellite locations and signal strength Signal Strength To view the satellite page select GPS from the main menu The bars indicate GPS satellite strength White bars indicate that the Foretrex is still collecting data Solid bars indicate that the Foretrex is tracking that satellites Sky View Press enter on the satellite page to switch to sky view Sky view shows the location of the sa...

Page 28: ...ensor After you pair the first time your Foretrex 401 automatically recognizes the wireless sensor whenever they are turned on and within range of each other To pair the Foretrex 401 with a wireless sensor 1 Place the Foretrex 401 within 10 feet 3 meters of the wireless sensor heart rate monitor or GSC 10 2 Put on the heart rate monitor or turn on the GSC 10 3 From the main menu select CONNECT HEA...

Page 29: ... DATA message appears A TRANSFER COMPLETE message appears when data is received To send a waypoint 1 From the main menu select WAYPOINTS LIST ALL 2 Select the waypoint you want to send 3 From the waypoint menu select OPTIONS SEND To send a track 1 From the main menu select TRACKS LIST ALL 2 Select the track you want to send 3 From the track menu select OPTIONS SEND To send a route 1 From the main ...

Page 30: ...trex under the weather cap 2 Connect the larger end of the USB cable to an available USB port on your computer 3 Select YES to enter mass storage mode Your Foretrex appears as a removable drive in My Computer on Windows computers and as a mounted volume on Mac computers A copy of the waypoints tracks and routes on your Foretrex can be found in the Garmin GPX current folder Adding Waypoints Tracks ...

Page 31: ...ratures can occur because it can cause permanent damage User information such as waypoints and routes will be retained in the unit s memory without the need for external power It is always a good practice to back up important user data Battery Information WARNING Do not use a sharp object to remove user replaceable batteries Contact your local waste disposal department to properly recycle the batt...

Page 32: ... tones off if not needed From the main menu select SETUP SYSTEM BEEPER OFF Turn off the compass when it is not being used Foretrex 401 only Select SETUP HEADING COMPASS OFF Resetting the Foretrex If your Foretrex is locked up press and hold page and simultaneously until the screen goes blank about 7 seconds This does not erase any of your data or settings Clearing User Data NOTICE This deletes all...

Page 33: ...end of the Foretrex strap through the plastic ring on the extension strap 2 Thread the other end of the extension strap through the plastic ring on the Foretrex strap 3 Adjust as necessary Cleaning the Unit and Wristband The Foretrex is constructed of high quality materials and does not require user maintenance other than cleaning Clean the unit using a cloth dampened with a mild detergent solutio...

Page 34: ...some batteries Some batteries can rupture at high temperatures Power Source Two AAA batteries alkaline or NiMH Accuracy GPS 33 ft 10 m 95 typical Subject to accuracy degradation to 100 m2 2DRMS under the US DoD imposed Selective Availability SA Program when activated Velocity 0 328 ft sec 0 1 m sec steady state Interface USB mass storage device Data Storage Life Indefinite no memory battery requir...

Page 35: ...ght treaties You further acknowledge that the structure organization and code of the Software are valuable trade secrets of Garmin and that the Software in source code form remains a valuable trade secret of Garmin You agree not to decompile disassemble modify reverse assemble reverse engineer or reduce to human readable form the Software or any part thereof or create any derivative works based on...

Page 36: ...adio frequency energy and if not installed and used in accordance with the instructions may cause harmful interference to radio communications However there is no guarantee that interference will not occur in a particular installation If this equipment does cause harmful interference to radio or television reception which can be determined by turning the equipment off and on the user is encouraged...

Page 37: ...4 contacting Garmin i custom data fields 15 D data transferring 23 data fields 15 changing 12 13 distance measuring 5 E elevation page 6 plot 13 zoom 13 F files adding 24 transferring 23 G Garmin Product Support i GPS acquiring signals 3 mode 21 modes 15 reception 21 sky view 21 GSC 10 16 22 H heart rate monitor 22 L language 14 M main menu 7 options 13 main pages 4 manual conventions i map detail...

Page 38: ...ignals 3 21 sensors 22 serial number 1 specifications 28 storing 25 T time 14 timer options 20 setting 12 13 tracks navigating 10 recording 10 trip computer options 13 page 7 U USB connecting 24 W waypoints editing 8 marking 8 navigating 8 wireless transfer 23 wristband cleaning 27 extender strap 27 replacing 27 ...

Page 39: ......

Page 40: ...om 2009 Garmin Ltd or its subsidiaries Garmin International Inc 1200 East 151st Street Olathe Kansas 66062 USA Garmin Europe Ltd Liberty House Hounsdown Business Park Southampton Hampshire SO40 9LR UK Garmin Corporation No 68 Jangshu 2nd Road Shijr Taipei County Taiwan www garmin com May 2009 Part Number 190 01068 00 Rev A Printed in Taiwan ...

Reviews: