


18
Pulzusszám ingadozás és stressz szint megtekintése
A funkció Garmin mellkasi pulzusmérővel érhető el, melyet fel kell vennünk,
majd párosítanunk kell a készülékkel (
„Vezeték nélküli kapcsolattal működő
). Amennyiben a mellkasi pulzusmérő a készülék-
hez járt, a mérő már gyárilag párosításra került.
TIPP!
Garmin javaslata szerint a stressz szintet lehetőleg minden nap ugyan-
abban az időpontban, ugyanolyan körülmények között mérjük.
1.
Amennyiben szükséges, nyomjuk meg a
Introduction
WARNING
See the
Important Safety and Product Information
guide in the
product box for product warnings and other important
information.
Always consult your physician before you begin or modify any
exercise program.
Getting Started
When using your watch the first time, you should complete these
tasks to set it up and get to know the basic features.
1
Press
LIGHT
to turn on the watch (
Buttons
, page 1
).
2
Follow the on-screen instructions to complete the initial
setup.
During the initial setup, you can pair your smartphone with
your watch to receive notifications, sync your activities, and
more (
Pairing Your Smartphone
, page 2
).
3
Charge the device (
Charging the Device
, page 2
).
4
Start an activity (
Starting an Activity
, page 2
).
Buttons
LIGHT
• Press to turn the backlight on and off.
• Press to turn the device on.
• Hold to view the controls menu.
• Press to scroll through the widget loop and menus.
• Hold to view the menu.
DOWN
• Press to scroll through the widget loop and menus.
• Press to view the activity list and start or stop an activity.
• Press to choose an option in a menu.
BACK·LAP
• Press to return to the previous screen.
• Press to record a lap, rest, or transition during a multisport
activity.
• Hold to view the watch face from any screen.
Using the Watch
• Hold
LIGHT
to view the controls menu.
The controls menu provides quick access to frequently used
functions, such as turning on do not disturb mode, saving a
location, and turning the watch off.
• From the watch face, press
UP
or
DOWN
to scroll through
the widget loop.
Your watch comes preloaded with widgets that provide at-a-
glance information. More widgets are available when you pair
your watch with a smartphone.
• From the watch face, press to start an activity or open an
app (
Activities and Apps
, page 2
).
• Hold
MENU
to customize the watch face, adjust settings, and
pair wireless sensors.
Viewing the Controls Menu
The controls menu contains options, such as turning on do not
disturb mode, locking the keys, and turning the device off. You
can also open the Garmin Pay
™
wallet.
NOTE:
You can add, reorder, and remove the options in the
controls menu (
Customizing the Controls Menu
, page 36
).
1
From any screen, hold
LIGHT
.
2
Press
UP
or
DOWN
to scroll through the options.
Enabling Airplane Mode
You can enable airplane mode to disable all wireless
communications.
NOTE:
You can add options to the controls menu (
Customizing
the Controls Menu
, page 36
).
1
Hold
LIGHT
.
2
Select .
Viewing Widgets
Your device comes preloaded with several widgets, and more
are available when you pair your device with a smartphone.
• Press
UP
or
DOWN
.
The device scrolls through the widget loop and displays
summary data for each widget.
• Press to view widget details.
TIP:
You can press
DOWN
to view additional screens for a
widget, or press to view additional options and functions
for a widget.
• From any screen, hold
BACK
to return to the watch face.
• If you are recording an activity, press
BACK
to return to the
activity data pages.
Customizing the Watch
• From the watch face, hold
MENU
to change the watch face.
• From the widget screens, hold
MENU
to customize the
widget options.
• From the controls menu, hold
MENU
to add, remove, and
reorder the controls.
• From any screen, hold
MENU
to change additional settings.
Introduction
1
gombot, majd válasszuk a
Hozzáad
>
HRV stressz
pontot, ezzel a stressz szint alkalmazást hozzá-
adjuk az alkalmazás listához.
2.
Az
Igen
gombot választva az alkalmazás bekerül a kedvencek listába
.
3.
Az óra számlapon nyomjuk meg a
Introduction
WARNING
See the
Important Safety and Product Information
guide in the
product box for product warnings and other important
information.
Always consult your physician before you begin or modify any
exercise program.
Getting Started
When using your watch the first time, you should complete these
tasks to set it up and get to know the basic features.
1
Press
LIGHT
to turn on the watch (
Buttons
, page 1
).
2
Follow the on-screen instructions to complete the initial
setup.
During the initial setup, you can pair your smartphone with
your watch to receive notifications, sync your activities, and
more (
Pairing Your Smartphone
, page 2
).
3
Charge the device (
Charging the Device
, page 2
).
4
Start an activity (
Starting an Activity
, page 2
).
Buttons
LIGHT
• Press to turn the backlight on and off.
• Press to turn the device on.
• Hold to view the controls menu.
UP·MENU
• Press to scroll through the widget loop and menus.
• Hold to view the menu.
DOWN
• Press to scroll through the widget loop and menus.
• Press to view the activity list and start or stop an activity.
• Press to choose an option in a menu.
BACK·LAP
• Press to return to the previous screen.
• Press to record a lap, rest, or transition during a multisport
activity.
• Hold to view the watch face from any screen.
Using the Watch
• Hold
LIGHT
to view the controls menu.
The controls menu provides quick access to frequently used
functions, such as turning on do not disturb mode, saving a
location, and turning the watch off.
• From the watch face, press
UP
or
DOWN
to scroll through
the widget loop.
Your watch comes preloaded with widgets that provide at-a-
glance information. More widgets are available when you pair
your watch with a smartphone.
• From the watch face, press to start an activity or open an
app (
Activities and Apps
, page 2
).
• Hold
MENU
to customize the watch face, adjust settings, and
pair wireless sensors.
Viewing the Controls Menu
The controls menu contains options, such as turning on do not
disturb mode, locking the keys, and turning the device off. You
can also open the Garmin Pay
™
wallet.
NOTE:
You can add, reorder, and remove the options in the
controls menu (
Customizing the Controls Menu
, page 36
).
1
From any screen, hold
LIGHT
.
2
Press
UP
or
DOWN
to scroll through the options.
Enabling Airplane Mode
You can enable airplane mode to disable all wireless
communications.
NOTE:
You can add options to the controls menu (
Customizing
the Controls Menu
, page 36
).
1
Hold
LIGHT
.
2
Select .
Viewing Widgets
Your device comes preloaded with several widgets, and more
are available when you pair your device with a smartphone.
• Press
UP
or
DOWN
.
The device scrolls through the widget loop and displays
summary data for each widget.
• Press to view widget details.
TIP:
You can press
DOWN
to view additional screens for a
widget, or press to view additional options and functions
for a widget.
• From any screen, hold
BACK
to return to the watch face.
• If you are recording an activity, press
BACK
to return to the
activity data pages.
Customizing the Watch
• From the watch face, hold
MENU
to change the watch face.
• From the widget screens, hold
MENU
to customize the
widget options.
• From the controls menu, hold
to add, remove, and
to change additional settings.
Introduction
1
gombot, majd válasszuk a
HRV
stressz
pontot, majd nyomjuk meg a
Introduction
WARNING
See the
Important Safety and Product Information
guide in the
product box for product warnings and other important
information.
Always consult your physician before you begin or modify any
exercise program.
Getting Started
When using your watch the first time, you should complete these
tasks to set it up and get to know the basic features.
1
Press
LIGHT
to turn on the watch (
Buttons
, page 1
).
2
Follow the on-screen instructions to complete the initial
setup.
During the initial setup, you can pair your smartphone with
your watch to receive notifications, sync your activities, and
more (
Pairing Your Smartphone
, page 2
).
3
Charge the device (
Charging the Device
, page 2
).
4
Start an activity (
Starting an Activity
, page 2
).
Buttons
• Press to turn the backlight on and off.
• Press to turn the device on.
• Hold to view the controls menu.
UP·MENU
• Press to scroll through the widget loop and menus.
• Hold to view the menu.
DOWN
• Press to scroll through the widget loop and menus.
• Press to view the activity list and start or stop an activity.
• Press to choose an option in a menu.
BACK·LAP
• Press to return to the previous screen.
• Press to record a lap, rest, or transition during a multisport
activity.
• Hold to view the watch face from any screen.
Using the Watch
• Hold
LIGHT
to view the controls menu.
The controls menu provides quick access to frequently used
functions, such as turning on do not disturb mode, saving a
location, and turning the watch off.
• From the watch face, press
UP
or
Your watch comes preloaded with widgets that provide at-a-
glance information. More widgets are available when you pair
your watch with a smartphone.
• From the watch face, press to start an activity or open an
app (
Activities and Apps
, page 2
).
• Hold
MENU
to customize the watch face, adjust settings, and
pair wireless sensors.
Viewing the Controls Menu
The controls menu contains options, such as turning on do not
disturb mode, locking the keys, and turning the device off. You
can also open the Garmin Pay
™
wallet.
NOTE:
You can add, reorder, and remove the options in the
controls menu (
Customizing the Controls Menu
, page 36
).
1
From any screen, hold
LIGHT
.
2
Press
UP
or
DOWN
to scroll through the options.
Enabling Airplane Mode
You can enable airplane mode to disable all wireless
communications.
NOTE:
You can add options to the controls menu (
Customizing
the Controls Menu
, page 36
).
1
Hold
LIGHT
.
2
Select .
Viewing Widgets
Your device comes preloaded with several widgets, and more
are available when you pair your device with a smartphone.
• Press
UP
or
DOWN
.
The device scrolls through the widget loop and displays
summary data for each widget.
• Press to view widget details.
TIP:
You can press
DOWN
to view additional screens for a
widget, or press to view additional options and functions
for a widget.
• From any screen, hold
BACK
to return to the watch face.
• If you are recording an activity, press
BACK
to return to the
activity data pages.
Customizing the Watch
• From the watch face, hold
MENU
to change the watch face.
• From the widget screens, hold
MENU
to customize the
• From the controls menu, hold
MENU
to add, remove, and
• From any screen, hold
MENU
to change additional settings.
Introduction
1
gombot.
4.
Három percen át álljunk mozdulatlanul és lazítsunk.
Erőnléti állapot megtekintése
Ahogy futunk vagy kerékpározunk, az erőnléti állapot funkció elemzi tempón-
kat, pulzusszámunkat, pulzusszámunk szórását, és ezek alapján valós idő-
ben veti össze jelenlegi teljesítményünket átlagos erőnléti állapotunkkal
. Az
erőnléti állapot érték -20 és +20 közötti tartományban mozoghat. A futás
első 6-20 percében jelenik meg az erőnléti állapot mutató. Például +5 azt
jelenti, hogy kipihentek, kellőképp frissek vagyunk, és alkalmasak egy ki-
adós futásra. Az erőnléti állapot emellett a fáradtság mértékének is egy
mutatója, főképp egy hosszú futás végső szakaszában. Az erőnléti álla-
pot mutatót valamelyik edzési adatképernyőhöz hozzáadva folyamato-
san láthatjuk erőnlétünk, tartalékaink alakulását.
TIPP!
Pár futást, kerékpározást végre kell hajtanunk ahhoz, hogy a készü-
lék pontosan tudja mérni a VO2 max. becslési értéket és kiismerje teljesítő-
képességünket (
„VO2 max. becslések”; 16. oldal
Erőnléti állapotunk megtekintése
A funkció csukló alapú pulzusméréssel és mellkasi pulzusmérővel is műkö-
dik. Mellkasi pulzusmérő használata esetén a mérőt fel kell vennünk, majd
párosítanunk kell az Enduro készülékkel. Amennyiben a mellkasi pulzusmé-
rő a készülékhez járt, a mérő már gyárilag párosításra került.
A pulzusszám és teljesítmény adatok alapján a készülék felméri erőnléti ál-
lapotunkat, kondíciónkat.
1.
Az egyik adatképernyőhöz adjuk hozzá az
Erőnléti állapot
mutatót
(
„Adatképernyők beállítása”; 32. oldal
2.
Indítsuk a futást, kerékpározást.
Úgy 6-20 perc után megjelenik az erőnléti állapot mutató.
3.
Amennyiben a futás során meg kívánjuk tekinteni az erőnléti állapot mu-
tatót, váltsunk arra az adatképernyőre, melyet korábban beállítottunk úgy,
hogy ezt az adatot megjelenítse.
Laktátküszöb (tejsavküszöb)
A laktátküszöb az az edzési intenzitás, ahol laktát (tejsav) kezd felgyűlni a
véráramban. Futás során ez az erőfeszítés, tempó egy becsült mértéke. Ami-
kor a futó átlépi ezt a küszöbértéket, hirtelen felgyorsuló ütemben kezd el fá-
radni. Tapasztalt futók esetén ez a küszöbérték maximális pulzusszám 90%-
ánál és 10K vagy félmaraton versenytempó mellett következik be. Átlagos
felkészültségű futók esetén ez a pont gyakran a maximális pulzusszám 90%-
a alatti pulzusszámnál is bekövetkezik. Ismerve laktátküszöbünket, könnyeb-
ben meghatározhatjuk, meddig mehetünk el az edzés során, illetve verseny
során mekkora maximális erőfeszítést bírunk ki.
Amennyiben ismerjük laktátküszöb értékünket, a felhasználói profilban adjuk
azt meg (
„Felhasználói profil beállítása”; 21. oldal
Irányított mérés végrehajtása a laktátküszöb érték meghatározásához
A méréshez Garmin mellkasi pulzusmérő szükséges. A mérés végrehajtása
előtt vegyünk fel mellkasi pulzusmérőt, majd amennyiben ez még nem tör-
tént meg, párosítsuk azt a készülékkel (
„Vezeték nélküli kapcsolattal műkö-
dő mérő párosítása”; 39. oldal
). A készülék a laktátküszöb becsléséhez az el-
sődlegesen beállított felhasználói profil információit és a VO2 max. becslést
használja fel. Folyamatos, magas intenzitású futások során a készülék a pul-
zusszámot felhasználva automatikusan érzékeli a laktátküszöbünket.
TIPP!
Pár futást végre kell hajtanunk ahhoz, hogy a készülék pontosan tud-
ja mérni a maximális pulzusszám értékét és a VO2 max. becslési értéket. Ha
nem sikerül megkapnunk a laktátküszöbünk értékét, próbáljuk meg manuáli-
san csökkenteni pulzusszámunk értékét.
1.
Az óra számlapon nyomjuk meg a
Introduction
WARNING
See the
Important Safety and Product Information
guide in the
product box for product warnings and other important
information.
Always consult your physician before you begin or modify any
exercise program.
Getting Started
When using your watch the first time, you should complete these
tasks to set it up and get to know the basic features.
1
Press
LIGHT
to turn on the watch (
Buttons
, page 1
).
2
Follow the on-screen instructions to complete the initial
setup.
During the initial setup, you can pair your smartphone with
your watch to receive notifications, sync your activities, and
more (
Pairing Your Smartphone
, page 2
).
3
Charge the device (
Charging the Device
, page 2
).
4
Start an activity (
Starting an Activity
, page 2
).
Buttons
LIGHT
• Press to turn the backlight on and off.
• Press to turn the device on.
• Hold to view the controls menu.
UP·MENU
• Press to scroll through the widget loop and menus.
• Hold to view the menu.
DOWN
• Press to scroll through the widget loop and menus.
• Press to view the activity list and start or stop an activity.
• Press to choose an option in a menu.
BACK·LAP
• Press to return to the previous screen.
• Press to record a lap, rest, or transition during a multisport
activity.
• Hold to view the watch face from any screen.
Using the Watch
• Hold
LIGHT
to view the controls menu.
The controls menu provides quick access to frequently used
functions, such as turning on do not disturb mode, saving a
location, and turning the watch off.
• From the watch face, press
UP
or
DOWN
to scroll through
the widget loop.
Your watch comes preloaded with widgets that provide at-a-
glance information. More widgets are available when you pair
your watch with a smartphone.
• From the watch face, press to start an activity or open an
app (
Activities and Apps
, page 2
).
• Hold
MENU
to customize the watch face, adjust settings, and
pair wireless sensors.
Viewing the Controls Menu
The controls menu contains options, such as turning on do not
disturb mode, locking the keys, and turning the device off. You
can also open the Garmin Pay
™
wallet.
NOTE:
You can add, reorder, and remove the options in the
controls menu (
Customizing the Controls Menu
, page 36
).
1
From any screen, hold
LIGHT
.
2
Press
UP
or
DOWN
to scroll through the options.
Enabling Airplane Mode
You can enable airplane mode to disable all wireless
communications.
NOTE:
You can add options to the controls menu (
Customizing
the Controls Menu
, page 36
).
1
Hold
LIGHT
.
2
Select .
Viewing Widgets
Your device comes preloaded with several widgets, and more
are available when you pair your device with a smartphone.
• Press
UP
or
DOWN
.
The device scrolls through the widget loop and displays
summary data for each widget.
• Press to view widget details.
TIP:
You can press
DOWN
to view additional screens for a
widget, or press to view additional options and functions
for a widget.
• From any screen, hold
BACK
to return to the watch face.
• If you are recording an activity, press
BACK
to return to the
activity data pages.
Customizing the Watch
• From the watch face, hold
MENU
to change the watch face.
• From the widget screens, hold
MENU
to customize the
widget options.
• From the controls menu, hold
MENU
to add, remove, and
reorder the controls.
• From any screen, hold
MENU
to change additional settings.
Introduction
1
gombot.
2.
Válasszunk egy szabadtéri, futó tevékenységet.
A mérés végrehajtásához GPS-vétel szükséges.
3.
Nyomjuk meg hosszan a
MENU
gombot.
4.
Válasszuk a
Tréning
>
Tejsavküszöb
vezetett teszt
et.
5.
Indítsuk az időmérőt, és övessük a képernyőn megjelenő utasításokat.
Futás megkezdése után a készülék kimutatja az egyes szakaszok időtar-
tamát, a célt, valamint a jelenlegi pulzusszám adatokat. A teszt befejezté-
vel egy üzenet jelenik meg.
6.
A vezetett teszt elvégzése után állítsuk le az időmérőt és mentsük a tevé-
kenységet.
Amennyiben ez az első laktát küszöb becslésünk, a készülék felszólít, hogy
frissítsük a pulzusszám tartományainkat a laktátküszöb-pulzusszám érték
alapján. Minden további laktátküszöb becslésnél a készülék felszólít, hogy
fogadjuk vagy utasítsuk el a becslést.
FTP becslés lekérése
A funkcionális küszöb teljesítmény (FTP) érték lekéréséhez mellkasi pulzus-
mérőt kell felvennünk, valamint teljesítménymérőt kell használnunk, illetve
mindkettőt párosítanunk kell az Enduro készülékkel (
lattal működő mérő párosítása”; 39. oldal
). Emellett egy korábbi kerékpározás-
ból származó VO2 max. becsléssel is rendelkeznünk kell (
lekérése kerékpározáshoz”; 17. oldal
A készülék a kezdeti beállítások során megadott felhasználói adatok és a
VO2 max. becslés alapján kiszámolja a funkcionális küszöb teljesítményt
(FTP). Folyamatos, magas intenzitású kerékpározás során a készülék a pul-
zus- és teljesítménymérő felhasználásával automatikusan érzékeli a funkcio-
nális küszöb teljesítményt (FTP).
1.
Az
UP
vagy
DOWN
gombokkal válasszuk ki a teljesítmény widgetet.
2.
A
Introduction
WARNING
See the
Important Safety and Product Information
guide in the
product box for product warnings and other important
information.
Always consult your physician before you begin or modify any
exercise program.
Getting Started
When using your watch the first time, you should complete these
tasks to set it up and get to know the basic features.
1
Press
LIGHT
to turn on the watch (
Buttons
, page 1
).
2
Follow the on-screen instructions to complete the initial
setup.
During the initial setup, you can pair your smartphone with
your watch to receive notifications, sync your activities, and
more (
Pairing Your Smartphone
, page 2
).
3
Charge the device (
Charging the Device
, page 2
).
4
Start an activity (
Starting an Activity
, page 2
).
Buttons
LIGHT
• Press to turn the backlight on and off.
• Press to turn the device on.
• Hold to view the controls menu.
UP·MENU
• Press to scroll through the widget loop and menus.
• Hold to view the menu.
DOWN
• Press to scroll through the widget loop and menus.
• Press to view the activity list and start or stop an activity.
• Press to choose an option in a menu.
BACK·LAP
• Press to return to the previous screen.
• Press to record a lap, rest, or transition during a multisport
activity.
• Hold to view the watch face from any screen.
Using the Watch
• Hold
LIGHT
to view the controls menu.
The controls menu provides quick access to frequently used
functions, such as turning on do not disturb mode, saving a
location, and turning the watch off.
• From the watch face, press
UP
or
DOWN
to scroll through
the widget loop.
Your watch comes preloaded with widgets that provide at-a-
glance information. More widgets are available when you pair
your watch with a smartphone.
• From the watch face, press to start an activity or open an
app (
Activities and Apps
, page 2
).
• Hold
MENU
to customize the watch face, adjust settings, and
pair wireless sensors.
Viewing the Controls Menu
The controls menu contains options, such as turning on do not
disturb mode, locking the keys, and turning the device off. You
can also open the Garmin Pay
™
wallet.
NOTE:
You can add, reorder, and remove the options in the
controls menu (
Customizing the Controls Menu
, page 36
).
1
From any screen, hold
LIGHT
.
2
Press
UP
or
DOWN
to scroll through the options.
Enabling Airplane Mode
You can enable airplane mode to disable all wireless
communications.
NOTE:
You can add options to the controls menu (
Customizing
the Controls Menu
, page 36
).
1
Hold
LIGHT
.
2
Select .
Viewing Widgets
Your device comes preloaded with several widgets, and more
are available when you pair your device with a smartphone.
• Press
UP
or
DOWN
.
The device scrolls through the widget loop and displays
summary data for each widget.
• Press to view widget details.
TIP:
You can press
DOWN
to view additional screens for a
widget, or press to view additional options and functions
for a widget.
• From any screen, hold
BACK
to return to the watch face.
• If you are recording an activity, press
BACK
to return to the
activity data pages.
Customizing the Watch
• From the watch face, hold
MENU
to change the watch face.
• From the widget screens, hold
MENU
to customize the
widget options.
• From the controls menu, hold
MENU
to add, remove, and
reorder the controls.
• From any screen, hold
MENU
to change additional settings.
Introduction
1
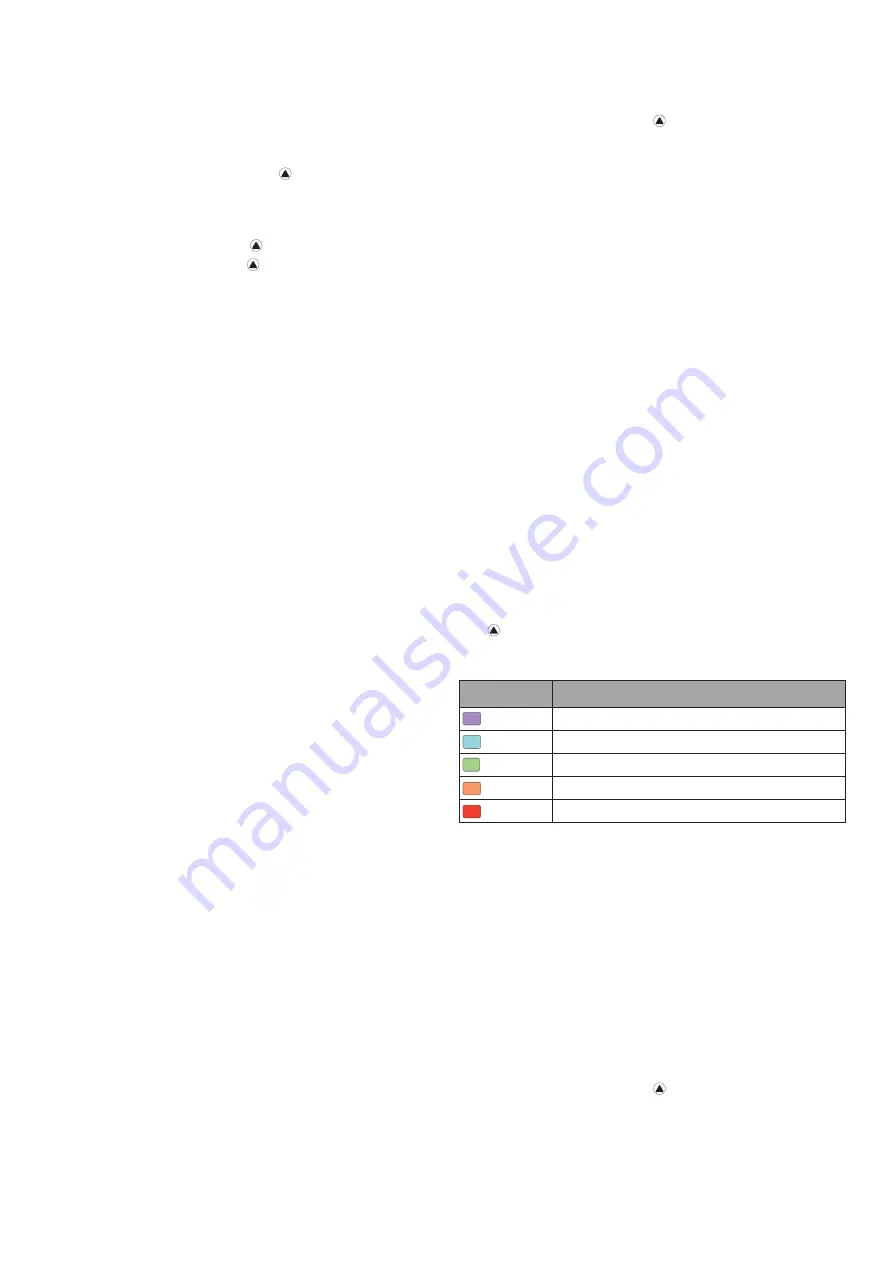
gombbal léptethetünk a teljesítmény mutatók között.
Az FTP érték watt/kg mértékegység szerint jelenik meg, illetve a színská-
lán belül egy szín is jelzi, hogy mely kategória alá sorolódik az érték.
Színkód
Teljesítmény értékelése
Bíbor
Felsőfokú
Kék
Kiváló
Zöld
Jó
Narancs
Megfelelő
Piros
Edzetlen
További információkat a függelékben találunk (
NE FELEDJÜK!
Amikor egy teljesítmény értesítésben új FTP értéket ka-
punk, az
Elfogad
gombbal elmenthetjük az új FTP értéket, míg az
Eluta-
sít
gombbal megőrizhetjük az eddigi FTP értéket.
FTP mérés elvégzése
Az FTP érték méréséhez mellkasi pulzusmérőt kell felvennünk, valamint tel-
jesítménymérőt is telepítenünk kell, ahol mindkettőt párosítanunk kell a ké-
szülékkel (
„Vezeték nélküli kapcsolattal működő mérő párosítása”; 39. oldal
)
.
Emellett egy korábbi kerékpározásból származó VO2 max. becsléssel is ren-
delkeznünk kell (
„VO2 max. értékek lekérése kerékpározáshoz”; 17. oldal
)
.
MEGJEGYZÉS!
Az FTP teszt egy körülbelül 30 percig tartó megerőltető
edzés. Praktikus és inkább sík útvonalat válasszunk, amely lehetővé teszi
számunkra, hogy folyamatosan növeljük az erőfeszítsét egy időmérős futam-
hoz hasonlóan.
1.
Az óra számlapon nyomjuk meg a
Introduction
WARNING
See the
Important Safety and Product Information
guide in the
product box for product warnings and other important
information.
Always consult your physician before you begin or modify any
exercise program.
When using your watch the first time, you should complete these
tasks to set it up and get to know the basic features.
Press
LIGHT
to turn on the watch (
Buttons
, page 1
).
2
Follow the on-screen instructions to complete the initial
setup.
During the initial setup, you can pair your smartphone with
your watch to receive notifications, sync your activities, and
more (
Pairing Your Smartphone
, page 2
).
3
Charge the device (
Charging the Device
, page 2
).
4
Start an activity (
Starting an Activity
, page 2
).
Buttons
LIGHT
• Press to turn the backlight on and off.
• Press to turn the device on.
• Hold to view the controls menu.
UP·MENU
• Press to scroll through the widget loop and menus.
• Hold to view the menu.
DOWN
• Press to scroll through the widget loop and menus.
• Press to view the activity list and start or stop an activity.
• Press to choose an option in a menu.
BACK·LAP
• Press to return to the previous screen.
• Press to record a lap, rest, or transition during a multisport
activity.
• Hold to view the watch face from any screen.
Using the Watch
• Hold
LIGHT
to view the controls menu.
The controls menu provides quick access to frequently used
functions, such as turning on do not disturb mode, saving a
location, and turning the watch off.
• From the watch face, press
UP
or
DOWN
to scroll through
the widget loop.
Your watch comes preloaded with widgets that provide at-a-
glance information. More widgets are available when you pair
your watch with a smartphone.
• From the watch face, press to start an activity or open an
app (
Activities and Apps
, page 2
).
• Hold
MENU
to customize the watch face, adjust settings, and
pair wireless sensors.
Viewing the Controls Menu
The controls menu contains options, such as turning on do not
disturb mode, locking the keys, and turning the device off. You
can also open the Garmin Pay
™
wallet.
NOTE:
You can add, reorder, and remove the options in the
controls menu (
Customizing the Controls Menu
, page 36
).
1
From any screen, hold
LIGHT
.
2
Press
UP
or
DOWN
to scroll through the options.
Enabling Airplane Mode
You can enable airplane mode to disable all wireless
communications.
NOTE:
You can add options to the controls menu (
Customizing
the Controls Menu
, page 36
).
1
Hold
LIGHT
.
2
Select .
Viewing Widgets
Your device comes preloaded with several widgets, and more
are available when you pair your device with a smartphone.
• Press
UP
or
DOWN
.
The device scrolls through the widget loop and displays
summary data for each widget.
• Press to view widget details.
TIP:
You can press
DOWN
to view additional screens for a
widget, or press to view additional options and functions
for a widget.
• From any screen, hold
BACK
to return to the watch face.
• If you are recording an activity, press
BACK
to return to the
activity data pages.
Customizing the Watch
• From the watch face, hold
MENU
to change the watch face.
• From the widget screens, hold
MENU
to customize the
widget options.
• From the controls menu, hold
MENU
to add, remove, and
reorder the controls.
• From any screen, hold
MENU
to change additional settings.
Introduction
1
gombot.
2.
Válasszunk egy kerékpáros tevékenységet.
3.
Nyomjuk meg hosszan a
MENU
gombot.
4.
Válasszuk a
Tréning > FTP vezetett teszt
pontot.


