background image

2

Plug the small end of the USB cable into the USB port on the 

device.

3

Plug the large end of the USB cable into an AC adapter or a 

computer USB port.

4

Plug the AC adapter into a standard wall outlet.
When you connect the device to a power source, the device 

turns on.

5

Charge the device completely.

After you charge the device, close the weather cap.

About the Battery

 WARNING

This device contains a lithium-ion battery. See the 

Important 

Safety and Product Information

 guide in the product box for 

product warnings and other important information.

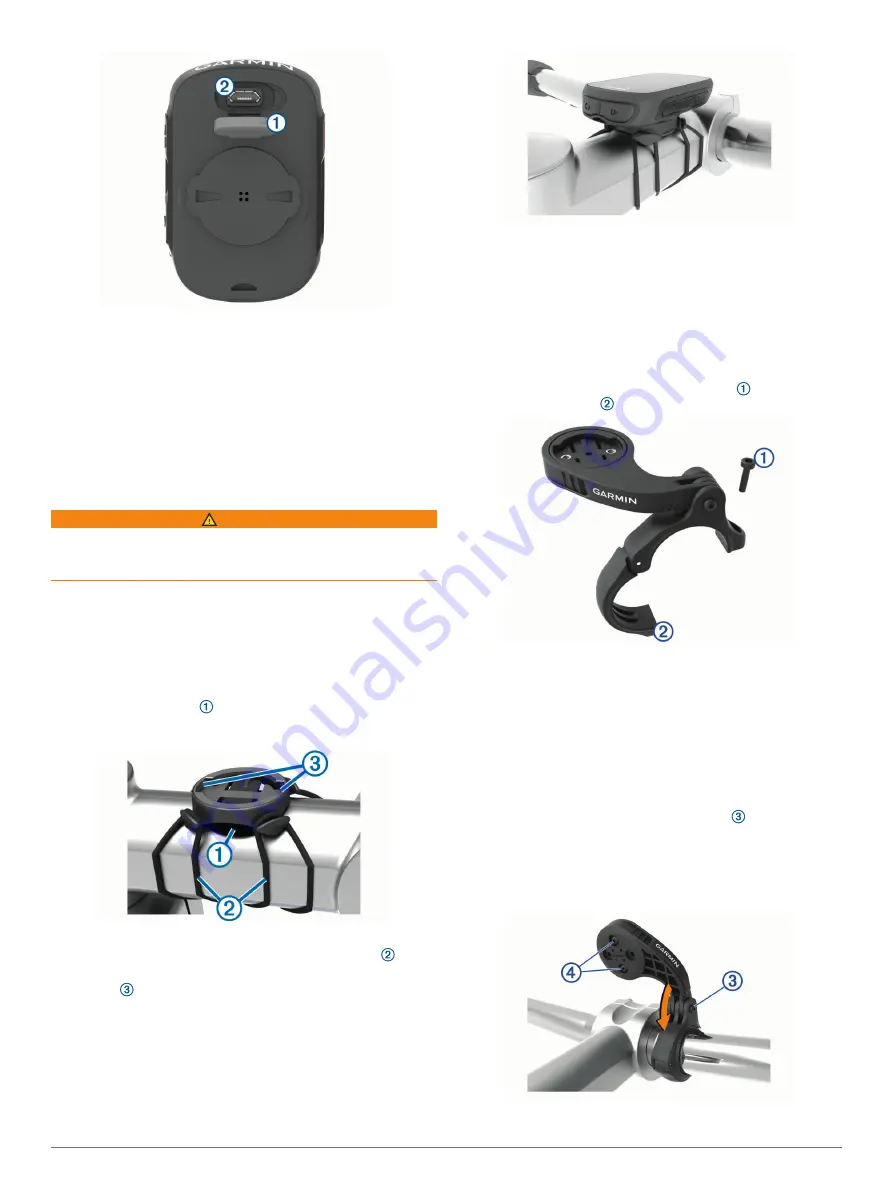
Installing the Standard Mount

For the best GPS reception, position the bike mount so the front 

of the device is oriented toward the sky. You can install the bike 

mount on the stem or the handlebars.

1

Select a secure location to mount the device where it does 

not interfere with the safe operation of your bike.

2

Place the rubber disk   on the back of the bike mount.
The rubber tabs align with the back of the bike mount so it 

stays in place.

3

Place the bike mount on the bike stem.

4

Attach the bike mount securely using the two bands  .

5

Align the tabs on the back of the device with the bike mount 

notches  .

6

Press down slightly and turn the device clockwise until it 

locks into place.

Releasing the Edge

1

Turn the Edge clockwise to unlock the device.

2

Lift the Edge off the mount.

Installing the Mountain Bike Mount

NOTE: 

If you do not have this mount, you can skip this task.

1

Select a secure location to mount the Edge device where it 

does not interfere with the safe operation of your bike.

2

Use the 3 mm hex key to remove the screw   from the 

handlebar connector  .

3

Select an option:
• If the handlebar diameter is 25.4 mm, place the thicker 

pad around the handlebar.

• If the handlebar diameter is 31.8 mm, place the thinner 

pad around the handlebar.

• If the handlebar diameter is 35 mm, do not use a rubber 

pad.

4

Place the handlebar connector around the handlebar, so that 

the mount arm is above the bike stem.

5

Use the 3 mm hex key to loosen the screw   on the mount 

arm, position the mount arm, and tighten the screw.

NOTE: 

Garmin

®

 recommends tightening the screw so the 

mount arm is secure, with a maximum torque specification of 

20 lbf-in. (2.26 N-m). You should check the tightness of the 

screw periodically.

2

Introduction

Summary of Contents for EDGE 130 PLUS

Page 1: ...EDGE 130PLUS Owner sManual...

Page 2: ...t IQ Garmin Connect Garmin Express Varia and Vector are trademarks of Garmin Ltd or its subsidiaries These trademarks may not be used without the express permission of Garmin The BLUETOOTH word mark a...

Page 3: ...ncelling an Automated Message 8 Sending a Status Update After an Incident 8 Turning On LiveTrack 8 Connect IQ Downloadable Features 8 Downloading Connect IQ Features Using Your Computer 8 Wireless Sen...

Page 4: ...Updating the Software Using the Garmin Connect App 14 Updating the Software Using Garmin Express 14 Product Updates 14 Getting More Information 14 Appendix 14 Data Fields 14 VO2 Max Standard Ratings...

Page 5: ...ctions When appears on the screen hold to view the shortcut menu options Pairing Your Smartphone To use the connected features of the Edge device it must be paired directly through the Garmin Connect...

Page 6: ...Attach the bike mount securely using the two bands 5 Align the tabs on the back of the device with the bike mount notches 6 Press down slightly and turn the device clockwise until it locks into place...

Page 7: ...k to Start to navigate back to your starting location Select Mark Location to mark your location and save it Select Main Menu to return to the main menu Following a Saved Ride 1 Hold 2 Select Navigati...

Page 8: ...can plan workouts in advance and store them on your device Following a Workout From Garmin Connect Before you can download a workout from Garmin Connect you must have a Garmin Connect account Garmin...

Page 9: ...2 max estimate appears as a number and position on the gauge VO2 max data and analysis is provided with permission from The Cooper Institute For more information see the appendix VO2 Max Standard Rati...

Page 10: ...ocations 3 Select a saved location 4 Select Details Viewing User Locations on the Map 1 Hold 2 Select Map User Locations 3 Select Show Customizing the Map Icons You can customize map icons to identify...

Page 11: ...ects an incident LiveTrack Allows friends and family to follow your races and training activities in real time You can invite followers using email or social media allowing them to view your live data...

Page 12: ...vice must detect an incident and send an automated emergency message to your emergency contacts You can send a status update to your emergency contacts informing them you are not in need of assistance...

Page 13: ...strap around the wheel hub and attach it to the hook on the sensor The sensor may be tilted when installed on an asymmetrical hub This does not affect operation 3 Rotate the wheel to check for clearan...

Page 14: ...luding the number of rides time distance and calories 1 Hold 2 Select History Totals Resetting Bike Totals Select History Totals Reset Totals Yes NOTE This does not delete any saved activities Garmin...

Page 15: ...ng segments Segments page 3 Nav Prompts Enables or disables turn by turn navigation prompts and off course warnings GPS Allows you to turn off GPS Training Indoors page 5 or change the satellite setti...

Page 16: ...Sets the units of measure used on the device Time Sets the device to display time in a 12 hour or 24 hour format Position Format Allows you to set the format for viewing geographical coordinate positi...

Page 17: ...lity of the heart rate monitor to report accurate data Go to www garmin com HRMcare for detailed washing instructions Rinse the strap after every use 1 The device withstands incidental exposure to wat...

Page 18: ...placement bands O rings are available for the mounts NOTE Use Ethylene Propylene Diene Monomer EPDM replacement bands only Go to http buy garmin com or contact your Garmin dealer Updating the Software...

Page 19: ...lap Lap Time The stopwatch time for the current lap Location at Dest The last point on the route or course Location at Next The next point on the route or course Maximum Speed The top speed for the cu...

Page 20: ...peed sensor settings The tire size is marked on both sides of the tire This is not a comprehensive list You can also measure the circumference of your wheel or use one of the calculators available on...

Page 21: ...13 zones 9 16 history 3 10 12 14 deleting 10 sending to computer 10 viewing 10 I icons 1 6 incident detection 7 8 indoor training 5 installing 2 9 K keys 1 L language 12 14 laps 1 12 LiveTrack 8 locat...

Page 22: ...support garmin com GUID 0E629F64 4ADF 459F 8A85 1E28685E4ED4 v1 June 2020...

Reviews: