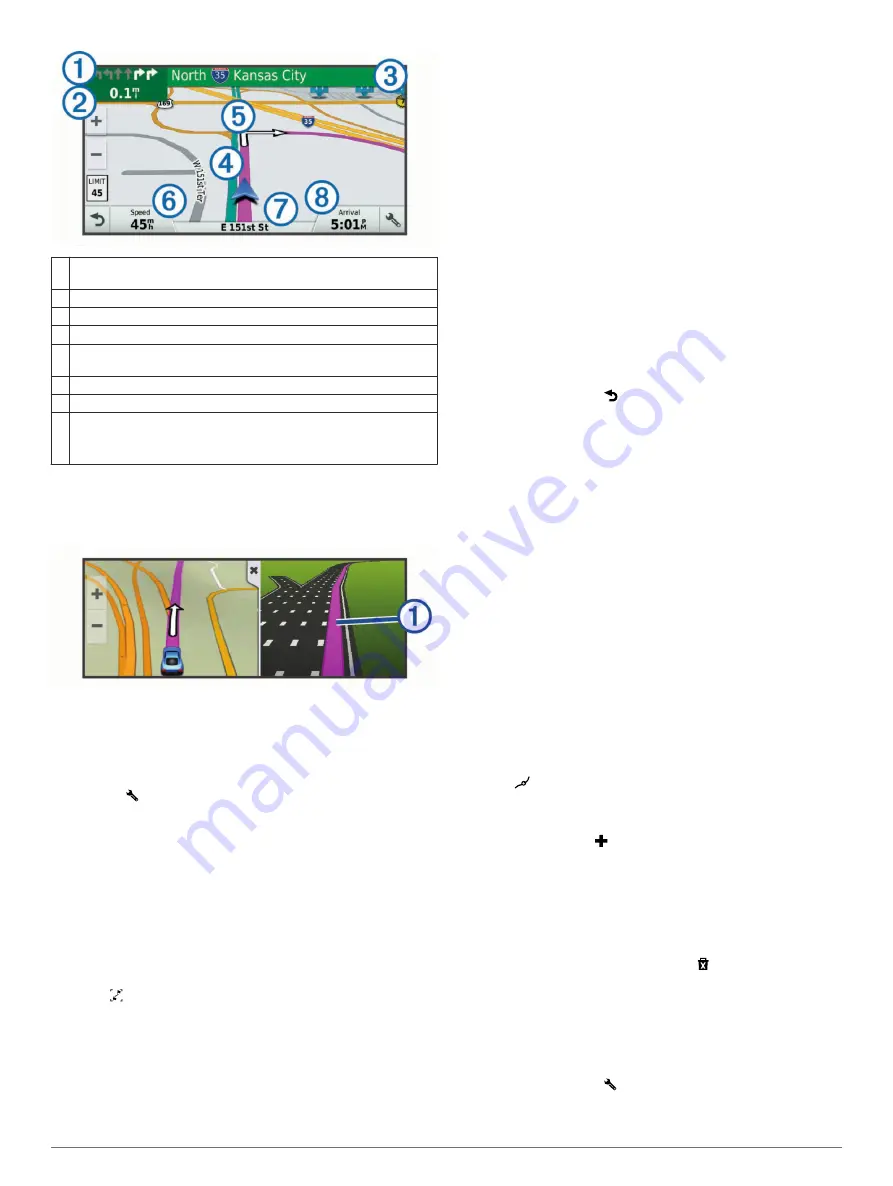
background image

À

Next action in the route. Indicates the next turn, exit, or other action 
and the lane in which you should travel, if available.

Á

Distance to the next action.

Â

Name of the street or exit associated with the next action.

Ã

Route highlighted on the map.

Ä

Next action in the route. Arrows on the map indicate the location of 
upcoming actions.

Å

Vehicle speed.

Æ

Name of the road on which you are traveling.

Ç

Estimated arrival time.

TIP: 

You can touch this field to change the information it shows 

(

Changing the Map Data Field

, page 12

).

Active Lane Guidance

As you approach a turn while navigating a route, a detailed 

simulation of the road appears beside the map, if available. A 

colored line 

À

 indicates the proper lane for the turn.

Viewing Turns and Directions

While navigating a route, you can view upcoming turns, lane 

changes, or other directions for your route.

1

From the map, select an option:
• To view upcoming turns and directions as you navigate, 

select   > 

Turns

.

The map tool displays the next four turns or directions 

beside the map. The list updates automatically as you 

navigate the route.

• To view the complete list of turns and directions for the 

entire route, select the text bar at the top of the map.

2

Select a turn or direction (optional).
Detailed information appears. An image of the junction may 

appear for junctions on major roadways, if available.

Viewing the Entire Route on the Map

1

While navigating a route, select anywhere on the map.

2

Select  .

Destination Arrival with Garmin Real Vision

Assistance

The Garmin Real Vision feature automatically displays a camera 

view when approaching some destinations, including addresses 

and geographic coordinates. The location of your destination 

appears on an image of your surroundings captured by the dash 

camera.

Some conditions may prevent this feature from appearing.
• This feature is not available in all areas or for all types of 

destinations.

• This feature may not appear for destinations far from the 

route or road, close to a turn or maneuver, or located on a 

very curvy or hilly road.

• This feature may not appear when the road or destination is 

obscured by weather, vegetation, or other obstructions.

• This feature may not appear in very bright or dark 

environments.

Adding a Location to Your Route

Before you can add a location to your route, you must be 

navigating a route (

Starting a Route

, page 5

).

You can add locations to the middle or end of your route. For 

example, you can add a fuel station as the next destination in 

your route.

TIP: 

To create complex routes with multiple destinations or 

scheduled stops, you can use the trip planner to plan, schedule, 

and save a trip (

Planning a Trip

, page 7

).

1

From the map, select   > 

Where To?

.

2

Search for a location (

Finding and Saving Locations

page 8

).

3

Select a location.

4

Select 

Go!

.

5

Select an option:
• To add the location as the next destination in your route, 

select 

Add As Next Stop

.

• To add the location to the end of your route, select 

Add 

As Last Stop

.

• To add the location and edit the order of destinations in 

your route, select 

Add to Active Route

.

The device re-calculates the route to include the added location 

and guides you to the destinations in order.

Shaping Your Route

Before you can shape your route, you must start a route 

(

Starting a Route

, page 5

).

You can manually shape your route to change its course. This 

allows you to direct the route to use a certain road or go through 

a certain area without adding a destination to the route.

1

Touch anywhere on the map.

2

Select  .
The device enters route shaping mode.

3

Select a location on the map.

TIP: 

You can select   to zoom in on the map and select a 

more precise location.
The device recalculates the route to travel through the 

selected location.

4

If necessary, select an option:
• To add more shaping points to the route, select additional 

locations on the map.

• To remove a shaping point, select  .

5

When you are finished shaping the route, select 

Go!

.

Taking a Detour

You can take a detour for a specified distance along your route 

or detour around specific roads. This is useful if you encounter 

construction zones, closed roads, or poor road conditions.

1

From the map, select   > 

Change Route

.

TIP: 

If the Change Route tool is not in the map tools menu, 

you can add it (

Enabling Map Tools

, page 11

).

6

Navigating to Your Destination

Summary of Contents for DriveAssist 50

Page 1: ...Garmin DriveAssist 50 Owner s Manual February 2016 190 01923 00_0A...

Page 2: ...without the express permission of Garmin Garmin babyCam Garmin Connect Garmin DriveAssist Garmin Express Garmin Real Vision and myTrends are trademarks of Garmin Ltd or its subsidiaries These tradema...

Page 3: ...Avoiding Toll Stickers 8 Avoiding Road Features 8 Avoiding Environmental Zones 8 Custom Avoidances 8 Navigating Off Road 8 Finding and Saving Locations 8 Finding a Location Using the Search Bar 9 View...

Page 4: ...ettings 18 Setting a Simulated Location 18 Camera Settings 18 Backup Camera Settings 18 babyCam Settings 18 Bluetooth Settings 18 Disabling Bluetooth 19 Display Settings 19 Traffic Settings 19 Units a...

Page 5: ...latest available mapping data to ensure your device continues to calculate accurate and efficient routes to your destinations Garmin Express is available for Windows and Mac computers 1 On your comput...

Page 6: ...GPS receiver must collect satellite data and establish the current location in the status bar indicates the satellite signal strength The time required to acquire satellite signals varies based on se...

Page 7: ...er external storage location for permanent storage Videos and Photos on Your Computer page 3 Taking a Photo You can take still photographs with this device By default the device stores time and locati...

Page 8: ...cription Advanced Driving Assistance System Your device includes an advanced driving assistance system ADAS which uses the integrated dash camera to provide warnings and alerts about your driving envi...

Page 9: ...current location to one or more destinations The device calculates a recommended route to your destination based on the preferences you set including the route calculation mode Changing the Route Cal...

Page 10: ...is feature may not appear when the road or destination is obscured by weather vegetation or other obstructions This feature may not appear in very bright or dark environments Adding a Location to Your...

Page 11: ...a trip select Optimize Order Editing and Reordering Locations in a Trip 1 Select Apps Trip Planner 2 Select a saved trip 3 Select a location 4 Select an option To move the location up or down select a...

Page 12: ...l zone select Always Ask To always avoid environmental zones select Avoid To always allow environmental zones select Allow 3 Select Save Custom Avoidances Custom avoidances allow you select specific a...

Page 13: ...ching Within a Category After you have performed a search for a point of interest certain categories may display a Quick Search list that shows the last four destinations you selected 1 Select Where T...

Page 14: ...ies Coordinates 2 If necessary select and change the coordinate format or datum 3 Enter the latitude and longitude coordinates 4 Select View on Map Viewing Recently Found Locations Your device stores...

Page 15: ...e route or the road on which you are traveling Up Ahead page 11 Turns Displays a list of upcoming turns in your route Viewing Turns and Directions page 6 Trip Data Displays customizable trip data such...

Page 16: ...While navigating a route select Traffic The nearest upcoming traffic incident appears in a panel on the right side of the map 2 Select the traffic incident to view additional details Viewing Traffic o...

Page 17: ...oice Command NOTE Voice command is not available for all languages and regions and may not be available on all models NOTE Voice Activated Navigation may not achieve desired performance when in a nois...

Page 18: ...e Garmin DriveAssist device and your phone within 3 m 10 ft of each other 3 On the Garmin DriveAssist device select Settings Bluetooth and fill the Bluetooth check box 4 Select Search for Devices 5 On...

Page 19: ...ation categories and apps appears 5 Select an option To enable or disable a notification select the toggle switch next to the category or app name To add an app to the list select Smartphone Link Smar...

Page 20: ...oice command say Play Message NOTE This option is available only when the selected language supports the voice command feature and appears in the map tool To perform additional actions such as dismiss...

Page 21: ...The weather icon changes to show weather in the vicinity such as rain snow and thunderstorms 1 Select Apps Weather 2 If necessary select a city 3 Select Weather Radar Viewing Weather Alerts Before yo...

Page 22: ...following too closely to the vehicle in front of you Forward Collision Warning System page 4 Forward Collision Sensitivity Allows you to set the sensitivity of the forward collision warning A higher...

Page 23: ...ompts Text Language Sets all on screen text to the selected language NOTE Changing the text language does not change the language of user entered data or map data such as street names Keyboard Languag...

Page 24: ...ball on the suction cup Removing the Suction Cup from the Windshield 1 Flip the lever on the suction cup toward you 2 Pull the tab on the suction cup toward you Changing the Fuse in the Vehicle Power...

Page 25: ...ve or volume and not as a portable device Windows versions prior to Windows XP Service Pack 3 use USB mass storage mode My device does not appear as either a portable device or a removable drive or vo...

Page 26: ...s connected to your computer as a removable drive or volume you must safely disconnect your device from your computer to avoid data loss If your device is connected to your Windows computer as a porta...

Page 27: ...rmin Connect 14 Garmin Express registering the device 1 updating software 1 Garmin Live Services 15 subscribing to 15 Garmin Real Vision 6 geocaching 10 going home 5 GPS 2 22 H hands free phone calls...

Page 28: ...aps 11 traffic 12 13 19 adding subscriptions 13 alternate route 8 cameras 17 incidents 12 map 12 receiver 13 searching for delays 12 traffic cameras viewing 17 travel history 19 trip information 12 re...

Page 29: ......

Page 30: ...5 69 33 99 39 02 36 699699 52 001 855 792 7671 0800 427 652 0800 0233937 47 815 69 555 00800 4412 454 44 2380 662 915 35 1214 447 460 386 4 27 92 500 0861 GARMIN 427 646 27 0 11 251 9800 34 93 275 44...

Reviews: