190-02692-00 Rev. A
Garmin G100 Pilot’s Guide for the Piper PA-32 Saratoga
55
FLIGHT INSTRUMENTS
SY
STEM
O
VER
VIEW
FLIGHT
INSTRUMENTS
EIS
AUDIO P
ANEL
& CNS
FLIGHT
MANA
GEMENT
HAZARD
AV
OID
ANCE
AFCS
ADDITIONAL
FEA
TURES
APPENDICES
INDEX
Adjusting the selected heading:
Turn the
HDG
Knob to set the selected heading.
Push the
HDG
Knob to synchronize the bug to the current heading.
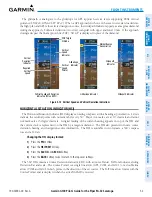
The Selected Course is shown to the upper right of the HSI for three seconds after being adjusted. While the
HSI is displayed as an arc, the Selected Course is displayed whenever the Course Pointer is not within the 140˚
currently shown. The color of the Selected Course corresponds to the selected navigation source: magenta for
GPS or green for NAV (VOR, LOC).
Adjusting the Selected Course:
Turn the
CRS
Knob to set the Selected Course.
Push the
CRS
Knob to re-center the CDI and return the Course Pointer to the bearing of the active waypoint or
navigation station.
Figure 2-13 Heading and Course Indications (Magnetic)
Selected
Heading
Selected
Course
Current Heading
Heading Bug
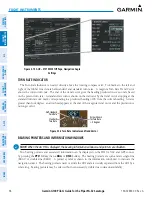
Navigation angles (track, heading, course, bearing) are set on the AUX – SYSTEM SETUP Page and are either
corrected to the computed magnetic variation (MAG VAR) or referenced to true north (denoted ‘T’). When an
approach referenced to true north has been loaded into the flight plan, the system generates a message to change
the NAV ANGLE setting to TRUE at the appropriate time.
Figure 2-14 Heading and Course Indications (True)
Changing the navigation angle setting:
1)
Use the
FMS
Knob to select the AUX – SYSTEM SETUP Page on the MFD.
2)
Push the
FMS
Knob to activate the cursor.
3)
Turn the large
FMS
Knob to highlight the NAV ANGLE Field in the DISPLAY UNITS Box.
4)
Turn the small
FMS
Knob to highlight the desired setting and press the
ENT
Key.
•
TRUE
–
References angles to true north (denoted with ‘T’)
•
MAGNETIC – Angles corrected to the computed magnetic variation (MAG VAR)

