background image

3


en-us

Table of contents

en-us 

Use and Care Manual, Installation Instructions

Important information

5

Purchase information

5

Customer service

5

Your dryer is intended for

6

Safety Definitions

6

IMPORTANT SAFETY INSTRUCTIONS

6

Introduction to your new dryer

10

Standard features and helpful information

10

Special features

10

Environmentally friendly use of your dryer

11

Dimensions and clearances required

11

Installation for best performance

11

Appliance dimensions

12

Length of power cord and drain hose

12

Minimum clearances

12

INSTALLATION INSTRUCTIONS

14

Introduction

14

Before installing the dryer

15

Waste disposal

15

Parts provided with your dryer

16

Accessories for your appliance

17

Installation - step by step and check list

17

Electrical Connections

19

Leveling the dryer

21

Check heating system

21

Preparing to transport the dryer - step by step

21

Reversing the door - step by step

22

Getting to know your appliance

25

Control panel

25

Display area

26

OPERATING INSTRUCTIONS

28

Your new dryer

28

Before using the dryer for the first time 

29

Temporary disconnection of the dryer

30

Using program selector to choose a drying program

30

Program selection

30

Selecting optional program settings

30

Loading the laundry

31

Starting the program

31

Indicator of program sequence

32

Selecting a different program

32

Cancel program

32

Program end

32

Removing laundry/switching the appliance off

32

Home Connect®

33

Calling up the Home Connect menu

33

Connecting your home network to the 
Home Connect app

33

Activating/deactivating Wi-Fi

35

Resetting your network settings

35

Updating the software

35

Information on data protection

36

Declaration of Conformity

36

Wi-Fi® Module FCC/IC Statements

36

Laundry

37

Preparing the laundry

37

Sorting the laundry

37

Drying tips

37

Program selection table

38

Optional program settings

39

U

 (Low Heat)

39

ü

 (Time Dry)

39

ý

 (Remote Start)

39

(Finish in)

39

(Dryness Level)

39

·

 (Level Adjust)

39

ò

 (End Signal)

40

5

 (Wrinkle Block™)

40

Appliance settings

40

¯

 3 sec. (Child lock)

40

Activating setting mode

40

Exiting setting mode

41

Summary of Contents for WT262700

Page 1: ...DJJHQDX en us Use and Care Manual Installation Instructions Dryer WT262700...

Page 2: ...2...

Page 3: ...25 Control panel 25 Display area 26 OPERATING INSTRUCTIONS 28 Your new dryer 28 Before using the dryer for the first time 29 Temporary disconnection of the dryer 30 Using program selector to choose a...

Page 4: ...ce of drain hose 45 Replacing fuses in the Power Adapter step by step 45 Troubleshooting 45 Introduction 45 General Troubleshooting 46 STATEMENT OF LIMITED PRODUCT WARRANTY 50 Gaggenau Clothes Dryer 5...

Page 5: ...ufacturer reserves the right to make changes in the product or manual without notification Customer service Your dryer does not require any special care other than the maintenance and care mentioned i...

Page 6: ...ls and headings are used to identify areas where you should take precautions to avoid injury or property damage Please take a moment to become familiar with each of these symbols and what they mean be...

Page 7: ...nstructions Do not use replacement parts that have not been recommended by the manufacturer e g parts made by using a 3D printer Do not use fabric softeners or products to eliminate static unless reco...

Page 8: ...have been installed according to the Installation Instructions Installation and grounding are in compliance with all local regulations and or other applicable regulations and requirements Failure to...

Page 9: ...ility of the parents or legal guardians to ensure they are instructed in safe practices by qualified persons Keep all laundry aids including detergents bleach fabric softeners etc out of the reach of...

Page 10: ...gular cotton loads Large door opening 180 opening angle Quality tested Each dryer which leaves our factory has undergone a thorough performance test and is in full working condition Website Visit our...

Page 11: ...r after each drying process Air inlet on the dryer Do not cover or allow any articles items to restrict the air inlet on the front of the dryer Energy saving mode The display panel lighting goes out a...

Page 12: ...of another washer Ensure washer transportation bolts have been removed and washer does not vibrate excessively For shortest drying times keep closet door open while dryer is operating NOTICE When clo...

Page 13: ...s or coverings Label Dimension U S Inches Metric cm A Both Sides 0 6 1 5 B Top 6 3 16 C Rear 2 5 6 2 D Front 2 4 6 E F are minimum area size E Top Vent 63 sq 404 sq F Bottom Vent 63 sq 404 sq Vent spa...

Page 14: ...rating this appliance To reduce the risk of severe injury or death follow all installation instruction Clothes dryer installation must be performed by a qualified installer according to these instruct...

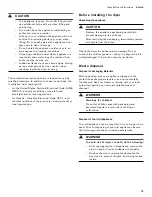
Page 15: ...he provincial municipal and or local regulations Before installing the dryer Unpacking the appliance 9 CAUTION Remove the appliance packaging carefully to prevent damage to the surfaces After removing...

Page 16: ...se notify your dealer immediately Power cord with plug 0 Drain hose connected to the dryer 8 Elbow to form the hose to fit the drain H P User Manual and Product Registration Power Adapter Supplied Pow...

Page 17: ...below Stacking kits must be used when stacking this dryer on a Bosch washer Stacking kit without a shelf WTZ20410UC Stacking kit with a shelf WTZ11400UC Power Adapter The Power Adapter is for pluggin...

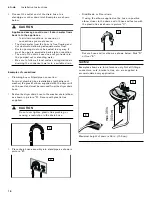
Page 18: ...umbing box or Standpipe connection For most plumbing box installations with adjacent washer the plastic elbow supplied with the dryer will not be used and must be removed from the dryer drain hose 1 F...

Page 19: ...andard NEMA 6 15P cord and is UL approved and listed in the USA and Canada It meets the following requirements 208 240 volt rated 15 amps NOTICE This appliance is restricted to being powered by the su...

Page 20: ...rtment Do not use NEMA 14 30P 4 prong nor 10 30P 3 prong power cords on this appliance Do not reuse old power cord Do not make a sharp bend or crimp wiring or conductors at connections Electric shock...

Page 21: ...ke sure the dryer does not wobble There should be no give or movement All four dryer feet should press equally against the floor This is just as important as the dryer being level to prevent vibration...

Page 22: ...e dryer side then remove the door and hinge assembly from the dryer housing 3 Place the door on a flat smooth secure surface such as a towel or cloth lying on the floor or table 4 Remove screws from t...

Page 23: ...ngs with those on the door body Place door body back on door ring as shown below 14 Follow directions of the images below to lock the door ring in door body 15 Place the hook insert in position adjace...

Page 24: ...nstall the door latch 1 and cover 2 on the opposite side of the door opening 19 Install the door and hinge assembly back on the dryer with the original screws 20 Confirm the door closes and latches in...

Page 25: ...us Getting to know your appliance Gettingtoknowyourappliance Control panel Programs 0 Program Selector Center is pressed to power the appliance ON or OFF and dial turns in both directions to select a...

Page 26: ...is paused press to restart A H Select 6 Finish in End of program Finish in time after h hours e g Press 6 Finish in M and N at once for approximately 3 seconds to activate or deactivate 3 sec Child l...

Page 27: ...art Pause button is pressed on control panel Pause is activated from App or door is opened during the drying cycle If you remove heated items from the dryer it is recommended to spread them out allowi...

Page 28: ...injury to persons read the IMPORTANT SAFETY INSTRUCTIONS and OPERATING INSTRUCTIONS before operating this appliance Your new dryer 3 Control panel display area program selector 0 Drum with interior l...

Page 29: ...the dryer for the first time 1 Read these operating instructions carefully 2 Check that the supply voltage corresponds with the voltage specifications on the rating plate on the dryer see top rear sid...

Page 30: ...the program depends on the measured degree of moisture in the laundry and on the selected degree of dryness e g Extra Dry Special programs The programs ANTI SHRINK WOOL BULKY LARGE SUPER 40 SUPER 15...

Page 31: ...Recommended maximum load size can be found in the program selection table in this manual Page 38 Load the laundry Place laundry in the empty drum Put each piece of laundry into machine separately For...

Page 32: ...rocess can be stopped at any time by opening the door 2 Select another program and or a different optional program setting NOTICE Do not change the program during the Cool Down process 3 Press A Start...

Page 33: ...s in the Home Connect app You cannot use the Home Connect app to make changes while the controls on the appliance are being operated However you can use the Home Connect app to see any adjustments mad...

Page 34: ...ed successfully open the Home Connect app on your mobile device and carry out the steps in the app 6 In the Home Connect app enter the network name SSID and password key for your home network 7 Carry...

Page 35: ...ck on If you activate this function the energy consumption increases Resetting your network settings You can reset all of the network settings Ensure that you are in the Home Connect menu Page 33 1 Se...

Page 36: ...accordance with the essential requirements and other relevant provisions of the following Directives Wi Fi Module FCC IC Statements Model COM1 FCC ID 2AHES COMGEN1 IC 21152 COMGEN1 The Home Connect m...

Page 37: ...type and drying program Always dry very small items such as socks and handkerchiefs and underwired bras together with large items of laundry or in a laundry bag Do not over dry easy care laundry risk...

Page 38: ...t not quilts only dry one article at a time QUICK AUTO DRY 1 4 load Laundry made of synthetic fibers cotton or blended fabrics for example that needs to be dried quickly Values may differ from those s...

Page 39: ...olding the Remote Start button for at least 3 seconds enters Home Connect settings 6 Finish in The program end Finish in time can be set in one hour increments to a maximum of 24 h hours After selecti...

Page 40: ...iance against inadvertent changing of the set functions To do this activate the Child lock after cycle start To Activate Deactivate press 6 Finish in M and N for approximately 3 seconds In the display...

Page 41: ...function cannot be activated if Wi Fi is activated Exiting setting mode Once you have applied all the settings press the power button to switch off the appliance The settings you have selected will b...

Page 42: ...ess collects in the lint filter area This lint can be easily removed using a vacuum cleaner Cleaning the lint filter Dirty filters prolong the drying time and increases energy consumption The filter s...

Page 43: ...Close the door Cleaning the Condenser The Condenser requires periodic cleaning recommended once per month under normal drying conditions The frequency of cleaning depends on the amount and type loads...

Page 44: ...enance flap until it locks into position 13 Look in the Troubleshooting table to reset the maintenance indication Page 45 Cleaning the moisture sensors The dryer is equipped with a stainless steel moi...

Page 45: ...ll the fuse and fuse holder in the Power Adapter ensuring it snaps into place Troubleshooting TroubleshootingIntroduction NOTICE Before doing maintenance work or trying to fix a problem press the cent...

Page 46: ...unter a problem it will be something minor Before you call Customer Service consider the suggestions and instructions below NOTICE The troubleshooting items listed below can help resolve minor issues...

Page 47: ...filter Page 42 Press the A Start Pause button to reset the dis played indication and then press A Start Pause but ton again to reset the appliance if necessary Condenser dirty Clean Condenser Page 43...

Page 48: ...itial load is too wet Spin laundry at higher speed in the washing machine before drying Switch off the dryer and then turn it on again Drying time too long Lint filter and or Condenser is dirty Clean...

Page 49: ...be established Check whether your home network is available or try to connect to your home network again Home Connect is not working You can find solutions to problems with Home Con nect at www home...

Page 50: ...icular purpose which are also expressly excluded with respect to third party accessories other than those shipped with your Gaggenau appliance Use of third party accessories other than those shipped w...

Page 51: ...charges by the service company assuming they agree to make the service call Out of Warranty Product Gaggenau is under no obligation at law or otherwise to provide you with any concessions including r...

Page 52: ...LOSSES OR EXPENSES INCLUDING WITHOUT LIMITATION TIME AWAY FROM WORK HOTELS AND OR RESTAURANT MEALS REMODELLING EXPENSES IN EXCESS OF DIRECT DAMAGES WHICH ARE DEFINITELY CAUSED EXCLUSIVELY BY BOSCH OR...

Page 53: ......

Page 54: ......

Page 55: ......

Page 56: ...DJJHQDX 6 RPH SSOLDQFHV RUSRUDWLRQ 0DLQ 6WUHHW 6XLWH UYLQH ZZZ JDJJHQDX FRP XV 6 RPH SSOLDQFHV RUSRUDWLRQ DJJHQDX DXVJHUlWH PE DUO HU 6WUD H 0 QFKHQ 50 1 9001601951 9001601951 0012 en us...

Reviews: