background image

12

en

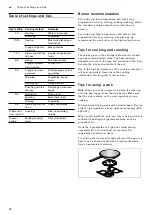
       Table of settings and tips

Table of settings and tips

Table of settings 

and tips

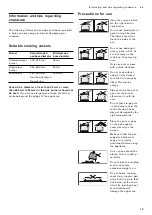
Burner recommendation

For cooking at low temperatures and with a long 
preparation time (e.g. melting, soaking, baking), select 
the standard- or high-output burner (not the wok 
burner). 

For cooking at high temperatures and with a short 
preparation time (e.g. warming, deep-frying), we 
recommend the wok burner or the high-output burner.

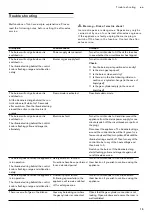
Tips for cooking and roasting

The values given in the settings table must be looked 
upon as recommended values. The heat required 
depends not only on the type and condition of the food, 
but also the size and contents of the pot.

Due to the high performance of the cooktop, fat and oil 
will heat up quickly. Never leave the cooktop 
unattended, fat can ignite, food can burn.

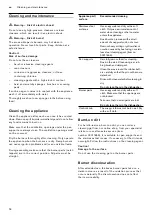
Tips for using a wok

Note: 

When you cook using a wok, place the wok ring 

onto the pan support over the wok burner. Make sure 
that the wok is stable on the wok ring when you are 
cooking.

We recommend using woks with a domed base. You can 
order a high-quality wok as an optional accessory (WP 
400 001).

When cooking with the wok, use only cooking oil that is 
suitable for heating to high temperatures, such as 
groundnut oil.

Cook the ingredients at a high heat, while stirring 
constantly. Do not cook them for too long. The 
vegetables should be al dente.

For stirring the food and for taking it out of the pan, it is 
best to use a shallow ladle with a long handle made 
from a heat-resistant material.

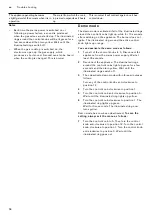
Heat setting Cooking method

Examples

12

Heating

Water, clear soups

Blanching

Vegetables

10-12

Searing

Meat, wok dishes/pan-
fried dishes

Frying at high tem-
peratures

Meat, potatoes

7-10

Simmering with the 
lid open

Liquids, dough-based 
foods

6-8

Baking

Flour-based food

Frying at medium 
temperatures

Poultry, fish

4-6

Frying at low tem-
peratures

Fried sausages, onions, 
egg dishes

Warming

Vegetables, soups, 
stews

Deep-frying

Chips, pastries

Poaching with the 
lid open

Dumplings, boiled sau-
sages

3-4

Defrosting

Frozen food

Braising

Beef olives, joints

Stewing

Vegetables

2-4

Simmering with the 
lid on

Soups, vegetables

Simmer set-
ting – up to 3

Soaking

Rice, rice pudding, 
cereals

Simmer 
setting

Melting, keeping 
warm

Chocolate, butter

Summary of Contents for VG 491

Page 1: ...Instruction manual Instrucciones de uso Instru es de servi o VG 491 Gas cooktop Encimera a gas Placa de fog o a g s...

Page 2: ...2 Table of contents 3 ndice 18 ndice 33 48...

Page 3: ...nic flame monitoring and automatic re ignition 11 Switching off 11 Residual heat indicator 11 Safety shut off 11 Table of settings and tips 12 Burner recommendation 12 Tips for cooking and roasting 12...

Page 4: ...ration Only use the appliance indoors Do not install this appliance on boats or in vehicles This appliance is intended for use up to a maximum height of 2000 metres above sea level This appliance is n...

Page 5: ...very hot Never place combustible items on the hob Never place objects on the hob Risk of fire The appliance becomes very hot and flammable materials could catch fire Never store or use flammable objec...

Page 6: ...in the fuse box Shut off the gas supply Contact the after sales service Risk of injury Unsuitable pan sizes damaged or incorrectly positioned pans can cause serious injury Observe the instructions wh...

Page 7: ...r appliance Saving energy Choose a burner of roughly the same size as your pan Place the cookware in the middle Use small saucepans for small quantities Using a large saucepan with little in it consum...

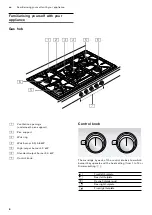
Page 8: ...e control knobs show which burner they operate and the heat setting from 1 to 12 or Simmer setting 3 3 Ventilation openings underneath pan support 0 Pan support 8 Wok ring Wok burner 6 0 5 8 kW H High...

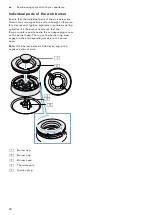
Page 9: ...the latches on the lower section of the burner click into place in the corresponding slots The alignment of the burner head and the burner ring is not important Note If the burner parts are fitted at...

Page 10: ...s may result in ignition problems or problems during operation Fit the burner head such that the thermocouple is positioned in the corresponding recess on the burner head The lug on the burner ring mu...

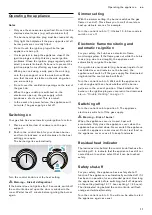
Page 11: ...This allows you to melt chocolate or heat up delicate sauces for example Turn the control knob to It takes 10 50 seconds to switch on or off Electronic flame monitoring and automatic re ignition For...

Page 12: ...omed base You can order a high quality wok as an optional accessory WP 400 001 When cooking with the wok use only cooking oil that is suitable for heating to high temperatures such as groundnut oil Co...

Page 13: ...mall pots or pans on large burners The flame should not touch the sides of the pot Do not use damaged pots or pans which do not sit evenly on the cooktoop they may tip over Only use pots or pans with...

Page 14: ...on dirt For hard to remove burnt on dirt you can order a cleaning gel from our online shop from your specialist retailer or our after sales service item number 00311859 It is suitable for pan support...

Page 15: ...rner will not ignite when it is switched on The illuminated ring behind the control knob is flashing yellow and magenta alternately Electronics fault Turn all control knobs to 0 and disconnect the app...

Page 16: ...the appliance The illuminated rings around the control knobs light up green for a few seconds and then turn yellow Wait until the illuminated rings switch off 3 Then deactivate demo mode within three...

Page 17: ...your appliance and the telephone number of the after sales service in the space below in case you need them Please note that a visit from an after sales service engineer is not free of charge in the e...

Page 18: ...a y reignici n autom tica 26 Apagar 26 Indicador de calor residual 26 Desconexi n de seguridad 26 Tabla de ajustes y consejos 27 Recomendaci n sobre los quemadores 27 Consejos para cocinar y asar 27 C...

Page 19: ...s interiores No montar este aparato en barcos o veh culos Este aparato est previsto para ser utilizado a una altura m xima de 2 000 metros sobre el nivel del mar Este aparato no est previsto para el f...

Page 20: ...rtencia Peligro de incendio El aceite caliente y la grasa se inflaman con facilidad Estar siempre pendiente del aceite caliente y de la grasa No apagar nunca con agua un fuego Apagar la zona de cocci...

Page 21: ...co debidamente instruido Si el aparato est averiado desenchufarlo de la red o desconectar el fusible en la caja de fusibles y cortar la alimentaci n de gas Avisar al Servicio de Asistencia T cnica Pel...

Page 22: ...ecipiente para cocinar centrado Utilizar una olla peque a para cantidades reducidas Una olla grande y poco llena requiere mucha energ a Utilizar siempre la tapa correspondiente a cada olla Cuando se c...

Page 23: ...nivel de fuego lento 3 3 Aberturas de ventilaci n bajo el soporte para ollas 0 Soporte para ollas 8 Accesorio para wok Quemador para wok de 6 0 5 8 kW H Quemador de gran potencia 4 0 kW P Quemador es...

Page 24: ...ntes La direcci n del cabezal y del c rculo de llama del quemador no es importante Nota Si los componentes del quemador no se colocan rectos el aparato no funcionar Componentes del quemador est ndar y...

Page 25: ...dido ser defectuoso Limpiarlas peri dicamente con un cepillo peque o no met lico Tenga en cuenta que las buj as no deben sufrir impactos violentos Para cocinar con una sart n wok hay que colocar el ac...

Page 26: ...n comprobar si todos los componentes del quemador est n colocados correctamente Comprobar si el quemador o la buj a est n sucios Qu hacer en caso de aver a en la p gina 30 Apagar Girar el mando de con...

Page 27: ...abombado Se puede adquirir una sart n wok de gran calidad como accesorio especial n de referencia WP 400 001 Para cocinar con la sart n wok utilizar nicamente un aceite de cocina que alcance elevadas...

Page 28: ...La llama no deber tocar los laterales del recipiente de cocci n No utilice recipientes de cocci n deformados que no asienten de forma estable sobre la placa de cocci n Los recipientes podr an volcar...

Page 29: ...e puede solicitar un gel limpiador n art 00311859 en nuestra tienda en l nea o a trav s de un comercio especializado o de nuestro servicio de atenci n al cliente Este gel est indicado para los soporte...

Page 30: ...10 segundos tras encender el aparato Despu s el anillo luminoso del mando de control activo se ilumina en naranja El modo Demo est activado Desactivar el modo Demo La llama no se enciende al activarla...

Page 31: ...aguen 3 A continuaci n desactivar el modo Demo dentro de los siguientes 3 minutos siguiendo estos pasos Girar uno de los mandos de control hacia la izquierda hasta la posici n 12 4 Girar el mando de c...

Page 32: ...legado el momento le recomendamos anotar los datos de su aparato as como el n mero de tel fono del Servicio de Asistencia T cnica en el siguiente apartado En caso de manejo incorrecto debe tenerse en...

Page 33: ...nica da chama e re igni o autom tica 41 Desligar 41 Indicador de calor residual 41 Bloqueio de seguran a 41 Tabela de regula es e conselhos 42 Recomenda o relativa ao queimador 42 Dicas para cozer e f...

Page 34: ...o monte este aparelho em embarca es ou ve culos O aparelho foi concebido para ser utilizado at a uma altitude de 2000 metros acima do n vel do mar no m ximo Este aparelho n o foi previsto para ser uti...

Page 35: ...mianto ou um objecto equivalente Perigo de inc ndio As zonas de cozinhar ficam muito quentes Nunca coloque objectos inflam veis sobre a placa de cozinhar N o guarde objectos sobre a placa de cozinhar...

Page 36: ...quadro el ctrico e feche a alimenta o de g s Contacte o servi o de assist ncia t cnica Perigo de ferimentos Avarias ou danos no aparelho s o perigosos Nunca ligue um aparelho defeituoso Desligue a fi...

Page 37: ...cipiente para cozinhar ao centro Para pequenas por es utilize um tacho pequeno Um tacho grande pouco cheio necessita de muita energia Tape sempre os tachos com uma tampa adequada Cozinhar sem tampa co...

Page 38: ...a o da pot ncia de cozedura de 1 a 12 ou o n vel de cozedura lenta 3 3 Orif cios de ventila o por baixo das grelhas 0 Grelhas 8 Anel wok Queimador para wok 6 0 5 8 kW H Queimador r pido 4 0 kW P Queim...

Page 39: ...encaixem nos respetivos rebaixos A orienta o da cabe a e do anel do queimador irrelevante Conselho Se os componentes do queimador forem colocados de forma inclinada o aparelho n o funciona Componentes...

Page 40: ...r Garanta a m xima limpeza Se as fichas estiverem sujas pode ocorrer uma igni o incorreta Limpe as fichas regularmente com uma escova pequena n o met lica Preste aten o para que as fichas n o sejam su...

Page 41: ...iente e verifique se todas as pe as do queimador est o corretamente colocadas Verifique se o queimador ou a vela est o sujos Anomalias o que fazer na p gina 45 Desligar Rode o comando para a posi o 0...

Page 42: ...de encomendar uma frigideira wok de alta qualidade como acess rio especial n mero de encomenda 400 001 Para cozinhar com a frigideira wok utilize apenas leo para cozinhar com alta capacidade de desemp...

Page 43: ...res grandes A chama n o dever tocar nas partes laterais dos tachos panelas N o use tachos panelas que n o tenham um apoio est vel sobre a placa de fog o pois estes poder o tombar Utilize apenas tachos...

Page 44: ...estar em linha reta Sujidade incrustada Para remover a sujidade dif cil e incrustada poss vel encomendar na nossa loja online em lojas especializadas ou atrav s do nosso servi o de apoio ao cliente u...

Page 45: ...do de demonstra o O queimador n o acende ao ligar O anel luminoso atr s dos comandos pisca alternadamente a amarelo e magenta Falha eletr nica Rode todos os comandos para 0 e desligue o aparelho da re...

Page 46: ...sligue o aparelho da fonte de alimenta o Aguarde pelo menos 30 segundos 2 Volte a ligar o aparelho Os an is luminosos dos comandos acendem durante alguns segundos a verde e depois a amarelo Aguarde at...

Page 47: ...aixo do aparelho Para que em caso de necessidade n o perca tempo a procurar poder inserir aqui os dados do seu aparelho e o n mero de telefone da assist ncia t cnica Tenha em aten o que a desloca o do...

Page 48: ...48 el 49 50 53 53 53 53 54 54 54 55 55 55 Wok 56 56 56 57 57 57 57 57 58 58 58 Wok 58 59 59 59 60 60 60 60 61 62 63 E FD 63 Internet www gaggenau com online shop www gaggenau com zz store...

Page 49: ...49 el 2 000 8 8 8...

Page 50: ...50 el m m m m 15...

Page 51: ...51 el m m m...

Page 52: ...52 el...

Page 53: ...53 el 2012 19 E waste electrical and electronic equipment WEEE...

Page 54: ...54 el 1 12 3 3 0 8 Wok Wok 6 0 5 8 kW H 4 0 kW P 2 0 kW X u v Wok x y...

Page 55: ...55 el Off OFF ON OFF WP 400 001 Wok 36 cm 6 10 cm 0 8 H...

Page 56: ...56 el Wok Wok Wok Wok Wok Wok Wok 1 2 0 8 H...

Page 57: ...57 el m 15 10 50 0 61 0 m 12 1 1 4 0...

Page 58: ...58 el Wok Wok Wok Wok Wok Wok Wok Wok Wok Wok WP 400 001 Wok 12 10 12 Wok 7 10 6 8 4 6 3 4 2 4 3...

Page 59: ...59 el 90 mm 280 mm 320 mm Wok 200 240 mm 90 mm 240 280 mm 90 mm Wok 240 320 mm Wok Wok 160 mm...

Page 60: ...60 el m m Online Shop 00311859 00311499...

Page 61: ...61 el m 0 0 10 0 0 0...

Page 62: ...62 el 10 1 0 30 2 3 3 12 4 1 5 0 6 1 5 7 0 12 1 0 0...

Page 63: ...63 el E FD E FD E Nr FD Nr O GR 18 182 1U 1U 7 SH...

Page 64: ...DJJHQDX DXVJHUlWH PE DUO HU 6WUD H 0 QFKHQ 50 1 ZZZ JDJJHQDX FRP 9001154601 9001154601 961201 en es pt el...

Reviews: