background image

en 

Installation and connection

10

4.5 Connecting the appliance

to the electricity supply

1.

Insert the mains plug of the appli-
ance's power cable in a socket
nearby.
The connection data of the appli-
ance can be found on the rating
plate. 

→ "Appliance", Fig. 

1

/

4

,

Page 11

2.

Check the mains plug is inserted
properly.

a

The appliance is now ready for
use.

Summary of Contents for RC 200

Page 1: ...User manual RC 200 Refrigerator Gaggenau ...

Page 2: ...2 6 4 Door rack 13 6 5 Accessories 13 7 Basic operation 13 7 1 Switching on the appliance 13 7 2 Operating tips 13 7 3 Switching off the appliance 13 7 4 Setting the temperature 13 8 Refrigerator compartment 14 8 1 Tips for storing food in the refrigerator compartment 14 8 2 Chill zones in the refrigerator compartment 14 8 3 Cooling capacity 14 8 4 OK sticker 14 9 Defrosting 15 9 1 Defrosting in t...

Page 3: ... This appliance may be used by children aged 8 or over and by people who have reduced physical sensory or mental abilities or inadequate experience and or knowledge provided that they are supervised or have been instructed on how to use the appliance safely and have understood the resulting dangers Children must not play with the appliance Cleaning and user maintenance must not be performed by chi...

Page 4: ...stallation regulations When installing the appliance check that the power cable is not trapped or damaged If the insulation of the power cord is damaged this is dangerous Never let the power cord come into contact with heat sources WARNING Risk of explosion If the appliance s ventilation openings are sealed a leak in the re frigeration circuit may result in a flammable mixture of gas and air Keep ...

Page 5: ...ldren play with small parts WARNING Risk of explosion Mechanical devices or other devices may damage the refrigera tion circuit flammable refrigerant may escape and explode To accelerate the defrosting process do not use any other mechanical devices or devices other than those recommended by the manufacturer Products which contain flammable propellants and explosive sub stances may explode e g spr...

Page 6: ...mpty for an extended period of time switch off the appliance defrost it clean it and leave the door open to prevent the formation of mould Metal or metal style parts in the appliance may contain aluminium If acidic food comes into contact with aluminium in the appliance aluminium foil ions may pass into the food Do not consume soiled food 1 7 Damaged appliance WARNING Risk of electric shock If the...

Page 7: ...ant and harmful gases may escape and ignite Keep naked flames and ignition sources away from the appli ance Ventilate the room Switch off the appliance Page 13 Unplug the appliance from the mains or switch off the circuit breaker in the fuse box Call after sales service Page 21 ...

Page 8: ...tallation location Keep the appliance out of direct sunlight Install the appliance as far away as possible from heating elements cookers and other heat sources Maintain a 30 mm clearance to electric or gas cookers Maintain a 300 mm clearance to oil or solid fuel cookers Never cover or block the exterior ventilation grilles Saving energy during use Note The arrangement of the fittings does not affe...

Page 9: ...ppliance s climate class The climate class can be found on the rating plate Appliance Fig 1 4 Page 11 Climate class Permitted room tem perature SN 10 C to 32 C N 16 C to 32 C ST 16 C to 38 C T 16 C to 43 C The appliance is fully functional within the permitted room temperature If an appliance with climate class SN is operated at colder room temperat ures the appliance will not be dam aged up to a ...

Page 10: ...electricity supply 1 Insert the mains plug of the appli ance s power cable in a socket nearby The connection data of the appli ance can be found on the rating plate Appliance Fig 1 4 Page 11 2 Check the mains plug is inserted properly a The appliance is now ready for use ...

Page 11: ...sing yourself with your appliance Familiarising yourself with your appliance 5 1 Appliance You can find an overview of the parts of your appliance here 1 2 3 6 7 4 5 1 1 Light switch 2 Control panel 3 Pull out container Page 12 4 Rating plate 5 Fruit and vegetable container 6 Exterior ventilation grille ...

Page 12: ...model 6 1 Shelf To vary the shelf as required you can remove the shelf Removing the shelf Page 17 Re position the stoppers on both sides and re insert the shelf 6 2 Pull out container Do not store animal based food in the pull out container You can take out the pull out container for loading and unloading Page 17 6 3 Fruit and vegetable con tainer with cover Store fresh fruit and vegetables in the...

Page 13: ...ic operation 7 Basic operation Basic operation 7 1 Switching on the appli ance 1 Turn the temperature controller from position 0 a The appliance begins to cool 2 Set the required temperature Page 13 7 2 Operating tips Once you have switched on the appliance the set temperature is only reached after several hours Do not put any food in the appli ance until the temperature has been reached If you op...

Page 14: ...s different chill zones Coldest zone The coldest zone is in the pull out container Tip Store highly perishable food such as fish sausages and meat in the coldest zone Warmest zone The warmest zone is at the very top of the door Tip Store food that does not spoil easily in the warmest zone e g hard cheese and butter Cheese can then continue to release its aroma and the butter will still be easy to ...

Page 15: ...s steel surfaces use only cleaning cloths and cleaning agents suitable for stainless steel Tips To prevent visible scratches wipe the stainless steel surface in the direction of the grain Suitable cleaning agents and cleaning cloths are available from our customer service your dealer or on our website 10 2 Preparing the appliance for cleaning 1 Switch off the appliance Page 13 2 Disconnect the app...

Page 16: ...ttings 5 Electrically connect the appliance 6 Putting the food into the appliance 10 4 Cleaning the condensa tion channel and drain age hole Regularly clean the condensation channel and drainage hole to ensure that the condensation can drain 1 Remove the pull out container Page 17 2 Carefully clean the condensation channel and the drainage hole e g using a moistened cotton bud 10 5 Cleaning the ve...

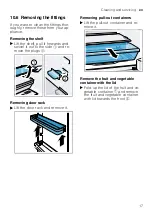
Page 17: ...pull it forwards and swivel it out to the side and re move the plugs Removing door rack Lift the door rack and remove it Removing pull out containers Lift the pull out container and re move it Remove the fruit and vegetable container with the lid Fold up the lid of the fruit and ve getable container and remove the fruit and vegetable container with lid towards the front ...

Page 18: ... cord of this appliance is damaged it must be replaced by the manufacturer the manufacturer s Customer Service or a similarly qualified person in order to prevent any risk Fault Cause and troubleshooting The LED lighting does not work The illuminant is defective 1 Switch off the appliance Page 13 2 Disconnect the appliance from the mains Unplug the appliance from the mains or switch off the circui...

Page 19: ...hole Page 16 The appliance hums bubbles buzzes gargles or clicks Not a fault A motor is running e g refrigerating unit fan Refrigerant flows through the pipes The motor switches or solenoid valves are switching on or off No action required The appliance makes noises Fittings wobble or stick Check the removable fittings and if required re place these Bottles or containers are touching Move the bott...

Page 20: ...from the mains or switch off the circuit breaker in the fuse box 3 Remove all of the food 4 Clean the appliance Page 15 5 To guarantee the ventilation inside the appliance leave the appliance open 12 2 Disposing of old appli ance Valuable raw materials can be re used by recycling WARNING Risk of harm to health Children can lock themselves in the appliance thereby putting their lives at risk Leave ...

Page 21: ...te If you contact Customer Service you will require the product number E Nr and the production number FD of your appliance The contact details for Customer Ser vice can be found in the enclosed Customer Service directory or on our website 13 1 Product number E Nr and production number FD You can find the product number E Nr and the production number FD on the appliance s rating plate Appliance Fig...

Page 22: ......

Page 23: ......

Page 24: ...Gaggenau Hausgeräte GmbH Carl Wery Straße 34 81739 München GERMANY www gaggenau com 9001595065 9001595065 en 001103 ...

Reviews: