background image

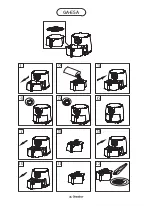
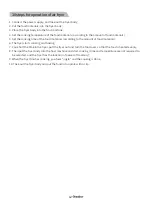
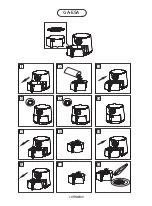
10 steps for operation of air fryer

1. Connect the power supply, and take out the fryer body;
2. Put the food materials into the fryer body;
3. Place the fryer body into the host machine;
4. Set the cooking temperature of the food materials (according to the amount of food materials);
5. Set the cooking time of the food materials (according to the amount of food materials);
6. The fryer starts cooking and baking;
7. Cook half the time in the fryer, pull the fryer out and turn the food over, so that the food is heated evenly;
8. Then put the fryer body into the host machine and start cooking (time and temperature are not required to 
     be selected, and the fryer has the function of power off memory);
9. When the fryer finishes cooking, you hear "jingle" and the cooking is done;
10. Take out the fryer body and put the food into a plate with a clip.

12

Summary of Contents for GA-E5A

Page 1: ...Electric Oven Air Fryer Thank you for purchasing our product Please read this manual carefully before use Instructions Model GA E5A ...

Page 2: ......

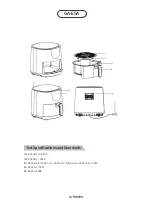
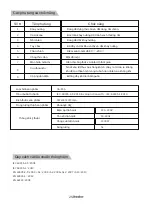
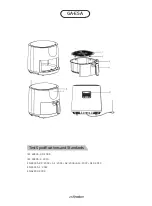
Page 3: ...tion Introduction Baking tray Silicone case Fryer Handle Used to contain food and place it in the fryer Sleeved on a baking tray to prevent from scratching the fryer Used to place the grill Used to push the fryer and take place the grill To control temperature within 80 200 Surface film To display the menu time and temperature The air flows in from the inlet and out from the outlet to form a hot air...

Page 4: ...02 GA E5A IEC 60335 2 9 2008 IEC 60335 1 2010 EN 60335 2 9 2003 A1 2004 A2 2006 A12 2007 A13 2010 EN 60335 1 2012 EN 62233 2008 Test Specifications and Standards ...

Page 5: ...of children under 8 years old 7 Do not allow the power cord to come into contact with a hot surface 8 Never insert the product plug or operate the control panel by wet hands 9 The product must be plugged into a grounded socket and be sure it is plugged correctly 10 Do not connect the product to the external timer so as to avoid danger 11 Do not place the product on or near flammable materials such ...

Page 6: ...e automatically powered off To turn off the product manually turn the timer knob counterclockwise to 0 The product complies with the relevant standards for the electromagnetic field EMF Based on the current scientific evidence the product is safe if it is used correctly and operated according to the operating instructions in the user manual Note The product can also be turned off automatically if the f...

Page 7: ...s in this chapter To turn the food materials over hold the handle and pull the fryer out of the product and then turn them over Slide the fryer back to the air fryer Figure 7 Figure 8 Figure 9 Tips If you set the timer to half the cooking time the timer will ring when you need to turn the food materials over However this means that you must set the timer again for the remaining cooking time after ...

Page 8: ...06 GA E5A 1 2 3 4 OFF 80 120 160 200 200 5 6 0 30min 30 25 20 15 Min 5 10 0 7 8 9 10 11 12 ...

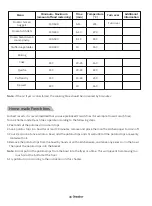
Page 9: ...r Sausage roll Chicken drumstick Chicken breast Pastry Spring roll 100 500 100 500 100 500 100 500 100 500 100 400 8 12 7 14 13 15 18 22 10 15 10 15 180 180 200 180 180 200 Turn over 9 16 11 20 16 10 18 22 12 18 15 18 15 18 200 200 200 180 180 180 200 Turn over Turn over Turn ove Turn ove Turn ove Turn over Turn over Add 1 2 spoon of oil Add 1 2 spoon of oil Add 1 2 spoon of oil Temperature C Addi...

Page 10: ...xcess oil in the bowl Then pour the potato strips into the basket 5 Fry potato strips according to the instructions in this chapter Note If the air fryer is cold started the cooking time should be increased by 5 minutes Note Do not put all the potato strips from the bowl into the fryer at a time This will prevent from leaving too much oil at the bottom of the fryer Home made French fries Menu Mini...

Page 11: ...plug the product plug and allow the product to cool down completely 2 Make sure all components are clean and dry 3 Store the product in a clean and dry place When disposing of the product please do not put it together with the general household wastes it should be sent to the officially designated recycling point This is good for the environmental protection If you need services or information or ha...

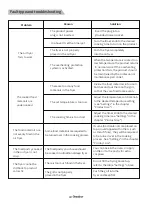
Page 12: ...ce personnel Insert the plug into a grounded power socket Turn the timer knob to the desired cooking time to turn on the product Push the fryer completely into the air fryer Solution The cooking time is too short Adjust the timer knob to the desired cooking time see Settings in the chapter Product Use Some food materials are required to be turned over in the cooking process If some food materials ...

Page 13: ...al frying effect of the food materials Solution The fresh French fries are not evenly fried in the air fryer You do not soak the potato strips properly before frying You do not use the right variety of potatoes Use fresh potatoes and make sure they do not scatter during frying Soak potato strips in a bowl for at least 30 minutes remove and place them on the kitchen paper to drain off The French frie...

Page 14: ...aterials according to the amount of food materials 6 The fryer starts cooking and baking 7 Cook half the time in the fryer pull the fryer out and turn the food over so that the food is heated evenly 8 Then put the fryer body into the host machine and start cooking time and temperature are not required to be selected and the fryer has the function of power off memory 9 When the fryer finishes cooking...

Page 15: ... ใช สำหรับดันและวางกระวางหม อ และวางตะแกรง ปรับอุณหภูมิได 80 c 200 c ฉลากบอกฟังก ชั น แสดงเมนู อุณหภูมิ และเวลา ไหลเข าจากช องนำเข าอากาศและไหลออกจากช องระบายอากาศ เพื อสร างการหมุนเวียนความร อนของอากาศ รุ น มาตรฐานผลิตภัณฑ ขนาดของผลิตภัณฑ น ำหนักของผลิตภัณฑ ระบบทำความร อน GA E5A IEC 60335 2 9 2019 in conjunction with IEC 60335 1 2010 347x347x373mm ประมาณ 4 0kg แรงดันไฟฟ า ความถี กำลังไฟฟ า ความจุ...

Page 16: ...GA E5A 14 IEC 60335 2 9 2008 IEC 60335 1 2010 EN 60335 2 9 2003 A1 2004 A2 2006 A12 2007 A13 2010 EN 60335 1 2012 EN 62233 2008 ข อกำหนดและมาตรฐานของการทดสอบ ...

Page 17: ...ัวผลิตภัณฑ เสียหาย โปรดอย าใช ผลิตภัณฑ นี 4 หากสายไฟชำรุด เพื อหลีกเลี ยงอันตราย ต องเปลี ยนโดยผู ผลิต และผู เชี ยวชาญฝ ายซ อมบำรุงหรือหน วยงานที เกี ยวข องจากผู ผลิต 5 ต องดูแลเด กให ดี อย าให เด กมาเล นผลิตภัณฑ นี ไม ควรให เด กอายุต ำกว า 8 ปีทำความสะอาดและบำรุงรักษา หรือต องมีผู ใหญ ดูแลอยู รอบข างถึงให เด กดำเนินการได 6 เมื อผลิตภัณฑ นี กำลังเชื อมต อกับแหล งจ ายไฟหรืออยู ระหว างระบายความร อน ...

Page 18: ...ละฟองน ำล างจานแบบไม ขัดสแตนเลมาทำความสะอาดตะแกรงและจานอบ 1 วางผลิตภัณฑ บนพื นผิวที มั นคง แนนนอนและพื นเรียบอย าวางผลิตภัณฑ ไว บนพื นผิวที ไม ทนความร อน 2 วางตะแกรงไว ในหม อทอดไร น ำมันให ถูกต อง 3 ใส หม อทอดไร น ำมันเข าไปในผลิตภัณฑ ให ถูกต อง หม อทอดไร น ำมันต องใส เข าไปในผลิตภัณฑ ให ถูกต อง ไม งั นผลิตภัณฑ ไม ทำงานตามปกติ 4 เช ดด านในและด านนอกของผลิตภัณฑ ด วยผ าเปียก หมายเหตุ ยังสามารถทำความ...

Page 19: ...ื อรักษาอุณหภูมิให คงที d รวบรวมน ำมันส วนเกินในอาหารไว ที ด านล างของหม อทอด 7 อาหารบางส วนต องพลิกด านในระหว างทอด โปรดอ าน การตั งค า ในบทนี ต องพลิกด านของอาหาร โปรดจับด ามจับไว ดึงหม อทอดให ออกจากผลิตภัณฑ จากนั นค อยทำการพลิกด านจากนั นเลื อนหม อทอดเข าไปในหม อทอด ไร น ำมัน รูปภาพที 7 8 9 เคล ดลับ หากคุณตั งเวลาของการปรุงอาหารเป นครึ งหนึ งของเวลาที ต องการ งั นคุณจะได ยินเสียงแจ งเตือนเมื อต...

Page 20: ...18 GA E5A 1 2 3 4 OFF 80 120 160 200 200 5 6 0 30min 30 25 20 15 Min 5 10 0 7 8 9 10 11 12 ...

Page 21: ... 180 200 พลิก พลิก พลิก พลิก พลิก พลิก พลิก ใส น ำมัน 1 2 ช อนโต ะ ใส น ำมัน 1 2 ช อนโต ะ ใส น ำมัน 1 2 ช อนโต ะ เมนู ขั นต ำ สูงสุด ปริมาณของอาหาร กรัม เวลา นาที อุณหภูมิ ข อมูลเพิ มเติม พลิก เค กมันฝรั ง มันฝรั งครีม เมนู ขั นต ำ สูงสุด ปริมาณของอาหาร กรัม เวลา นาที อุณหภูมิ ข อมูลเพิ มเติม พลิก เนื อสัตว และสัตว ปีก สเต ก แฮมเบอร เกอร ไส กรอกโรล ขาไก อกไก 100 500 100 500 100 500 100 500 100 500...

Page 22: ...ก 20 200 200 200 180 ขนม ปอเปี ยะ นักเก ตไก แช แข ง เนื อปลาแช แข ง สแน คครีมเกล ดขนมปังแช แข ง 100 400 100 500 100 400 100 400 8 10 6 10 6 10 8 10 พลิก พลิก ผักยัดไส การอบ เค ก อาหารฝรั งเศสชนิดหนึ ง มัฟฟิน 100 400 300 300 300 4000 10 20 25 20 22 15 18 20 160 160 180 200 160 ขนม ...

Page 23: ...กจากเต าเสียบ และให อุณหภูมิของผลิตภัณฑ ลดลง หมายเหตุ เอาหม อทอดออกมา เพื อให อุณหภูมิของหม อทอดไร น ำมันลดลงเร วขึ น 2 ใช ผ าเปียกมาเช ดด านนอกของผลิตภัณฑ 3 ใช น ำร อน น ำยาล างจาน และฟองน ำไม ขัดมาทำความสะอาดจานทอดและตะกร า คุณใช น ำยาขจัดคราบไขมันล างคราบไขมันก อนได หมายเหตุ สามารถใช เครื องล างจานทำความสะอาดหม อทอดและตะแกรงได เคล ดลับ หากคราบไขมันติดไว บนตะแกรงหรือด านล างของหม อทอด โปรดใส น ำ...

Page 24: ...ี คุณต องการ เพื อเปิดใช งานของผลิตภัณฑ เอาหม อทอดเข า ไปในหม อทอดไร น ำมันอย างสนิท หม อทอดไม ได ใส เข า ไปในหม อทอดไร น ำมันอย างถูกที วิธีการแก ไข ระยะเวลาในการปรุงอาหารสั นเกินไป ปรับปุ มควบคุมเวลาไปที ระยะเวลาที ต องการ อ านส วน การตั งค า ใน การใช ผลิตภัณฑ ของบนนี อาหารบางชนิดต องพลิกด านในระหว างปรุง หากอาหารบางอย างอยู ด านบน หรือทับซ อนกับอาหารอย างอื น เช น ทอดเฟรนช ฟรายส งั นต องทำการพล...

Page 25: ...ไร น ำมัน ในหม อทอดยังมีคราบน ำมันที ใช ในครั งล าสุด ก อนทอดคุณไม ได แช มันฝรั งอย างถูกต อง คุณใช ประเภทของมันฝรั งไม ถูกต อง แช มันฝรั งในชามอย างน อย 30 นาที จากนั นนำออกมา วางบนกระดาษสำหรับทำอาหารเพื อสะเด ดน ำ ควันขาวเกิดจากการทำความร อนให กับ ไขมันในหม อทอด ตรวจ สอบให แน ใจว าคุณได ทำความสะอาดกระทะ ทอดอย างถูกต องหลังการใช งานทุกครั งแล วหรือไม ใช มันฝรั งสด และแน ใจว าระหว างทอดจะไม ขาดเสี...

Page 26: ...ม อทอดเริ มปรุงและอบ 7 พอหม อทอดทำงานไปครึ งหนึ งของระยะเวลาทั งหมด เอาหม อทอดออกมาพลิกด านของอาหาร เพื อให อาหารได รับความร อนอย างทั วถึง 8 จากนั นใส หม อเข าไปในเครื อง ดำการปรุงต อ ไม ต องเลือกเวลาและอุณหภูมิ หม อทอดไร น ำมันมีฟังก ชั นหน วยความจำในการปิดเครื อง 9 หลังปรุงอาหารเสร จแล ว จะได เสียงแจ งเตือน 10 เอาหม อออกมา ใช ที หนีบหยิบอาหารใส จาน แล วก ทานได เลย การดำเนินงานของหม อทอดไร น ำมั...

Page 27: ...c và nhiệt độ thời gian Nó đi vào từ đầu vào không khí và chảy ra từ cửa ra không khí để tạo thành một vòng tuần hoàn nhiệt của không khí Loại hình sản phẩm Tiêu chuẩn thi hành Kích thước sản phẩm Trọng lượng thịnh sản phẩm Thông số kỹ thuật GA E5A IEC 60335 2 9 2019 in conjunction with IEC 60335 1 2010 347x347x373mm Khoảng4 0kg Điện áp định mức Tần số định mức Công suất định mức Dung lượng 220 24...

Page 28: ...26 GA E5A IEC 60335 2 9 2008 IEC 60335 1 2010 EN 60335 2 9 2003 A1 2004 A2 2006 A12 2007 A13 2010 EN 60335 1 2012 EN 62233 2008 Test Specifications and Standards ...

Page 29: ...hận giống như để thay thế 5 Chăm sóc trẻ em đảm bảo rằng chúng không chơi với sản phẩm này Trẻ em dưới 8 tuổi không nên vệ sinh và bảo trì cần phải có người giám sát 6 Khi sản phẩm đang bật nguồn hoặc làm lạnh nên đặtdây nguồn của sản phẩm xa tầm tay của trẻ em dưới 8 tuổi 7 Không để dây nguồn tiếp xúc với bề mặt nóng 8 Không cắm ổ cắm của sản phẩm hoặc sử dụng bảng điều khiển khi tay ướt 9 Sản ph...

Page 30: ... bên trong bị lỗi hệ thống bảo vệ quá nhiệt sẽ tự động bật và sản phẩm không thể sử dụng được nữa bất cứ lúc nào hãy rút ổ cắm trước Chỉ sau khi sản phẩm nguội hoàn toàn gửi cho nhân viên bảo trì chuyên nghiệp để sửa chữa sản phẩm mới có thể sử dụng lại Lưu ý Bảo vệ quá nhiệt Sản phẩm này được trang bị một bộ hẹn giờ Khi đồng hồ đếm ngược đến 0 sản phẩm sẽ kêu chuông vàtắt nguồn tự động Để tắt sản...

Page 31: ...ại ở đáy của nồi chiên 7 Một số nguyên liệu cần lật mặt trong quá trình nấu tham khảo phần Cài đặt trong chương này Nguyên liệu cần lật hãy kéo nồi chiên ra khỏi sản phẩm rồi lật lại Trượt nồi chiên vào nồi chiên không dầu Hình 7 8 9 Lưu ý nếu bạn đặt hẹn giờ là một nửa thời gian nấu bạn sẽ nghe thấy chuông kêu hẹn giờ khi bạn cần lật nguyên liệu Tuy nhiên điều này có nghĩa là bạn phải đặt thời gi...

Page 32: ...GA E5A 1 2 3 4 OFF 80 120 160 200 200 5 6 0 30min 30 25 20 15 Min 5 10 0 7 8 9 10 11 12 30 ...

Page 33: ... tăng lên một chút và khi lượng nguyên liệu ít thời gian nấu chỉ cần ngắn hơn một chút Trong quá trình nấu lật nửa chừng các nguyên liệu có khối lượng nhỏ có thể cải thiện hiệu quả nấu cuối cùng và giúp các nguyên liệu được chiên đều Thêm một chút dầu vào khoai tây tươi để nguyên liệu giòn hơn Sau khi thêm dầu các nguyên liệu nên được để trong vài phút và sau đó chiên trong nồi chiên không dầu Khô...

Page 34: ...20 16 10 18 22 12 18 15 18 15 18 200 200 Thêm 1 2 thìa dầu Thêm 1 2 thìa dầu Thêm 1 2 thìa dầu 200 180 180 180 200 Thực đơn Min Max lượng thành phần g Thời gian phút Nhiệt độ Thông tin kèm theo Quay 200 200 200 180 Lót dạ Nêm rán Gà cốm đông lạnh Phi lê cá đông lạnh Rau nhồi 100 400 10 160 thức ăn nhẹ kem bánh mì đông lạnh 100 400 100 500 100 400 100 400 8 10 6 10 6 10 8 10 Quay Quay Nướng bánh 30...

Page 35: ...m ra khỏi ổ điện và để sản phẩm nguội 1 Rút phích cắm của sản phẩm và để nguội hoàn toàn 2 Đảm bảo rằng tất cả các bộ phận sạch sẽ và khô ráo 3 Bảo quản ở nơi sạch sẽ và khô ráo Khi vứt bỏ sản phẩm vui lòng không chất chung với rác sinh hoạt chung và chuyển đến điểm thu gom được chỉ định chính thức Điều này có lợi cho việc bảo vệ môi trường Nếu bạn cần dịch vụ hoặc thông tin hoặc có bất kỳ câu hỏi...

Page 36: ...Đẩy nồi chiên hoàn toàn vào nồi chiên không dầu Nồi chiên không được đặt đúng cách trong nồi chiên không dầu Vấn đề Nguyên nhân Giải pháp Thời gian nấu quá ngắn Điều chỉnh núm hẹn giờ đến thời gian nấu mong muốn xem Cài đặt trong chương Sử dụng Sản phẩm Một số nguyên liệu cần được đảo trong quá trình nấu Nếu một số nguyên liệu nằm trên hoặc chồng lên các nguyên liệu khác chẳng hạn như khoai tây ch...

Page 37: ...u chiên Khoai tây chiên tươi không được chiên đều trong nồi chiên không dầu Bạn đã không ngâm khoai tây chiên đúng trước khi chiên Bạn đang không sử dụng đúng loại khoai tây Sử dụng khoai tây tươi và đảm bảo rằng chúng không bị vỡ vụn trong quá trình chiên Ngâm các dải khoai tây trong bát ít nhất 30 phút sau đó vớt chúng ra và để trên giấy bếp cho ráo nước Khoai tây chiên làm từ nồi chiên không dầ...

Page 38: ...ên liệu cài đặt theo số lượng nguyên liệu 6 Nồi chiên bắt đầu nấu và nướng 7 Một nửa thời gian nấu trong nồi chiên rút nồi chiên ra và lật mặt thức ăn để làm nóng đều thức ăn 8 Sau đó đặt nồi vào bộ phận chính để bắt đầu nấu không cần chọn thời gian và nhiệt độ nồi chiên có chức năng nhớ tắt nguồn 9 Sau khi nồi chiên nấu xong bạn sẽ nghe thấy âm thanh ding và việc nấu nướng đã hoàn tất 10 Lấy thân...

Page 39: ...lekat Bentangkan menu dan suhu waktu Beralir daripada inlet bentukkan sirkulasi panas udara daripada outlet angin 9 Kabel listrik Sambungkan kabel Model produk Standar pelaksanaan Saiz produk Berat bersih produk Parameter teknis GA E5A IEC 60335 2 9 2019 in conjunction with IEC 60335 1 2010 347x347x373mm Kira kira4 0kg Tegangan ternilai Frekuensi ternilai Daya ternilai Kapasitas 220 240V 50 60Hz 1...

Page 40: ...38 GA E5A IEC 60335 2 9 2008 IEC 60335 1 2010 EN 60335 2 9 2003 A1 2004 A2 2006 A12 2007 A13 2010 EN 60335 1 2012 EN 62233 2008 Test Specifications and Standards ...

Page 41: ...k memastikan mereka tidak memainkan produk ini Pembersihan dan pemeliharaan tidak boleh dioperasikan atau diawasi oleh anak di bawah 8 tahun 6 Ketika produk sudah disambungkan atau sedang didinginkan harus meletakkan produk dan kabel listrik jauh dari jangkauan anak anak di bawah 8 tahun 7 Jangan membiarkan kabel listrik menyentuh permukaan suhu tinggi 8 Jangan menyentuh soket produk atau panel co...

Page 42: ...dapat digunakan lagi harus mencabut steker terlebih dahulu Hanya setelah produk benar benar sudah kembali dingin produk dapat digunakan kembali setelah dikirim ke personel perawatan profesional untuk diperbaiki Perhatian Perlindungan Jika Suhu Terlalu Tinggi Produk ini dilengkapi dengan pengatur waktu Ketika penghitungan waktu mundur ke 0 produk akan berbunyi dan otomatis mati Untuk mematikan prod...

Page 43: ...ở đáy của nồi chiên 7 Một số nguyên liệu cần lật mặt trong quá trình nấu tham khảo phần Cài đặt trong chương này Nguyên liệu cần lật hãy kéo nồi chiên ra khỏi sản phẩm rồi lật lại Trượt nồi chiên vào nồi chiên không dầu Hình 7 8 9 Lưu ý nếu bạn đặt hẹn giờ là một nửa thời gian nấu bạn sẽ nghe thấy chuông kêu hẹn giờ khi bạn cần lật nguyên liệu Tuy nhiên điều này có nghĩa là bạn phải đặt thời gian ...

Page 44: ...42 GA E5A 1 2 3 4 OFF 80 120 160 200 200 5 6 0 30min 30 25 20 15 Min 5 10 0 7 8 9 10 11 12 ...

Page 45: ... bentuknya besar waktu memasak untuk makanan yang ukurannya relatif kecil akan lebih singkat Ketika bahan masakan relatif banyak hanya butuh untuk menambahkan waktu memasak apabila jumlah masakan relatif sedikit maka waktu yangdibutuhkan lebih singkat juga Dalam proses masak bahan relatif kecil dapat dibalikkan untuk meningkatkan efek pemasakan terakhir dan juga bermanfaat untuk kerataan pemanggan...

Page 46: ...15 18 22 10 15 180 180 200 180 180 Menu Minimum Maksimum keberatan g Waktu menit Suhu Informasi tambahan Membalikkan 200 200 200 160 Dim Sum 160 100 400 100 500 100 400 100 400 100 400 8 10 6 10 6 10 10 10 Membalikkan Membalikkan 300 400 400 400 Lumpia Ayam frozen Fillet ikan frozen Sayuran isian Pembakaran Kue Kue telur susu Muffin Dessert Camilan Krim Remah Roti Beku 20 25 20 22 15 18 20 160 180 2...

Page 47: ...i lengket 1 Cabut steker dari soket dinginkan produk Perhatian keluarkan oven panggang dengan begitu Air Fryer akan lebih cepat dingin 2 Mengelap bagian luar produk dengan kain basah 3 Menggunakan air panas sabun dan spons untuk membersihkan pemanggang dan penggoreng Anda bisa menggunakan degreaser untuk membersihkan kotoran yang tersisa Perhatian Penggorengan dan pemanggang boleh dicuci menggunak...

Page 48: ...ryer secara keseluruhan Oven panggang belum terpasang ke air fryer secara tepat Masalah Sebab Cara penyelesaian Waktu masakan terlalu pendek Sesuaikan kenop pengatur waktu untuk waktu masakan mengacu pada Pengaturan dalam Buku Petunjuk Beberapa bahan masakan butuh dibalik dalam proses masak Jika beberapa bahan berada di atas atau bahan lain tumpang tindih Seperti kentang goreng jika ingin membalik...

Page 49: ...i hasil penggorengan Kentang tidak dipanggangkan secara rata dalam Air Fryer Anda belum merendam kentang secara benar sebelum digoreng Anda belum menggunakan jenis kentang yang benar Penggunaan kentang yang segar pastikan tidak akan hancur saat digoreng Rendam kentang sekurangnya 30 menit dalam mangkuk kemudian ambil kertas dapur untuk mengengeringkan Kentang yang dimasak dengan Air Fryer tidak re...

Page 50: ...an dengan jumlah makanan 6 Oven panggang akan mulai memasak 7 Sampai oven panggang operasi dengan setengah waktu balikkan makanan dengan oven panggang agar makanan lebih rata 8 Masukkan kembali oven ke dalam mesin utama mulai memasak lagi Tidak perlu mengatur waktu dan suhu oven panggang mempunyai fungsi memori 9 Sesudah selesai pemanasan akan terdengar bunyi ding dan sudah selesai 10 Keluarkan ov...

Page 51: ......
Page 52: ...UNITED GAIN LIMITED Manufactuer HANGZHOU GLOBAL JET ECOMMERCE CO LTD Address 1 1407 501 2nd Avenue QianTang New Area Hangzhou P R China Telephone 0571 88269187 ...

Reviews: