background image

1.  OPERATION

16

[TX Power]

: Interference may appear on the 

screen when an echo sounder having the 
same frequency as your own is being operat-
ed in the vicinity of your vessel. In this case, 
lower your TX power and contact the vessel to 
request them to reduce their TX power. The 
higher the numeric the greater the TX power. 
The [Auto] setting automatically adjusts TX 
power with depth.

[TX Rate]

: Change pulse repetition rate. Nor-

mally, the highest rate (10) is used. When in 
shallow waters second reflection echoes may 
appear between the surface and actual bot-
tom echo. In this case, lower the TX rate level. 
The setting [MAX] automatically adjusts the 
frequency and pulse length with depth. The 
[S] setting, which requires speed data, selects 
the TX rate according to your boat’s speed. A 
high rate for fast speed; a slow rate for slow 
speed.

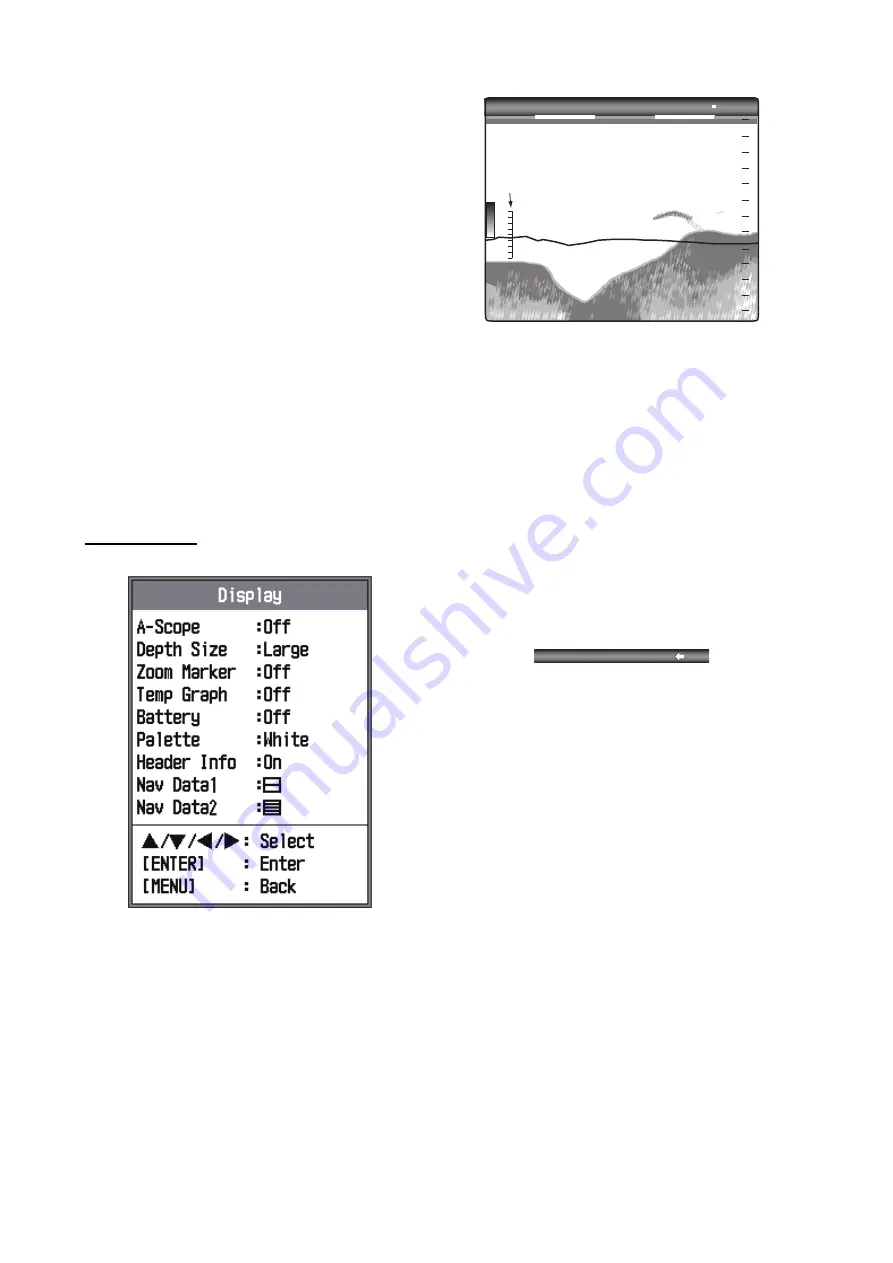
Display menu

[Depth Size]

: Select the font size of the depth 

indication ([Small], [Medium] or [Large]).

[Zoom Marker]

: Turn the zoom marker on or 

off (on the single frequency display) when the 
bottom lock display, the bottom zoom display 
or the marker zoom display is active.

[Temp Graph]

: Turn the water temperature 

graph on or off. The temperature scale range 
is 16°(°F) in [Narrow]; 40°(°F) in [Wide]. Re-
quires water temperature data.

Temperature graph

[Battery]

: Turn the battery voltage indication 

(appears at the top of the screen) on or off. 
When displayed, the battery indication replac-
es the picture advance speed indication.

[Palette]

: Change the background color of the 

screen in six colors: White, Blue, Black, Night, 
Emphasis-BLK and Emphasis-BLU (empha-
sizes medium strength colors).

[Header Info]

: Turn the operational info dis-

play (appears at the top on the screen) on or 
off. 

Note: 

When the header info is off in the dual 

frequency display, it is not known which gain 
(HF or LF) can currently be adjusted. In this 
case, select the frequency with 

W

 (LF) or 

X


(HF), then adjust the gain with the GAIN knob.

[Nav Data1, Nav Data2]

: Set the division con-

figuration of respective displays.

Water temp graph

Water temp scale

x1 

20

40

60

0

0.0

37.2

ft

40

80

70

50

60

AUTO_R                            LF        L:AF

AUTO_R        LF        L:AF 

AUTO_R        LF        L:AF 

x1

x1

Summary of Contents for FCV-288

Page 1: ......

Page 2: ...al is elemental chlorine free FURUNO Authorized Distributor Dealer 9 52 Ashihara cho Nishinomiya 662 8580 JAPAN A APR 2012 Printed in Japan All rights reserved D AUG 08 2014 Pub No OME 23830 D GREG FC...

Page 3: ...s How to discard this product Discard this product according to local regulations for the disposal of industrial waste For disposal in the USA see the home page of the Electronics Industries Alliance...

Page 4: ...tact a FURUNO agent for service Do not maneuver the vessel based on the depth indication alone Grounding can result Do not disassemble or modify the equipment Fire electrical shock or injury can resul...

Page 5: ...re guidelines for handling of the transducer cable Keep fuels and oils away from the cable Locate cable in a safe place Do not paint the cable The sheath of the cable is made of chloroprene rubber or...

Page 6: ...4 1 18 1 Nav data displays 14 1 19 Menu Description 15 2 SYSTEM MENU 18 2 1 How to Display the System Menu 18 2 2 Range Menu 18 2 3 Key Menu 19 2 4 Language Menu 19 2 5 Units Menu 19 2 6 Calib Menu 19...

Page 7: ...you for considering and purchasing FURUNO equipment Features The FURUNO FCV 288 is a dual frequency 50 kHz and 200 kHz Fish Finder Comprised of a display unit and a transducer the FCV 288 displays und...

Page 8: ...hown below with solid line Low Freq Transducer High Freq Transducer Navigation Equipment DISPLAY UNIT CV 288 Power 12 24 VDC Rectifier PR 62 100 110 115 220 230 VAC 1 50 60 Hz Water Temperature Sensor...

Page 9: ...lay mode 3 GAIN Push Opens Auto Gain setting window Rotate Manually adjusts gain 4 FUNC Short press Opens window programmed Long press Opens function key programming window 5 MARK Outputs the position...

Page 10: ...illiance 1 4 Display Mode 1 Rotate the MODE knob to open the mode setting window which is displayed for six seconds 2 Rotate the MODE knob again to select the display mode desired The screen re lated...

Page 11: ...bottom zoom mode expands bottom and bottom fish on the left half window This mode is useful for tracking bottom contour When the bottom depth increases or decreases the display automatically shifts to...

Page 12: ...ays are available Nav Data 1 or Nav Data 2 and you may select the combination of data on the Display menu The default settings are as follows NAV1 Two data display SPEED STW WIND NAV2 Four data displa...

Page 13: ...n page 16 1 6 How to Adjust the Gain How to select the gain adjustment mode The gain may be adjusted automatically Fishing or Cruising or manually In auto matic adjustment the gain is automatically se...

Page 14: ...the low and high frequencies can be set individually on the dual frequency dis play paragraph 1 4 2 Turn off Auto Gain section 1 6 to enable this function Press W to select the LF or X to select HF th...

Page 15: ...Range The basic range and range shift together give you the means to select the depth you can see on the screen The basic range can be thought of as providing a window into the water column and range...

Page 16: ...er of scan lines produced per transmission For example 1 16 means one scan line is produced every 16 transmissions Stop stops picture advancement and is useful for taking a screenshot Current picture...

Page 17: ...tter cannot be adjusted when Fishing or Cruising is selected on the Auto Gain setting window 1 Open the menu select Sounder and press the ENTER key 2 Select Clutter and press the ENTER key 3 Select th...

Page 18: ...er has four fish alarms When the conditions of an alarm are met the audio alarm sounds and the alarm icon flashing appears at the top right corner on the display The audio alarm may be silenced by pre...

Page 19: ...4 To change the name of the alarm select Name and press the ENTER key 5 Enter the name of the alarm Max of eight characters 1 Use S or T to select a character Use S to select a character in numerical...

Page 20: ...key 4 Select Span and press the ENTER key 5 Enter the width for the alarm and press the ENTER key Bottom 1 Set Bottom to On and press the EN TER key 2 Select From and press the ENTER key 3 Set the st...

Page 21: ...n 1 Press and hold down the FUNC key to show the FUNC Key menu 2 Select a function and press the ENTER key 1 17 Position Data To output the position data follow the proce dure below 1 Press the MARK k...

Page 22: ...d wind angle Atmosphericpressure Atmosphericpres sure 1 2 3 4 5 6 7 8 9 Two data display Three data display Four data display Items displayable in 1 3 speed STW wind speed and direction compass headin...

Page 23: ...ttom echo in white The echo color chosen on the color bar is changed to white That color is also white on the color bar To turn off the white marker select Off 3 Press the ENTER key 4 To restore the o...

Page 24: ...arker on or off on the single frequency display when the bottom lock display the bottom zoom display or the marker zoom display is active Temp Graph Turn the water temperature graph on or off The temp...

Page 25: ...you set the Data Box 1 Bearing Select the bearing sensor True for gyrocompass satellite compass Mag netic for magnetic compass Wind Spd Dir Select the format of wind speed and direction output from a...

Page 26: ...d whenever the depth unit is changed Therefore change the depth unit before changing the preset ranges Available range for Range 1 to Range 8 16 to 9 000 ft Zoom Range Select the range to zoom in the...

Page 27: ...required 2 6 Calib Menu Draft The default depth display shows the distance from the transducer If you would rather show the dis tance from the sea surface set your ship s draft Gain ADJ HF Gain ADJ LF...

Page 28: ...e Rejec tor is turned on For a long tail increase the value If the transmission line does not disap pear lower the TX power Bottom Detect In some in stallations the tail of the TX line or the echo aft...

Page 29: ...lso do not use degreaser or anti fog solution on the LCD as they can strip the coating on the LCD 3 3 Transducer Main tenance Marine life on the face of the transducer will result in a gradual decreas...

Page 30: ...an result in fire and damage the equipment If Then check the screen is blank adjust the brilliance neither echo nor fixed range scale appears battery voltage fuse power cable connection breaker no ech...

Page 31: ...b The indication goes higher with clockwise rotation lower with counter clockwise rotation Press the knob The knob s corresponding on screen circle lights in red if the knob is normal Press the knob a...

Page 32: ...restore default menu settings and re set the odometer trip distance indication as follows 1 Open the menu and select Restore un der System and press the ENTER key 2 Select Default Setting or Odometer...

Page 33: ...ay Unit Cable MJ A6SPF0003 050C 000 154 054 10 One end 6 pin 5 m for navigator CO SPEVV SB C 2Px0 2 LF 000 111 680 10 5 m 000 120 792 10 10 m 000 120 793 10 15 m Water temperature sensor T42 000 026 8...

Page 34: ...B 1100 2 T 693 F 3k 3k 50 200 Steel 50BL 24HR 200B 12H TFB 7000 2 T 683 FRP TRB 1100 2 T 683 F 1k 50 Steel 50B 6 6B TFB 5000 1 T 605 FRP TRB 1000 1 T 605 F Steel 50B 9B TFB 5000 1 T 603 FRP TRB 1000 1...

Page 35: ...witchboard Preparation for installation 1 Open the back cover The power cable and water temperature speed sensor ca ble are tied to a plate with cable ties Cut the cable tie which binds the power cabl...

Page 36: ...nsor does not have to be installed perfectly perpendicular The sensor must not be located where it might get damaged in dry docking operation Select a place apart from equipment generating heat Select...

Page 37: ...VDC Rectifier PR 62 100 110 115 220 230 VAC 1 50 60 Hz IV 2 0sq High MJ A6SPF0003 050C Display unit rear panel Grounding wire As short as possible Connect to a dedicated breaker in the mains switchboa...

Page 38: ...power cables to prevent interference Connect the cable to the transducer port for high frequency and or low frequency at the rear of the display unit Fabricate the cable as below BATTERY Cable connec...

Page 39: ...re to hole 4 Release opener 5 Pull the core to confirm that it is tightly fastened Opener Large one for transducer port Small one for NMEA port 200kHz 50kHz WAGO connectors for transducer type setting...

Page 40: ...00B 12H 3 C E D C B A Tap setting plug for high frequency 200 kHz ONLY Tap setting plug for low frequency 50 kHz ONLY Set this end in applicable slot according to alphabet indication Jumper connection...

Page 41: ...a surface DBT Depth below transducer DPT Depth below transducer and offset MTW Water tempera ture Output only when Temp Source of Data menu is set to Own and data from a water tem perature sensor is i...

Page 42: ...em of the NMEA menu NMEA0183 Choose NMEA0183 version of navigation equipment connected to the NMEA port among Ver 1 5 Ver 2 0 or Ver 3 0 TLL Output Output the position selected by the MARK key to the...

Page 43: ...uto High Medium Low Off Color Erase 0 50 0 Clutter 0 100 0 White Line 0 100 Edge 0 White Marker TVG Low Medium High Smoothing Off On TX Power Auto 10 100 TX Rate 1 10 S Max 10 ALARM1 ALARM3 fish alarm...

Page 44: ...7 16 9000 ft 1600 ft Range 8 16 9000 ft 3000 ft Zoom Range 16 600 ft 30 ft BL Range 16 600 ft 30 ft Key FUNC Key Pic Advance Shift Interference Clutter Color Erase White Line White Marker TVG Key Beep...

Page 45: ...AP 3 APPENDIX 2 T42 AND T80 TEMPERATURE SENSORS The following pages of this appendix provide a copy of the installation instructions for AIRMAR temperature sensors T42 and T80...

Page 46: ...e cable tag for future reference Part No _________________Date___________ Follow the precautions below for optimal product performance and to reduce the risk of property damage personal injury and or...

Page 47: ...nsducer cable from other electrical wiring and the engine Coil any excess cable and secure it in place with cable ties to prevent damage 2 Refer to the instrument owner s manual to connect the transdu...

Page 48: ...plastics possibly damaging the sensor Reapply anti fouling paint every 6 months or at the beginning of each boating season Replacement Sensor Parts The information needed to order a replacement senso...

Page 49: ...4 Copyright 2014 Airmar Technology Corp All rights reserved 35 Meadowbrook Drive Milford New Hampshire 03055 4613 USA www airmar com AP 7...

Page 50: ...ce and to reduce the risk of property damage personal injury and or death WARNING Always wear safety goggles and a dust mask when installing WARNING Below the waterline mount When the boat is placed i...

Page 51: ...1 8 drill bit drill a pilot hole s at the marked locations 10mm 3 8 deep 9 Apply marine sealant to the threads of the screw s to prevent water from seeping into the transom 10 Fasten the cable clamp s...

Page 52: ...tom lock expansion Bottom zoom Marker zoom 2 8 Picture advance speed 7 steps Lines TX Stop 1 16 1 8 1 4 1 2 1 1 2 1 4 1 Synchronize w ship s speed 2 9 Alarm Fish Normal Bottom Water temperature Bottom...

Page 53: ...R ASSY 2 734206 1JP 18 L50 000 167 274 10 NYLON CABLE TIE 5 CV 120L 999 999 171 00 TERMINAL OPENER 1 231 131 000 165 800 11 TERMINAL OPENER 1 734 230 000 147 417 10 DOCUMENT OPERATOR S MANUAL CD 1 1 F...

Page 54: ...D 1 27 Apr 2012 Y NISHIYAMA...

Page 55: ...00 L TD_200 H BLK RED BLK RED LOW HIGH TRANSDUCER NC NC 1 2 3 4 TB2 5 NMEA1_TD A NMEA1_TD B NMEA1_RD A NMEA1_RD B SHIELD TEMP SENSOR 8m ST 02MSB ST 02PSB 10m 2 TEMP SPEED SENSOR 1 2 3 4 5 6 MJ A6SPF P...

Page 56: ...Gain adjustment 5 GAIN knob 5 H Header info 16 HF display 2 I Interference 8 K Key menu 19 L Language menu 19 LCD test 24 LF display 2 M Maintenance 21 Marker zoom display 4 MODE knob 2 N Nav data dis...

Reviews: