


2-14
Chapter 2 Installation
Acquiring the Date and Time
Check the date and time at the bottom right of the home display and set the correct date and time if they are not correct.
If the date/time becomes incorrect although the correct date/time is set, the built-in battery may have reached the
expiration date. Replace the battery as soon as possible. (Refer to "Replacing the Clock Battery" (P12-10) .)
1
Touch the [Menu] button on the touch
panel.
2
When the "Menu" display appears,
touch [Maintenance].
3
When the "Maintenance" display
appears, touch [Set Time/Date].
4
Check that the date and time are
correct.
If correct, proceed to step 9, and if incorrect, proceed to
step 5.
If the device is already connected to the network and the
date and time can be obtained from the NTP server, the
date and time can be set automatically by touching
[Acquire Time/Date from NTP Server].
It is possible to automatically obtain the date and time
from the NTP server each time the device is turned ON
by placing a check mark for [Acquire Automatically on
Power On].
5
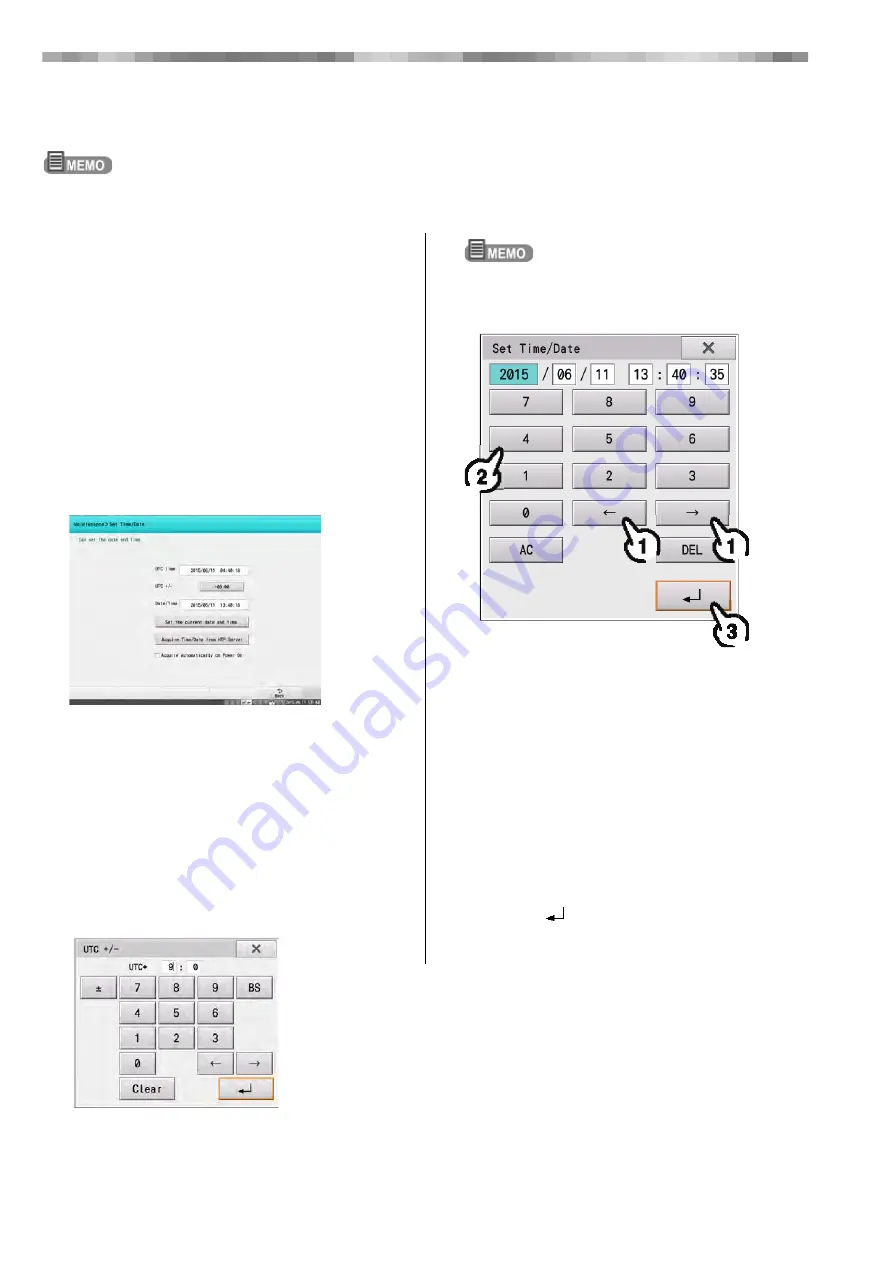
Set the time difference between UTC.
Touch the box for "UTC+".
Enter the time difference between UTC.
Touch [±] to switch between [+] and [-].
The default setting is "+9:00".
6
Set the current date and time.
1)
Touch [
←
] and [
→
] to select the item to be
changed.
2)
Enter the current date and time.
• [0] - [9]:
Enters the numbers.
• [AC]:
Clears all entered numbers
• [DEL]:
Clears the number immediately before (to the
left of) the cursor.
• [
←
]/[
→
]:
Changes the item to be entered.
3)
Touch [
].
Touching [x] will close the "Set Time/Date" window
without saving the changes.
7
After the settings have been configured,
press [Back] twice and then press the
[HOME] on the display unit.
Summary of Contents for VaSera VS-2000 Series
Page 4: ......
Page 22: ...18 ...
Page 134: ...6 10 Chapter 6 Blood Pressure and Pulse Wave Examination Simple Mode ...
Page 140: ...7 6 Chapter 7 Blood Pressure and Pulse Wave Examinations Other Functions ...
Page 172: ...9 22 Chapter 9 File Transfers Communication History ...
Page 176: ...10 4 Chapter 10 Recording Daily Reports ...
Page 214: ...12 12 Chapter 12 Maintenance and Inspection ...


