


14-18
Chapter 14 Troubleshooting
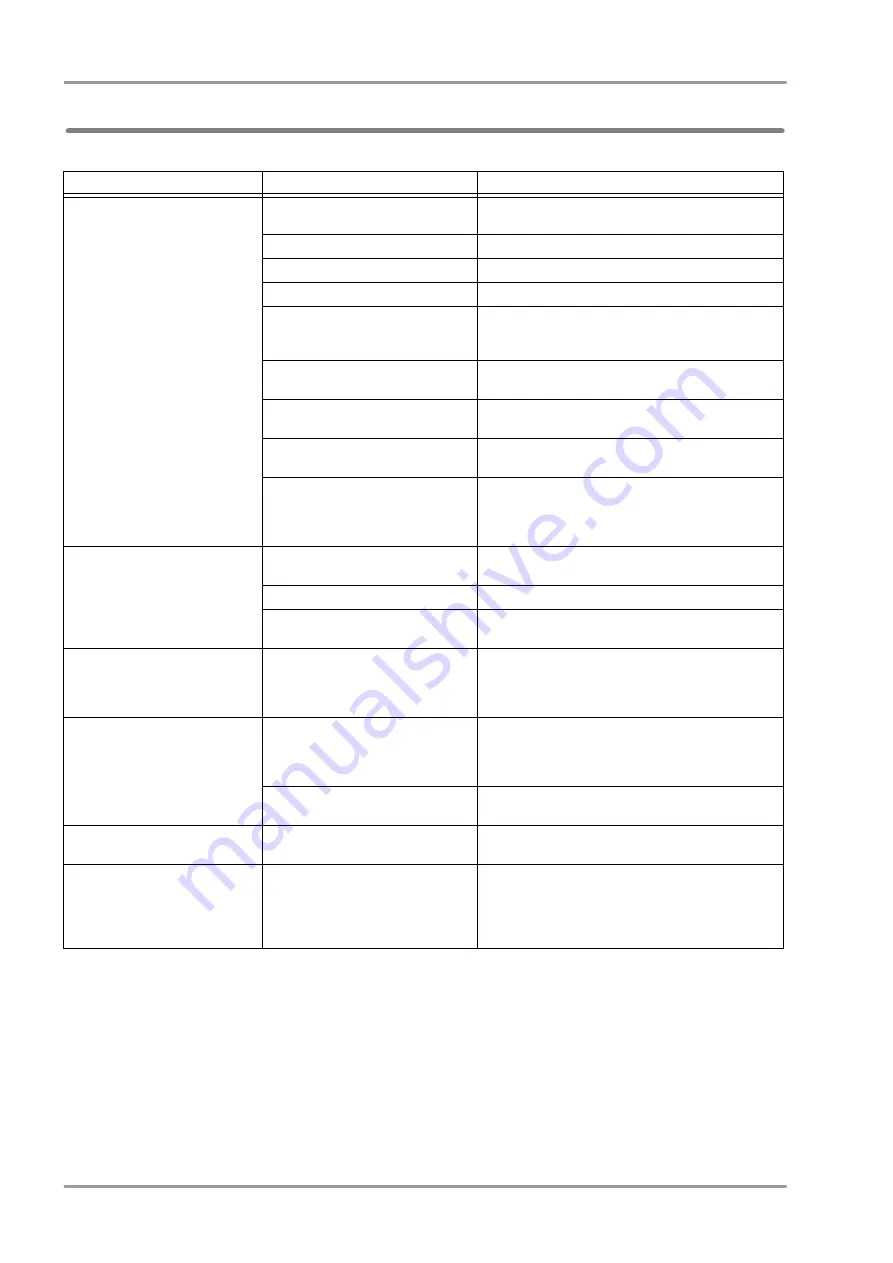
Troubleshooting
Laser Printer
Situation
Cause
Solution
The data is not output to the laser
printer.
The paper cassette is not firmly closed. Close the paper cassette.
The paper cassette is empty.
Install the paper in to the paper cassette.
Printer cable is disconnected.
Connect the printer cable.
Printer is set to offline mode.
Set the printer to online mode.
HUB failure has occurred.
Check the LED on the HUB if it is properly
communicating. If the LED is not lighted, contact your
nearest service representative.
Other monitor is in process of printing. Suspend the ongoing printing or wait until the printing is
complete.
The network setup for the laser printer
is not performed.
Contact your nearest service representative.
The MAC address, IP address setting
of the printer is incorrect.
Set the correct MAC address, IP address and restart the
printer.
The network board of the laser printer
is malfunctioning.
Check if any error message or error code is displayed on
the printer LCD.
If displayed, contact your nearest service
representative.
The data cannot be output to the
printer.
Printer cable is disconnected.
Connect the printer cable.
Printer is set to offline mode.
Set the printer to online mode.
Printer is in sleep mode.
Change the printer setting so that it will not enter into
sleep mode.
Printer output does not stop.
Printing operation was performed too
frequently.
Wait until the printing is complete.
Or, deleted the stacked data.
Do not turn off the power of the printer during printing as
it may cause a printing error.
The printed output is incomplete or
frame only.
The printer cover or paper cassette
was opened during printing, or the
printer was left out of paper for a
certain time.
Do not open the cover or paper cassette during printing.
Also, supply new pad of paper immediately when the
paper is out.
The system was restarted during
printing.
Do not restart the system during printing.
Printer output is garbled.
The power of the printer was reset
during printing.
When resetting the printer power, it should be done after
the printing is complete.
The [Print] key does not function.
The stacked data has reached the
maximum quantity (64).
Wait until the quantity of stacked data decreases.
Or, press the [Cancel Printing] key displayed at the
lower part of the home display to delete the stacked
data.
(
Summary of Contents for DYASCOPE 8000 Series
Page 1: ......
Page 2: ......
Page 12: ...Contents ...
Page 20: ...Contents ...
Page 44: ...1 2 Chapter 1 General Description Contents ...
Page 50: ...2 2 Chapter 2 Name of Parts and Their Functions Contents ...
Page 54: ...2 4 Chapter 2 Name of Parts and Their Functions ...
Page 56: ...3 2 Chapter 3 Description of the Display Contents ...
Page 70: ...4 2 Chapter 4 Basic Operation Contents ...
Page 82: ...5 2 Chapter 5 Preparation Contents ...
Page 88: ...5 6 Chapter 5 Preparation Nurse Call Daily Check ...
Page 90: ...6 2 Chapter 6 Admit Discharge Contents ...
Page 110: ...7 2 Chapter 7 Alarm Function Contents ...
Page 138: ...8 2 Chapter 8 Parameter Setup Contents ...
Page 164: ...8 26 Chapter 8 Parameter Setup Parameter ON OFF ...
Page 166: ...9 2 Chapter 9 Data Review Contents ...
Page 190: ...10 2 Chapter 10 Waveform Review Contents ...
Page 206: ...11 2 Chapter 11 Calculation Contents ...
Page 212: ...12 2 Chapter 12 Printing Contents ...
Page 230: ...13 2 Chapter 13 Menu Items Contents ...
Page 270: ...13 40 Chapter 13 Menu Items Nurse Team Setup ...
Page 272: ...14 2 Chapter 14 Troubleshooting Contents ...
Page 296: ...14 24 Chapter 14 Troubleshooting Troubleshooting ...
Page 298: ...15 2 Chapter 15 Setup Item Default Value Contents ...
Page 320: ...15 22 Chapter 15 Setup Item Default Value Menu Central Monitor Display ...
Page 322: ...16 2 Chapter 16 Accessories Contents ...
Page 326: ...16 4 Chapter 16 Accessories Optional Accessories ...
Page 328: ...17 2 Chapter 17 Specification Contents ...
Page 342: ...17 14 Chapter 17 Specification Technical Information ...
Page 347: ......
Page 348: ......
Page 349: ......