background image

Technical data

Operating temperature

5 °C .... 35 °C / 41 °F .... 95 °F

Transport temperature (2K2)

–15 °C .... 60 °C / 5 °F .... 140 °F

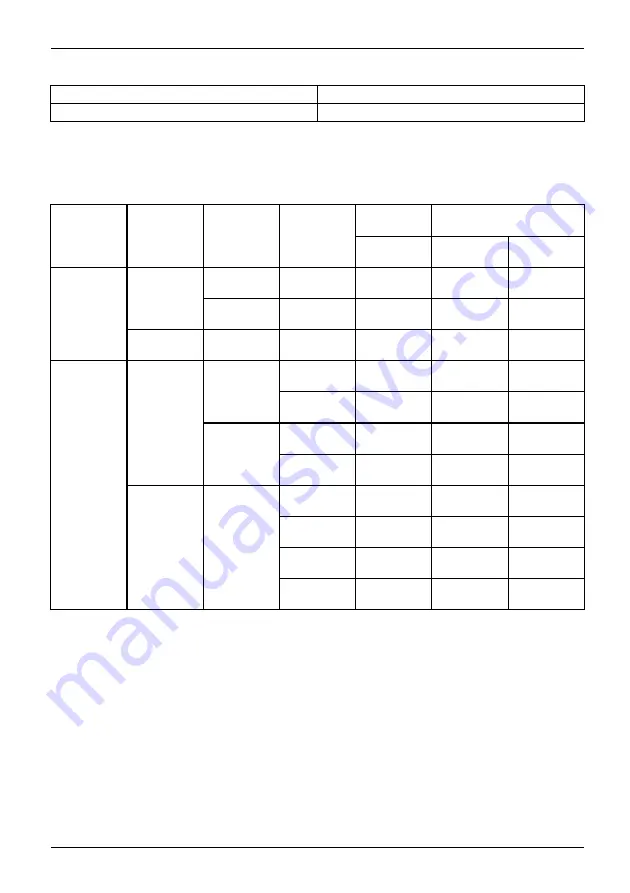
Screen resolutions for integrated screen
and external screens

System
interface

Ports on the cradle

Max.
number of
screens

Number of
external
screens

Inte-
grated
screen

Display
Port

VGA

Display
Port

0

1920x1280

@60Hz

-

-

-

1

1

-

3840x2160

@60Hz

-

-

Only Tablet
PC

2

1

1920x1280

@60Hz

3840x2160

@60Hz

-

-

1920x1280

@60Hz

-

1920x1200

@60Hz*

-

1

1920x1280

@60Hz

-

-

1920x1200

@60Hz*

-

3840x2160

@60Hz

1920x1200

@60Hz*

-

2

2

-

3840x2160

@60Hz

-

1920x1200

@60Hz*

1920x1280

@60Hz

3840x2160

@60Hz

1920x1200

@60Hz*

-

1920x1280

@60Hz

3840x2160

@60Hz

-

1920x1200

@60Hz*

1920x1280

@60Hz

-

1024x768

@60Hz

1024x768

@60Hz

with cradle

3

2

-

3840x2160

@60Hz

1024x768

@60Hz

1024x768

@60Hz

* with reduced blanking

Fujitsu

77

Summary of Contents for STYLISTIC V727

Page 1: ...System Operating manual FUJITSU Tablet STYLISTIC V727 ...

Page 2: ...e found on the Internet at http www fujitsu com fts You can find driver updates at http support ts fujitsu com download Should you have any technical questions please contact our Hotline Service Desk http support ts fujitsu com contact servicedesk Your sales partner Your sales office We hope you enjoy working with your new Fujitsu system ...

Page 3: ......

Page 4: ...ujitsu Technology Solutions GmbH Mies van der Rohe Straße 8 80807 Munich Germany http www fujitsu com fts Copyright Fujitsu Technology Solutions GmbH 2018 All rights reserved Publication Date 06 2018 Order No A26391 K480 Z320 1 7619 edition 1 ...

Page 5: ... Important notes 12 First time setup of your device 16 Working with the Tablet PC 19 Accessories for your Tablet PC optional 39 Security functions 50 Connecting external devices 59 Settings in BIOS Setup Utility 64 Troubleshooting and tips 67 Technical data 76 Manufacturer s notes 80 Index 81 ...

Page 6: ...ed trademarks of Microsoft Corporation in the USA and or other countries HDMI and High Definition Multimedia Interface are trademarks or registered trademarks of HDMI Licensing LLC s Bluetooth and the Bluetooth logo are registered trademarks of Bluetooth SIG Inc Adobe Reader is a trademark of Adobe Systems Incorporated USB Type C and USB C are trademarks of the USB Implementers Forum in the USA and...

Page 7: ...ing with the Tablet PC 19 Status indicators 19 Switching on the Tablet PC 21 Programming the ON OFF button 21 Switching the Tablet PC off 22 Handwriting recognition 22 Touch screen 22 Select display orientation portrait or landscape orientation 23 Using fingers 24 Calibrating the monitor for pen or finger tip input 24 Using the stylus pen 24 Pen position 26 Energy saving functions of the pen 26 Char...

Page 8: ...y lock cradle only 51 Configuring password protection in BIOS Setup Utility 52 Protecting BIOS Setup Utility supervisor and user password 52 Password protection for booting of the operating system 53 Password protection for the hard disk 54 SmartCard reader depending on configuration 55 Inserting the SmartCard 56 Trusted Platform Module TPM depending on configuration 57 Enabling TPM 57 Disabling TPM ...

Page 9: ... 70 The Tablet PC stops working 70 The printer does not print 71 The wireless connection to a network does not work 71 The battery discharges too quickly 71 SmartCard reader is not recognised 72 SmartCard PIN forgotten 72 SmartCard lost 72 Acoustic warnings 72 Error messages on the screen 73 Restoring the system under Windows 10 75 Technical data 76 Tablet PC 76 Screen resolutions for integrated s...

Page 10: ...Contents 6 Fujitsu ...

Page 11: ...authorised use Information on the connections and controls for your Tablet PC can be found in chapter Ports and controls Page 9 Further information The Windows drivers for your device can be found on our Internet site The factory installation of your device does not support any other operating system Fujitsu Technology Solutions accepts no liability whatsoever if any other operating system is used...

Page 12: ...me123 or a command used to start a program start exe This font indicates information that is displayed on the screen by a program e g Installation is complete This font indicates terms and texts used in a software interface e g Click on Save names of programs or files e g Windows or setup exe This font indicates cross references to another section e g Safety information cross references to an exter...

Page 13: ...d connections Please familiarise yourself with these components before you start to work with the device Front 1 11 7 2 9 9 4 3 5 5 6 10 8 7 8 1 Power indicator 2 Touchscreen 3 Camera LED 4 Ambient light sensor 5 Microphone 6 Camera 7 Loudspeaker 8 Mechanical fixture for cradle 9 Mechanical fixture for magnetic keyboard 10 Docking port 11 Alignment marking Fujitsu 9 ...

Page 14: ...cator 5 Memory card slot 6 Combined headphone and microphone port 7 DC input connector DC IN Right side 2 3 4 5 7 8 6 1 1 SmartCard slot configuration dependent 2 Shortcut button 3 Volume down button 4 Volume up button 5 ON OFF button 6 USB 3 1 Gen1 port with charging function USB Type C 7 USB port 3 0 USB Type A 8 Pen slot 10 Fujitsu ...

Page 15: ...ngerprint sensor configuration dependent 2 Eyelet for pen tether top of device 3 Camera LED 4 Camera 5 Camera light 6 Battery release slider 7 Battery compartment with SIM card slot under the battery SIM card slot configuration dependent Fujitsu 11 ...

Page 16: ...ded in the Safety Regulations manual This Tablet PC complies with the relevant safety regulations for data processing equipment If you have questions as to whether you can set up the Tablet PC in the intended environment please contact your sales point or our hotline help desk Additional safety notes for devices with wireless components Wirelesscomponent WirelessLAN Bluetooth safetynotes If a wire...

Page 17: ...with a heavily soaked cloth Do not place items on the top of the screen or damage may occur During normal use of the device small particles from the environment can become embedded in the pen tip and scratch the screen The warranty does not cover a scratched screen Energy saving Notes Energy Energysaving Switch off your Tablet PC if you do not need to use it Switch off connected external devices i...

Page 18: ...ains voltage If this is not the case obtain the appropriate mains adapter for your Tablet PC Do not use any other voltage converter Check whether the local mains voltage and the power cable are compatible If this is not the case buy a power cable that matches the local conditions Ask the appropriate government office for your travel destination whether you may use your Tablet PC with its installed ...

Page 19: ...sensitive to scratches Only clean the display surface with a very soft slightly damp cloth Switch the Tablet PC off Cleaning Notes TabletPC Keyboard Touchpad Touchscreen To prevent the device switching on unintentionally disconnect the mains plug of the mains adapter from the mains socket and remove the rechargeable battery see chapter Removing and installing the battery Page 31 The casing surface...

Page 20: ...h off your device during the first time setup process On delivery the battery can be found in the battery compartment or in the accessories kit The battery must be charged if you want to operate your device using the battery When used on the move the built in battery provides the device with the necessary power You can increase the operating time by using the available energy saving functions For i...

Page 21: ...urface Please note that the rubber feet of the device may mark certain types of delicate surfaces Keep other objects at least 100 mm 4 inches away from the device and its mains adapter to ensure adequate ventilation Do not expose the device to extreme environmental conditions Protect the device against dust moisture and heat Mains adapter connecting Preparingforoperation Mainsadapter Observe the s...

Page 22: ... to use your device for the first time the operating system is pre installed on the hard disk 2 1 Press the ON OFF button 1 for about one second to switch the device on The power on indicator 2 lights up as long as the system is switched on During installation follow the instructions on screen If a Windows operating system is installed on your device you will find more information on the system and ...

Page 23: ...ow to connect external devices e g mouse flash memory to the Tablet PC in the chapter Connecting external devices Page 59 Please refer to the notes in Important notes Page 12 Status indicators Statusindicators Symbols The status indicators 1 2 3 provide information about the condition of the power supply the rechargeable battery and the wireless components 2 3 1 1 Fujitsu 19 ...

Page 24: ...s than 90 the battery will be charged to 100 as soon as the mains adapter is connected The indicator light is orange The battery is being charged The indicator is not lit The battery is not being charged the battery is already more than 90 charged or the mains adapter is not connected 3 Wireless components indicator The indicator lights up white The wireless components are switched on while the Ta...

Page 25: ... lights up as long as the system is switched on Programming the ON OFF button You can program the ON OFF button Operating system Menu Windows 10 Control Panel Hardware and Sound Power Options If you have assigned a password you must enter this when requested to do so in order to start the operating system Detailed information can be found in the chapter Security functions Page 50 Fujitsu 21 ...

Page 26: ...ns for integrated screen and external screens Page 77 High quality LCD screens TFT are installed in Fujitsu Tablet PCs For technical reasons these screens are manufactured for a certain resolution An optimum and sharp image can only be ensured with the resolution intended for the particular screen A screen resolution which differs from the specification can result in an unclear image The screen res...

Page 27: ...Control Panel System and Security Power Options Change plan settings Change advanced power options Display Activate adaptive brightness setting Synchronising the display on the touchscreen and an external monitor In Windows 10 you can proceed as follows to set the output type Wipe your finger over the screen starting from the right hand edge Select All settings Look for the keyword project Select t...

Page 28: ...tem Menu Windows 10 To calibrate call up the Hardware and Sound Tablet PC Settings function in the Control Panel You need to calibrate both portrait and landscape formats Using the stylus pen Pen 2 3 5 4 1 1 pen tip 2 pen button delete function 3 pen button right mouse button 4 charging contacts 5 eyelet for optional pen strap You can use the pen on your Tablet PC as an electronic writing implemen...

Page 29: ...e the pen tip may react as though it is constantly being pressed down To avoid damage the pen should be stored in the slot when not in use The pen can be influenced by electromagnetic fields cursor quivers or jumps There may be a few areas on the screen where the cursor quivers slightly in spite of pressing the pen down firmly The screen responds to entries made with the tip of the finger or the pen w...

Page 30: ...de The pen automatically returns to normal operating mode after the next contact with the pen tip Charging the pen battery The pen contains an integrated battery which is automatically charged when the pen is fully inserted into its slot The pen is also charged when the Tablet PC is in power saving mode or is switched off A charging time of approximately 15 seconds is sufficient to enable to pen to...

Page 31: ...ossible You should also always repeat the calibration if the co ordination between the pen and cursor movement deteriorates Operating system Menu Windows 10 To calibrate call up the Hardware and Sound Tablet PC Settings function in the Control Panel You need to calibrate both portrait and landscape formats Securing the pen tether optional You can attach the pen with an optional pen tether to preve...

Page 32: ...scription Functions 2 Volume up button Increase the volume 3 Volume down button Decrease the volume 4 Shortcut button Start function manager or screen shot function If the ON OFF switch of the Tablet PC is pressed in combination with the volume down button this corresponds to the function of the key combination Ctrl Alt Del on a keyboard 28 Fujitsu ...

Page 33: ...pends on the lighting conditions and the software being used You can only use the camera with a particular application e g an Internet telephony program or a video conferencing program which supports a camera When using the camera the Tablet PC support must not shake The camera automatically adjusts itself to the current light level For this reason the touchscreen may flicker while the light level ...

Page 34: ...g alarm If you do not connect the mains adapter within five minutes of the warning alarm described above your Tablet PC will switch off automatically monitoring the battery charging level Battery Batterystatusmeter In the system bar status display there is a battery symbol shown for monitoring the battery capacity The battery symbol shows you the battery charge If you place the mouse cursor over th...

Page 35: ...he safety information in chapter Important notes Page 12 Remove the power plug from the mains outlet Switch off the tablet PC The device must not be in energy saving mode Remove all the cables from the device Turn the device over and place it on a stable flat and clean surface If necessary place a slip resistant cloth on this surface to prevent the device from being scratched 2 1 3 Slide the batter...

Page 36: ...ery in the battery compartment 1 Slide the battery release in the direction of the arrow 2 The battery is now secured in place Turn the Tablet PC the correct way around again and place it on a flat surface Reconnect the cables that were previously disconnected 32 Fujitsu ...

Page 37: ...re held in the main memory or in a swap file on the hard disk Never switch off the Tablet PC while it is in a power saving mode If the built in battery is nearly flat close the open files and do not go into power saving mode If you do not intend to use your Tablet PC for a long period of time Exit the power saving mode if necessary via touching the screen or by switching on the Tablet PC Close all op...

Page 38: ...herwise the delicate contact surfaces could be damaged Memorycard Removing the memory card Memorycard To avoid any loss of data always follow the correct procedure for removing the card see the documentation for your operating system 2 1 a Press the edge of the memory card so that the memory card jumps 1 slightly out of the slot a Pull the memory card out of the slot a in the direction of the arro...

Page 39: ...lease note that the SIM card format must be nano SIM 4FF Other SIM card formats such as full size 1FF mini SIM 2FF or micro SIM 3FF do not fit in the SIM card slot of your Tablet PC Please do not insert any other format of SIM card as they could jam or could even damage the system Inserting the SIM card Remove the battery see Removing the battery Page 31 1 3 2 Pull the SIM card holder out of the sl...

Page 40: ...he battery see Removing the battery Page 31 1 3 2 Pull the SIM card holder out of the slot 1 Remove the SIM card from the SIM card holder 2 Slide the SIM card holder back into its slot 3 Install the battery again see Installing the battery Page 32 36 Fujitsu ...

Page 41: ...ntation for your operating system Access via LTE If you ordered an integrated LTE module with your system you can fully enjoy optimum reception and maximum energy efficiency without the hassle of cables or antennae An installed LTE module is ready for immediate use If you did not order an LTE module you can purchase the accessories for LTE reception from your retailer or your Fujitsu Technology Sol...

Page 42: ... cable to the LAN port of the accessory 1 Connect the network cable to your network connection 2 Your network administrator can help you to configure and use the LAN connections The network cable is not included in the delivery scope This type of cable can be obtained from a specialist dealer Use a shielded network cable CAT 5e GPS GPS Whether your device has this function or not depends on the dev...

Page 43: ...ollowing accessories are available for your Tablet PC Cradle for charging the Tablet PC and with additional ports Magnetic keyboard Flip cover stand USB LAN adapter cable Adapter cable USB Type C HDMI The following sections provide more information on handling the accessories Fujitsu 39 ...

Page 44: ...t PC 4 USB 3 0 port Type A 5 VGA video graphics array screen connection 6 Display port HDMI port 7 LAN port 8 Security Lock Device 9 DC input connector DC IN The status LED 2 of the cradle lights up as soon as the Tablet PC is connected to the cradle even if the Tablet PC is switched off Setting up the cradle Select a suitable location for the cradle before setting it up Follow the instructions be...

Page 45: ... Remove the power plug of the mains adapter from the mains socket Pull the mains adapter cable out of the DC jack DC IN of the Tablet PC 2 4 1 3 Position the Tablet PC so that it lies on the surface of the tray on the cradle Push the tablet PC onto the cradle in the direction of the arrow 1 until you feel it engage in the connector and until the release button has returned to its original position...

Page 46: ...rate the Tablet PC from the cradle during operation 2 1 Push the release button in the direction of the arrow 1 until it remains in the pressed position red marking becomes visible While holding the bottom part of the cradle lift the Tablet PC away from the cradle in the direction of the arrow 2 42 Fujitsu ...

Page 47: ...2 Function Lock indicator execute Fn functions by directly pressing the keys 3 Num Lock indicator switch virtual keypad on and off 4 Caps Lock indicator switch upper case writing function on and off 5 Scroll Lock indicator scroll function depends on application program A microfibre cloth is provided with your magnetic keyboard To protect your Tablet PC s touchscreen we recommend placing the microfib...

Page 48: ...o that the docking ports of the Tablet PC and the magnetic keyboard approach in the direction of the arrow 1 and the magnetic connection clicks into place Connect the mains adapter cable to the DC input connector DC IN on the Tablet PC 2 Connect the mains cable to the mains adapter 3 Plug the mains cable into the mains socket 4 44 Fujitsu ...

Page 49: ...oard in the direction of the arrow 1 Flip Cover Stand optional With the Tablet PC installed in the flip cover stand you can use it in the upright position by itself or together with a magnetic keyboard When it is folded over the flip cover stand serves as a protective cover for the Tablet PC and magnetic keyboard The flip cover stand contains magnets Please take into account the safety information in...

Page 50: ... the touchscreen The flip cover stand has an adhesive surface on the inside for securing the Tablet PC Only separate the flip cover stand from the Tablet PC in exceptional circumstances because otherwise the permanent adhesive ability will be reduced Insert the Tablet PC into the flip cover stand Switch the Tablet PC off before attaching the flip cover stand Remove the mains adapter the magnetic keybo...

Page 51: ...bjects become trapped between the Tablet PC and the flip cover stand 2 2 3 Apply the Tablet PC to the edge of the flip cover stand as shown 2 Place the Tablet PC down on the flip cover stand 3 Carefully lift the Tablet PC and flip cover stand and check that they are firmly connected together When required the Tablet PC and flip cover stand can be connected to the magnetic keyboard optional Fujitsu 47 ...

Page 52: ...Accessories for your Tablet PC optional The following illustration shows you the many ways in which the cover can be used 48 Fujitsu ...

Page 53: ...gnetic keyboard 2 2 1 Move the Tablet PC into the upright position with the aid of the flip cover stand 1 Position the Tablet PC so that the docking ports of the Tablet PC and the magnetic keyboard approach in the direction of the arrow 2 and the magnetic connection clicks into place Fujitsu 49 ...

Page 54: ...tting your password you may be locked out and unable to access your data Therefore please note the following information Back up your data on external data carriers at regular intervals Some security functions need you to choose passwords Make a note of the passwords and keep them in a safe place If you forget your passwords you will need to contact the our Service Desk Deletion or resetting of pa...

Page 55: ... order to be able to use the fingerprint sensor 1 The current Workplace Protect software for the fingerprint sensor can be found on the Internet at http www fujitsu com fts solutions business technology security secure index html Using the security lock cradle only SecurityLock Anti theftprotection SecurityLock Your cradle optional is equipped with a security device for a Kensington lock cable You c...

Page 56: ... functions of the BIOS Setup Utility while the user password will only give you access to some of the functions You can only set up a user password if a supervisor password has already been assigned Please refer to section Settings in BIOS Setup Utility Page 64 for a description of how to call up and operate the BIOS Setup Utility Setting supervisor and user password Start the BIOS Setup Utility a...

Page 57: ...d and the password is cancelled Removing the supervisor password simultaneously deactivates the user password Password protection for booting of the operating system With the supervisor password you have set in the BIOS Setup Utility see section Setting supervisor and user password Page 52 you can also prevent starting of the operating system Operatingsystem Activating system protection Start the ...

Page 58: ...firm that the new password has been saved The field Password Entry on Boot is set to Enabled by default You can exit the BIOS Setup once you have finished changing the settings From the Exit menu choose the option Exit Saving Changes Press the Enter key and select Yes The Table PC reboots and your hard disk is now protected with a password The password prompt is enabled as soon as the Tablet PC has r...

Page 59: ...ing your e mails or for home banking We recommend that you always use two SmartCards Always keep one of the SmartCards in a safe place if you are carrying the other SmartCard with you In order to be able to take advantage of all the security features of your Tablet PC you will need a CardOS SmartCard from Fujitsu The SmartCard can only be used with a PIN offering maximum protection even if you los...

Page 60: ...evice may be equipped with a SmartCard reader Do not use force when inserting and removing the SmartCard Make sure that foreign objects do not fall into the SmartCard reader 1 Push the SmartCard into the SmartCard reader 1 with the chip towards the front of the Tablet PC 56 Fujitsu ...
Page 61: ...to delete the holder in the TPM By clicking on Enabled all secret keys e g SRK Storage Root Keys AIK Attestation Identity Keys etc generated by applications are deleted Please note that you will then no longer be able to access the data you have encrypted with the keys based on that holder In the Exit menu choose the option Exit Saving Changes Press the enter key and select Yes The tablet PC resta...

Page 62: ... BIOS Setup Call BIOS Setup and select the Advanced menu Mark Boot Configurations and press the enter key From the UEFI Boot On Screen Keyboard selection choose the option Enabled In the Exit menu choose the option Exit Saving Changes Press the enter key and select Yes The tablet PC is rebooted and the password dialogue is displayed Tap on the password field to enable the on screen keyboard 58 Fuji...

Page 63: ...to the documentation supplied with the external device Some of the external devices require special drivers see the operating system and external device documentation Connecting an external monitor Display port cradle only Displayport The display port of the cradle can be used to connect a display LCD TV or a plasma TV with an appropriate port The screen output is limited to a maximum of two exter...

Page 64: ...creenport Monitorport Switch off the Tablet PC and the external monitor Plug the data cable of the external monitor into the monitor port First switch on external monitor and then the Tablet PC You can also switch back and forth between the external monitor and the LCD screen of the Tablet PC see Touch screen Page 22 You can display the same picture on the external monitor and the LCD screen of th...

Page 65: ...SB 2 0 has a data transfer rate of up to 480 Mbit s USB 3 0 has a data transfer rate of up to 5 Gbit s USB 3 1 Gen1 has a data transfer rate of up to 5 Gbit s USB 3 1 Gen2 has a data transfer rate of up to 10 Gbit s Additional information can be found in the documentation for the USB devices Connect the data cable to the external device Connect the data cable to the USB port on the Tablet PC or Co...

Page 66: ... in BIOS Setup Utility Page 64 section USB devices are hot pluggable This means you can connect and disconnect the cables of USB devices while the system is running Additional information can be found in the documentation for the USB devices Connect the data cable to the external device Connect the data cable to a USB port USB Type C of the Tablet PC How to remove USB devices correctly Always corr...

Page 67: ... or external loudspeakers to your Tablet PC Connect the audio cable to the external device Connect the audio cable to the headphone port of the Tablet PC The internal loudspeakers are disabled If you purchase a cable from a retailer please note the following information The headphones microphone Line In Line Out headset combi port on your Tablet PC is a 3 5 mm jack socket If you want to connect he...

Page 68: ...u save and exit the BIOS Setup Utility The BIOS Setup Utility program contains the following menus About Displays information relating to the BIOS processor and Tablet PC System Advanced system settings Advanced Configuration of various hardware components such as mouse keyboard processor Security Password settings and security functions Boot Configuration of the start up sequence Exit Exits the BIO...

Page 69: ...he BIOS Setup Utility With the F9 key you can load the default settings of the BIOS Setup Utility Use the cursor keys or to select the menu you wish to access to make changes The menu is displayed on the screen Select the option you want to change with the cursor keys or Press the Enter key Press the ESC key to exit the selected menu For future reference make a note of the changes you have made fo...

Page 70: ...standard entries for all menus of the BIOS Setup Utility choose Load Setup Defaults and Yes Discard Changes Discard changes without exiting the BIOS Setup Utility To discard the changes you have made select Discard Changes and Yes The settings in place when BIOS Setup Utility was called remain effective You can now make additional settings in the BIOS Setup Utility If you want to exitBIOS Setup Ut...

Page 71: ...connected to your system Your sales contract Our Tablet PCs have been designed primarily with mobile applications in mind This means that considerable effort has been made to optimise components and equipment in terms of weight space and energy requirements Depending on the particular configuration you have purchased it is possible that functionality may be slightly reduced compared to a desktop PC...

Page 72: ...t PC to a mains outlet using the mains adapter Note The battery will only be charged again when the battery capacity is less than 90 The Tablet PC s touchscreen remains dark Touchscreen touchscreenistoodark Cause Troubleshooting Touchscreen is switched off Press a key external keyboard or tap on the touchscreen External monitor or television set connected Check whether the graphics driver settings...

Page 73: ...d to the Tablet PC and the external monitor if it is plugged in with a connector Switch on the Tablet PC and the external monitor The external monitor is blank or the image is unstable Screen Monitor Cause Troubleshooting The wrong external monitor has been selected or the wrong screen resolution has been set for the application program Terminate the application program in Windows If the error per...

Page 74: ...ery is dead Charge the battery or Insert a charged battery or Connect the mains adapter to the Tablet PC The power adapter is not connected correctly Check whether the mains adapter is connected correctly to the Tablet PC Switch on the Tablet PC The Tablet PC stops working TheTabletPC Energysavingmode Cause Troubleshooting The Tablet PC is in energy saving mode Leave energy saving mode An applicat...

Page 75: ...ching the wireless components on and off Page 37 The wireless component is enabled Despite this the wireless connection to a network does not work Check whether the wireless connection is switched on via the software Further information on using the wireless component can be found in the help files The battery discharges too quickly Battery Cause Troubleshooting The battery is either too hot or too...

Page 76: ...he ISO standard 7816 1 2 3 and 4 SmartCard PIN forgotten Cause Troubleshooting PIN forgotten If you work in a network contact your system administrator who can unlock your Tablet PC with a supervisor PIN SmartCard lost Cause Troubleshooting SmartCard lost If you work in a network contact your system administrator who can boot your Tablet PC with a Supervisor SmartCard Acoustic warnings Acousticerr...

Page 77: ...ribes the error messages generated by the BIOS Setup Error messages displayed by the operating system or programmes are described in the relevant documentation If the error message appears repeatedly despite troubleshooting measures please contact the place of purchase or our customer service centre Fujitsu 73 ...

Page 78: ...econds and switch on the Tablet PC again Keyboard error If you are using an external keyboard Check the connection and reboot the Tablet PC nn Stuck key Make sure that no key is pressed Operating system not found Check in the BIOS Setup whether your hard disk has been set correctly Make sure that the operating system is installed on the corresponding drive Press F1 to resume F2 to SETUP This error...

Page 79: ...to the original state of the hard disk Beginning at the right edge of the Windows Start screen or the desktop use a finger to sweep over the screen to open the Action Centre Select All settings Select Update security Select Recovery Select according to your requirements from the options given Fujitsu 75 ...

Page 80: ...card Chip Intel Graphics 615 Maximum resolution on external display 4096 x 2160 Dimensions Width x depth x height 295 2 x 209 3 x 8 9 mm 11 62 x 8 24 x 0 35 inches Weight depending on configuration from 770 g 1 70 lbs Input devices Tablet buttons 4 keys Pen optional Pen with 2 pen buttons Slots Memory card slot 1 x microSD SIM card slot configuration dependent 1 x Nano SIM SmartCard reader configurat...

Page 81: ...en Display Port VGA Display Port 0 1920x1280 60Hz 1 1 3840x2160 60Hz Only Tablet PC 2 1 1920x1280 60Hz 3840x2160 60Hz 1920x1280 60Hz 1920x1200 60Hz 1 1920x1280 60Hz 1920x1200 60Hz 3840x2160 60Hz 1920x1200 60Hz 2 2 3840x2160 60Hz 1920x1200 60Hz 1920x1280 60Hz 3840x2160 60Hz 1920x1200 60Hz 1920x1280 60Hz 3840x2160 60Hz 1920x1200 60Hz 1920x1280 60Hz 1024x768 60Hz 1024x768 60Hz with cradle 3 2 3840x21...

Page 82: ...1 25 V Rated capacity 35 Wh Mains adapter 65 W for the Tablet PC with without the magnetic keyboard Technicaldata Rated voltage 19 V Max rated current 3 42 A An additional mains adapter or power cable can be ordered at any time Mains adapter 90 W for the Tablet PC with cradle Technicaldata Rated voltage 19 V Max rated current 4 74 A An additional mains adapter or power cable can be ordered at any ...

Page 83: ...ck device 1 x Ambient conditions Environment class DIN IEC 721 7K1 Mechanism class DIN IEC 721 7M2 Operating temperature 5 C 35 C 41 F 95 F Transport temperature 15 C 60 C 5 F 140 F Magnetic keyboard optional Electrical data Protection class II Ports Docking port 11 pin Environmental conditions Environment class DIN IEC 721 7K1 Mechanism class DIN IEC 721 7M2 Operating temperature 5 C 35 C 41 F 95...

Page 84: ...on on the Internet at http www fujitsu com fts products computing pc tablets datasheets Intended viewing distance 400 mm as a hand held product A monitor and a keyboard should be connected externally for use in an office SAR limit value Specific Absorption Rate SAR The SAR limit value 2W kg is complied with Other certification markings Certificationmarkings Any other certification markings are listed i...

Page 85: ...necting headphones 63 cradle Connecting a Tablet PC 41 Cradle 40 D Date is incorrect 68 Device setting up 17 Display orientation selecting 23 Display port 59 E Energy energy saving 13 Energy saving 13 Energy saving mode leaving 70 Error message on the screen 73 Error messages on the screen 73 Errors Acoustic warnings 72 Ethernet LAN 38 F Fault correction 67 Fingerprint sensor 51 configure 51 First ...

Page 86: ... Battery 30 S Safety notes 12 SAR 80 Screen no screen display 69 Screen port see VGA connection socket 60 Security functions 50 SystemLock 55 Security functions SmartCard 55 Security Lock anti theft protection 51 Using 51 Selecting a location 17 Self discharge battery 30 Setup see BIOS Setup Utility 64 Slot Memory cards 33 Status indicators 19 Summer time 68 Supervisor password changing 53 enterin...

Page 87: ...57 Transport Transport damage 16 Transportation 14 Travel 14 Troubleshooting 67 Trusted Platform Module 57 U USB connection with charging function USB Type C 62 USB ports 61 User password changing 53 entering 52 removing 53 V VGA connection socket 60 W Wireless component safety notes 12 Wireless LAN safety notes 12 Fujitsu 83 ...

Reviews: