284
Upgrade and Maintenance Manual
TX1320
M1
System board and components
Ê
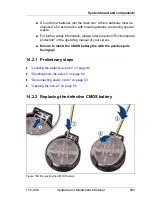
Press out on the locking spring to eject the depleted CMOS battery (1).
Ê
If the CMOS battery cannot be ejected this way, use a toothpick
(recommended) or similar tool as a lever: Insert the toothpick between the
battery and locking spring as shown (2).
V
CAUTION!
Do not use sharp-edged tools like screw drivers as they may damage
system board components when slipping.
Ê
Carefully pry the depleted CMOS battery out of its socket as shown (3).
Ê
Remove the CMOS battery (4).
I
Do not throw the CMOS battery into the trash can. Lithium batteries
must be disposed of in accordance with local regulations concerning
special waste.
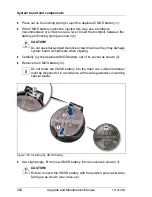
Figure 169: Installing the CMOS battery
Ê
At a slight angle, fit the new CMOS battery into its socket as shown (1).
V
CAUTION!
Ensure to insert the CMOS battery with the positive pole (label side)
facing up as shown (see close-up).
Summary of Contents for PRIMERGY TX1320 M1
Page 18: ...Upgrade and Maintenance Manual TX1320 M1 Contents ...
Page 42: ...42 Upgrade and Maintenance Manual TX1320 M1 Important information ...
Page 106: ...106 Upgrade and Maintenance Manual TX1320 M1 Basic software procedures ...
Page 150: ...150 Upgrade and Maintenance Manual TX1320 M1 Hard disk drives solid state drives ...
Page 280: ...280 Upgrade and Maintenance Manual TX1320 M1 Front panel ...
Page 320: ...320 Upgrade and Maintenance Manual TX1320 M1 Cables Figure 200 Cabling with extension box ...

