background image

3-6

 Using Microsoft CE Applications

Pocket Access: Viewing and Creating Data

3

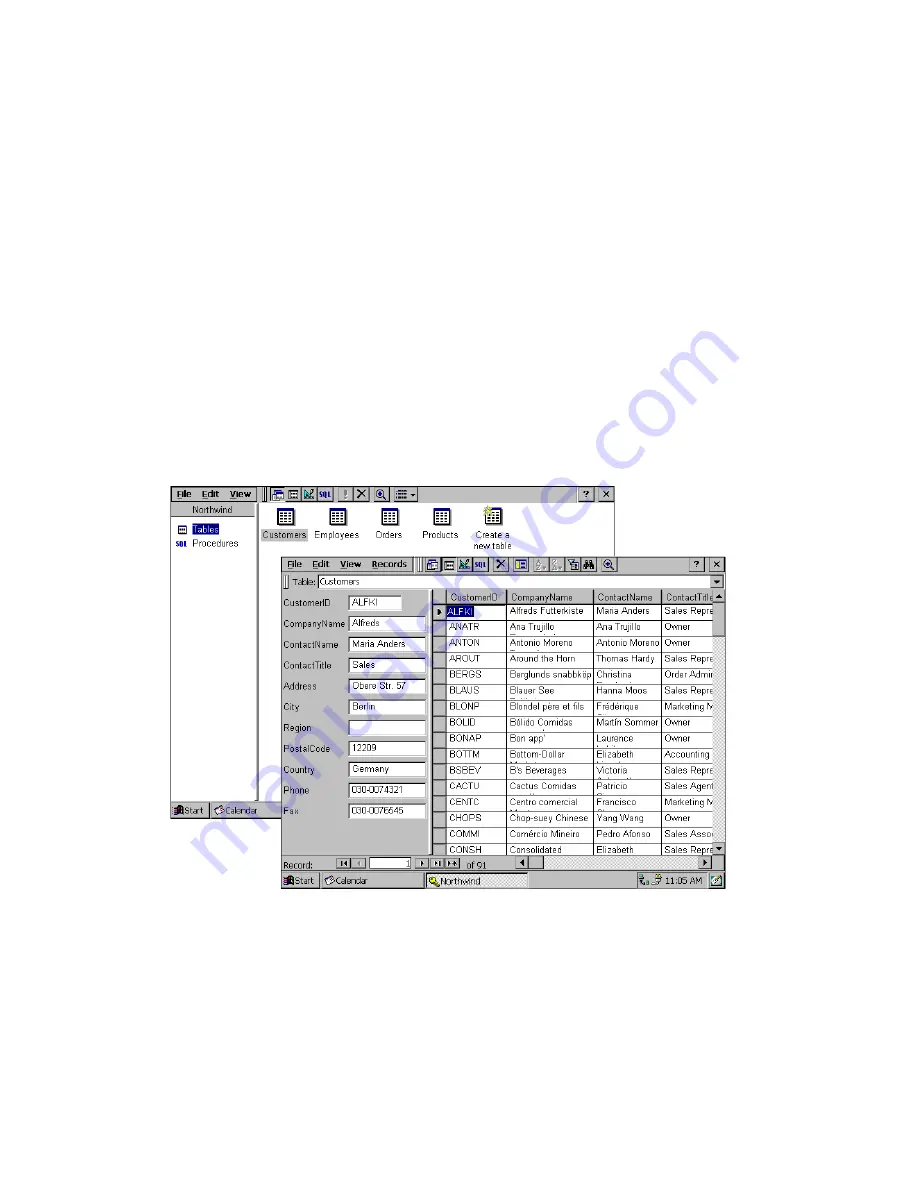
Use Pocket Access to view and update data derived from Microsoft Access, Microsoft 
SQL Server, and other ODBC databases you have created on the desktop computer. 
Simply create the database on your desktop computer and then transfer the data to 
your PenCentra 130. For example, a sales organization might use Access on the 
desktop computer to create a master database of products and order forms (see 
Figure 3-3). The sales force can synchronize their PenCentra 130s with the master 
database to get up-to-date product information and to upload completed client order 
information. For more information on synchronizing, see the section of this chapter 
entitled “Microsoft Windows CE Services.”

You can also use Pocket Access to create new databases, tables, and SQL procedures 
directly on your PenCentra 130.


Figure 3-3    Pocket Access Database

Summary of Contents for PenCentra 130

Page 1: ...User s Guide Manual d Utilisation Benutzerhandbuch Manual del Usuario Manuale Utente ...

Page 2: ......

Page 3: ...User s Guide Benutzerhandbuch Manual del Usuario Manuale Utente Manual d Utilisation ...

Page 4: ...emarks or registered trademarks of bSQUARE Corporation ActiveSync ActiveX Microsoft Microsoft InkWriter Microsoft Outlook Microsoft PowerPoint Microsoft Windows Microsoft Windows NT MSN Visual Basic Visual C and the Windows logo are either registered trademarks or trademarks of Microsoft Corporation in the United States and or other countries Microsoft products are licensed to OEMs by Microsoft Li...

Page 5: ...e manufacturer Dispose of used batteries according to manufacturer s instruction Changes or modifications not expressly approved by Fujitsu Personal Systems Inc could void this user s authority to operate the equipment Warnings The backup battery may explode if mistreated Do not recharge disassemble or dispose of in fire For a spare battery pack order only Fujitsu Model FMW51BP1 To charge the batt...

Page 6: ...Model PenCentra 130 Complies with Part 15 of the FCC Rules This device complies with Part 15 of the FCC rules Operation is subject to the following two conditions 1 This device may not cause harmful interference and 2 This device must accept any interference received including interference that may cause undesired operation David Woo Mgr Agency Compliance 6 15 99 Full Name Title Date Screen Type M...

Page 7: ...sing the PenCentra 130 2 1 Before Setting Up the PenCentra 130 2 1 Setting Up the PenCentra 130 2 1 Turning the device off and on suspending resuming 2 1 Resetting the system 2 2 Using the Pen 2 3 Calibrating the pen 2 3 Replacing the Pen 2 5 Inserting Removing PC Cards 2 5 Powering the PenCentra 130 2 5 Removing and Installing a Battery Pack 2 6 Charging the Battery Pack 2 7 Conserving Power Opti...

Page 8: ... Connecting to a mail server 3 21 Setting up Inbox for connecting to a mail server 3 21 Downloading messages 3 22 Disconnecting from the server 3 22 Managing messages and folders 3 22 ActiveSync Synchronizing E mail 3 24 Downloading messages 3 24 Managing messages and folders 3 25 Sending a message 3 25 To send a message 3 25 Getting Connected Remotely 3 26 Connecting to an ISP 3 27 To create a di...

Page 9: ...ing and replacing text in a window 4 7 Managing your custom dictionary 4 7 CIC Jot 4 7 Jot Tutorial 4 8 Jot Trainer 4 8 CIC Handwriter 4 8 Using the Online Help 4 8 Getting to Know Handwriter 4 8 Getting to Know the Recognizer 4 9 Writing Case identical Letters 4 9 Writing Punctuation Marks 4 10 Spacing Between Characters and Words 4 10 Tips for Using the Recognizer 4 10 Distinguish Letters from N...

Page 10: ...et Is Not Responding to the Pen 6 2 Pen Tablet is Not Responding to the Keyboard 6 2 Pen Not Calibrated 6 3 Audio Volume Too Low 6 3 Remote connection problems 6 3 Can t dial out with the device modem 6 3 Can dial out but can t make a proper connection 6 4 The connection is unreliable 6 4 Network connection is not listed in the ActiveSync dialog box 6 4 Appendix A PenCentra 130 H PC Pro Hardware S...

Page 11: ... Chapter 2 Using the PenCentra 130 This chapter provides steps for the initial setup of your system as well as a brief description of the software loaded on the system Also included are instructions for a variety of procedures such as printing and customizing your PenCentra 130 Chapter 3 Using Microsoft CE Applications This chapter offers details on the various Windows CE applications such as Pock...

Page 12: ...g your pen tablet Appendix A Glossary The Glossary contains a description of Microsoft and Fujitsu Personal Systems Inc terms used throughout this guide Appendix B Hardware Specifications This appendix contains detailed information about your PenCentra 130 specifications Appendix C Agency Notices This appendix contains notices required by the Federal Communications Commission ...

Page 13: ...Fujitsu Personal Systems Inc web site http www fpsi fujitsu com Windows CE Programs This User s Guide On line Help on your device Select Start and then Help CIC Programs This User s Guide On line Help on your device Select Start and then Help Communication Intelligence Corp web site www cic com bSQUARE Programs This User s Guide On line Help on your device Select Start and then Help bSQUARE web si...

Page 14: ...ons The Communications Troubleshooter on your desktop computer In the Mobile Devices window click Help then Communications Troubleshooter Up to date information on Windows CE based devices Microsoft Windows CE web site http www microsoft com windowsce Information on this release of Windows CE Readme doc file located in the Windows CE Services folder on your desktop computer For Information On Use ...

Page 15: ...luded with the PenCentra 130 1 The following items are included with your PenCentra 130 Lithium ion battery pack AC Adapter Microsoft Windows CE Services CD ROM Screen Protectors quantity 2 PenCentra 130 Pen Internal 56 Kbps fax modem V 90 53 Kbps receive 33 6 Kbps send 14 4 Kbps fax The internal modem is available in North America only The 56 Kbps rate is nominal due to FCC restrictions actual ra...

Page 16: ...W51DS1 16MB RAM Expansion Module FMW51EM16 32MB RAM Expansion Module FMW51EM32 8MB Flash ROM Expansion Module FMW51FL8 Harsh Environment Case FMWCC36 Spare Battery Pack FMW51BP1 External Battery Charger FMW51BC1 Handstrap FMWHS3 Screen Protectors 12 pack FMWSP6 Compact Folding Deskstand FMWDS4 System Holster FMWCC34 Harsh Environment Case Holster FMWCC37 Slipcase FMWCC33 Portfolio Case FMWCC35 Mob...

Page 17: ...ation and entering data When not in use it should be stored in the PenCentra 130 pen holder or optional carrying case Record Button The Record button is used to initiate recording of sound on the system via the microphone Microphone The microphone allows you to record sound files such as voice memos Hotpads Hotpads allow you to change settings for the display sound and mouse button emulation Three...

Page 18: ...ptional Kensington type security cable Notification Button The Notification button is used to acknowledge a notification from the system such as a meeting reminder Figure 1 1 PenCentra Front Left Top View The internal modem is available in North America only Microphone Record Button Status Indicators Hotpads 8 places Suspend Resume Button Modem Jack IrDA Port PC Card Slot 1 Ejector Buttons Reset B...

Page 19: ... ROM and flash memory modules inside your PenCentra Microphone Jack Allows you to connect an external microphone Headphone Jack Allows you to connect headphones to your PenCentra 130 Serial Port This port is used for connecting the synchronization cable between your PenCentra 130 and a desktop computer This port can also be used as a standard serial port USB Port Allows you to connect Universal Se...

Page 20: ...onal docking station Figure 1 2 PenCentra Rear Right Bottom View Removable Battery Pack Battery Pack Latch Pen Tether Slot Handstrap Attachment Points Speaker Microphone Jack Headphone Jack Serial Port Door USB Port DC Input PS 2 style Keyboard Mouse Port High Usage Docking Contacts Handstrap Attachment Points Memory Access Door ...

Page 21: ...n of event The notification indicator flashes when a pre determined event is detected by the system such as a meeting reminder The notification indicator is reset by pressing the notification button on the top of the system DC Input Off No battery no DC Input Orange Charging Green Charge complete Yellow Thermal Alarm When this indicator is lit the system is running on external DC power Battery Off...

Page 22: ... on the PenCentra Notification Button The notification button is used to turn off the notification indicator and launch the message that generated the notification Kensington Lock The KensingtonTM Microsaver security slot allows you to secure the PenCentra using Kensington compatible locking devices PC Cards Install one or two Type II PCMCIA Cards If only one card is installed either slot can be u...

Page 23: ...ote that the system must be suspended prior to installing a device to this port DC Input Connect an external power source such as the AC Adapter or the optional Auto Adapter USB Port Connect Universal Serial Bus compliant devices Headphone Jack Connect mono headphones or powered external speakers The internal speaker is disabled when you plug in external headphones or speakers Serial Port Connect ...

Page 24: ...ows CE Pocket Office and Microsoft Windows CE Services 1 Windows CE Operating System The operating system installed on your PenCentra 130 2 Microsoft Windows CE Pocket Office consisting of Microsoft Pocket Access View ODBC databases and create Access information Microsoft Pocket Excel Create and view Excel documents Microsoft Pocket PowerPoint Allows you to present PowerPoint presentations Microso...

Page 25: ...rminal Lets you view and download files from a bulletin board or send and receive email World Clock Sets the date time and alarm for your home city and the city you are visiting Calculator Lets you perform calculations 3 Microsoft Windows CE Services is included on CD ROM for installation on your desktop system Windows CE Services allows you to synchronize your data between the PenCentra 130 and y...

Page 26: ...aracter sets Full character set and natural character set CIC Handwriter Handwriter is a full context sensitive word recognizer Handwriter allows you to write whole words or sentences before recognition CIC On Screen Keyboard The on screen keyboard allows you to enter data using an on screen virtual keyboard CIC InkTools InkTools provides signature capture and verification bSQUARE bFAX The bFAX ut...

Page 27: ...t that accompanies the screen protector for installation instructions The system should be charged for a full 48 hours prior to first using it The 48 hour period ensures that the main battery pack and the backup battery are fully charged Setting Up the PenCentra 130 2 Turning the device off and on suspending resuming 2 The suspend resume button is used to stop and start the operation of your PenCe...

Page 28: ... Save your work then click the Start icon on your desktop Click on Suspend from the Start menu The system operation will immediately suspend When you resume operation the system will resume at the point at which you suspended operation Resetting the system 2 Note Pressing the reset button while there is active data on your screen will result in that data being lost It is not necessary to use exces...

Page 29: ...the pen tip once on the right mouse button hotpad then tap the desired object Hotpads are described in the section of this chapter entitled Using the Hotpads The right mouse function is only valid for a single tap To move or drag an object on the screen place the pen tip directly over the object then as you hold the pen tip against the screen move the pen Calibrating the pen 2 You calibrate the pe...

Page 30: ...s on the screen The calibration utility displays a cross hair symbol in the middle and corners of the screen one corner at a time Hold the pen as you normally would while using the system and as accurately as possible tap the center of each crosshair as it is displayed A dialog box is displayed after you tap the last of the four cross hair symbols Tap the screen within 30 seconds if you wish to sa...

Page 31: ...el facing towards the screen The shutter covering the slot folds into the system as you insert the card Ensure that the card is properly seated by firmly pushing it in until it stops When the card is properly seated the ejector button rises to be flush with the system surface To remove a PC Card first ensure that it is not running Using the back end of your PenCentra pen press the ejector button f...

Page 32: ...moving Installing the Battery Pack 3 Using the system pen push the spring loaded battery latch to the left 4 While the battery latch is pushed to the left slide the battery pack out of the battery tray by pulling it towards you When the battery is clear of the latch mechanism release the battery latch 5 Resume system operation To install a new or recharged battery pack slide it into the battery tr...

Page 33: ...r A fully charged battery pack can run the system under normal use for approximately 8 hours Your results may vary depending upon the applications you use Here are some suggestions to help you conserve battery power Note Certain power optimization features may have been disabled by your reseller when the pen tablet was customized Open the Power Properties screen from the Control Panel Click on the...

Page 34: ... icon appears When a mouse is installed the stylus is still functional 3 Resume system operation Using the Keyboard Function Keys 2 When a PenCentra 130 keyboard is attached to your pen tablet you can use the function keys as shortcut keys to the most commonly used Windows CE applications The following table lists the function keys and the application that is invoked when you press the key Table 2...

Page 35: ...he system was suspended This hotpad does not repeat if held down Increase Contrast Hotpad When tapped LCD contrast becomes lighter by one step The contrast range is 16 steps This hotpad repeats if held down Decrease Contrast Hotpad When tapped LCD contrast becomes darker by one step The contrast range is 16 steps This hotpad repeats if held down Right Mouse Button Hotpad Tapping this hotpad causes...

Page 36: ...cation is brought to the foreground a second instance of the application is not started You can define which application will be launched by configuring the Application Launcher utility located in the Control Panel Each programmable hotpad can represent up to five different programs These hotpads do not repeat pressing them more than once has the same effect as pressing them once Table 2 2 PenCent...

Page 37: ...r edit Excel and Word files PowerPoint presentation notes and Access databases and tables on your PenCentra 130 Word and Excel templates are available to help you quickly create documents Once you have created or edited a document on your PenCentra 130 synchronize it with your desktop computer to copy the new document to your desktop computer For more information on synchronization see the section...

Page 38: ...t in Pocket Word Using the on screen keyboard To open the on screen keyboard double click on the on screen keyboard icon at the bottom of the display screen Enter data with the on screen keyboard as you would with a regular keyboard Using a keyboard Install a PS 2 style keyboard to the system s PS 2 plug and enter data using that device Using Handwriting Recognition Refer to the section of Chapter...

Page 39: ...ket Word 3 1 Select File New and then Document from Template 2 Select Meeting Notes and then OK 3 Select File and then Save 4 Enter a name choose a storage location and then select OK 5 Replace the text in the Template Note To see more of your document select Full Screen on the View menu ...

Page 40: ...to someone who will be using Excel not Pocket Excel be sure to save it in the Excel xls format Pocket Excel provides fundamental spreadsheet tools such as formulas functions sorting and filtering You can split panes to easily view different areas of a large worksheet You can also freeze the top and left most panes in a worksheet to keep row and column labels or other data visible as you scroll thr...

Page 41: ...Windows CE Applications 3 5 Figure 3 2 Pocket Excel Spreadsheet ...

Page 42: ...a sales organization might use Access on the desktop computer to create a master database of products and order forms see Figure 3 3 The sales force can synchronize their PenCentra 130s with the master database to get up to date product information and to upload completed client order information For more information on synchronizing see the section of this chapter entitled Microsoft Windows CE Se...

Page 43: ...mbers with decimal points select the Float data type 8 To enter numbers between 32 768 and 32 767 select the Integer data type 9 To enter smaller numbers select the Small Integer data type 10 To set the size limit of a field enter an amount in the Field Size box A field s size cannot be changed after the table is saved 11 To index the field select Yes from the Indexed list Indexing a field allows ...

Page 44: ...position of the original Microsoft PowerPoint presentation but will not include animations or slide transitions Figure 3 4 Pocket Power Point Display To show a presentation 3 1 Using Windows CE Services copy the presentation from your desktop com puter to your PenCentra 130 For more information see the section of this chap ter entitled Microsoft Windows CE Services 2 Select Start Programs Office a...

Page 45: ...ct View and then View Show If you chose Manual in step 4 use the Previous and Next buttons to control the slides 6 You can tailor a presentation while on the road by adding a new title slide to your presentation To do so select Tools and then Title Slide ...

Page 46: ...yped notes and create drawings Note More information on the procedures described in this chapter as well as information on additional procedures can be found in online Help on your PenCentra 130 Select Start Help and then the program on which you want information Voice Recorder Capturing Ideas and Thoughts 3 You can quickly capture ideas reminders and phone numbers with Voice Recorder Figure 3 5 V...

Page 47: ...ording select the Stop button The new recording appears in the recording list 5 To play a recording double tap or double click it in the recording list To pause playback select the Play Pause button Select Play Pause again to resume playback Note You can play all of your recordings one after another Select the recording you want to play first select Control and then Play Sequential The selected re...

Page 48: ...at you ve written and drawn With InkWriter you can enter information in the way that s easiest for you You can type using the keyboard or you can write and draw directly on the screen using your stylus or pointing device Figure 3 6 Using InkWriter to Create Drawings To create an InkWriter document 3 1 Select Start Programs Accessories and then InkWriter 2 Create your document Writing button Select...

Page 49: ...sing Windows CE Services you can synchronize information in Microsoft Outlook Microsoft Schedule or Microsoft Exchange on your desktop computer with your PenCentra 130 Each time you synchronize Windows CE Services compares the changes you made on your PenCentra 130 and desktop computer and updates both computers For more information see the section of this chapter entitled Microsoft Windows CE Ser...

Page 50: ...to schedule appointments meetings and other events You can check your appointments in one of several views Day Week Month Year and Agenda and easily switch among the views by selecting the corresponding toolbar button Figure 3 7 Pocket Outlook Calendar Weekly View New Appointment Button View Buttons ...

Page 51: ...he notes area Enter your notes 5 To assign the appointment to a category select the Categories button and select a category from the list 6 Select other desired options and then OK when finished Note To quickly add an appointment in Day or Week view select the time and type the description and location Enter the location in parentheses if you want Calendar to recognize it as the location For examp...

Page 52: ...ving E mail Messages later in this chapter To create a meeting request 3 1 Select Tools Options and then choose a mail transport If you send and receive messages using synchronization select ActiveSync If you connect to an ISP or network select the service you set up in Inbox 2 Select File and then Make Meeting 3 Enter the meeting information 4 Select the contacts you want to invite 5 Select other...

Page 53: ...fields Supply an e mail address if you want to send meeting requests and e mail messages to this contact 4 To add a note or assign the contact to a category select the Notes Categories button Then select the notes area and enter your notes or select a category from the list Note You can send up to 25 contact cards at a time to another Windows CE based device Line up the infrared ports on the two d...

Page 54: ... To Do List 3 Use Tasks to keep track of what you have to do Overdue tasks are displayed in bold and in red on color devices Figure 3 11 Keeping a To Do List Notes Categories Button Personal Button Business Button New Task Button Double tap or double click to display or edit a task card ...

Page 55: ...e notes area Enter your notes 5 To assign the task to a category select the Categories button and select a category from the list 6 Select other desired options and then OK Note To mark a task as complete in the task list select the check box in the Status column To delete all completed tasks select Edit and then Delete Completed Tasks Figure 3 12 Creating a New Task Notes Button Categories Button...

Page 56: ...rk account or by synchronizing with your desktop computer Figure 3 13 Sending and Receiving E mail Email messages you send and receive through synchronization are stored here When you set up the Inbox a service is added to the Inbox window Mail folders are stored under the service name The double arrow icon marks offline folders Messages in these folders can be viewed even when you are not connect...

Page 57: ...ame user name password and domain name for network connections only 2 Select Start Programs Pocket Outlook and then Inbox 3 Select Services and then Options 4 On the Services tab select Add 5 Choose IMAP4 Mail or POP3 Mail enter a name for the connection and then select OK 6 In the Mail Service Definition dialog box enter the information from step 1 In Connection choose the remote connection you w...

Page 58: ... that have been deleted on the server are removed from the Inbox These folders are stored under the service you created when setting up Inbox Double tap or double click a message in the message list to open it If you read a message and decide that you need the full copy select the Get Full Copy button Disconnecting from the server 3 To disconnect Inbox from your mail server select the Connect butt...

Page 59: ...rom anywhere except your PenCentra 130 If you are using IMAP4 the folders you create and the messages you move are mirrored on the server For example if you move two messages from the Inbox folder to a folder called Family the server will create a copy of the Family folder and copy the messages into that folder Therefore messages are available to you anytime you connect to your mail server whether...

Page 60: ... to Calendar Contacts and Tasks are updated If you are receiving e mail by synchronizing with your desktop computer the PenCentra 130 Inbox is set up by default However because e mail messages are not synchronized by default you will need to set up Windows CE Services on your desktop computer to include e mail messages when synchronizing To do so select your PenCentra 130 icon in the Mobile Device...

Page 61: ... PenCentra 130 Inbox folder and delete them from the Inbox folder on the desktop so that both Inbox folders match This prevents you from getting duplicate copies of a message but it also means that you will no longer have access to the messages you move out of Inbox except from your PenCentra 130 Sending a message 3 To send a message 3 1 Select Compose and then New Message 2 Select the To field an...

Page 62: ...he following remote networking options Connect to your Internet service provider ISP Once connected you can send and receive e mail messages and view Web pages If this is the method you want to use see Connecting to an ISP Connect to the network at your company or organization Once connected you can send and receive e mail messages view intranet Web pages and access files on the network If this is...

Page 63: ...tap or double click the Make New Connection icon 5 Enter a name for the connection such as ISP Dial Up select Dial Up Connection and then select Next 6 Select your modem type 7 You should not need to change any settings in the Configure or TCP IP Settings dialog boxes Most ISPs now use server assigned addresses If the ISP you are connecting to does not use server assigned addresses enter the addre...

Page 64: ...rt Programs Communications and then Remote Networking 4 Double tap or double click the Make New Connection icon 5 Enter a name for the connection such as Corporate Dial Up select Dial Up Connection and then select Next 6 Select your modem type You should not need to change settings in the Configure or TCP IP Settings dialog boxes When finished select Next 7 Enter the access phone number and select...

Page 65: ... Panel and double tap or double click Network In the Identification tab enter your name password and domain Once connected you can use Pocket Internet Explorer to visit intranet Web pages and Inbox to send and receive e mail Before you can use Inbox you need to provide the information it needs to communicate with the mail server For specific instructions see Inbox Sending and Receiving E mail Mess...

Page 66: ... use see To create a dial up connection to a network Once the connection has been created and you are connected select Start Programs Communications and then ActiveSync on your PenCentra 130 In the ActiveSync dialog box select the dial up connection you created as the method to connect and the name of the computer you want to connect to Use an Ethernet card to connect to the network Once connected...

Page 67: ...via Serial Port and Device Connections via Network 7 Follow the steps in To create a dial up connection to an ISP to create the connection Substitute the phone number you noted in step 2 for the ISP dial in number Getting Help on Connecting Remotely 3 More information on the procedures described here as well as information on additional procedures can be found in the following locations Inbox Send...

Page 68: ...s between your PenCentra 130 and your desktop computer Installing Windows CE Services and Setting up a Partnership 3 1 If you want to upgrade to Microsoft Outlook 98 install it first 2 Use a standard serial cable to connect your PenCentra 130 to your desktop computer 3 Insert the Desktop Software for Microsoft Windows CE CD ROM into your CD ROM drive 4 The Windows CE Services Setup Wizard should s...

Page 69: ...nchronize in the Synchronized Files folder on the PenCentra 130 and desktop computer During synchronization files are updated in both locations Note On the PenCentra 130 the Synchronized Files folder is in the My Documents folder On the desktop computer the Synchronized Files folder is called device Synchronized Files where device is the name of your PenCentra 130 If you are using Windows 95 98 th...

Page 70: ... you do not log out CE Services will continue to look for a connection when the cable is not installed You can synchronize with your desktop computer while away from the office by connecting to your network or directly to your computer via a modem attached to your computer For more information see Connecting to Your Desktop Computer to Synchronize Remotely earlier in this chapter Getting Help on W...

Page 71: ...ng with several other system refinements The Windows CE based programs that are loaded on your PenCentra 130 are discussed in Chapter 3 CIC QuickNotes 4 CIC QuickNotes allows you to take notes on your PenCentra 130 while automatically compressing the file and timestamping each note Using QuickNotes also allows you to search by text or stamp you can add your own text or stamps for a variety of data...

Page 72: ...telling you the time and date the note was created and which book it is in The status line can be turned on or off in the Options menu Ink Snap speed is the time period for which QuickNotes waits after you finish writing and pick up your stylus Once this time period is up QuickNotes will resize the ink and put it in the correct position Redraw Timing can also be changed here Grid lines will lay a ...

Page 73: ...sing Ink 4 Ink is easily removed from the note page by using the eraser Select the eraser button from the Toolbar If you need to erase a larger area or be very precise with the ink you are erasing the eraser size can be altered in the Pen menu The eraser will only erase standard ink it will not erase Ink Snap objects You can also use the Remove Last Stroke command from the Pen menu This command ca...

Page 74: ... InkSnap menu To select an InkSnap object place the pen tip on the object and hold until the object is highlighted The object can be dragged and dropped by lifting the pen then touching and holding on the selected object while dragging to the new desired location Ink Snap speed can also be adjusted from the Options dialog in the File menu Editing and Manipulating Objects 4 Ink objects can be manip...

Page 75: ... To view the entire note page press the zoom button or select zoom from the edit menu This is also handy for moving around the note page quickly You can also jump directly to the page of your choice Select Jump to Page from the Tools menu Enter the page you wish to jump to and press OK CIC Speller 4 CIC Speller is a utility program that checks for spelling errors finds unfamiliar words gets docume...

Page 76: ... the macro name and the macro text then press Save Note that you can only enter lowercase letters for a macro name To delete a macro Select it from the list and press Delete To edit a macro Double tap it from the list or select it and press Edit Looking up the spelling of a word 4 Choose Lookup Word from Speller s menu The Lookup Word window appears You can lookup a word in one of two ways By typi...

Page 77: ...Centra 130 It is designed for maximum speed and accuracy while using a minimal amount of memory Jot has a patented user interface that allows convenient and natural handwritten input on small devices You get fast accurate recognition with Jot s natural character set and unique user interface You can write anywhere on the screen Jot recognizes characters uppercase letters lowercase letters numbers ...

Page 78: ... almost all types of character shapes Using the Online Help 4 Open the online help by tapping the button in Recognizer Properties Recognizer Properties can be opened from the Control Panel window or by double tapping the pen icon in the System Tray Getting to Know Handwriter 4 To use the pen for pointing instead of writing tap the pen icon in the System Tray The pen icon changes depending on wheth...

Page 79: ... mode from within writing mode Getting to Know the Recognizer 4 Following these suggestions helps Handwriter recognize the characters you write Handwriter is a discrete character recognizer which means it easily accepts unconnected letters However since people often connect adjacent letters even when they are printing Handwriter has built in recognition for many commonly connected pairs Writing Ca...

Page 80: ...gnizer Properties dialog box Tips for Using the Recognizer 4 Use the following tips to help ensure that Handwriter recognizes all of your characters Be distinct Some characters resemble one another For example a 5 can look like an S a U can look like a V etc When you write characters pay special attention to the order and direction of your strokes this is one of the ways Handwriter recognizes what...

Page 81: ...rs might not be recognized Customizing Handwriter Settings 4 By changing its settings you can customize Handwriter s appearance and operation To do this select Recognizer Properties from the Control Panel icon Recognizer Properties dialog box appears with the General tab displayed Alternately you can access Recognizer Properties by double tapping the pen icon in the System Tray Choosing the Recogn...

Page 82: ... recognition timeout is set faster than you write Handwriter interpreted what you wrote before you finished all the strokes As you gain more experience with Handwriter you can reset this feature to improve the response time Selection Timeout 4 When you pen down Handwriter will try to take the ink and recognize it If you need to select something or drag and drop an item you must hold the pen down a...

Page 83: ...ext including standard edit fields of any Windows application To start the Macro Editor tap Macro Editor on the Advanced tab The Circle Gesture Macro Editor dialog box opens You are presented with a list of circle gestures some of which have pre assigned functions You can create your own circle gestures as well as change the pre defined ones To create a new circle gesture 1 Select an unused circle...

Page 84: ...your PenCentra 130 using a virtual keyboard CIC InkTools 4 Provides signature capture and verification For instructions in using InkTools refer to the online help by clicking Start Help then selecting InkTools bFAX 4 Creating a New Fax 4 To create a new fax tap the New Fax button or choose New Fax from the Fax menu An item named New Fax appears in the Fax Workspace Type a new name for your fax and...

Page 85: ... the Document window A dialog box will appear allowing you to browse for the file you wish to send Select the desired file and choose Open to add it to the Document window Note Once added to the fax documents will remain in the Document window until removed Removing a Document 4 In the Document window tap the document you wish to delete Then tap the delete button or choose Delete from the Edit win...

Page 86: ...lect the desired file and choose Open to add it to the Document window Note Once added to the fax documents will remain in the Document window until removed Removing a Document 4 In the Document window tap the document you wish to delete Then tap the delete button or choose Delete from the Edit window Note This will delete documents only from the Document window They will remain in your PenCentra ...

Page 87: ... for the standard Windows CE applications databases and file types These script files help interpret search results and drive other third party applications to complete searches that are started within bFIND Appointments Database bFIND searches the database used by the Windows CE Appointments Calendar application Contacts Database bFIND searches the database used by the Windows CE Contacts applica...

Page 88: ...s may be displayed Any database that is found on the PenCentra 130 without a script will still appear in the Search Location group box For example if you use Pocket Internet Explorer Cookies and URL Cache will appear For additional information on using the bSQUARE products go to the bSQUARE web site www bsquare com ...

Page 89: ...tor on your pen tablet 1 If a screen protector is already installed on the display screen remove it before installing the new screen protector The screen protector is held onto the display screen surface by a thin strip of adhesive around the edges A notch in one corner of the screen protector allows you to slide your fingernail under the screen protector for easy removal 2 Clean the adhesive resi...

Page 90: ... behind by the protective coating from the exposed surface of the screen protector by wiping gently with a soft cotton cloth dampened with denatured alcohol Wipe the screen protector with a soft dry cloth to remove any low tack adhesive this will help to prevent the pen tip from squeaking The screen protector is now installed Storing the PenCentra 130 5 Store the PenCentra 130 pen tablet in Suspen...

Page 91: ... environment case For additional information on the PenCentra 130 harsh environment case as well as additional carrying cases and holsters contact your reseller Avoiding Overheating 5 Excessive heat can damage internal components of the pen tablet over a period of time To avoid overheating your PenCentra 130 do not charge the pen tablet while it is in the harsh environment case unless the system i...

Page 92: ...5 4 Care and Maintenance of the PenCentra 130 ...

Page 93: ...adapter or install a charged battery pack in the pen tablet Display Screen Is Blank or Difficult to Read 6 If the display screen on your PenCentra 130 pen tablet appears blank or is unreadable check the following The backlight time out may have expired Tap on the display screen to reactivate the display Note that this is a normal power saving feature The system brightness may be set too low causin...

Page 94: ...e other device Adjust the room lighting Some types of light interfere with infrared communication including direct sunlight Try moving to a different location or turning off some lights Pen Tablet Is Not Responding to the Pen 6 If your pen tablet is not responding to the pen check the following Note A quick way to tell if the pen is responding is to try to adjust the volume hotpad This will help d...

Page 95: ...nicating with your desktop see Windows CE Services Help Can t dial out with the device modem 6 If using a PC Card modem verify that the modem is firmly seated and connected to your PenCentra and the telephone jack Make sure the telephone line is analog Analog telephone lines transmit data in analog instead of digital form Your home telephone line is most likely analog while office telephone lines ...

Page 96: ...hat the location settings reflect your current location that the location s dialing pattern is appropriate and that the local country and area code are correct The connection is unreliable 6 If using a PC Card modem make sure the modem is firmly seated and connected to your PenCentra and the telephone jack Disable call waiting Select Start Settings Control Panel and then double tap or double click...

Page 97: ...y 91 kg Processing Specifications CPU NEC VR4121 131 Processor Speed 131 MHz Memory Storage Specifications Main RAM 16 MB on main board 48 MB maximum Masked ROM 24 MB Flash ROM non volatile storage 8 MB on main board 16 MB maximum Input Output Specifications Display Indoor Outdoor Color Display 8 VGA 640 x 480 256 colors Color reflective DSTN with frontlight Indoor Only Color Display 8 VGA 640 x 4...

Page 98: ...ontrollerless data fax modem North America only RJ 11 jack on top of system Ring wakeup internal or PC Card modem Integrated Interfaces USB Host Type A connector 5 V 500 mA maximum current PS 2 style keyboard full size 6 pin DIN connector 5 V 500 mA maximum current RS 232C serial port full size DB 9 connector Note that Pin 9 on this serial port has 5 V 500 mA maximum current support Pin 9 on the o...

Page 99: ...ness contrast volume right mouse programmable 3 Suspend Resume on off button Record button Reset button Notification button Status Indicators LEDs Notification Charging Low battery Power Specifications Main Battery Removable lithium ion 10 8 V 1300 mAh Dimensions 6 3 x 1 0 x 0 5 Weight 5 25 oz 150 g Warm swappable Recharge time 90 minutes 90 Life Up to 10 hours operation depending on backlight and...

Page 100: ...y when the system is on Suspend life fully charged backup battery no main battery 2 days Additional Specifications Reliability 50 000 hours MTBF Heavy duty Lexan housing with rubber handgrips Breakaway serial port door hinges Security Features Kensington lock slot Owner password capability PenCentra 130 Specifications Continued ...

Page 101: ...in Calendar attachment An item included with an e mail message backup file A duplicate copy of the program data on your PenCentra 130 This file does not include settings and information stored in ROM such as factory installed software Use your backup file to return your PenCentra 130 to its previous state if your system data is damaged or destroyed or if you have performed a full reset baud rate T...

Page 102: ...A connection between your PenCentra 130 and another computer by means of a serial cable or infrared ports download The process of transferring data from your desktop computer to your PenCentra 130 e mail Messages and other items that you send and receive with Inbox Explorer window The window that appears when you double click a device icon in the Mobile Devices window In the Explorer window which ...

Page 103: ...0 and a server that provides access to the Internet typically an ISP Internet service provider ISP A company that provides access to the Internet intranet A network designed for information sharing within a company or organization IrDA infrared connection A connection between your PenCentra 130 and another computer or device such as a printer by means of the IR port on each device JOT The characte...

Page 104: ...ection between your desktop computer and your PenCentra 130 for the purpose of synchronizing and transferring data Your PenCentra 130 can have partnerships with up to two desktop computers PC Card A removable card such as modem Ethernet or storage card that conforms to the PCMCIA specification PC Link The program on your PenCentra 130 that you use to connect and synchronize with your desktop compu...

Page 105: ...r PenCentra 130 to your desktop computer serial connection A connection between your PenCentra 130 and a desktop computer or external modem by means of a serial cable slider The vertical double bar on the command bar used to switch between displaying toolbar buttons and menu names stylus A pointing device similar to a pen used to make selections tap and enter information on the touch screen synchr...

Page 106: ...ocation of a touch on its surface typically done by using a stylus and translate that touch into a desired action such as making a selection or moving the cursor Windows CE Services The desktop computer program used to synchronize transfer and manage data and files between your PenCentra 130 and desktop computer You open Windows CE Services by double clicking the Mobile Devices folder ...

Page 107: ...radio or television reception which can be determined by turning the equipment off and on the user is encouraged to try to correct the interference by one or more of the following measures Reorient or relocate the receiving antenna Increase the separation between the equipment and receiver Connect the equipment into an outlet that is on a different circuit than the receiver Consult the dealer or a...

Page 108: ...t to your line as determined by the RENs contact your local telephone company If this equipment causes harm to the telephone network your telephone company may discontinue your service temporarily If possible they will notify you in advance If advance notice is not practical they will notify you as soon as possible You will also be advised of your right to file a complaint with the FCC This fax mo...

Page 109: ...ing impaired customers on request DOC Industry Canada Compliance Notices 6 This digital apparatus does not exceed the Class B limits for radio noise emissions from digital apparatus as set forth in the radio interference regulations of the Canadian Department of Communications Le présent appareil numérique n émet pas de bruits radioélectriques dépassant les limites applicables aux appareils numéri...

Page 110: ...adienne Industrie Canada identifie l équipement certifié Cette certification signifie que l équipement satisfait certaines normes de protection d exploitation et de sécurité des réseaux de télécommunications Le département ne garantit pas le fonctionnement de l équipement à la satisfaction de l utilisateur Le PenCentra 130 possede un modem interne conforme aux normes de certification d Industrie C...

Page 111: ...tage de la charge totale pouvant être connecté à une boucle ou à un circuit téléphonique utilisé par ce périphérique afin de prévenir toute surcharge La terminaison d une boucle peut être constituée de n importe quelle combinaison de périphériques de sorte que le total de numéros de charge de tous les périphériques n excède pas 100 Avertissement Pour assurer la sécurité les utilisateurs doivent vé...

Page 112: ...C 6 Appendix ...

Page 113: ... circle gestures 4 13 cleaning the display screen 5 3 clicking 4 8 connecting remotely getting help 3 31 connecting to an ISP 3 27 connecting to the network 3 28 connectors and peripheral interfaces 1 8 Contacts 3 17 creating a dial up connection 3 28 creating a dial up connection to a modem 3 31 creating an Ethernet connection 3 28 D dc input 1 9 DC input connector 1 5 display screen is blank 6 1...

Page 114: ...Editor using 4 13 microphone 1 3 microphone jack 1 5 1 8 Microsoft InkWriter 1 11 Microsoft Pocket Office 3 1 opening 3 1 Microsoft Voice recorder 1 11 mobile keyboard 1 2 modem jack 1 3 1 9 N notification button 1 3 1 8 O On Screen Keyboard 4 5 overheating avoiding 5 3 P PC Card doors 1 3 PC Cards 1 8 inserting and removing 2 5 PC Link 1 11 pen clicking 4 8 erasing text 4 9 not responding 6 2 rep...

Page 115: ...lecting text 4 9 sending a message 3 25 serial port 1 5 1 9 slip case 1 2 space inserting automatically 4 13 spacing between characters and words 4 10 spare battery 1 2 spare pen 1 2 speaker 1 5 1 10 spell checker using 4 12 Speller 4 5 starting Macro Editor 4 13 Recognition Tuner 4 14 status indicators 1 3 1 7 battery 1 7 DC input 1 7 notification indicator 1 7 Storing 5 2 Stylistic LT protecting...

Page 116: ... USB port 1 5 1 9 Using Online Help 4 8 Using the Pen 2 3 V Voice Recorder 3 10 recording and playing 3 11 W where to find information ix Windows CE applications 3 1 Windows CE Services 3 31 installing 3 32 remote synchronization 3 34 setting up a partnership 3 32 synchronizing files 3 33 Windows CE website x World Clock 1 11 writing case identical letters 4 9 punctuation marks 4 10 text 4 8 ...

Reviews: