background image

Important notes

FCC Class B Compliance Statement

The following statement applies to the products covered in this manual, unless otherwise speci

fi

ed

herein. The statement for other products will appear in the accompanying documentation.

NOTE:

This equipment has been tested and found to comply with the limits for a "Class B" digital
device, pursuant to Part 15 of the FCC rules and meets all requirements of the Canadian
Interference-Causing Equipment Standard ICES-003 for digital apparatus. These limits are
designed to provide reasonable protection against harmful interference in a residential installation.
This equipment generates, uses and can radiate radio frequency energy and, if not installed
and used in strict accordance with the instructions, may cause harmful interference to radio
communications. However, there is no guarantee that interference will not occur in a particular
installation. If this equipment does cause harmful interference to radio or television reception,
which can be determined by turning the equipment off and on, the user is encouraged to
try to correct the interference by one or more of the following measures:

Reorient or relocate the receiving antenna.

Increase the separation between equipment and the receiver.

Connect the equipment into an outlet on a circuit different from that to
which the receiver is connected.

Consult the dealer or an experienced radio/TV technician for help.

Fujitsu America Inc. is not responsible for any radio or television interference caused by unauthorized
modi

fi

cations of this equipment or the substitution or attachment of connecting cables and equipment

other than those speci

fi

ed by Fujitsu America Inc.. The correction of interferences caused by such

unauthorized modi

fi

cation, substitution or attachment will be the responsibility of the user.

The use of shielded I/O cables is required when connecting this equipment to any and all optional
peripheral or host devices. Failure to do so may violate FCC and ICES rules.

A26361-K1253-Z220-1-7619, edition 2

5

Downloaded from ManualMonitor.com Manuals

Summary of Contents for P22W-5 ECO

Page 1: ...P22W 5 ECO Operating Manual Display Downloaded from ManualMonitor com Manuals ...

Page 2: ...partner your sales office The latest information about our products useful tips updates etc is available on our website http ts fujitsu com support Further information can be found in the Service Desk list http ts fujitsu com support servicedesk html Downloaded from ManualMonitor com Manuals ...

Page 3: ...Downloaded from ManualMonitor com Manuals ...

Page 4: ...s and delivery subject to availability Any liability that the data and illustrations are complete actual or correct is excluded Designations may be trademarks and or copyrights of the respective manufacturer the use of which by third parties for their own purposes may infringe the rights of such owner For further information see http ts fujitsu com terms_of_use html Order No Fujitsu Technology Sol...

Page 5: ...1 Important notes 3 Getting started 8 Operation 15 Notes on ergonomic colour adjustment 23 Troubleshooting 24 Notes regarding the DIN EN ISO 13406 2 standard 26 Technical data 27 Operating Manual Downloaded from ManualMonitor com Manuals ...

Page 6: ...s hereby recognised Copyright Fujitsu Technology Solutions GmbH 2009 All rights including rights of translation reproduction by printing copying or similar methods of the whole document or parts thereof are reserved Offenders will be liable for damages All rights reserved including rights created by patent grant or registration of a utility model or design Subject to availability and technical mod...

Page 7: ...5 Switching the device on and off 15 Notes on power management 16 Changing the monitor settings 17 Changing the monitor settings with the buttons of the control panel 17 Changing the monitor settings using the OSD menu 18 Adjusting the brightness and contrast 20 Selecting the application mode 20 Adjusting the picture size and position 21 Adjusting the volume 21 Setting colour temperature and colou...

Page 8: ...Contents DVI D port 30 HDMI port 31 A26361 K1253 Z220 1 7619 edition 2 Downloaded from ManualMonitor com Manuals ...

Page 9: ...ower management for reducing power consumption when the computer is not in use Compliance with the recommendations according to TCO 03 the monitor fulfills all GS Geprüfte Sicherheit Certified Security requirements This operating manual contains important information you require to start up and run your LCD monitor When putting the monitor into operation for the first time the screen display shoul...

Page 10: ...mmand to launch a program start exe This style refers to information displayed by a program on the screen e g Installation is completed This style is for terms and texts in a software user interface e g Click Save names of programs or files e g Windows or setup exe This style is for cross references to another section e g Safety information cross references to an external source e g a web address ...

Page 11: ...oes not disconnect the monitor from the mains voltage To disconnect fully from the mains supply disconnect the power plug from the socket The device is equipped with a power cable that complies with safety standards Use the supplied power cable only Lay the cables in such a way that they do not create a hazard danger of tripping and cannot be damaged When connecting the device observe the relevant...

Page 12: ...type SVT or SJT cable sets may be used For devices which sit on the floor only SJT type cable sets may be used The cable set must be selected according to the rated current for your device If necessary replace the original power cable with a regular grounded 3 core mains lead Transporting the device Device Transportation Retransportation Transport all parts separately in their original packaging o...

Page 13: ...ful interference to radio or television reception which can be determined by turning the equipment off and on the user is encouraged to try to correct the interference by one or more of the following measures Reorient or relocate the receiving antenna Increase the separation between equipment and the receiver Connect the equipment into an outlet on a circuit different from that to which the receiv...

Page 14: ...enning Bernd Phone No 408 329 6737 Fax No 408 746 8299 We Fujitsu technology Solution Inc hereby declare that the equipment bearing the trade name and model number specified above was tested confirming to the applicable FCC Rules under the most accurate measurement standards possible and that all the necessary steps have been taken and are in force to assure that production units of the same equip...

Page 15: ...of the following directly Germany Belgium Switzerland Fujitsu Technology Solutions GmbH Remarketing and Recycling D 33106 Paderborn Germany Tel 49 5251 81 80 10 Fax 49 5251 81 80 15 http ts fujitsu com wvm RECUPEL Boulevard Reyers 80 B 1030 Brussels Tel 32 2 706 86 16 Fax 32 2 706 86 13 E mail info recupel be http www recupel be SWICO Schweizerischer Wirtschaftsverband der Informations Kommunikati...

Page 16: ...dividual parts Check the contents of the package for any visible damage caused during transport Check whether the delivery conforms to the details in the delivery note Should you discover that the delivery does not correspond to the delivery note notify your local sales outlet immediately Do not discard the original packing material of the devices You may need the packaging in the future if you ne...

Page 17: ...on 1 Do not position the video workstation opposite a window 1 1 Position the monitor outside the reach of a light source 1 1 Position the keyboard where it is easiest to reach 1 A26361 K1253 Z220 1 7619 edition 2 9 Downloaded from ManualMonitor com Manuals ...

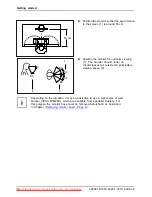
Page 18: ...no circumstances fall outside the permissible viewing space 2 Depending on the situation it may be advisable to use a swivel arm or wall bracket VESA FPMPMI which are available from specialist dealers For this purpose the monitor base must be removed beforehand as described in Chapter Removing monitor base Page 12 10 A26361 K1253 Z220 1 7619 edition 2 Downloaded from ManualMonitor com Manuals ...

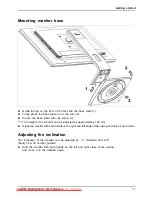
Page 19: ...pproximately 120 mm Grasp the monitor with both hands on the right and left edge of the casing and move it up or down Adjusting the inclination The inclination of the monitor can be adjusted by 5 forward and 25 back from its vertical position Hold the monitor with both hands on the left and right sides of the casing and move it to the desired angle A26361 K1253 Z220 1 7619 edition 2 11 Downloaded ...

Page 20: ...nitor You can now mount a swivel arm or a wall bracket as per VESA FPMPMI with 100 mm hole spacing For instructions on how to mount the swivel arm or wall bracket please see the documentation for the swivel arm or wall bracket Connecting the device Please observe the safety information in Important notes Page 3 CE conformance and optimum picture quality are guaranteed only if you use the data cabl...

Page 21: ...priate data cable for your computer Connect one of the connectors of the data cable to the D SUB socket 7 or the DVI D socket 6 or the HDMI socket 5 of the monitor and secure the plug connection by tightening the retaining screws The monitor automatically detects the input when only one signal source is connected Insert one connector of the audio line in the AUDIO IN 8 socket on the monitor and ma...

Page 22: ... on the computer and secure the plug in connection by tightening the safety screws Insert the other plug of the audio cable in the audio output of the computer Plug the power connector of the monitor into a properly grounded mains outlet Plug the power connector of the computer into a properly grounded mains outlet If your computer has two monitor ports onboard screen controller and separate graph...

Page 23: ...ottom up The colour of the LED indicator changes as follows LED indicator Status blue Monitor and computer are switched on orange Monitor is not receiving a video signal or is in power saving mode does not light up Monitor is switched off or is in 0W energy saving mode 3 2 1 1 Power indicator 2 ON OFF switch 3 0W switch BASIC ECO A26361 K1253 Z220 1 7619 edition 2 15 Downloaded from ManualMonitor ...

Page 24: ...st energy saving effect Stage Operation Energy saving mode Normal ECO ECO Standby 0 BASIC I Power indicator glows blue glows green is unlit glows orange Display max brightness typ 200 cd m2 unlit unlit Power consumption typical P22W 5 70 W P22W 5 47 W 0 W reduced to 1 W If your computer detects inactivity no input it sends an appropriate signal to the monitor to reduce the power consumption energy...

Page 25: ...ck INPUT button 4 EXIT AUTO button 5 Power indicator 6 ON OFF switch Performing auto adjustment of the monitor Press the EXIT AUTO button for about 1 second The Auto Processing message appears Picture quality and position are set to optimum values for your system Selecting input signal D SUB DVI_D HDMI Press the Back INPUT button to call up the Input selectsetting window Press the Forwards ECO but...

Page 26: ...appears Please proceed in the same manner to release the locked OSD menu again Locking the ON OFF button The ON OFF switch can be locked to prevent accidental or unauthorised changes to the monitor settings Press the Forwards ECO button and the Back INPUT button at the same time and keep them pressed for a few seconds The message Action was executed appears Please proceed in the same manner to rel...

Page 27: ...on or the Back INPUT button to highlight another function Press the SELECT MENU button to select the highlighted function Press the Forwards ECO button or the Back INPUT button to highlight another function Press the EXIT AUTO button to exit the function Press the Forwards ECO button or the Back INPUT button to highlight another function or press the EXIT AUTO button to return to the main menu All...

Page 28: ...l the brightness of the background lighting using the light sensor On The brightness is adjusted according to the ambient brightness Off The brightness is adjusted manually by the user Auto level Adjust the signal level With this function you can automatically set the contrast The function is executed with the SELECT MENU button If the contrast is set too high bright surfaces can no longer be dist...

Page 29: ... screen selection of full screen mode Keep aspect maximum picture size without distortion only for PC image 16 9 16 9 widescreen format Video TV picture only 4 3 4 3 format Video TV picture only Adjusting the volume Call the Audio setting window Volume Set the volume for playback with the integrated loudspeakers Mute Switch the loudspeakers off or on Setting colour temperature and colours Call the...

Page 30: ...SD menu to the left or to the right OSDV position Set the vertical position of the OSD menu With this function you move the OSD menu up or down OSDTimeout Set the display duration of the OSD menu With this function you select a value from 10 to 120 seconds If the set time expires without a setting being made the OSD menu is automatically faded out Factory recall Activate the factory settings With ...

Page 31: ...ing several colours for characters and background and giving the primary colours full modulation you can obtain very suitable colour combinations see the following table Characters Background black white purple blue cyan green yellow red black white purple blue cyan green yellow red Colour combination very suitable Colour combination not suitable because colour hues are too close together thin cha...

Page 32: ...r is correctly attached to the monitor port on the computer Check whether the computer is switched on Message Frequency out of range kHz Hz Please change the display mode to 1680 x 1050 with 60 Hz The input signal horizontal frequency and refresh rate at the displayed input does not correspond to the technical data for the monitor Adjust the video frequency range using the computer software see do...

Page 33: ...nces horizontal lines picture noise Press the EXIT AUTO button to perform auto adjustment of the screen The screen becomes darker The background lighting has a limited lifetime If your monitor display should become too dark the background lighting will have to be replaced Please contact our Service desk A26361 K1253 Z220 1 7619 edition 2 25 Downloaded from ManualMonitor com Manuals ...

Page 34: ...050 has 1680 x 1050 1764000 pixels Each pixel consists of three subpixels red green and blue so there are almost 5 3 million subpixels in total In accordance with ISO 13406 2 Class II a maximum of 6 pixels and 9 subpixels may be defective Pixel A pixel consists of 3 subpixels normally red green and blue A pixel is the smallest element that can be generated by complete functionality of the display ...

Page 35: ...orable display modes 25 Pixel error classes according to ISO 13406 2 Class II Electrical data Analog positive 0 7 Vss 75 Ω Video Digital DVI D HDMI with HDCP Synchronisation Separate Sync TTL positive or negative Horizontal frequency 28 kHz 80 kHz multi scanning Refresh rate 50 Hz 75 Hz Maximum pixel rate 165 MHz Power supply switches automatically 100 V 240 V 50 Hz 60 Hz Normal operation 70W ECO ...

Page 36: ...ration from the monitor and select the appropriate settings Preset operating modes The picture position and size have been optimised at the factory for the operating modes listed above Depending on the graphics card used it may be necessary to adjust the display position or size In this case you can change and save the settings see chapter Changing the monitor settings Page 17 Most frequent operat...

Page 37: ...50 60 Hz 16 9 1920 x 1080 i 50 60 Hz 16 9 1920 x 1080 p 50 60 Hz 16 9 Only possible with HDMI SUB D port 6 10 11 15 5 1 Pin Meaning 1 Video input red 2 Video input green 3 Video input blue 4 Ground 5 Ground 6 Video ground red 7 Video ground green 8 Video ground blue 9 5 V DDC 10 Sync ground 11 Ground 12 DDC Data 13 H sync 14 V sync 15 DDC Clock A26361 K1253 Z220 1 7619 edition 2 29 Downloaded from...

Page 38: ...og Vertical Sync 9 TMDS Data1 10 TMDS Data1 11 TMDS Data 1 3 Shield 12 not connected 13 not connected 14 5V Power 15 Earth 16 Hot Plug Detect 17 TMDS Data0 18 TMDS Data0 19 TMDS Data 0 5 Shield 20 not connected 21 not connected 22 TMDS Clock Shield 23 TMDS Clock 24 TMDS Clock 30 A26361 K1253 Z220 1 7619 edition 2 Downloaded from ManualMonitor com Manuals ...

Page 39: ...eld 3 TMDS Data2 4 TMDS Data1 5 TMDS Data1 Shield 6 TMDS Data1 7 TMDS Data0 8 TMDS Data0 Shield 9 TMDS Data0 10 TMDS Clock 11 TMDS Clock Shield 12 TMDS Clock 13 CEC 14 N C 15 SCL 16 SDA 17 DDC CEC Ground 18 5 V Power 19 Hot plug detect A26361 K1253 Z220 1 7619 edition 2 31 Downloaded from ManualMonitor com Manuals ...

Reviews: