background image

122

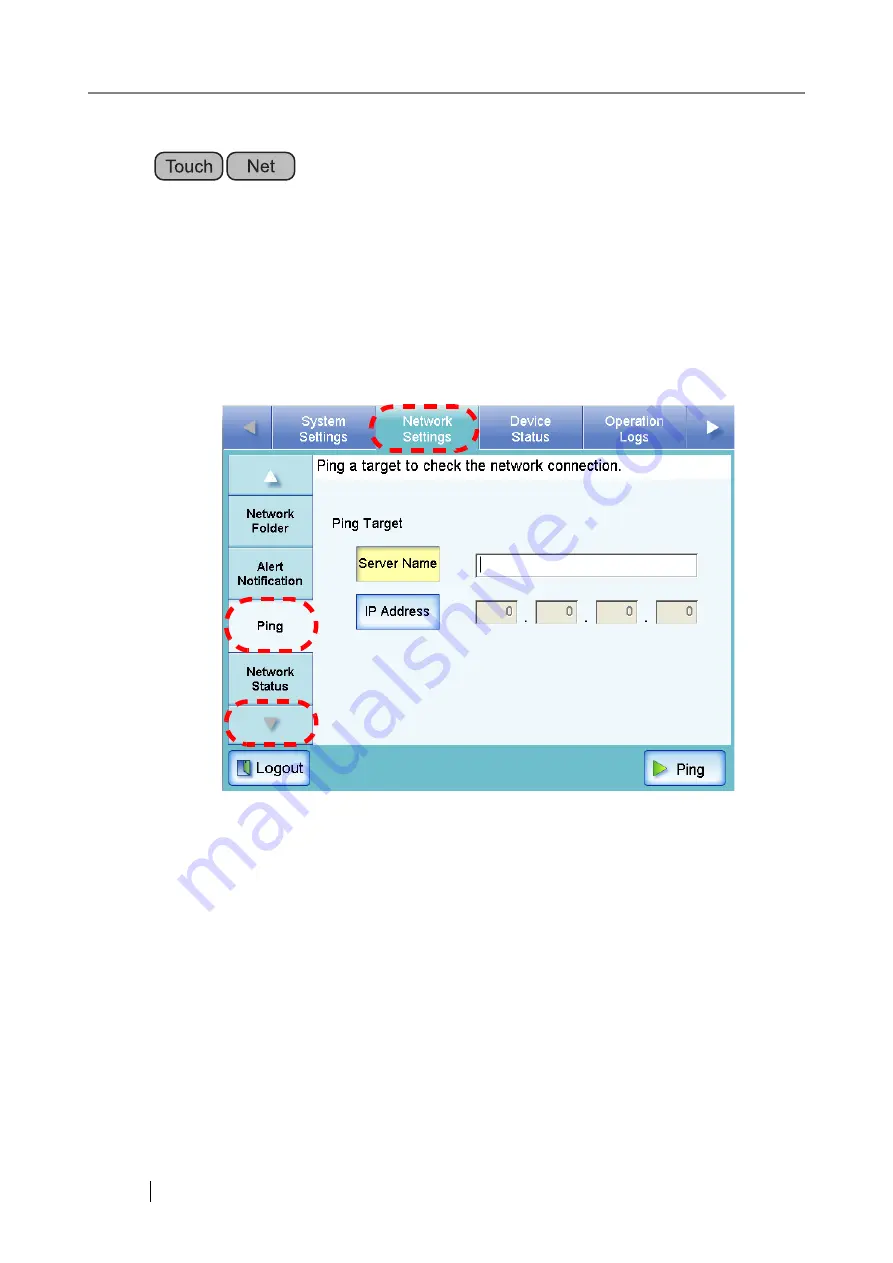
3.6.11 Checking the Network Connection with a Ping Test 

The network connection can be checked using a ping test.

1. Select the [Network Settings] tab on the top menu.

2. Press the [Down] button on the left side menu.

Scroll the left side menu down until the [Ping] tab appears.

3. Select the [Ping] tab on the left side menu.

The "Ping" screen appears.

Summary of Contents for FI-6000NS

Page 1: ...P3PC 1852 06ENZ0 ...

Page 2: ......

Page 3: ...s and Functions 3 1 2 1 External Parts 3 1 2 2 Internal Parts 5 1 3 User Types and Operations 6 1 4 Scanner Quick User Guide 9 1 4 1 Sending Scanned Data as an e Mail Attachment 9 1 4 2 Sending Scanned Data by Fax 11 1 4 3 Printing Scanned Data on a Network Printer 13 1 4 4 Saving Scanned Data in a Network Folder 15 1 5 Scanner Requirements 17 1 5 1 Administrator Requirements for Login via the Net...

Page 4: ...1 Menu Tabs 29 3 2 2 Input Fields and Entering Characters 30 3 3 Administrator Login via the Scanner s Touch Panel 31 3 4 Administrator Login via the Network Interface 34 3 4 1 Setting up for Administrator Access via the Network Interface 34 3 4 2 Logging In 41 3 5 Using the System Settings Menus 45 3 5 1 Calibrating the Touch Panel 45 3 5 2 Setting the Scanner Name 48 3 5 3 Setting the Region Tim...

Page 5: ... Network Connection with a Ping Test 122 3 6 12 Checking the Network Operating Status 125 3 7 Using the Device Status Menus 127 3 7 1 Viewing the System Status 127 3 7 2 Viewing the Usage Status 128 3 7 3 Viewing the Add in Status 132 3 8 Using the Operation Logs Menus 133 3 8 1 Managing User Logs 133 3 8 2 Managing the System Log 139 3 9 Using the Maintenance Menus 144 3 9 1 Maintaining the User ...

Page 6: ...ress Book 197 4 5 Sending the Scanned Data by Fax 199 4 5 1 Selecting a Fax Number from the Fax Number List 202 4 5 2 Adding a Contact to the Fax Number List 203 4 5 3 Editing a Contact in the Fax Number List 205 4 5 4 Deleting a Contact from the Fax Number List 207 4 6 Printing the Scanned Data 209 4 6 1 Scaling 214 4 6 2 Positioning 219 4 6 3 Simplex Duplex 222 4 7 Saving the Scanned Data to a N...

Page 7: ...ing a Scanned Page 262 4 10 3 Adding a Scanned Page 263 4 10 4 Deleting a Scanned Page 264 4 11 Checking the User Log 265 4 12 Maintenance 267 Chapter 5 Scanner Care 269 5 1 Cleaning 270 5 1 1 Cleaning Materials 270 5 1 2 Which Parts and When 271 5 2 Cleaning the ADF 272 5 2 1 Cleaning the ADF 272 5 3 Cleaning the LCD Touch Panel 278 5 4 Cleaning the Keyboard 278 5 5 Replacing Parts 279 5 5 1 Repl...

Page 8: ... 6 3 4 Problems when Connecting to the Scanner using the Network Scanner Admin Tool 311 6 4 Other Troubleshooting 312 6 5 Points to Check before Contacting Your FUJITSU Scanner Dealer 315 6 5 1 General Details 315 6 5 2 Error Status 316 6 6 Checking the Scanner Labels 318 6 7 Pre Maintenance Preparations 319 Appendix A ADF Paper Specifications 321 A 1 Paper Size 322 A 2 Paper Requirements 323 A 2 ...

Page 9: ...Specifications 331 B 1 Device Specifications 332 B 2 Scanner Specifications 333 Appendix C Operation Messages 335 C 1 Administrator Messages 336 C 1 1 Administrator Screen Messages 337 C 1 2 System Log Messages 357 C 1 3 Alert Monitor System Log Messages 359 C 2 Regular User Messages 363 C 2 1 Regular User Screen Messages 363 C 2 2 System Log Messages 382 C 2 3 User Log 393 Appendix D Glossary 399...

Page 10: ...x ...

Page 11: ...oducts derived from this software without specific prior written permission THIS SOFTWARE IS PROVIDED BY THE COPYRIGHT HOLDERS AND CONTRIBUTORS AS IS AND ANY EXPRESS OR IMPLIED WARRANTIES INCLUDING BUT NOT LIMITED TO THE IMPLIED WARRANTIES OF MERCHANTABILITY AND FITNESS FOR A PARTICULAR PURPOSE ARE DISCLAIMED IN NO EVENT SHALL THE COPYRIGHT OWNER OR CONTRIBUTORS BE LIABLE FOR ANY DIRECT INDIRECT I...

Page 12: ...MPLIED WARRANTIES OF MERCHANTABILITY AND FITNESS FOR A PARTICULAR PURPOSE ARE DISCLAIMED IN NO EVENT SHALL THE REGENTS OR CONTRIBUTORS BE LIABLE FOR ANY DIRECT INDIRECT INCIDENTAL SPECIAL EXEMPLARY OR CONSEQUENTIAL DAMAGES INCLUDING BUT NOT LIMITED TO PROCUREMENT OF SUBSTITUTE GOODS OR SERVICES LOSS OF USE DATA OR PROFITS OR BUSINESS INTERRUPTION HOWEVER CAUSED AND ON ANY THEORY OF LIABILITY WHETH...

Page 13: ...CIAL EXEMPLARY OR CONSEQUENTIAL DAMAGES INCLUDING BUT NOT LIMITED TO PROCUREMENT OF SUBSTITUTE GOODS OR SERVICES LOSS OF USE DATA OR PROFITS OR BUSINESS INTERRUPTION HOWEVER CAUSED AND ON ANY THEORY OF LIABILITY WHETHER IN CONTRACT STRICT LIABILITY OR TORT INCLUDING NEGLIGENCE OR OTHERWISE ARISING IN ANY WAY OUT OF THE USE OF THIS SOFTWARE EVEN IF ADVISED OF THE POSSIBILITY OF SUCH DAMAGE Portions...

Page 14: ... OR IN CONNECTION WITH THE USE OR PERFORMANCE OF THIS SOFTWARE Portions Copyright 1995 1996 1997 1998 and 1999 WIDE Project All rights reserved Redistribution and use in source and binary forms with or without modification are permitted provided that the following conditions are met 1 Redistributions of source code must retain the above copyright notice this list of conditions and the following di...

Page 15: ...ocumentation and or other materials provided with the dis tribution THIS SOFTWARE IS PROVIDED BY THE COPYRIGHT HOLDERS AND CONTRIBUTOR AS IS AND ANY EXPRESS OR IMPLIED WARRANTIES INCLUDING BUT NOT LIMITED TO THE IMPLIED WARRANTIES OF MERCHANTABILITY AND FITNESS FOR A PARTICULAR PURPOSE ARE DISCLAIMED IN NO EVENT SHALL THE COPYRIGHT HOLDERS OR CONTRIBUTORS BE LIABLE FOR ANY DIRECT INDIRECT INCIDENT...

Page 16: ... or promote products derived from this software without specific prior written permission THIS SOFTWARE IS PROVIDED BY THE COPYRIGHT HOLDERS AND CONTRIBUTORS AS IS AND ANY EXPRESS OR IMPLIED WARRANTIES INCLUDING BUT NOT LIMITED TO THE IMPLIED WARRANTIES OF MERCHANTABILITY AND FITNESS FOR A PARTICULAR PURPOSE ARE DISCLAIMED IN NO EVENT SHALL THE COPYRIGHT OWNER OR CONTRIBUTORS BE LIABLE FOR ANY DIR...

Page 17: ...uipment generates uses and can radiate radio frequency energy and if not installed and used in accordance with the instruction manual may cause harmful interference to radio communications However there is no guarantee that interference will not occur in a particular installation If this equipment does cause harmful interference to radio or television reception which can be determined by turning t...

Page 18: ...ions It has not been designed and manufactured for use in applications simply called high safety applications from here on that directly involve danger to life and health when a high degree of safety is required for example in the control of nuclear reactions at nuclear power facilities automatic flight control of aircraft air traffic control operation control in mass transport systems medical equ...

Page 19: ...replace the battery yourself as there is a risk of explosion if the wrong type is used Please contact your maintenance engineer in charge when the battery runs low Do not touch the battery Never install or remove the battery by yourself Doing so may cause electric shock or static electricity which can damage the device Trademarks Microsoft Windows and Windows Vista are registered trademarks of Mic...

Page 20: ...44 540 4538 All Rights Reserved Copyright PFU LIMITED 2007 2009 Windows Microsoft Windows operating system Windows XP Microsoft Windows XP Professional operating system Microsoft Windows XP Home Edition operating system Windows Vista Microsoft Windows Vista Home Basic operating system Microsoft Windows Vista Home Premium operating system Microsoft Windows Vista Business operating system Microsoft ...

Page 21: ...supplements whether such errors are omissions or statements resulting from negligence accidents or any other cause PFU further assumes no liability arising from the application or use of any product or system described herein nor any liability for incidental or consequential damages arising from the use of this manual PFU disclaims all warranties regarding the information contained herein whether ...

Page 22: ...erators to helpful advice regarding operation A TRIANGLE symbol indicates that special care and attention is required The drawing inside the triangle shows the specific caution A CIRCLE with a diagonal line inside shows action which users may not perform The drawing inside or under the circle shows the specific action that is not allowed R Outline characters on a colored background show instructio...

Page 23: ...FUJITSU scanner dealer or an authorized FUJITSU scanner service provider for repairs to this product High Temperature The glass scanner windows surface inside the ADF becomes hot when the scanner is used Be careful not to touch the surface of the glass scanner windows ATTENTION Do NOT remove from the scanner stain or scratch the warning labels ...

Page 24: ... or electric shock Do not place heavy objects on AC cables or pull bend twist heat damage or modify AC cables Do not use damaged AC cables or power plugs or install any cables or power plugs to loose wall sockets Use only specified AC cables and connector cables Failure to use the correct cables might cause electric shock and or equipment failure Please do not use the AC cable provided with this s...

Page 25: ... contacting your FUJITSU scanner dealer or an authorized FUJITSU scanner service provider Do not insert or drop metal objects in to the scanner Do not scan wet documents or documents with paper clips or staples Do not splash or allow the scanner to get wet If foreign objects water small metal objects liquids etc get inside the scanner immediately turn off the scanner and disconnect the power plug ...

Page 26: ...d other devices Firmly insert the power plug as far it can go into the power outlet Do not block the ventilation ports Blocking the ventilation ports generates heat inside of scanner which may result in fire or scanner failure Do not place heavy objects on the scanner or use the scanner s surface top to perform other work Improper installation might cause injuries and equipment failure Do not use ...

Page 27: ...uching any scanner mechanism during scanning since this may cause injuries When the scanner is not going to be used for a long period of time be sure to disconnect the power plug from the power outlet Do not install the scanner under direct sunlight or near heating apparatus Doing so might cause excessive heat to build up inside the scanner which can cause scanner trouble or even fire Install the ...

Page 28: ...xxviii ...

Page 29: ...k Scanner fi 6000NS Operator s Guide 1 Chapter 1 Scanner Overview 1 1 Scanner Features 2 1 2 Part Names and Functions 3 1 3 User Types and Operations 6 1 4 Scanner Quick User Guide 9 1 5 Scanner Requirements 17 ...

Page 30: ...orarily stored in the scanner before being e mailed faxed printed or saved the scanned data is always kept in an encrypted form in order to prevent exposure of data via analysis of the disk contents Scanned data deletion After the scanned data has been e mailed faxed printed or saved the temporary data is deleted Even if an error interrupts this process leaving some scanned data in the scanner thi...

Page 31: ...er Overview 1 1 2 Part Names and Functions 1 2 1 External Parts 1 Startup button 2 Scan button 3 LCD touch panel 4 Keyboard 5 Output tray 6 ADF paper chute 7 Side guides 8 Top cover Front view Rear view 9 ADF release 11 AC adaptor connector 12 LAN connector 10 Security cable slot ...

Page 32: ...s are ejected from the ADF onto this tray Small documents may be retrieved by flipping up the key board after scanning has completed 6 ADF paper chute Holds the documents waiting to be scanned scan side down 7 Side guides Adjust to the width of the paper to prevent skewing of the scanned pages 8 Top cover Frames the LCD touch panel and covers the upper scanner ADF mechanism Must be opened to clean...

Page 33: ...s from the ADF paper chute to the glass scanner windows 2 Pick roller 3 Sheet guide 4 Glass scanner win dows Place where the documents are scanned 5 ADF Automatic Doc ument Feeder Drives the documents from the ADF paper chute past the glass scanner windows to the output tray 1 Pad assembly 2 Pick roller 3 Sheet guide Separate shaft and roller 4 Glass scanner windows 5 ADF ...

Page 34: ...t or save the resulting data Top Menu Tab Side Menu Tab Used to Admin Regular User See Touch Net System Settings Screen Calibra tion Calibrate the touch panel A page 45 Scanner Name Set the scanner name A A page 48 Date Time Set the date time A A page 55 Region Time zone Set the region timezone A A page 53 Standby Mode Set the standby mode A A page 57 Admin Password Change the admin password A A p...

Page 35: ...ter Set the network priners A A page 88 Network Folder Set the network folders file servers A A page 108 Alert Notifica tion Set the destination for alert notifications A A page 120 Ping Check the network connec tion with a Ping test A A page 122 Network Status Check the network operating status A A page 125 Device Status System Status View the system status A A page 127 Usage Status View the usag...

Page 36: ... A page 186 Fax Send the scanned data by fax A page 199 Save Save the scanned data to a network folder A page 223 Scan Settings Set the scan options A page 228 Scan Viewer Enable disable the scan viewer A page 258 Maintenance Edit e Mail Addresses Edit contacts in the e mail address book A page 195 Edit Fax Num bers Edit contacts in the fax num ber list A page 205 Roller Cleaning Clean the ADF A p...

Page 37: ...NT The administrator must setup the Send e Mail function for the user to be able to send scanned data as an e mail attachment For details about the required settings refer to 3 1 Required Scanner Function Settings page 28 Loading Docu ments For details refer to 4 1 Loading Documents page 176 Logging in Regu lar User Mode For details refer to 4 3 Logging in Regular User Mode page 183 On the Main Me...

Page 38: ...e Mail screen enter the mail destination For details refer to 4 4 Sending the Scanned Data by e Mail page 186 On the Send e Mail screen press For details refer to 4 4 Sending the Scanned Data by e Mail page 186 On the Scan Viewer screen check the scanned data and press For details refer to 4 10 Editing the Scanned Data in the Scan Viewer page 261 Document is Scanned and e Mailed To check if the e ...

Page 39: ...e required settings refer to 3 1 Required Scanner Function Settings page 28 Loading Docu ments For details refer to 4 1 Loading Documents page 176 Logging in Regu lar User Mode For details refer to 4 3 Logging in Regular User Mode page 183 On the Main Menu screen press For details refer to 4 5 Sending the Scanned Data by Fax page 199 Setting the Scan Options Adjust the scan settings as necessary F...

Page 40: ...e 258 On the Send Fax screen enter the fax destination For details refer to 4 5 Sending the Scanned Data by Fax page 199 On the Send Fax screen press For details refer to 4 5 Sending the Scanned Data by Fax page 199 Document is Scanned and Faxed To check if the fax has been sent successfully refer to 4 11 Checking the User Log page 265 ...

Page 41: ...ettings page 28 Loading Docu ments For details refer to 4 1 Loading Documents page 176 Logging in Regu lar User Mode For details refer to 4 3 Logging in Regular User Mode page 183 On the Main Menu screen press For details refer to 4 6 Printing the Scanned Data page 209 Setting the Scan Options Adjust the scan settings as necessary For details refer to 4 8 Setting the Scan Options page 228 Setting ...

Page 42: ... to 4 6 Printing the Scanned Data page 209 On the Print screen press For details refer to 4 6 Printing the Scanned Data page 209 On the Scan Viewer screen check the scanned data and press For details refer to 4 10 Editing the Scanned Data in the Scan Viewer page 261 Document is Scanned and Printed To check if the document has been printed successfully refer to 4 11 Checking the User Log page 265 ...

Page 43: ...he required settings refer to 3 1 Required Scanner Function Settings page 28 Loading Docu ments For details refer to 4 1 Loading Documents page 176 Logging in Regu lar User Mode For details refer to 4 3 Logging in Regular User Mode page 183 On the Main Menu screen press For details refer to 4 7 Saving the Scanned Data to a Network Folder page 223 Setting the Scan Options Adjust the scan settings a...

Page 44: ...e Scanned Data to a Network Folder page 223 On the Save as screen press For details refer to 4 7 Saving the Scanned Data to a Network Folder page 223 On the Scan Viewer screen check the scanned data and press For details refer to 4 10 Editing the Scanned Data in the Scan Viewer page 261 Document is Scanned and Saved To check if the document has been saved suc cessfully refer to 4 11 Checking the U...

Page 45: ...lling the network scanner admin tool confirm that NET Framework 2 0 is installed If not already installed a message will appear telling you to install NET Framework 2 0 from the Microsoft Web site When installing NET Frame work at least 280MB of additional free disk space is required 2 Confirm that the latest security patch has been applied If the latest patch has not been applied downloading oper...

Page 46: ...P Windows Server 2003 2 SMTP File Server Windows 2000 Server 1 Windows Shared Folder Windows Server 2003 2 Windows Shared Folder Print Server Windows 2000 Server 1 Printer Driver 3 Windows Server 2003 2 Printer Driver 3 WINS Server Windows 2000 Server 1 WINS Windows Server 2003 2 WINS DHCP Server Windows 2000 Server 1 DHCP Windows Server 2003 2 DHCP NTP Server Redhat Enterprise Linux ntp Fax Serve...

Page 47: ...ts from WINS clients register their names and IP addresses and responds to NetBIOS name queries submitted by clients returning the IP address of a queried name if it is listed in the server database In addition when a DNS name resolution fails the query can be transferred to the WINS server DHCP Server The DHCP server automatically assigns an IP address for this scanner and other client PCs NTP Se...

Page 48: ...Fax Server The fax server is used for sending faxes This scanner supports the following fax servers Captaris RightFax Business Server Version 9 3 This fax server can be used to send the scanned data by fax ...

Page 49: ...2 Network Scanner fi 6000NS Operator s Guide 21 Chapter 2 Basic Scanner Operations 2 1 Using the Scanner Buttons 22 2 2 Using the LCD Touch Panel 24 2 3 Using the Keyboard 25 ...

Page 50: ...TION When the scanner is starting up or in standby mode be careful to never hold the startup button down for four seconds as this will cause the scanner to shutdown If this happens saved scanned data may become unusable If the startup button is accidentally held down too long causing the scanner to shutdown temporally detach the AC adaptor to ensure that the power is completely off After turning t...

Page 51: ... Guide 23 Basic Scanner Operations 2 2 1 2 Using the Scan Button When the Scan button on the touch panel is pressed it will start the scan This button has the following names Scan button Scan Send button Scan Print button Scan Save button Scan More button Scan button ...

Page 52: ... Administrator Control Screens page 29 or 4 2 Using Touch Panel Screens Regular User page 179 ATTENTION Do not use a pen or other hard object on the LCD touch panel The LCD touch panel may be damaged If the screen is dirty this may cause the LCD touch panel to malfunction Clean the screen if it is visibly dirty For details refer to 5 3 Cleaning the LCD Touch Panel page 278 ...

Page 53: ... button Space Select the button in focus However this cannot be used for the Download Get CSV and Backup buttons Enter Set the contents of the current screen Used instead of the OK button or Login button Change the value of the numerical input for the field in focus Page Up Page Down Scroll up or down the contents on the screen Used instead of the scroll buttons ATTENTION The keyboard cannot be us...

Page 54: ...screen Used instead of the OK button or Login button On Search screens may be used instead of the Find button Esc Return to the previous screen On Main Menu may be used instead of the Logout button Alt F4 Shutdown the scanner Used instead of the Shutdown button on the Login screen Scroll up or down between items Page Up Page Down Scroll up or down the page on the screen ...

Page 55: ...essages page 357 Symbols used in this chapter Administrator operating via the touch panel Administrator operating via the network interface using the fi Network Scanner Admin Tool 3 1 Required Scanner Function Settings 28 3 2 Administrator Control Screens 29 3 3 Administrator Login via the Scanner s Touch Panel 31 3 4 Administrator Login via the Network Interface 34 3 5 Using the System Settings M...

Page 56: ...ee System Settings Screen Calibration page 45 Scanner Name N N N N page 48 Region Timezone A A A A page 53 Date Time A A A A page 55 Standby Mode page 57 Admin Password A A A A page 61 Multifeed Settings page 63 Scanner Adjustment page 67 Network Settings IP Address N N N N page 70 DNS Server A A A A page 73 WINS Server A A A A page 74 NTP Server A A A A page 75 LDAP Server A 1 A 1 A 1 A 1 page 77...

Page 57: ...top menu tabs is selected the related function tabs are displayed on the left side menu Actual icon Shown in manual as Used to Left button Right button Switch between top menu tabs scrolling the top menu as necessary Up button Down button Switch between side menu tabs scrolling the left side menu as necessary List button Display a list of possible selections Logout button Log the current user out ...

Page 58: ...e current screen settings Cancel button Abandon any input to the current screen and keep present settings and or return to the previous screen Actual icon Shown in manual as Used to Screen Field name Login Password Admin Password Current Password New Password Confirm New Password Authentication screen for setting a network folder Password ...

Page 59: ... are already queued these jobs may not be processed normally In such cases wait for all buffer jobs to be processed before changing any settings If the Cancel button is rapidly pressed many times in succession a The page can not be displayed message may appear Selecting another tab or reloading the page will refresh the screen HINT The user name and initial password for the administrator are as fo...

Page 60: ...ser name Passwords must be between 7 and 127 characters long Alphanumeric characters case sensitive and symbols may be entered HINT The Caps Lock indicator is on if the keyboard s Caps Lock is set The Num Lock indicator is on if the keyboard s Num Lock is set ...

Page 61: ...rator Login via the Scanner s Touch Panel Network Scanner fi 6000NS Operator s Guide 33 Administrator Operations 3 3 Press the Login button If the user name and password are valid the System Settings screen appears ...

Page 62: ...ettings button on the Temporary Internet Files The Settings dialog box appears 3 For Check for newer versions of stored pages select Automatically HINT For details about setting up to manage the scanner via a personal com puter refer to 1 5 1 Administrator Requirements for Login via the Network Interface page 17 HINT The following are required for administrator login via the network interface 3 5 ...

Page 63: ...the Temporary Internet files folder section specify Amount of disk space to use as 63MB or above 5 Press the OK button ATTENTION Different browser versions may require a different set up procedure Do not use a proxy server setting HINT If any updates or service packs are available for Internet Explorer make sure they are applied ...

Page 64: ... IP address can be specified instead of a scanner name for the URL If the IP address is xxx xxx xxx xxx the specified URL is http xxx xxx xxx xxx The Login screen appears 2 Enter a User Name and Password Enter admin for the user name Passwords must be between 7 and 127 characters long Alphanumeric characters case sensitive and symbols may be entered ATTENTION If this tool has already been installe...

Page 65: ...ogin via the Network Interface Network Scanner fi 6000NS Operator s Guide 37 Administrator Operations 3 3 Press the Login button The Download screen appears 4 Press the Download button The File Download dialog box appears ...

Page 66: ...utton The Select Installation Folder window appears HINT If NET Framework 2 0 has not been installed the following message appears Pressing Yes accesses the Microsoft homepage Download and install the NET Framework version 2 0 Redistributable Package After installing the package try again from Step 1 ...

Page 67: ... network scanner admin tool To select a different folder press the Browse button To check the free space available for the currently selected folder press the Disk Cost button ATTENTION Installation will fail if the length of any installation path folder path plus installation file name exceeds 259 characters Select an installation folder that respects this limit ...

Page 68: ...e network scanner admin tool should now be usable Click the Start button select the Programs fi scanner sub menu and then click on the fi Network Scanner Admin Tool UnInstalling the Network Scanner Admin Tool The network scanner admin tool can be uninstalled from the PC it was installed on from Control Panel Add or Remove Programs ATTENTION Close the network scanner admin tool before uninstalling ...

Page 69: ...horized FUJITSU scanner service provider If changes are made to settings such as IP address settings when buffer jobs are already queued these jobs may not be processed normally In such cases wait for all buffer jobs to be processed before changing any settings If the Cancel button is rapidly pressed many times in succession a Con nection error message may appear You will need to wait for the erro...

Page 70: ...42 3 Press the Connect button The Login screen appears ...

Page 71: ...etwork Scanner fi 6000NS Operator s Guide 43 Administrator Operations 3 4 Enter a User Name and Password Enter admin for the user name Passwords must be between 7 and 127 characters long Alphanumeric characters case sensitive and symbols may be entered ...

Page 72: ...44 5 Press the Login button If the user name and password are valid the System Settings screen appears ...

Page 73: ...s should be done when the touch panel responses seem out of alignment with the positions of objects on the LCD screen 1 Select the System Settings tab on the top menu 2 Select the Screen Calibration tab on the left side menu The Screen Calibration screen appears 3 Press the Calibrate Screen button A blank calibration screen appears with a red adjustment mark in the top left cor ner ...

Page 74: ...raight to the post calibration test screen Use the arrow keys to move the to a different calibration point This allows a bad touch to be redone Press the Esc key to stop the calibration process and return to the Screen Calibration screen Press the Enter key to close the error dialog Not normally needed After being touched the will move to the next calibration posi tion Each time it stops touch it ...

Page 75: ...f button cannot be used 6 When you are satisfied with the touch screen response press the Update button This saves the current calibration data completing the calibration process and returns you to the Screen Calibration screen ATTENTION If the calibration is not performed carefully or the Enter key is pressed before all the calibration points have been touched the fol lowing error message may app...

Page 76: ...gs tab on the top menu 2 Select the Scanner Name tab on the left side menu The Scanner Name screen appears ATTENTION Do not use a name already being used in the network Name duplication will cause a network connection error For more details about how to deal with such errors refer to C 1 1 Administrator Screen Messages page 337 ...

Page 77: ... 3 3 Enter a Scanner Name Scanner names may be up to 15 characters long Alphanumeric characters case sensitive and hyphens may be entered Initial character may not be a hyphen 4 Press the OK button The restart confirmation screen appears ATTENTION Do not use a name that is already being used in the network ...

Page 78: ...50 5 Press the Now button The system is restarted ...

Page 79: ...can be changed again by entering a new scanner name in the current scanner name field and pressing the OK button Alternatively the scanner can be reverted to its old name i e no change after restart by pressing the OK button with out changing the current scanner name Use the following procedure to restart the scanner after the Later option has been selected 1 Press the Logout button A restart conf...

Page 80: ...ble and turn the scanner off 2 Reboot the scanner with the LAN cable disconnected and enter a non duplicate scanner name 3 Reboot the scanner again 4 Re connect the LAN cable to the scanner The connection will be lost if the scanner name is changed via the network interface To continue with other settings wait a short time for the device to restart then login to the network interface again ...

Page 81: ...tting the Region Timezone 1 Select the System Settings tab on the top menu 2 Select the Region Timezone tab on the left side menu The Region Timezone screen appears 3 Press the List button for the Timezone input field The default timezone is GMT 09 00 Osaka Sapporo Tokyo A list of timezones appears 4 Select a timezone ...

Page 82: ...54 5 Select whether Daylight Savings Time should be on or off This option is not shown for timezones where daylight savings time is not used 6 Press the OK button The Region Timezone is set ...

Page 83: ...perations 3 3 5 4 Setting the Date Time 1 Select the System Settings tab on the top menu 2 Select the Date Time tab on the left side menu The Date Time screen appears with a system date time near to the current date time shown 3 Press the Date Format List button A date format drop down list appears ...

Page 84: ...elected The date time range that may be entered is from January 1st 2001 00 00 00 to December 31st 2037 23 59 59 When entering a one digit number for date and time such as for January prepend 0 and enter 01 in the input field 6 Press the OK button The date and time are set HINT Pressing the Get Time button refreshes the current value of the internal system date time HINT An adjustment that advance...

Page 85: ...ner automatically logs the user out If no operations are performed for the specified Standby after period of time the scanner enters standby mode The touch panel is switched off when the scanner enters standby mode When the startup button is pressed the Login screen will appear 1 Select the System Settings tab on the top menu 2 Press the Down button on the left side menu Scroll the left side menu ...

Page 86: ...58 3 Select the Standby Mode tab on the left side menu The Standby Mode screen appears 4 Press the List button for the Logout after input field A list of Logout after times appears ...

Page 87: ...work Scanner fi 6000NS Operator s Guide 59 Administrator Operations 3 5 Select the desired time before automatic log out The default time is 5min 6 Press the List button for the Standby after input field A list of Standby after times appears ...

Page 88: ...fore standby mode The default time is 15min 8 Press the OK button The scanner is set to first standby and then automatically log out after the specified times ATTENTION The Standby after time must be longer than the Logout after time ...

Page 89: ...he Down button on the left side menu Scroll the left side menu down until the Admin Password tab appears 3 Select the Admin Password tab on the left side menu The Admin Password screen appears ATTENTION Login is not possible without a password therefore manage them carefully If a password has been lost or forgotten contact your FUJITSU scanner dealer or an authorized FUJITSU scanner service provid...

Page 90: ...ters case sen sitive and symbols may be entered 5 Press the OK button The new admin password is set HINT The Caps Lock and Num Lock indicators are shown when the admin istrator logs in via the scanner s touch panel The Caps Lock indicator is on if the keyboard s Caps Lock is set The Num Lock indicator is on if the keyboard s Num Lock is set ...

Page 91: ... detected as a multifeed When scanning documents multifeed detection area may be adjusted to ignore the area excluding the photograph or attachments and prevent mis detections For document requirements for multifeed detection refer to A 5 Multifeed Detection Conditions page 328 1 Select the System Settings tab on the top menu 2 Press the Down button on the left side menu Scroll the left side menu ...

Page 92: ... 4in of the vertical center line of the document Middle Multifeeds will be detected within 1 upper limit and 2 lower limit set a Top Bot tom Multifeeds will be detected from the top of the page to 1 upper limit and from 2 lower limit to the bottom of the page b Center of paper 35mm a 1 2 Up to 510mm Outside of multifeed detection area Center of paper 35mm b 1 2 b Up to 510mm Outside of multifeed d...

Page 93: ...3 5 Using the System Settings Menus Network Scanner fi 6000NS Operator s Guide 65 Administrator Operations 3 ATTENTION Multifeed may not be detected for the top and bottom 25mm of a doc ument ...

Page 94: ...ultifeeds is set ATTENTION Specify a lower value for 1 than for 2 2 can have a maximum value of 510mm If the paper size setting is long page mode but the length of the document is longer than 510mm multifeed cannot be detected by length When Middle is selected if the document is shorter than 1 multi feed will not be detected When Top Bottom is selected if the document is shorter than 2 multifeed w...

Page 95: ...g Performance Usually it is not necessary to make any setting changes 1 Select the System Settings tab on the top menu 2 Press the Down button on the left side menu Scroll the left side menu down until the Scanner Adjustment tab appears 3 Select the Scanner Adjustment tab on the left side menu The Scanner Adjustment screen appears ...

Page 96: ...he scan offsets can be adjusted 1 On the Scanner Adjustment screen under Front Side Offsets Reverse Side Off sets enter values for the Horizontal Offset and Vertical Offset input fields Offset lengths are measured in units of 0 5mm and may be set to between 4 and 4 2 Press the OK button The offset settings are set ...

Page 97: ...he actual documents being scanned the length magnification can be adjusted 1 On the Scanner Adjustment screen enter the value for the Length Magnification input field This changes the length magnification correction value of the vertical scan Using the fac tory default setting as a starting point the length of the scan can be magnified or reduced to between 3 1 and 3 1 2 Press the OK button The le...

Page 98: ...work Settings tab on the top menu 2 Select the IP Address tab on the left side menu The DHCP or IP address setting screen appears ATTENTION Do not use an IP address that already exists in the network IP address duplication will cause a network connection error For more details about how to deal with such errors refer to C 1 1 Administrator Screen Mes sages page 337 ...

Page 99: ...is required Set the scanner s IP address This may be done automatically by pressing the DHCP On button By default this is set as On The IP address may also be set manually by pressing the DHCP Off button and entering the following numerical addresses IP Address Subnet Mask Default Gateway 4 Press the OK button The information entered is set ...

Page 100: ...connect the LAN cable to the scanner When DHCP is set to On the following settings are assigned by the DHCP IP Address Subnet Mask Default Gateway DNS Server WINS Server Even if DNS or WINS server is set priority is given to the scanner set tings over the DHCP settings The connection will be lost if the scanner s IP address is changed via the network interface If connecting via an IP address to co...

Page 101: ...rimary DNS and secondary DNS can be set 1 Select the Network Settings tab on the top menu 2 Select the DNS Server tab on the left side menu The DNS Server screen appears 3 Enter the following numerical addresses Primary DNS Secondary DNS If a DNS server setting is not required enter 0 0 0 0 4 Press the OK button The information entered is set ...

Page 102: ...twork Settings tab on the top menu 2 Select the WINS Server tab on the left side menu The WINS Server screen appears 3 Enter the following numerical addresses Primary WINS Secondary WINS If a WINS server setting is not required enter 0 0 0 0 4 Press the OK button The information entered is set ...

Page 103: ...nus Network Scanner fi 6000NS Operator s Guide 75 Administrator Operations 3 3 6 4 Setting the NTP Server 1 Select the Network Settings tab on the top menu 2 Select the NTP Server tab on the left side menu The NTP Server screen appears ...

Page 104: ...d enter 0 0 0 0 5 Press the Sync Time button The result of the time synchronization for the specified NTP server is shown If no error message appears the NTP server setting is valid If an error message appears refer to C 1 1 Administrator Screen Messages page 337 6 Press the OK button on the confirmation message screen 7 Press the OK button The NTP server is set HINT The system time is automatical...

Page 105: ... the Network Settings tab on the top menu 2 Press the Down button on the left side menu Scroll the left side menu down until the LDAP Server tab appears 3 Select the LDAP Server tab on the left side menu The LDAP Server screen appears 4 Press the On button When the Off button is pressed the LDAP server will not be used and no settings can be entered Press the OK button to confirm the LDAP server O...

Page 106: ... Address buttons cannot be selected at the same time 6 Enter the LDAP server name or IP address selected in Step 5 If the Server Name button is selected Enter a FQDN or server name in the input field This may be up to 255 characters long If the IP Address button is selected Enter a numerical IP address ...

Page 107: ...ring entered here will be the root under which LDAP entries will be searched for This may be up to 255 characters long The following examples are of LDAP search bases for domain name example com The italic text represents variable character strings example com CN Users OU department OU section A OU section B Administrator User A User B User C User D User E LDAP Tree Example Example 3 Example 2 Exa...

Page 108: ...r user A user B CN Users DC example DC com For LDAP server Active Directory configuration is as follows Example 2 When searching for user C user D user E OU department DC example DC com For LDAP server Active Directory configuration is as follows ...

Page 109: ... Example 3 When searching for user C user D OU section A OU department DC example DC com For LDAP server Active Directory configuration is as follows Example 4 When searching for all users DC example DC com 8 Press the List button for the Maximum Results input field A list of number of maximum results appears ...

Page 110: ...number of results for LDAP List searches The default maximum is 1000 The selected Maximum Results value is displayed 10 Press the List button for the Search Timeout input field A list of LDAP List search timeout times appears ...

Page 111: ... Network Scanner fi 6000NS Operator s Guide 83 Administrator Operations 3 11 Select the LDAP List search timeout delay The default time is 60sec The selected Search Timeout value is displayed 12 Press the OK button The LDAP server is set ...

Page 112: ...er 1 Select the Network Settings tab on the top menu 2 Press the Down button on the left side menu Scroll the left side menu down until the SMTP Server tab appears 3 Select the SMTP Server tab on the left side menu The SMTP Server screen appears ...

Page 113: ...IP address selected in Step 4 If the Server Name button is selected Enter a FQDN or server name in the input field This may be up to 255 characters long If the SMTP server setting is not required leave the field blank If the IP Address button is selected Enter a numerical IP address If the SMTP server setting is not required enter 0 0 0 0 6 Set the Maximum Attachment Size for e mails This may be b...

Page 114: ...elect the Network Settings tab on the top menu 2 Press the Down button on the left side menu Scroll the left side menu down until the Fax Server tab appears 3 Select the Fax Server tab on the left side menu The Fax Server screen appears ...

Page 115: ...rised of alphanumerics and the following symbols _ However periods cannot be used in the following cases Using periods as a initial character Using periods as a last element Using periods consecutively IP_address Comprised of numbers separated by periods IP addresses within the following ranges may be used 1 0 0 1 126 255 255 254 128 0 0 1 191 255 255 254 192 0 0 1 223 255 255 254 Host_name Compri...

Page 116: ...ers and Faxes The Printers and Faxes window appears 2 Right click on a printer and select Properties Printer properties appear 3 Press the Additional Drivers button in the Sharing tab The Additional Drivers window appears ATTENTION Be sure to read the printer manual beforehand for information about setting a printer adding a network printer and other cautions If the drive on which the spool folder...

Page 117: ...ssor is x86 or intel and that Installed is Yes for version Windows XP When the Installed status is Yes the driver has been installed and the printer can be used as a network printer Press the Cancel button When the Installed status is No select version Windows XP and press the OK but ton The Windows XP compatible driver is installed ...

Page 118: ...ontrol Panel Printers and Faxes The Printers and Faxes window appears 2 Right click on a printer and select Properties The printer properties window appears 3 Press the Printing Defaults button in the Advanced tab The printing defaults window is displayed 4 Change the settings and press the OK button The printer properties are set ...

Page 119: ...he procedure for adding a printer is as follows 1 From the Start menu on the print server select Control Panel Printers and Faxes The Printers and Faxes window appears 2 Double click the Add Printer The Add Printer Wizard window appears 3 Follow prompts on the wizard window until the Use Existing Driver win dow appears 4 Select Keep existing driver recommended and press the Next button 5 Follow th...

Page 120: ...the added printer and select Properties The printer properties window appears 8 Press the Printing Defaults button on the Advanced tab The printing defaults window appears 9 Select Color on the Paper Quality tab and press the OK button Printing is set to Color After this if the printer set for color printing on the print server is added to the scanner printer list the user can specify to use this ...

Page 121: ...button on the left side menu Scroll the left side menu down until the Network Printer tab appears 3 Select the Network Printer tab on the left side menu The Network Printer screen appears ATTENTION If a printer connected to different print servers is to be registered as a network printer multiple times the software level of the driver should be the same on each print server If the software level o...

Page 122: ...94 4 Press the Add button The screen for adding a network printer is displayed ...

Page 123: ...gin is not required the network tree expands and computer names are displayed under the selected domain 1 Enter a User Name This may be up to 256 characters long 2 Enter a Password This may be up to 256 characters long 3 Press the OK button When the user name and password are valid or if login is not required the network tree expands and computer names are displayed under the selected domain ...

Page 124: ...Name This may be up to 256 characters long 2 Enter a Password This may be up to 256 characters long 3 Press the OK button When the user name and password is valid or if login is not required the network tree expands and network printers are displayed under the selected computer name 7 Select a network printer 8 Press the Select button ATTENTION A network printer that has already registered cannot ...

Page 125: ... Lock is set The Num Lock indicator is on if the keyboard s Num Lock is set Set the network path in the following format Domain_name Computer_name Printer_name Printer Alias or Network Path may be up to 255 characters long For the Domain_name specify the NetBIOS domain name or the workgroup name that the network printer belongs to For the Computer_name specify the FDQN host name or IP address form...

Page 126: ...omputer when completing its FQDN Example example com 5 After these changes are applied restart the computer When pressing the Add button without entering a Printer Alias the printer alias will be the same as the network printer Pressing the Network Tree button returns to the network tree selection screen ...

Page 127: ... Network Printer 1 Select the Network Settings tab on the top menu 2 Press the Down button on the left side menu Scroll the left side menu down until the Network Printer tab appears 3 Select the Network Printer tab on the left side menu The Network Printer screen appears 4 Select the network printer that is to be renamed ...

Page 128: ...he screen for renaming a network printer is displayed 6 Enter a new printer alias This may be up to 80 characters long The printer alias may not contain backslashes Trailing spaces are truncated so a spaces only alias is not allowed ...

Page 129: ...3 6 Using the Network Settings Menus Network Scanner fi 6000NS Operator s Guide 101 Administrator Operations 3 7 Press the OK button The network printer is renamed ...

Page 130: ...nu 2 Press the Down button on the left side menu Scroll the left side menu down until the Network Printer tab appears 3 Select the Network Printer tab on the left side menu The Network Printer screen appears 4 Select the network printer that is to be removed from the printer list ...

Page 131: ...d 6 Confirm the details of the network printer that is to be removed are correct and press the Yes button The selected network printer is removed from the network printers list ATTENTION If removing a network printer is attempted while the network is not connected the Deleting status on the screen be stopped Before removing a network printer check that the network is functioning nor mally ...

Page 132: ... top menu 2 Press the Down button on the left side menu Scroll the left side menu down until the Network Printer tab appears 3 Select the Network Printer tab on the left side menu The Network Printer screen appears 4 Select the desired network printer from the printer list ...

Page 133: ...3 6 Using the Network Settings Menus Network Scanner fi 6000NS Operator s Guide 105 Administrator Operations 3 5 Press the Details button The information for the selected network printer is displayed ...

Page 134: ...ing applies to all printers 1 Select the Network Settings tab on the top menu 2 Press the Down button on the left side menu Scroll the left side menu down until the Network Printer tab appears 3 Select the Network Printer tab on the left side menu The Network Printer screen appears 4 Press the Margin Removal button The margin removal screen appears ...

Page 135: ... set between 0 mm and 5 mm If margin removal is not required enter 0 mm 6 Press the OK button The width to be removed from the edges of the scanned data is set ATTENTION When this setting is enabled and 600dpi resolution is selected scanning may take a long time than usual Scanned Data Print Sheet Scanned Data Print Sheet No Margin Removal Margin Removal Edge of Scanned Data Margin Removal Frame o...

Page 136: ...twork folder is on a Windows file server and the length of the full Windows path including the file name exceeds 259 characters the scan data will not be saved Before registering a Windows network folder check that the length of the full file path name is not likely to exceed 259 characters If the selected folder was created using a language foreign to that of the browsing operating system the net...

Page 137: ... Network Scanner fi 6000NS Operator s Guide 109 Administrator Operations 3 3 Select the Network Folder tab on the left side menu The Network Folder screen appears 4 Press the Add button The screen for adding a network folder is displayed ...

Page 138: ...uter names are displayed under the selected domain 1 Enter a User Name This may be up to 256 characters long 2 Enter a Password This may be up to 256 characters long 3 Press the OK button When the user name and password are valid or if login is not required the network tree expands and computer names are displayed under the selected domain ...

Page 139: ... This may be up to 256 characters long 2 Enter a Password This may be up to 256 characters long 3 Press the OK button When the user name and password is valid or if login is not required the network tree expands and network folders are displayed under the selected computer name 7 Select a network folder The selected folder will be opened to show any sub folders which themselves may be selected in ...

Page 140: ...down when the num ber of items exceed 150 Close unneeded items Set the network path in the following format Domain_name Computer_name Folder_name Folder_name The minimum requirement for a network path is Domain_name Computer_name Folder_name Sub folders Folder_name is the example above are optional Folder Alias or Network Path may be up to 255 characters long and can be used as a delimiter for the...

Page 141: ...g a Network Folder 1 Select the Network Settings tab on the top menu 2 Press the Down button on the left side menu Scroll the left side menu down until the Network Folder tab appears 3 Select the Network Folder tab on the left side menu The Network Folder screen appears 4 Select the network folder that is to be renamed ...

Page 142: ...on The screen for renaming a network folder is displayed 6 Enter a folder alias This may be up to 80 characters long The folder alias may not contain backslashes Trailing spaces are truncated so a spaces only alias is not allowed ...

Page 143: ...3 6 Using the Network Settings Menus Network Scanner fi 6000NS Operator s Guide 115 Administrator Operations 3 7 Press the OK button The network folder is renamed ...

Page 144: ...menu 2 Press the Down button on the left side menu Scroll the left side menu down until the Network Folder tab appears 3 Select the Network Folder tab on the left side menu The Network Folder screen appears 4 Select the network folder that is to be removed from the folder list ...

Page 145: ...117 Administrator Operations 3 5 Press the Remove button The screen for removing a network folder is displayed 6 Confirm the details of the network folder that is to be removed are correct and press the Yes button The selected network folder is removed from the network folders list ...

Page 146: ...on the top menu 2 Press the Down button on the left side menu Scroll the left side menu down until the Network Folder tab appears 3 Select the Network Folder tab on the left side menu The Network Folder screen appears 4 Select the desired network folder from the folder list ...

Page 147: ...3 6 Using the Network Settings Menus Network Scanner fi 6000NS Operator s Guide 119 Administrator Operations 3 5 Press the Details button The information for the selected network folder is displayed ...

Page 148: ...r page 84 When the destination for alert notification is set alert notification messages will be sent to the reg istered e mail address in the following title Network Scanner Scanner Name xxxx Alert Notification message For more details refer to C 1 3 Alert Monitor System Log Messages page 359 1 Select the Network Settings tab on the top menu 2 Press the Down button on the left side menu Scroll th...

Page 149: ...n for alert notifications is set XXXXXXX Comprised of alphanumerics and the following symbols _ However periods cannot be used in the following cases Using periods as a initial character Using periods as a last element Using periods consecutively IP_address Comprised of numbers separated by periods IP addresses within the following ranges may be used 1 0 0 1 126 255 255 254 128 0 0 1 191 255 255 2...

Page 150: ...ork connection can be checked using a ping test 1 Select the Network Settings tab on the top menu 2 Press the Down button on the left side menu Scroll the left side menu down until the Ping tab appears 3 Select the Ping tab on the left side menu The Ping screen appears ...

Page 151: ... IP address Both the Server Name and IP Address buttons cannot be selected at the same time 5 Enter the target server name or IP addresses selected in Step 4 If the Server Name button is selected Enter a Fully Qualified Domain Name FQDN or server name in the input field This may be up to 255 characters long If the IP Address button is selected Enter a numerical IP address ...

Page 152: ...124 6 Press the Ping button A ping test is performed and the results are displayed For more details about the result refer to Checking basic network operation with a Ping test page 296 ...

Page 153: ...on nection Troubleshooting page 296 and check the settings The following information is shown MAC Address IP Address Subnet Mask Default Gateway DNS Server IP Address WINS Server IP Address 1 Select the Network Settings tab on the top menu 2 Press the Down button on the left side menu Scroll the left side menu down until the Network Status tab appears 3 Select the Network Status tab on the left si...

Page 154: ...a nonduplicate IP address 3 Re connect the LAN cable to the scanner If the DHCP server cannot be reached when DHCP is set to On the IP Address is set to 169 254 XXX YYY where XXX and YYY are arbitrary values between 0 and 255 If the status of the network connection is correct but the network is not communicating properly change the Link Speed Duplex Mode from Auto Negotiation to a fixed mode ...

Page 155: ...lect the System Status tab on the left side menu The system status information is displayed The following system status information is available Info Details System Version Shows the current scanner system version number Scanner Version Shows the current scanner firmware version number Date of Registration Shows the date on which the scanner was first used Cumulative On Time Shows the total elapse...

Page 156: ... the scanner s consumable parts pad assembly or pick roller can be viewed For details on consumable replacement refer to 5 5 Replacing Parts page 279 Viewing the Status of Consumable Parts 1 Select the Device Status tab on the top menu 2 Select the Usage Status tab on the left side menu The Usage Status screen appears ...

Page 157: ...Pad Assembly Green Total throughput 0 to 44 999 sheets No action required Orange Total throughput 45 000 to 49 999 sheets Pad assembly needs to be replaced soon Obtain a replacement part Red Total throughput Over 50 000 sheets Pad assembly has passed its rated lifetime and needs to be replaced Pick Roller Green Total throughput 0 to 94 999 sheets No action required Orange Total throughput 95 000 t...

Page 158: ...ormal For more details about replacing consumable parts refer to 5 5 Replacing Parts page 279 1 Select the Device Status tab on the top menu 2 Select the Usage Status tab on the left side menu The Usage Status screen appears 3 Press the Clear button for the part replaced The counter reset confirmation screen appears ...

Page 159: ...3 7 Using the Device Status Menus Network Scanner fi 6000NS Operator s Guide 131 Administrator Operations 3 4 Press the Yes button The counter value is reset to 0 and the Status field turns green again ...

Page 160: ... in refer to 3 9 4 Installing Uninstalling an Add in Mod ule page 166 1 Select the Device Status tab on the top menu 2 Select the Add in Status tab on the left side menu The Add in status screen appears The following information is shown Info Details Add in Shows the name of the add in module Version Shows the current add in module version number ...

Page 161: ...n Timezone or Date Time settings are changed the order of the log entries will not be changed 1 Select the Operation Logs tab on the top menu 2 Select the User Log tab on the left side menu The User Log screen appears ATTENTION User logs may contain private information such as e mail addresses or fax numbers so care should be taken when managing such data If a log file error is detected during sys...

Page 162: ...t the log you wish to view The details of the selected log are displayed Pressing the OK button returns to the User Log screen HINT On the User Log screen pressing the Refresh button updates the infor mation shown ...

Page 163: ...rrently processing a scan operation OK Operation completed successfully Error Operation failed to complete successfully Code xxxxxxxx Shows a code for each operation If a response is required refer to Appendix C Operation Messages page 335 Operation e Mail The scanned data is sent as an e mail attachment Fax The scanned data is sent as a fax Print The scanned data is sent to the print server and t...

Page 164: ...n downloaded to a computer the file will contain CSV format data The file is saved in the fol lowing form Date Time User Result Code Operation Pages Description 1 Select the Operation Logs tab on the top menu 2 Select the User Log tab on the left side menu The User Log screen appears 3 Press the Download button The File Download dialog box appears ...

Page 165: ...ter a file name The file will contain CSV format data 6 Press the Save button A file containing CSV format data is saved HINT The size of the user log file is displayed in the File Download dialog box Make sure there is enough free space on the disk where it is to be saved and press the Save button If there is not enough free disk space an incomplete file may be saved ...

Page 166: ...peration Logs tab on the top menu 2 Select the User Log tab on the left side menu The User Log screen appears 3 Press the Clear All button The clear all confirmation screen appears 4 Press the Yes button All the user operation logs are cleared ...

Page 167: ... Region Timezone or Date Time settings are changed the order of the log entries will not be changed 1 Select the Operation Logs tab on the top menu 2 Select the System Log tab on the left side menu The System Log screen appears ATTENTION System log may contain private information such as e mail addresses or fax numbers so care should be taken when managing such data If a log file error is detected...

Page 168: ...Shows the system log time record Type Information Shows information about the system No action required Error Shows the system error The same information will be sent to the e mail address set in 3 6 10 Setting the Destination for Alert Notifica tions page 120 To deal with errors refer to C 1 3 Alert Monitor System Log Messages page 359 Warning Shows the system warning The same information will be...

Page 169: ...fault file name is SystemLog csv When downloaded to a computer the file will contain CSV format data The file is saved in the fol lowing form Date Time Type Message 1 Select the Operation Logs tab on the top menu 2 Select the System Log tab on the left side menu The System Log screen appears 3 Press the Download button The File Download dialog box appears ...

Page 170: ... 6 Press the Save button A file containing CSV format data is saved HINT The size of the user log file is displayed in the File Download dialog box Make sure there is enough free space on the disk where it is to be saved and press the Save button If there is not enough free disk space an incomplete file may be saved ...

Page 171: ...trator Operations 3 Clearing the System Log 1 Select the Operation Logs tab on the top menu 2 Select the System Log tab on the left side menu The System Log screen appears 3 Press the Clear All button The clear all confirmation screen appears 4 Press the Yes button The system log is cleared ...

Page 172: ...er data store containing users A001 to A100 is cleared 4 960 new users A001 to A050 and B001 to B910 login ATTENTION Once 1 000 user names have been used to login new user logins are no longer possible until the entire user data store is cleared Refer to Backing up the User Data Store page 146 and Clearing the User Data Store page 152 for details It is recommended that the user data store be backe...

Page 173: ... be added to the user data store However 960 existing users 50 new users 1010 users As the number of users would exceed the 1 000 user limit the Step 2 user data store con taining users A001 to A100 is not restored The user data store contents are organized as follows ATTENTION The user data store may contain private information such as e mail addresses or fax numbers so care should be taken when ...

Page 174: ...ed up regularly The default file name is restored_data 1 Select the Maintenance tab on the top menu 2 Select the User Data Store tab on the left side menu The User Data Store screen appears 3 Press the Backup button The File Download dialog box appears HINT User logs cannot be backed up ...

Page 175: ... appears 5 Enter a file name Use of a name that includes the scanner name and backup date is recommended HINT The size of the user log file is displayed in the File Download dialog box Make sure there is enough free space on the disk where it is to be saved and press the Save button If there is not enough free disk space an incomplete file may be saved ...

Page 176: ...f the user data store is saved ATTENTION Do not change the contents of data store backup files If changed the file may no longer be used as a backup Trying to restore from a changed user data store backup file may render the scanner inoper able ...

Page 177: ...s fax number list and scan settings to the time the backup was taken During user data store restoration do not press and hold down the startup button for longer than four seconds as it may cause the scanner to func tion abnormally A version 01 01 01 0030 backup file cannot be used to recreate the user data store in a version 01 01 01 0025 or version 01 01 01 0026 system Attempting to perform this ...

Page 178: ...ore backup file Press the Browse button to select a file 4 Press the Restore button An OK to overwrite confirmation message appears 5 Press the Yes button After the user data store is restored a restore completion message appears ...

Page 179: ...3 9 Using the Maintenance Menus Network Scanner fi 6000NS Operator s Guide 151 Administrator Operations 3 6 Press the OK button ...

Page 180: ...r scanner My List e Mail Address Books one per user Scan Settings for each user User Logs for each user 1 Select the Maintenance tab on the top menu 2 Select the User Data Store tab on the left side menu The User Data Store screen appears 3 Press the Clear button The clear confirmation screen appears ATTENTION Clearing the user data store cannot be undone ...

Page 181: ...3 9 Using the Maintenance Menus Network Scanner fi 6000NS Operator s Guide 153 Administrator Operations 3 4 Press the Yes button The user data store is cleared ...

Page 182: ... format may be viewed by using spreadsheet software CSV system settings files are of the following format Function_name Option_name Value The default file name is Configuration_download csv 1 Select the Maintenance tab on the top menu 2 Select the System Settings File tab on the left side menu The System Settings File screen appears 3 Press the Get CSV button The File Download dialog box appears A...

Page 183: ...y where it should be saved The file will contain CSV format data 6 Press the Save button The system settings for the scanner are downloaded HINT The size of the user log file is displayed in the File Download dialog box Make sure there is enough free space on the disk where it is to be saved and press the Save button If there is not enough free disk space an incomplete file may be saved ...

Page 184: ...ed to restore system settings Backup should be performed regularly The default file name is SystemSettingsFile 1 Select the Maintenance tab on the top menu 2 Select the System Settings File tab on the left side menu The System Settings File screen appears 3 Press the Backup button The File Download dialog box appears ...

Page 185: ...Save button The system settings are backed up HINT The size of the user log file is displayed in the File Download dialog box Make sure there is enough free space on the disk where it is to be saved and press the Save button If there is not enough free disk space an incomplete file may be saved ATTENTION Do not change the contents of system settings backup files If changed the file may no longer b...

Page 186: ...en appears 3 Enter a backup file to restore from Press the Browse button to select a file ATTENTION A version 01 01 01 0030 backup file cannot be used to recreate the system settings in a version 01 01 01 0025 or version 01 01 01 0026 system Attempting to perform this particular system settings restoral operation will cause an error message to appear To restore the system settings from a version 0...

Page 187: ...e Restore button A confirmation message appears 5 Press the Yes button After factory default settings have been restored the scanner is restarted ATTENTION During system settings restoration do not press and hold down the startup button for longer than four seconds as it may cause the scan ner to function abnormally ...

Page 188: ... As the network interface connection to the scanner requires the IP address or scanner name if this is changed by the restoration of the sys tem settings i e if the backed up IP address or scanner name is different to the pre restoration IP address or scanner name the new IP address or scanner name will be needed If not known the current state of these set tings can always be checked by physically...

Page 189: ... s Guide 161 Administrator Operations 3 Resetting Factory Defaults 1 Select the Maintenance tab on the top menu 2 Select the System Settings File tab on the left side menu The System Settings File screen appears 3 Press the Reset button A confirmation message appears ...

Page 190: ...arted ATTENTION During factory defaults reset do not press and hold down the startup button for longer than four seconds as it may cause the scanner to function abnormally HINT After the factory default settings are restored the scanner name IP address and other settings will need to be set again as described in 3 5 Using the System Settings Menus page 45 ...

Page 191: ...tions 3 3 9 3 Updating the Scanner s System Software The scanner system can be updated as follows 1 Select the Maintenance tab on the top menu 2 Select the System Update tab on the left side menu The System Update screen appears 3 Select a system update file Press the Browse button to select a file ...

Page 192: ...ss the Upload button The version of the system update contained in the selected file is displayed 5 Press the OK button The system update process is started After the system has updated the scanner is restarted ...

Page 193: ...date do not press and hold down the startup button for longer than four seconds as it may cause the scanner to function abnormally HINT The network interface connection will be lost when the scanner is restarted to complete the system update To continue with other set tings wait a short time for the device to restart then login to the net work interface again ...

Page 194: ...per s Kit This section describes how to install and uninstall an Add in module Installing an Add in Module 1 Select the Maintenance tab on the top menu 2 Select the Add in Manager tab on the left side menu The Add in Manager screen appears 3 Select an Add in intstallation file Press the Browse button to select a file ...

Page 195: ...Menus Network Scanner fi 6000NS Operator s Guide 167 Administrator Operations 3 4 Press the Install button A confirmation message appears 5 Press the OK button After the Add in module has been installed the scanner is restarted ...

Page 196: ...168 Uninstalling an Add in Module 1 Select the Maintenance tab on the top menu 2 Select the Add in Manager tab on the left side menu The Add in Manager screen appears ...

Page 197: ...enus Network Scanner fi 6000NS Operator s Guide 169 Administrator Operations 3 3 Press the Uninstall button A confirmation message appears 4 Press the OK button After the Add in module has been installed the scanner is restarted ...

Page 198: ...Increasing the value of the output level increases the detail of information collected but slows down processing Set the level requested by your FUJITSU scanner dealer or an authorized FUJITSU scanner service provider 4 Press the Set button The information output level is set ATTENTION If the Information Output Level is set to 5 the output data may contain private user information such as e mail a...

Page 199: ...ing up or using the scanner technical support information can be collected to help determine the cause of the problem The information obtained should be sent to your FUJITSU scanner dealer along with the scanner when given for repair 1 Select the Maintenance tab on the top menu 2 Select the Technical Support tab on the left side menu The Technical Support screen appears ...

Page 200: ...button The Save As dialog box appears HINT The size of the user log file is displayed in the File Download dialog box Make sure there is enough free space on the disk where it is to be saved and press the Save button If there is not enough free disk space an incomplete file may be saved ...

Page 201: ...the Maintenance Menus Network Scanner fi 6000NS Operator s Guide 173 Administrator Operations 3 5 Name the file and specify where it should be saved 6 Press the Save button The technical information is downloaded ...

Page 202: ...174 ...

Page 203: ...ppear while performing operations described in this chapter For more details about these messages and actions to take refer to C 2 Regular User Messages page 363 4 1 Loading Documents 176 4 2 Using Touch Panel Screens Regular User 179 4 3 Logging in Regular User Mode 183 4 4 Sending the Scanned Data by e Mail 186 4 5 Sending the Scanned Data by Fax 199 4 6 Printing the Scanned Data 209 4 7 Saving ...

Page 204: ... 326 2 Fan the documents 1 Lightly grip the ends of the document stack in both hands and flex it back and forth two or three times 2 Rotate the documents 90 degrees and fan again 3 Align the edges of the document sheets 3 Load the documents into the ADF paper chute 1 Extend the ADF paper chute and adjust the side guides to hold the documents ...

Page 205: ...n If only one side is to be scanned it should face down in the ADF paper chute 3 Adjust the side guides to the width of the documents Move the side guides so that they touch both sides of the documents If there is any space between the side guides and the edges of documents the scanned data may be skewed R e v e rs e S id e ...

Page 206: ...It can be pulled out and adjusted to the size of the document being scanned 1 Pull out before scanning 2 The extension flap of output tray may also be flipped up as shown in the figure below Small documents may be retrieved by flipping up the keyboard after scan ning has completed ...

Page 207: ...hown in manual as Used to Up button Down button Scroll up or down between items OK button Set the contents of the current screen Cancel button Cancel the contents of the current screen or return to the previous screen Caps Lock indicator Indicate that the Caps Lock key has been set on the keyboard Num Lock indicator Indicate that the Num Lock key has been set on the keyboard ATTENTION If the Logou...

Page 208: ...to Maintenance but ton Access the Maintenance screen For details refer to 4 12 Maintenance page 267 Consumable Alert button Access the Consumable Alert screen The color of the button changes to orange or red to indicate a consumable replace ment is pending Blue Normal Orange Parts need to be replaced soon Contact a system administrator Red Parts need to be replaced now Replace the necessary part F...

Page 209: ...n For details refer to 4 4 Sending the Scanned Data by e Mail page 186 Fax button Access the Send Fax screen For details refer to 4 5 Sending the Scanned Data by Fax page 199 Print button Access the Print screen For details refer to 4 6 Printing the Scanned Data page 209 Save button Access the Save File screen For details refer to 4 7 Saving the Scanned Data to a Network Folder page 223 Logout but...

Page 210: ...2 3 Input Fields and Entering Characters Only passwords for the following fields are case sensitive Screen Field name Login Password PDF Password Password Confirm Password File Server Authentication Password ...

Page 211: ... the user login Note that the authenticated user info is also used when saving scans to a network folder 1 Push the startup button The Login screen appears User Name Authentication Target Contains a Active Directory user login name userPrincipalName Does not contain a Windows 2000 Server user login name sAMAccountName HINT When using the scanner without an LDAP server enter the following user name...

Page 212: ...se sensitive and some symbols allowed They may not start with a or and the following symbols may never be used Passwords may be up to 256 characters long and all alphanumerics case sensitive and symbols are allowed HINT The Caps Lock indicator is on if the keyboard s Caps Lock is set The Num Lock indicator is on if the keyboard s Num Lock is set ...

Page 213: ...4 3 Logging in Regular User Mode Network Scanner fi 6000NS Operator s Guide 185 Regular User Operations 4 3 Press the Login button If the user name and password are valid the Main Menu screen appears ...

Page 214: ...cs and the following symbols _ However periods cannot be used in the following cases Using periods as a initial character Using periods as a last element Using periods consecutively IP_address Comprised of numbers separated by periods IP addresses within the following ranges may be used 1 0 0 1 126 255 255 254 128 0 0 1 191 255 255 254 192 0 0 1 223 255 255 254 Host_name Comprised of alphanumerics...

Page 215: ...AP server is not being used or if no e mail address for the authenticated user has be registered in the LDAP server In this case directly enter the sender s e mail address using the keyboard e Mail addresses may be up to 255 characters long Alphanumeric characters and the follow ing symbols can be used _ However _ can only be used before Refer to Step 2 for complete details 5 Enter an e mail title...

Page 216: ...nned Data in the Scan Viewer page 261 8 Check the scanned data For more details about the Scan Viewer screen refer to 4 10 Editing the Scanned Data in the Scan Viewer page 261 HINT If a long word that cannot fit on one line is used the word will be automati cally alterted HINT Scan Viewer is initially On When the Scan Send button is pressed when Scan Viewer is Off after the last page has been disp...

Page 217: ...change this setting contact the administrator For more details about this setting refer to 3 6 6 Setting the e Mail Server SMTP Server page 84 For photos and images a high compression level can be used to create a smaller file For more details refer to 4 8 8 Compression page 247 If the file format is JPEG or TIFF a file will be attached for each page in the scan If the number of pages is over ten ...

Page 218: ...ist is Anywhere For LDAP List searches choose from Head Anywhere and Tail search methods The following explains how to select an e mail address using the LDAP List The LDAP list is an e mail address book which uses data stored on the LDAP server If the LDAP server is not used the LDAP List tab is not shown 1 On the Send e Mail screen press the button to the right of the e mail address field The e ...

Page 219: ...on setting By default Head abc is set The screen returns the e Mail Address Book LDAP list The selected position is dis played to the right of the Search Position button Search Position Search Method Example Target Search Result Head abc The LDAP e mail address book is searched for entries which start with the character string entered in Search Target abc abc abc1 abcd Anywhere abc The LDAP e mail...

Page 220: ... e Mail Address Book To add multiple e mail addresses from the e Mail Address Book it must be opened again each time an address is to be added When multiple e mail addresses are entered using the e mail address book a is auto matically entered in between each address Up to 30 e mail addresses can be entered at one time HINT The number of LDAP search results displayed can be specified LDAP server s...

Page 221: ...d in the e mail address book Once 1 000 contacts have been entered no more can be added 1 Open the e Mail Address Book screen To access the e Mail Address Book screen on the Send e Mail screen press the button to the right of an e mail address field Or on the Main Menu screen press the Maintenance button then on the Maintenance screen press the Edit e Mail Address button For details refer to 4 12 ...

Page 222: ...owing cases Using periods as a initial character Using periods as a last element Using periods consecutively IP_address Comprised of numbers separated by periods IP addresses within the following ranges may be used 1 0 0 1 126 255 255 254 128 0 0 1 191 255 255 254 192 0 0 1 223 255 255 254 Host_name Comprised of alphanumerics and hyphens only Initial character may not be a hyphen Domain_name Name ...

Page 223: ...tored in the LDAP list cannot be edited 1 Open the e Mail Address Book screen To access the e Mail Address Book screen on the Send e Mail screen press the button to the right of an e mail address field Or on the Main Menu screen press the Maintenance button then on the Maintenance screen press the Edit e Mail Address button For details refer to 4 12 Maintenance page 267 2 Select the My List tab 3 ...

Page 224: ... Using periods as a initial character Using periods as a last element Using periods consecutively IP_address Comprised of numbers separated by periods IP addresses within the following ranges may be used 1 0 0 1 126 255 255 254 128 0 0 1 191 255 255 254 192 0 0 1 223 255 255 254 Host_name Comprised of alphanumerics and hyphens only Initial character may not be a hyphen Domain_name Name elements co...

Page 225: ...tored in the LDAP list cannot be deleted 1 Open the e Mail Address Book screen To access the e Mail Address Book screen on the Send e Mail screen press the button to the right of an e mail address field Or on the Main Menu screen press the Maintenance button then on the Maintenance screen press the Edit e Mail Address button For details refer to 4 12 Maintenance page 267 2 Select the My List tab 3...

Page 226: ...198 5 Check the contact that is set to be deleted is the correct one and press the OK but ton The contact is deleted from the e mail address book ...

Page 227: ... the Recipient Fax No field without using Recipient fax numbers may be up to 64 digits long Numbers and the following symbols can also be used HINT The scan information can be changed by pressing the Scan Settings but ton For more details refer to 4 8 Setting the Scan Options page 228 HINT Recipient fax numbers can be selected directly from the fax number list For details refer to 4 5 1 Selecting ...

Page 228: ...lowing cases Using periods as a initial character Using periods as a last element Using periods consecutively IP_address Comprised of numbers separated by periods IP addresses within the following ranges may be used 1 0 0 1 126 255 255 254 128 0 0 1 191 255 255 254 192 0 0 1 223 255 255 254 Host_name Comprised of alphanumerics and hyphens only Initial character may not be a hyphen Domain_name Name...

Page 229: ... All processes queued so far are performed at the same time and are referred to as buffer jobs A maximum of ten jobs may be buffered HINT Scan Viewer is initially Off When the Scan button is pressed when Scan Viewer is On each page is briefly shown on the screen as it is scanned When the scan has completed the Scan Viewer screen opens For more details about Scan Viewer refer to 4 9 Enabling Disabl...

Page 230: ...s in number order Pressing the Recipient button displays the search results by recipient first names in alpha betical order 3 Enter a search string Contacts can be searched for individually or all at the same time A search string may be up to 256 characters long Wild card characters cannot be used the actual characters will be searched for 4 Press the Find button The search results are displayed o...

Page 231: ...fax number list Fax contact numbers added to the list are accessible to all users 1 Open the Fax Number List screen To access the Fax Number List screen on the Send Fax screen press Or on the Main Menu screen press the Maintenance button then on the Maintenance screen press the Edit Fax Numbers button For details refer to 4 12 Maintenance page 267 2 Press the Add button The Add Fax Number screen a...

Page 232: ...ax contact details Recipients may be up to 64 characters long Fax numbers may be up to 64 digits long Numbers and the following symbols can also be used 4 Press the OK button The contact is added to the fax number list ...

Page 233: ...e accessible to all users 1 Open the Fax Number List screen To access the Fax Number List screen on the Send Fax screen press Or on the Main Menu screen press the Maintenance button then on the Maintenance screen press the Edit Fax Numbers button For details refer to 4 12 Maintenance page 267 2 Select the fax contact that is to be edited 3 Press the Edit button The Edit Fax Number screen appears ...

Page 234: ...ontact information Recipients may be up to 64 characters long Fax numbers may be up to 64 digits long Numbers and the following symbols can also be used 5 Press the OK button The edited fax number list contact is saved ...

Page 235: ...r accessible to any user 1 Open the Fax Number List screen To access the Fax Number List screen on the Send Fax screen press Or on the Main Menu screen press the Maintenance button then on the Maintenance screen press the Edit Fax Numbers button For details refer to 4 12 Maintenance page 267 2 Select the fax contact that is to be deleted 3 Press the Delete button The Delete Fax Number confirmation...

Page 236: ...208 4 Check the contact that is set to be deleted is the correct one and press the OK but ton The contact is deleted from the fax number list ...

Page 237: ... will be shown each time that user logs in 2 To change the printer press the Select button At the first login the network printer registered by the administrator in Printer is dis played After the first login each time a user logs in the name of the last network printer used is displayed The Printer List screen appears HINT The scan information can be changed by pressing the Scan Settings but ton ...

Page 238: ...ct a printer HINT Only the administrator may add printers to the list or edit the details of printers already on the list For more details about adding printers refer to 3 6 8 Setting the Network Printers page 88 ...

Page 239: ...reen may be used instead 6 Enter a number in No of Copies field The default number is 1 Numbers from 1 to 99 can be used According to the printer settings from the printers properties screen may be used instead HINT User authentication may sometimes be required to access a network printer When the authentication is required the Print Server Authentica tion screen appears The authentication procedu...

Page 240: ...r more details about the Scan Viewer screen refer to 4 10 Editing the Scanned Data in the Scan Viewer page 261 8 Check the scanned data For more details about the Scan Viewer screen refer to 4 10 Editing the Scanned Data in the Scan Viewer page 261 HINT The default setting of Scan Viewer is On When the Scan Print button is pressed when Scan Viewer is Off after the last page is displayed on the Sca...

Page 241: ... Print button The scanned data is printed The document name for the scanned data to be printed is the name of the scanner ATTENTION The printing status is displayed in the user log until printing has finished The network printer printing result is not displayed For more details about the user log refer to 4 11 Checking the User Log page 265 ...

Page 242: ...214 4 6 1 Scaling Set the print size for the scanned data The setting selected here will be used every time the user prints a document 1 Press the Scaling button The Scaling screen appears ...

Page 243: ...tioning setting is Center the control point for printing is the center point of the area available for printing If the positioning setting is Top Left the control point for printing is the top left corner of the area available for printing For more details on the positioning setting refer to 4 6 2 Positioning page 219 Print Sheet Scanned Data Positioning Result Small Large Center Top Left Availabl...

Page 244: ...216 Large Small Center Top Left Same Same Center Top Left Print Sheet Scanned Data Positioning Result Print Sheet B Scanned Data B Scanned Data B Scanned Data Print Sheet C Scanned Data Scanned Data ...

Page 245: ... the positioning setting is Top Left the control point for printing is the top left corner of the print sheet For more details on the positioning setting refer to 4 6 2 Positioning page 219 Print Sheet Scanned Data Positioning Result Small Large Center Top Left Large Small Center Top Left Center Control Point Available Area for Printing Control Point Top Left Available Area for Printing Print Shee...

Page 246: ...argin set in the printer settings For more details refer to Removing the Margin page 106 If Shrink to Fit is set the margin set for removal is not included in the print data If 100 is set the margin set for removal is included in the print data When Shrink to Fit is set the printing result may differ from the original document since the starting position or available area of printing depends on ea...

Page 247: ...000NS Operator s Guide 219 Regular User Operations 4 4 6 2 Positioning Set the print position of the scanned data The setting selected here will be used every time the user prints a document 1 Press the Positioning button The Positioning screen appears ...

Page 248: ...on Scaling Control Point Center Shrink to Fit Uses the center point of the area available for print ing as a control point 100 Uses the center point of the sheet as a control point Available Area for Printing Control Point Center Center Control Point Available Area for Printing ...

Page 249: ...he Print screen The selected positioning setting is displayed to the right of the Positioning button Top Left Shrink to Fit Uses the top left corner of the area available for printing as a control point 100 Uses the top left corner of the print sheet as a control point Button Scaling Control Point Control Point Top Left Available Area for Printing Control Point Top Left Available Area for Printing...

Page 250: ...itially this setting is Duplex Flip on Long Flip on Long means that sheets are flipped vertically for printing Flip on Short means that sheets are flipped horizontally for printing This returns you to the Print screen The selected mode is displayed to the right of the Simplex Duplex button ATTENTION According to the printer settings from the printers properties screen may be used instead ...

Page 251: ...der 1 On the Main Menu screen press the Save button The Save screen appears Network folder preferences are saved for each user and will be shown each time that user logs in 2 Press the Select button The Folder List screen appears HINT Scan preferences can be changed by pressing the Scan Settings button For more details refer to 4 8 Setting the Scan Options page 228 ...

Page 252: ...lder path is too long for one line the path will be automatically split into subsequent lines Only network folders which are in the list may be selected Only the administrator may add folders to the list or edit the details of folders already on the list For more details about adding network folders refer to 3 6 9 Setting the Network Folders File Servers page 108 ...

Page 253: ...names may be up to 128 characters long By default Scanner Name Scan Date Time is entered HINT User authentication may sometimes be required to access the file server If authentication is required the Folder Server Authentication screen appears The authentication procedure is as follows 1 Enter a User Name and Password for the file server 2 Press the OK button ATTENTION The following file names can...

Page 254: ...ing starts Each page is briefly shown on the screen as it is scanned When the scan has completed the Scan Viewer screen opens For more details about the Scan Viewer screen refer to 4 10 Editing the Scanned Data in the Scan Viewer page 261 8 Check the scanned data For more details about the Scan Viewer screen refer to 4 10 Editing the Scanned Data in the Scan Viewer page 261 HINT Scan Viewer is ini...

Page 255: ...en created from scanned data while waiting for the save process to complete the scanner prepares for the next operation All processes queued so far are performed at the same time and are referred to as buffer jobs A maximum of ten jobs may be buffered HINT If the saving to the network folder fails an error message with the follow ing title is sent by e mail from the scanner to the e mail address r...

Page 256: ...le Default These are the factory settings To put a high priority on the scan speed press the Default button Custom This is shown when the user has customized any scanning preferences from the Default option Press each scan option button to set it as desired Function settings for e Mail Fax Print Save are saved for each user and will be used each time that user logs in For details refer to the sect...

Page 257: ...uplex page 239 Save File Format PDF TIFF JPEG PDF page 240 Searchable PDF No No No No page 242 PDF Password No No No No page 245 Compression Medium Medium Low Medium page 247 Advanced Brightness Medium Medium Medium Medium page 250 Contrast Medium Medium Medium Medium page 251 Page Orientation Auto Off Off Auto page 252 Blank Page Skip Auto Auto Off Auto page 254 Multifeed Setup Ultrasonic Ultraso...

Page 258: ...230 4 8 1 Color Mode Set whether the document is scanned in color or black and white 1 On the Scan Settings screen select the Basic tab 2 Press the Color Mode button The Color Mode screen appears ...

Page 259: ...T Usually the color mode should be set as Auto If this setting is specified there is no need to change the color mode each time you scan a document Note that black and white mode may be automatically selected for the fol lowing kinds of documents Faintly toned nonwhite papers Documents with only a minor amount of color Documents printed in gray or other close to black colors To ensure such documen...

Page 260: ... affects the scan data in the following ways 1 On the Scan Settings screen select the Basic tab 2 Press the Resolution button The Resolution screen appears High resolution Low resolution Scan speed Slow Fast Scan quality High Low File size Large Small ...

Page 261: ...lution level returns you to the Scan Settings screen The selected level is displayed to the right of the Resolution button HINT If Auto paper size is set 600dpi resolution cannot be selected If 600dpi is selected Custom paper size Long Page mode cannot be used For more details about paper size and long page mode refer to 4 8 3 Paper Size page 234 ...

Page 262: ...234 4 8 3 Paper Size Set a paper size for the scan data 1 On the Scan Settings screen select the Basic tab 2 Press the Paper Size button The Paper Size screen appears ...

Page 263: ... Paper size mm A4 210 297 Letter 215 9 279 4 A5 148 210 Legal 215 9 355 6 A6 105 148 Executive 266 7 184 2 B5 182 257 Postcard 148 100 B6 128 182 Business Card 51 89 ATTENTION When the Auto setting is used the paper size is set to the same size Maximum 215 9mm 355 6mm as the actual document being scanned However if using any of the following types of documents the automatic paper size detection ma...

Page 264: ... Blank Page function For more details refer to 4 8 12 Blank Page Skip page 254 When Custom settings are used any paper size for the scan data can be specified 1 Press the Custom button The Custom Paper Size screen appears 2 Enter the paper size for the scan data The size ranges that can be set are Width 2in to 8 5in 50 8mm to 216mm Height 2 91in to 14in 74mm to 355 6mm If the height is 14in or lon...

Page 265: ... than standard documents the Allow long pages setting must be specified 1 On the Scan Settings screen select the Basic tab 2 Press the Paper Size button The Paper Size screen appears HINT When long page scanning is set the following settings can not be used Auto Color Mode 600dpi Resolution Searchable PDF Page Orientation Blank Page Skip Multifeed Setup ...

Page 266: ...ess the Yes button 5 Enter the paper size for the scan data The size ranges that can be set are Height 2 91in to 34in 74mm to 863 6mm Width 2in to 8 5in 50 8mm to 216mm 6 Press the OK button This returns you to the Scan Settings screen Custom is displayed to the right of the Paper Size button ...

Page 267: ... 1 On the Scan Settings screen select the Basic tab 2 Press the Scan Mode button The Scan Mode screen appears 3 Select Simplex if only the front sides of the documents are to be scanned Select Duplex if both front and reverse sides are to be scanned Selecting a scan mode returns you to the Scan Settings screen The selected mode is displayed to the right of the Scan Mode button ...

Page 268: ...or RGB Color Compression also differs for certain file formats as follows NA Not available Option PDF JPEG TIFF MTIFF Searchable PDF A PDF Password A Compression A A A 1 A 1 Color Mode Document File Format PDF JPEG TIFF MTIFF Auto Color JPEG High Compression for Color PDF JPEG JPEG Black White MMR NA MMR RGB Color Color or Black White JPEG High Compression for Color PDF JPEG JPEG Black White Color...

Page 269: ...ng photographs or pictures since these graphical materials are recognized as background and com pressed as such causing degradation in the scanned image If this setting is specified the contrast of the image may become higher Also if High Compression for Color PDF is selected the file size of certain documents may be larger compared to the level of compression The file size of the following kinds ...

Page 270: ...fully recognized Handwritten documents Documents including smaller characters and scanned in low quality Skewed documents Documents written in languages other than English Documents including texts written in italic characters Superscript subscript letters and complex mathematical formulas Characters are written against an unevenly colored or patterned background Characters to which effects Shadow...

Page 271: ...the Searchable PDF button The Searchable PDF screen appears 3 Select which pages are to be made searchable in the PDF Searchable PDF Description No A searchable PDF is not created First Page Only the first page of the PDF is made searchable All Pages All pages of the PDF are made searchable Pages Only the specified range of pages in the PDF is made searchable ...

Page 272: ...es options cannot be selected The page numbers set here correspond to those shown on the Preview and Scan Viewer windows After pressing the Pages button the Searchable PDF screen appears Multiple ranges of pages cannot be set 1 Press the Pages button The Searchable PDF screen appears 2 Enter a start page and end page Values between 1 and 999 may be entered 3 Press the OK button ...

Page 273: ...sword 1 On the Scan Settings screen select the Save tab 2 Press the PDF Password button The Require PDF Password screen appears 3 Select whether or not a password is required When Yes is selected the Require PDF Password screen appears ATTENTION The password will need to be entered every time the password protected PDF file is opened Do not forget or lose this password ...

Page 274: ...e OK button The PDF will be created with password protection HINT The Caps Lock indicator is on if the keyboard s Caps Lock is set The Num Lock indicator is on if the keyboard s Num Lock is set HINT On the Require PDF Password screen pressing the No button cancels the set password The next time a password is set pressing the Yes button enters the pre viously set password by default ...

Page 275: ...ble to set the compression level Setting a compression level 1 to 5 reduces the file size when scanning documents such as photo graphs or figures Changing the compression level affects the scanned data in the following ways 1 On the Scan Settings screen select the Save tab 2 Press the Compression button The Compression screen appears High compression Low compression Quality Low High File size Smal...

Page 276: ... the resulting scan will be but at the expense of a larger file When PDF format is selected in 4 8 5 File Format page 240 High Compression for Color PDF can be used Selecting a compression level returns you to the Scan Settings screen The selected rate is displayed to the right of the Compression button ...

Page 277: ...d compressed as such causing degradation in the scanned image If this setting is specified the con trast of the image may become higher When one color page is scanned the file size criteria are shown as follows These numbers are for reference other documents may vary in size Actual paper size A4 size general catalog File format PDF Scanner paper size setting A4 File size KB for color files File si...

Page 278: ...the scanned data 1 On the Scan Settings screen select the Advanced tab 2 Press the Brightness button The Brightness screen appears 3 Select a brightness level Selecting a brightness level returns you to the Scan Settings screen The selected level is displayed to the right of the Brightness button ...

Page 279: ...setting can be adjusted to improve the visual appearance of the scan 1 On the Scan Settings screen select the Advanced tab 2 Press the Contrast button The Contrast screen appears 3 Select a contrast level Selecting a contrast level returns you to the Scan Settings screen The selected level is displayed to the right of the Contrast button ...

Page 280: ...s of documents When scanning such docu ments do not set automatic page orientation Documents with many extremely large small characters Documents on which the pitch of lines or characters is extremely nar row or characters overlap Documents with many characters that contact underlines or ruled lines Documents with many photographs or figures and only a few charac ters Documents which have a backgr...

Page 281: ...d This returns you to the Scan Settings screen The selected setting is displayed to the right of the Page Orientation button HINT Irrespective of what page orientation is decided pages may still be manu ally rotated as desired in the Scan Viewer screen For more details about the Scan Viewer screen refer to 4 10 Editing the Scanned Data in the Scan Viewer page 261 ...

Page 282: ... appears ATTENTION If the Brightness setting see 4 8 9 Brightness page 250 is set to Dark or Medium Dark blank pages may not be recognized as such by the scanner No scanned data is produced if all of the sheets in the document stack are recognized as blank pages The following types of documents may be accidentally recognized as blank pages Before discarding the scanned documents check for pages ac...

Page 283: ...canner fi 6000NS Operator s Guide 255 Regular User Operations 4 3 Select whether or not blank pages are to be skipped This returns you to the Scan Settings screen The selected setting is displayed to the right of the Blank Page Skip button ...

Page 284: ... stop the scan with an error message Multifeeds are to be detected by layer and length The following explains how to set whether or not multifeeds are to be detected and setup multifeed detection method For multifeed requirements refer to A 5 Multifeed Detection Conditions page 328 1 On the Scan Settings screen select the Advanced tab 2 Press the Multifeed Setup button The Multifeed Setup screen a...

Page 285: ...button Multifeed Setup Status None Multifeeds are not detected If scanning plastic cards select None For more details about scan ning plastic cards refer to A 2 Paper Requirements page 323 Ultrasonic Multifeeds are detected by layer Length Multifeeds are detected by length Both Multifeeds are detected by both layer and length ATTENTION An error will occur if the Length or Both multifeed setting is...

Page 286: ...e Scan Viewer page 261 If desired in the following screens the Scan Viewer screen can be set to be appear before the scanned data is finally processed Send e Mail screen Send Fax screen Print screen Save screen The following explains how to enable or disable the Scan Viewer using the Send e Mail screen 1 On the Send e Mail screen press the Scan Viewer button Pressing the Scan Viewer button will to...

Page 287: ...oceeds as follows When Scan Viewer is On and sending an e mail When Scan Viewer is Off and sending an e mail On the Send e Mail screen press the Scan button On the Send e Mail screen press the Scan Send button Documents are scanned The scanned data is shown on the Scan Viewer screen and may be edited On the Scan Viewer screen check and edit the scanned data and then press the Send button The scann...

Page 288: ... file size may differ from the estimated value shown Also note that skipped blank pages are not included in the total file size page count When the Scan Viewer is set to Off after the last page has been scanned the Cancel button is displayed for five seconds If the Cancel button is pressed a confirmation message appears When the OK button is pressed the scanned data is deleted and the screen retur...

Page 289: ...s actual or reduced size The scanned data can be moved by dragging it across the screen 1 On the Scan Viewer screen press the Previous or Next button to scroll though the pages of scanned data 2 Check the contents of the page shown When is pressed the scanned data will be shown without any magnification or reduction If is pressed the width of the scanned data will be scaled to fit the Scan Viewer ...

Page 290: ...iewer screen press the Previous or Next button to display the page you wish to rotate 2 Press either 90 or the 180 button If is pressed the page is rotated 90 degrees to the left If is pressed the page is rotated 90 degrees to the right If is pressed the page is rotated 180 degrees HINT The actual scanned data is updated to include the rotated page as soon as the button is pressed If the Cancel bu...

Page 291: ...ents into the ADF paper chute 2 On the Scan Viewer screen press the Scan More button Scanning starts Each page is briefly shown on the screen as it is scanned Any additionally scanned pages are added after the current scanned data The page num bers of additional pages will follow on from the last page of the current scanned data When the scan has completed the Scan Viewer screen opens and shows an...

Page 292: ...te 2 Press the Delete button A confirmation message appears 3 Press the OK button The page is deleted HINT If the scanned data consists of only one page that page cannot be deleted To re scan the document press the Cancel button The deleted page is removed from the actual scanned data as soon as the button is pressed so this procedure can not be undone If the Cancel button is pressed a confirmatio...

Page 293: ...he User Log button The User Log screen appears Info Info options Description Result In Progress Currently processing a scan operation OK Operation completed successfully Error Operation failed to complete successfully Code xxxxxxxx Shows a code for each operation For details refer to C 2 Regular User Mes sages page 363 Date MM dd yyyy dd MM yyyy yyyy MM dd Shows the date of each operation format s...

Page 294: ...he print server and the sending status is shown in the Result column until the scanned data is completely sent to the print server Save Scanned data is saved in a network folder Pages xxx Shows the number of pages scanned HINT If the Update button is pressed the log is updated to include the most recent operations Info Info options Description ...

Page 295: ...ing the Edit Fax Numbers button opens the Fax Number List screen Fax numbers can be added edited or deleted on the Fax Number List screen For details refer to 4 5 2 Adding a Contact to the Fax Number List page 203 4 5 3 Editing a Contact in the Fax Number List page 205 or 4 5 4 Deleting a Contact from the Fax Number List page 207 Pressing the Roller Cleaning button opens the Roller Cleaning screen...

Page 296: ...268 ...

Page 297: ...tlet and wait for at least 15 minutes The power does not need to be turned off when cleaning the feed rollers WARNING Do not use any aerosol sprays or alcohol based sprays to clean the scanner Dust blown up by strong air from the spray may enter the inside of the scanner This may cause the scanner to fail or malfunction Sparks caused by static electricity generated when blowing off dust and dirt f...

Page 298: ...thorized FUJITSU scanner service provider to obtain these products Item Part No Remarks Cleaner F1 PA03950 0352 1 bottle 100 ml Used to moisten the cloths before wiping parts clean Cleaning Wipe PA03950 0419 1 pack 24 sheets Pre moistened with Cleaner F1 Cleaning Wipes are used instead of moistened cloths Soft dry cloth Any commercially available lint free product ...

Page 299: ...er Idler rollers Glass scanner windows Ultrasonic sensor ATTENTION The scanner must be cleaned more frequently when the following types of documents are used Coated paper Documents with large areas of printing Chemically treated paper such as carbonless paper Paper containing large amounts of calcium carbonate filler Documents written in pencil Documents with insufficiently fused toner ...

Page 300: ...ON The glass scanner windows inside the ADF can become hot when the scanner is used Before cleaning inside the scanner or replacing any parts turn off the power unplug the AC adapter from the outlet and wait for at least 15 minutes The power does not need to be turned off when cleaning the feed rollers When you perform cleaning make sure that the inside of the scanner is free of any foreign object...

Page 301: ...mbly Refer to Pad assembly page 274 2 Feed rollers 4 Refer to Feed rollers page 275 3 Pick roller 1 Refer to Pick roller page 276 4 Idler rollers 4 Refer to Idler rollers page 276 5 Glass scanner windows 2 Refer to Glass scanner windows page 276 6 Ultrasonic sensor 2 Refer to Ultrasonic sensor page 276 Pad assembly Feed rollers Pick roller Idler rollers Glass scanner windows Ultrasonic sensor ...

Page 302: ... assy be careful not to get your hand or the cloth caught on the pick spring metal part ATTENTION When cleaning inside the ADF take care that the cloth does not get snagged by the document sensors and damage them Pick spring metal part Gray part Rubber pads clean here ...

Page 303: ...f the feed rollers 5 Press the c key on the keyboard The feed rollers will advance one step each time the c key is pressed Lightly press a soft cloth moistened with cleaning fluid against the surface of the rotating rollers to clean them Pressing the c key seven times will turn the roller one complete revolution The feed rollers should be cleaned carefully and thoroughly as dirty pick rollers can ...

Page 304: ...rip Idler rollers Gently rotate the idler rollers as you wipe them clean taking care not to scratch or ding them or tear the sponge wheels The idler rollers should be cleaned carefully and thor oughly as dirty idler rollers can adversely affect the paper pickup performance Glass scanner windows Clean lightly with a soft cloth moistened with cleaner F1 Ultrasonic sensor Clean lightly with a soft cl...

Page 305: ...es of the top cover return it to its original position You should hear a click ATTENTION Make sure that the top cover is completely closed If not completely closed document jams and feeding errors may occur When closing the top cover do not slam it shut by pushing the touch panel as this may damage it ...

Page 306: ...d never be scratched or banged with hard objects 5 4 Cleaning the Keyboard To prevent the keyboard from becoming dirty it should also be regularly cleaned with a soft dry cloth ATTENTION Always use a dry not damp cloth to clean the screen If dust is allowed to collect and compact around the frame of the screen it can cause the touch panel to malfunction ATTENTION Always use a dry not damp cloth to...

Page 307: ...sembly PAD ASSY PA03289 0111 After every 50 000 sheets scanned or once a year when using 64 g m2 17lb A4 Letter wood free or wood containing paper Green until the number of documents scanned reaches 45 000 sheets Orange after 45 000 sheets Red after 50 000 sheets Pick roller PA03289 0001 After every 100 000 sheets scanned or once a year when using 64 g m2 17lb A4 Letter wood free or wood containin...

Page 308: ...han the Replace at value should be replaced The value of the Usage Counter is in units of 500 sheets scanned For details on how to check the status of consumable parts on the administrator screen refer to 3 7 2 Viewing the Usage Status page 128 3 Replace the part Part replacement procedures are detailed in the following sections Replacing the Pad Assembly page 281 Replacing the Pick Roller page 28...

Page 309: ...r side of the pad assembly together and pull it upwards and to the front taking care not to snag the pick springs 4 Insert the new pad assembly Holding the new pad assembly by its sides insert into the pad assembly socket taking care not to snag the pick springs ATTENTION Be careful that the top cover does not shut on your fingers ATTENTION Make sure that the pad assembly is firmly and fully inser...

Page 310: ...r details refer to Resetting the Usage Counter page 130 5 5 2 Replacing the Pick Roller 1 Remove any documents from the ADF paper chute 2 Remove the ADF paper chute 3 Push the ADF release button then hold both sides of the top cover and lift it open ATTENTION Be careful that the top cover does not shut on your fingers ATTENTION Be careful that the top cover does not shut on your fingers ...

Page 311: ...eft side pick roller bushing in the direction indicated by the arrow 3 Gently lift and slide the pick roller shaft out of the left side of the ADF in the direction of the arrow Be careful as it is easy to bind the shaft in the right side bushing ATTENTION The pick roller bearing may be hard to rotate Do not try to turn it with your fingernail Use a paper clip to turn the roller bearing if you can ...

Page 312: ... pick roller lock tab with your fingernail as it may get chipped or broken If worried try lifting the tab using a paper clip as shown in the following diagram ATTENTION Make sure that the pick roller shaft is fully inserted If it is not cor rectly attached document jams and other feeding errors may occur You should hear a click when the pick roller shaft is inserted cor rectly Make sure you hear t...

Page 313: ...by the arrow 2 Open the tabs of the sheet guide release catch in the direction indicated by the arrow to lock the sheet guide in place 8 Close the top cover You should hear a click when it is returned to its original position 9 Attach the ADF paper chute 10 Reset the pick roller usage counter The usage counter must be reset by an administrator For details refer to Resetting the Usage Counter page ...

Page 314: ...replacement of consumable parts perform a scan test 1 On the Main Menu screen press the Maintenance button The Maintenance screen appears 2 Press the Scan Test button The Scan Test screen appears 3 Load the document into the ADF paper chute for the scan test ...

Page 315: ...completed the Scan Viewer screen appears If the scanner fails to scan correctly an error message is displayed For more details about how to deal with error messages refer to C 2 Regular User Messages page 363 5 Check the scanned data For more details about Scan Viewer refer to 4 10 1 Viewing a Scanned Page page 261 or 4 10 2 Rotating a Scanned Page page 262 ...

Page 316: ...288 6 Press the OK button The Maintenance screen is shown again ...

Page 317: ...hich may appear during scanner operations or cleaning refer to C 2 Regular User Messages page 363 For details of messages which might appear when acquiring log information in 3 8 Using the Operation Logs Menus page 133 refer to C 1 2 System Log Messages page 357 For details of device status messages refer to C 1 3 Alert Monitor System Log Messages page 359 6 1 Removing Jammed Documents 290 6 2 Dea...

Page 318: ...e button then hold both sides of the top cover and lift it open ATTENTION When removing jammed documents take care with dangling neckties necklaces etc as they may easily become entangled in the scanner The glass scanner windows inside the ADF can become hot when the scanner is used Take care not burn your hands ATTENTION Be careful that the top cover does not slam shut on your fingers ...

Page 319: ...ent jams Check the docu ment and feed path and remove any such objects that may have come loose Any staples clips etc should be removed from the document before starting a scan Take care not to snag the pick springs when removing jammed docu ments ATTENTION Make sure that the top cover is completely closed If not completely closed document jams and feeding errors may occur When closing the top cov...

Page 320: ...w the proce dure below to remove any such pages from the ADF 1 Remove all documents from the ADF paper chute 2 Push the ADF release button then hold both sides of the top cover and lift it open 3 Remove the remaining documents 4 Close the top cover If document pages become blocked while scanning check the scanned data If documents become blocked whilst being fed into the scanner document pages whi...

Page 321: ...6 1 Removing Jammed Documents Network Scanner fi 6000NS Operator s Guide 293 Troubleshooting 6 3 Load the documents into the ADF paper chute as shown in the following diagram ...

Page 322: ...it back onto its original location and push it down until it clicks into place If a keycap and key switch become loose they should be reattached as follows 1 Remove the key switch from the keycap 2 With the flat part of the key switch facing downwards reattach it to the keyboard Keycap ...

Page 323: ...leshooting 6 3 Fit the keycap back onto its original location and push it down until it clicks into place HINT If the detached keycap has a wire brace reattach the wire to the keyboard align the keycap over the middle of the wire and push the keycap down until it clicks into place Keycap ...

Page 324: ...strator screen and should be per formed after the network has been setup Checking basic network operation with a Ping test Checking the network operating status Checking the NTP server settings by synchronizing the system time if using an NTP server Checking the mail server by sending a test mail if scanned data is to be sent as an e mail by fax or when requesting alert notifications by e mail Che...

Page 325: ...g statistics shows Lost 4 100 loss NG Check that the ping target IP address is correct If the ping target IP address is correct refer to Failure to connect to a server using its IP address page 305 for further solutions Ping statistics shows Lost N 1 to 99 loss NG There may be a quality problem with the LAN cable Replace the LAN cable and try again In 3 6 12 Checking the Network Operating Status p...

Page 326: ...er to Failure to connect to a server by name page 307 for further solutions Ping statistics shows Lost 4 100 loss NG Check that the ping target server name is cor rect In 3 6 12 Checking the Network Operating Status page 125 change the Link Speed Duplex Mode from Auto Negotiation to a fixed mode Ping statistics shows Lost N 1 to 99 loss NG There may be a quality problem with the LAN cable Replace ...

Page 327: ...ld appear The following outcomes are possible Network settings Connection status Action The information shown is all valid OK None The information shown is not all valid NG If DHCP is not used Check that the IP Address setting is correct If DHCP is used Check that physical network connection to the DHCP server is functioning correctly Check the DHCP server The server may not be operating normally ...

Page 328: ...rk connection is not functioning normally NG In 3 6 12 Checking the Network Operating Status page 125 change the Link Speed Duplex Mode from Auto Negotiation to a fixed mode If the problem persists refer to Failure to con nect to a server using its IP address page 305 for further solutions Network settings Connection status Action ...

Page 329: ...a was available NG Try the following Check the NTP server name and address settings for errors Check the network path between to the NTP server for problems The NTP server may be busy Wait a short time before trying again to synchronize the system time If that does not work the specified server may not be an NTP server so try a different NTP server The specified NTP server cannot provide a trusted...

Page 330: ... System time synchronization failed Sending resync command to local computer The computer did not resync because the required time change was too big NG Refer to 3 5 4 Setting the Date Time page 55 adjust the date time and try again Message Connection status Action ...

Page 331: ...button a message dialog such as the following is displayed The following outcomes are possible Message Connection status Action Testing OK If no error message appears and the testing indicator disappears the test mail was sent successfully to the mail server Check that the alert notification e mail has arrived at the specified destination If the alert notification e mail has not arrived at the exp...

Page 332: ...egative response to the SMTP server ping test check that the system network is functioning normally by pinging the SMTP server from another machine in the network If only the scanner s network connection is not operating correctly refer to Failure to connect to a server using its IP address page 305 for further solutions If the problem seems to be with the SMTP server cannot connect to its network...

Page 333: ... a server cannot be connected to using its IP address and does not respond to a ping test try the following steps No Problem Action 1 Connection error between a server and the scanner or problem with the LAN cable Check that the LAN cable has been attached to both the scanner and server correctly If the server is connected using a LAN cable straight type in case auto mdi automatic selection is not...

Page 334: ...host or communication device is connected using the same IP address as the scanner If the same IP address has already been used by another host or communication device then even if the other device has been given a different IP address the server may not recognize the scanner s duplicate IP address until it is rebooted Restart the server If a duplicate IP address connection from another host or co...

Page 335: ...ink speed duplex settings to Auto Nego tiation select something other than Auto Negotiation and check again For more details about the Network Sta tus screen refer to 3 6 12 Checking the Network Operating Status page 125 No Problem Action 1 Same as in Failure to connect to a server using its IP address page 305 Check if a network connection is possible by trying the same solution for Failure to co...

Page 336: ...server For more details refer to 3 6 8 Setting the Network Printers page 88 2 Network printer shared name has been changed Check the shared name on the print server 3 The specified network printer path is invalid Check that the specified network printer path is correct No Problem Action 1 Printer is not usable due to an out of paper error paper jam or similar problem Check whether or not the print...

Page 337: ...ing its IP address page 305 2 The DNS server or WINS server is not functioning normally or the scanner name has not been registered in the DHCP or WINS server Check the connectivity of the specified IP address If it is possible to connect the scanner using the network scanner admin tool with a specified IP address specify the scan ner s IP address in the DNS or WINS server Also check the DNS or WI...

Page 338: ...s zone to Medium In the Security tab click the Custom Level button Then set the Script ing Active Scripting to Enable If connecting via the Internet zone on the Privacy tab set the level to below Medium High After the above settings have been per formed in Temporary Internet Files press the Delete Cookies button to delete all temporary internet files 5 The scanner is in standby mode Press the star...

Page 339: ...ity level for the corre sponding zone is set as high or in Custom Level Scripting Active Scripting is set to Prompt or Disable In Microsoft Internet Explorer in the Tools menu Internet Options try the following settings for the corresponding zone To enable Active Scripting set in one of the following ways In the Security tab set the required Security level for this zone to Medium In the Security t...

Page 340: ...pter Disconnect the AC cable from the scan ner wait at least ten seconds then reattach the cable and turn the power back on again If the problem persists contact your FUJITSU scanner dealer or an authorized FUJITSU scanner service pro vider Scanning does not start Has the document been loaded cor rectly into the ADF paper chute Reload the documents into the ADF paper chute Is the ADF completely cl...

Page 341: ...ick roller dirty Clean the pick roller For more details refer to 5 2 Cleaning the ADF page 272 Is the pick roller worn out Replace the pick roller For more details refer to 5 5 Replacing Parts page 279 Is there any foreign matter in the document feed path Clean the document feed path Scanned data is elongated Are the feed rollers dirty Clean the feed rollers For more details refer to 5 2 Cleaning ...

Page 342: ... button and try again To use the touch panel touch the input field directly and try again Saving is not possi ble after pressing Save on the File Download screen Does the length of the Save As folder path folder path plus file name exceed 259 characters Select a Save As folder that respects the limit Status screen stops at Printing scan data to Is there enough free space in the drive on which the ...

Page 343: ... scanner dealer or an authorized FUJITSU scanner service pro vider check the following points 6 5 1 General Details Info Findings Model fi 6000NS Serial No Example 000001 For the serial number refer to 6 6 Checking the Scanner Labels page 318 Production date Year Month 2006 05 May 2006 For details refer to 6 6 Checking the Scanner Labels page 318 Date of purchase Year Month Day Symptoms Frequency ...

Page 344: ...personal computer Document feed trouble Info Findings OS Windows Network scanner admin tool version Displayed error message Info Findings Document type Main purpose of use Last cleaned on Year Month Day Consumables last replaced on Year Month Day Error message details ...

Page 345: ...cting Your FUJITSU Scanner Dealer Network Scanner fi 6000NS Operator s Guide 317 Troubleshooting 6 Other problems Info Findings Can both the original document and scanner image be sent by e mail or fax Circle one Available Unavailable ...

Page 346: ...how to check the scanner s two information labels The following diagrams show where the labels are located on the scanner Label A example Contains various scanner information Label B example Indicates the various standards that the scanner conforms to Label A Label B ...

Page 347: ...ing the System Settings page 154 After backing up the user data store and system settings the original data may be deleted Refer to the following sections for details If the hard disk is replaced all settings will revert to their factory default values Clearing the User Data Store page 152 from 3 9 1 Maintaining the User Data Store page 144 Clearing the System Log page 143 from 3 9 2 Maintaining t...

Page 348: ...320 ...

Page 349: ...s appendix describes the paper size and quality requirements for ensuring that the ADF operates correctly when scanning documents A 1 Paper Size 322 A 2 Paper Requirements 323 A 3 Maximum Document Loading Capacity 326 A 4 Area not to be Perforated 327 A 5 Multifeed Detection Conditions 328 ...

Page 350: ...lowing paper sizes can be scanned with this scanner Width 53mm to 216mm 2 1in to 8 5 in Length 74mm to 356mm 2 9in to 14in When Custom paper size setting is used a page length of up to 863mm 34in is allowed for document scanning ...

Page 351: ...ts may not scan successfully Documents of non uniform thickness e g envelopes and documents with attachments Wrinkled or curled documents See the following HINT Folded or torn documents Documents with appended photographs notes etc Tracing paper Coated paper Carbon paper Carbonless paper Photosensitive paper Perforated or punched documents Documents that are not square or rectangular Exceptionally...

Page 352: ... shortened compared with the case where woodfree paper manuscripts are scanned When scanning photographs the face of the photograph may become damaged HINT When scanning semi transparent documents set the scan Brightness to Light to avoid image bleed through To prevent the rollers from becoming dirty avoid scanning documents con taining large areas written or filled in with pencil If scanning of s...

Page 353: ...in portrait mode as in the fol lowing figure Cards should be placed face down in the ADF paper chute Embossed cards should be placed with the raised lettering side down Cards should be of the following specifications ISO7810 compliant Type ID 1 cards Width Length 2 1in X 3 4in 54mm X 86mm Thickness 0 03 0 003in 0 76 0 08mm Material PVC polyvinyl chloride or PVCA polyvinyl chloride ace tate Cards t...

Page 354: ...ocument paper The following graph shows the maximum document loading capacity of ADF according to paper size and weight Unit Standard paper weights g m2 52 64 75 80 90 104 127 lb 14 17 20 21 24 28 34 kg 45 55 64 5 69 77 5 90 110 50 35 A4 Letter or smaller size 29 60 60 50 40 30 20 0 52 64 Paper weight g m2 80 104 127 Maximum ADF capacity sheets Legal 50 41 29 24 ...

Page 355: ...ide 327 A A 4 Area not to be Perforated ADF feed problems can occur while scanning if the document has any holes punched etc in the shaded area shown in the following figure Page top Front side Feed direction Center of paper Page bottom 35mm ...

Page 356: ...ted by layer In this case set sheets of the same thickness in the ADF at any one time Document thickness 0 065 to 0 15mm Punched holes are not allowed within 35mm 1 4in of the vertical center line of the docu ment Do not glue on any other paper within 35mm 1 4in of the vertical centerline of the docu ment A 5 2 Detection by Length If Length is selected in 4 8 13 Multifeed Detection Layer and Lengt...

Page 357: ...ation 1 or less Punched holes are not allowed within 35mm 1 4in of the vertical center line of the docu ment Do not glue on any other paper within 35mm 1 4in of the vertical centerline of the docu ment Area where multifeed detection is possible ATTENTION Multifeed detection by layer will often mis detect very thick paper or plastic documents When scanning such documents select None on the Multi fe...

Page 358: ...330 ...

Page 359: ...er fi 6000NS Operator s Guide 331 B Appendix B Scanner Specifications This appendix gives specifications for the scanner as a whole and for scanner parts B 1 Device Specifications 332 B 2 Scanner Specifications 333 ...

Page 360: ...LCD monitor Analog resistive touch panel Keyboard 101 keyboard Network interface LAN 10Base T 100Base TX Input power AC100 240V 10 50 60Hz HINT This scanner is installed with a LAN card which supports the Wakeup on LAN function If the last time the scanner power was turned off was due to an error or power failure the Wakeup on LAN function will not work ...

Page 361: ...ustom paper size setting is used a page length of up to 863mm 34in is allowed for docu ment scanning Paper weight 52 g m2 to 127 g m2 Scanning speed This is the scanning speed for A4 paper size setting ADF paper chute capacity Maximum 50 sheets A4 80g m2 Optical resolution 600 dpi Output resolution 150 dpi 200 dpi 300 dpi 600 dpi Grayscale level inter nal 1 024 levels The following table shows sca...

Page 362: ...334 ...

Page 363: ...ration Messages This appendix provides information about messages which may appear during scanner operations and how to deal with them Messages displayed in Italic in this manual may be subject to change C 1 Administrator Messages 336 C 2 Regular User Messages 363 ...

Page 364: ...he types of marks which may appear in a message dialog box Marks Description Warning message Displayed if invalid values have been entered for a setting Check the message and press the OK button Error message Check the message and press the OK button Information message Check the message and press the OK button No action required Inquiry message Check the message select and press a button ...

Page 365: ... or user can login to the scanner at any one time After the other user admin istrator or regular has logged out try again Logout Do you wish to logout now Logout Cancel Press the Logout button to exit the current session now Otherwise press the Cancel but ton to continue A restart is required to effect the changed settings Do you wish to restart now or later Restart Restart the system immedi ately...

Page 366: ...fferent scanner name The new settings will be enabled after the system has been restarted Do you wish to restart the system now or later Now Restart the system immediately Net login will not be possible until the restart completes Later The system will be restarted and the settings enabled when you logout Cancel Cancel the new settings Press the Now button to cause the system to restart immediatel...

Page 367: ...de ver tical offset that is between 4 and 4 Invalid reverse side vertical offset has been entered Re enter a value for reverse side vertical offset that is between 4 and 4 Invalid length magnification adjust ment has been entered Re enter a value for Length Mag nification that is between 3 1 and 3 1 Front side horizontal offset has not been set Set a front side horizontal offset Reverse side horiz...

Page 368: ...nter the same password string in both the New and Confirm Pass word fields Passwords must contain at least 7 characters Re enter a new or confirm pass word that contains at least 7 char acters IP Address IP Address has not been entered Enter an IP address Subnet Mask has not been entered Enter a subnet mask Default Gateway has not been entered Enter a default gateway IP Address is incomplete Compl...

Page 369: ...y DNS Secondary DNS has not been entered Enter a secondary DNS Primary DNS is incomplete Complete the primary DNS Secondary DNS is incomplete Complete the secondary DNS Primary DNS address is invalid Enter a valid primary DNS address Secondary DNS address is invalid Enter a valid secondary DNS address WINS Server Primary WINS has not been entered Enter a primary WINS Secondary WINS has not been en...

Page 370: ...ms The NTP server may be busy Wait a short time before trying again to synchronize the system time If that does not work the specified server may not be an NTP server so try a different NTP server The specified NTP server can not provide a trusted date and time It attempted to acquire the date and time from a higher level NTP server but failed Try a different NTP server or have the network adminis...

Page 371: ...se has not been entered Enter a search base address SMTP Server SMTP Server IP Address has not been entered Enter an SMTP server IP address SMTP Server IP Address is incom plete Complete the SMTP server IP address SMTP Server Name contains invalid characters Enter a valid SMTP server name SMTP Server IP address is invalid Enter a valid SMTP server IP address Invalid maximum attachment size has bee...

Page 372: ...work printer from multiple devices Close all other connections to this printer and try again Close all other connections to this printer and try again Access was refused Contact a server administrator to find out if an access permit has been set Operation not possible Network path is not working Contact a server administrator Too many network connections To continue close any unused network connec...

Page 373: ...able to login to this network printer The Specified user account has expired Try the following Login with a different account Contact a network administrator to have the account validated Specified password is no longer valid for this network printer Change the password before log ging in to the network printer for the first time Try the following Login with a different account Contact a network a...

Page 374: ...ttings and access privileges for the network printer have been set correctly Check that the shared printer settings have been set correctly on the print server By performing a ping test check if the network connection to the printer is working prop erly If there is no response from the ping test check that the system network is function ing normally by performing a ping test from another machine i...

Page 375: ...as name Network folder alias has not been entered Enter a network folder alias Specified network folder alias is already being used Try a different alias Rename the network folder whose alias is already being used and try adding the folder again OK to remove this network folder from the list To remove the network folder press the OK button Otherwise press the Cancel but ton A single user is not al...

Page 376: ...network connections and try again Close unneeded network connec tions then try opening the desired network connection again Network is busy Try again later Wait for a while and try again Number of network path connections has reached the maximum allowed No more may be specified Close unneeded network connec tions then try specifying the desired network path again Length of specified network folder...

Page 377: ... password before log ging in to the network folder for the first time Try the following Login with a different account Contact a network administra tor to have the password changed Maximum length of folder alias is 80 characters Set a folder alias that is no longer than 80 characters long Specified network folder path contains invalid characters Enter a valid network folder alias Network folder pa...

Page 378: ... from another per sonal computer in the network By performing a ping test check if the SMTP server or the network connection to the SMTP server is working prop erly If there is no response from the SMTP server ping test check that the system network is functioning normally by per forming an SMTP server ping test from another machine in the network If the system network is not operating correctly r...

Page 379: ... at least ten seconds then reconnect the AC cable and try turning the power back on again If the error status persists contact your FUJITSU scanner dealer or an authorized FUJITSU scanner service provider Usage Status Do you wish to clear the pad assembly usage counter To clear the pad assembly usage counter press the OK button Otherwise press the Cancel but ton Do you wish to clear the pick rolle...

Page 380: ... No button Specified backup file could not be uploaded or is not a valid user data store Try the following Check if the specified backup file is correct Try restoring the file again Specified backup file may not be uploaded because of network error Check the network status Restoring from the specified backup file will cause the maximum number of user data stores to be exceeded Clear the existing u...

Page 381: ...estore the system settings Net login will not be possible until the restart completes No Return to the previous screen without restoring the system settings To restore data press the Yes button Otherwise press the No button The system must be restarted to restore the system settings OK to restore the factory default system set tings Yes Restore the factory default sys tem settings Net login will n...

Page 382: ...pdate file could not be uploaded or is not a valid system update Try the following Check if the specified update file is correct and try again Specified update file may not be uploaded because of network error Check the network status This system update has already been applied System Version x x x x No action required The system needs to be restarted to finalize the update OK to update now OK upd...

Page 383: ...odule Specified Add in file cannot be applied to this system Check the system version prepare the correct version of the update file and try again Specified Add in could not be uploaded Try the following Check if the specified update file is correct and try again Specified update file may not be uploaded because of a net work error Check the network status System version xx or later is required to...

Page 384: ...out unistalling To uninstall now press the Yes button Otherwise press the No button Network Scanner Admin Tool Connection error If this error appears when connect ing reset the IP address and try connecting again If the error appears when using the network scanner admin tool con tact the network administrator to check the network operating envi ronment Screen Message Action ...

Page 385: ...mbly usage counter was cleared 01000003 Pick roller usage counter was cleared 01000004 All users log was prepared for down load 01000005 System log was prepared for down load 01000006 User data store was prepared for download 01000007 User data store was restored 01000008 System settings were prepared for download 01000009 System was updated Info New System Version x x x x 01000010 Test e mail was...

Page 386: ...er service provider Error code xxxxxxx Result code xxxxxxx XXXXXX Function Name Contact your FUJITSU scanner dealer or an authorized FUJITSU scanner service provider 81001002 Error problem with XXXXXX Contact your FUJITSU scanner dealer or an authorized FUJITSU scanner service provider XXXXXX Function Name Contact your FUJITSU scanner dealer or an authorized FUJITSU scanner service provider 810010...

Page 387: ...lowing table gives a summary of system log information messages which may be received from the scanner alert monitoring service No action is required Code Message Action 01001013 Scanner alert monitor started No action required 01001014 Scanner alert monitor start date time yyyy MM dd HH mm ss 01001015 Scanner alert monitor stopped 01001016 Scanner alert monitor stopped by sys tem standby mode 010...

Page 388: ...vice provider 81000002 1 5V power supply error 81000003 3 3V power supply error 81000004 5V power supply error 81000005 12V power supply error 81000006 12V power supply error 81000007 5V Standby power supply error 81000008 Battery power supply error 81000009 Internal temperature error Check if the air ventilation inlet is blocked Contact your FUJITSU scanner dealer or an authorized FUJITSU scanner...

Page 389: ...rom the SMTP server ping test check that the system network is functioning normally by per forming an SMTP server ping test from another machine in the network If the system network is not operating correctly refer to Failure to connect to a server using its IP address page 305 for further solu tions If only the SMTP server cannot connect to the net work request the network administrator to check ...

Page 390: ... should be replaced when convenient 82000005 Pad assembly needs replacement soon Obtain a replacement pad assem bly soon The pad assembly should be replaced after every 50 000 scanned sheets or once a year 82000006 Pad assembly needs replacement now Pad assembly has passed its rated lifetime 50 000 scanned sheets or one a year and needs to be replaced 82000007 Pick roller needs replacement soon Ob...

Page 391: ...dministrator and have them check that the LDAP server is set Contact a system administrator to have the server status checked Contact a system administrator to check if the password has expired Scanner initialization has failed Try turning the power off and back on again The administrator should con tact the FUJITSU scanner dealer or an authorized FUJITSU scanner service provider for help If the s...

Page 392: ...he user information deleted Restoring the User Data Store page 149 Consumable Alert Normal No action required Replace Soon Replace the consumable part when convenient For details refer to 5 5 Replacing Parts page 279 Scanning Scanning No action required Document not found Load a docu ment into the ADF making sure the side guides are adjusted correctly and try again Load the document into the ADF p...

Page 393: ... off and back on again If prob lem persists the administrator should contact the FUJITSU scanner dealer or an authorized FUJITSU scanner ser vice provider for help Try the following Reduce the size of the scan data or set a lower resolution level and try again System might be unstable If the scanner does not restart automatically try turning the power off for ten seconds and back on again If the e...

Page 394: ... and try scanning again Roller Clean ing Scanner top cover is closed Open the cover and try again Open the top cover to clean the feed rollers and try again For details refer to 5 2 1 Cleaning the ADF page 272 Press the c key to rotate the rollers Once roller cleaning has been com pleted press the OK button Clean the rollers and then press the OK button Main Menu Maximum number 10 of Scan Buffer j...

Page 395: ...e mode the following options are fixed at the indicated val ues Searchable PDF No Page Orientation Off Blank Page Skip Off Multifeed Setup None The following option values are also incompatible with long page mode Color Mode Auto changes to RGB Color Resolution 600dpi changes to 200dpi No action required File Format JPEG format is incompatible with the Black White color mode On the File Format scr...

Page 396: ...ain Password field is empty Enter a pass word and try again Enter a password and try again Compression Compression settings for color data No action required Only for the PDF File Format No action required High Compression for Color PDF is incompatible with 600dpi resolu tion No action required Multifeed Setup Problems can occur if Length or Both is used with the Auto paper size No action required...

Page 397: ...m persists consult the manual Press the ADF release button to open the top cover and remove the documents from the ADF If more than one sheet has been fed reset the document and try again Check that the actual document s size matches the paper size speci fied in the Paper Size screen If not specify the paper size again For details refer to 4 8 3 Paper Size page 234 Paper jam has occurred Remove th...

Page 398: ...lid To address Re enter the address and try again Enter a valid e mail address including Invalid Cc address Re enter the address and try again Enter a valid e mail address including Invalid Bcc address Re enter the address and try again Enter a valid e mail address including Current login LDAP account has become invalid Contact a system administrator to have the login account validated For JPEG an...

Page 399: ...ndi tions to narrow down the search Add e Mail Address First name is required Enter a first name e Mail address is required Enter an e mail address This e mail address already exists Try a different e mail address Enter a different e mail address Invalid e mail address Try again Enter a valid e mail address Edit e Mail Address First name is required Enter a first name e Mail address is required En...

Page 400: ...ave the time out interval checked 3 6 5 Setting the LDAP Server page 77 Add Fax Num ber Recipient must be specified Enter a recipient Fax number must be specified Enter a fax number This fax number already exists Try a different fax number Enter a different fax number Invalid fax number Try again Enter a valid fax number Only numbers 0 to 9 and can be used Edit Fax Num ber Recipient must be specif...

Page 401: ...ver administrator Not connected to the network Check that the system network is functioning normally by perform ing a ping test from another machine in the network other than the server with network printer If the system network is not operating correctly refer to Failure to connect to a server using its IP address page 305 for further solutions Scan Buffer job is already queued on the computer th...

Page 402: ...ied password is no longer valid for this network printer Try the following Login with a different account Contact a network administra tor to have the account vali dated again Specified user needs to renew their password for this network printer Try the following Login with a different account Contact a network administra tor to have the password changed Error network printer could not be accessed...

Page 403: ...that owns the specified network printer Try the following Select a different network folder Wait a short time then try again Access was refused Contact a server administrator to find out if an access permit has been set Number of network path connections has reached the maximum allowed No more may be specified Close unneeded network connec tions then try specifying the desired network path again S...

Page 404: ...already exists Choose a different name or change the overwrite permis sion setting Change the file name or select Yes to overwrite the file with the same name Not connected to the network Check that the system network is functioning normally by perform ing a ping test from another machine in the network other than the server with network folder If the system network is not operat ing correctly ref...

Page 405: ...that the file to be overwrit ten is closed and try again Current login LDAP account has become invalid Contact a system administrator to have the login account validated Specified user is no longer able to login to this network folder Try the following Login with a different account Contact a network administra tor to have the account vali dated Specified password is no longer valid for this netwo...

Page 406: ...ame or select Yes to overwrite the file with the same name Not connected to the network Check that the system network is functioning normally by perform ing a ping test from another machine in the network other than the server with network folder If the system network is not operat ing correctly refer to Failure to connect to a server using its IP address page 305 for further solutions Scan Buffer...

Page 407: ...k administrator to check whether the network folder can store data Startup Scan ner Application could not be started Sys tem restored to last known good state Contact a system administrator System or user settings were restored at system restart The administrator should check the restored system or user settings Scan Viewer Scan not possible Number of scan pages exceeds the maximum XXX pages Finis...

Page 408: ...anner dealer or an autho rized FUJITSU scanner service pro vider for help alphanumeric eight digits If the scanner does not restart auto matically try turning the power off for ten seconds and back on again If the problem persists the admin istrator should contact your FUJITSU scanner dealer or an authorized FUJITSU scanner ser vice provider An error has occurred The system must be restarted Any b...

Page 409: ...remove any documents that have been fed into the scanner disconnect and reattach the power cord and restart the system again If problem persists the administrator should con tact a FUJITSU scanner dealer or an authorized FUJITSU scanner service provider for help alphanumeric eight digits If the problem persists the admin istrator should contact a FUJITSU scanner dealer or an authorized FUJITSU sca...

Page 410: ...s may be buffered Wait until scanner is no longer in busy sta tus 01121001 Scanner started up No action required 01121002 Scanner resumed from standby mode No action required 01131001 Scanner shutdown No action required 01131002 Scanner entered standby mode No action required 05050000 Add in module loaded successfully No action required 05050001 Add in module operation started No action required 0...

Page 411: ...dministrator To have the pick roller replaced contact a system administrator The system administrator should open the top cover and replace the pick roller 5 5 2 Replacing the Pick Roller page 282 Code Message Action 100B0001 Network is busy Try again later Wait for a while and try again 11080001 Number of user data stores has reached the maximum allowed New users may not login until the old user ...

Page 412: ...word and try again Contact a system administrator and have them check that the LDAP server is set Contact a system administrator to have the server status checked Contact a system administrator to check if the password has expired 110D0002 Cannot connect to the LDAP server Try the following The network settings may not be valid Contact a system administrator to have the network settings checked 6 ...

Page 413: ...e the account validated 110D0049 Specified password is no longer valid for this network printer Try the following Login a with different account Contact a network administrator to have the account validated again 110D004A Specified user needs to renew their password for this network printer Try the following Login a with different account Contact a network administrator to have the password change...

Page 414: ... to server when sending e mail Try the following Check that the LAN cable of the scanner and SMTP server is connected properly Contact a system administrator to check that then scanner IP address and SMTP server settings are correct 6 3 Network Connection Troubleshooting page 296 Contact a system administrator to check that the SMTP server is working prop erly 12010003 From address was rejected by...

Page 415: ...is allowed 12020001 Scanned data size exceeded maximum size allowed for sending by fax Try the following Reduce the number of pages to be scanned and send the fax in separate parts Select a higher compression level and try again 4 8 8 Compression page 247 If the problem persists contact a system administrator to check the Maximum Attachment Size setting 3 6 6 Setting the e Mail Server SMTP Server ...

Page 416: ...at the LAN cable of the scanner and SMTP server is connected properly Contact a system administrator to check that then scanner IP address and SMTP server settings are correct 6 3 Network Connection Troubleshoot ing page 296 Contact a system administrator to check that the SMTP server is working prop erly Contact a system administrator to check the maximum e mail size allowed by the SMTP server 12...

Page 417: ...e server with network folder If the system network is not operating correctly refer to Failure to connect to a server by name page 307 for further solutions 12040008 Scan Buffer job is already queued on the computer that owns the specified network folder Try the following Select a different network folder Wait a short time then try again 12040009 Insufficient free space in the designated network f...

Page 418: ...itialization has failed Try turning the power off and back on again If prob lem persists the administrator should contact the FUJITSU scanner dealer or an authorized FUJITSU scanner service pro vider for help If the scanner does not restart automati cally disconnect the AC cable from the scanner to turn the power off wait for at least ten seconds then reconnect the AC cable and try turning the pow...

Page 419: ... to restart the scanner If the problem persists contact your FUJITSU scanner dealer or an authorized FUJITSU scanner service provider 83070007 83070008 8307000C 84000001 An error has occurred Try turn ing the power off and back on again If problem persists the administrator should contact the FUJITSU scanner dealer or an authorized FUJITSU scanner service provider for help alphanumeric eight digit...

Page 420: ...s that have been fed into the scan ner disconnect and reattach the power cord and restart the sys tem again If problem persists the administrator should contact a FUJITSU scanner dealer or an authorized FUJITSU scanner service provider for help alphanumeric eight digits If the problem persists the administrator should contact a FUJITSU scanner dealer or an authorized FUJITSU scanner service provid...

Page 421: ...scanner and SMTP server is connected properly Contact a system administrator to check that then scanner IP address and SMTP server settings are correct 6 3 Network Connection Troubleshooting page 296 Contact a system administrator to check that the SMTP server is working prop erly 12010003 From address was rejected by the server when sending e mail Contact a system administrator to check that the ...

Page 422: ...canned data size exceeded maximum size allowed for sending by fax Try the following Reduce the number of pages to be scanned and send the fax in separate parts Select a higher compression level and try again 4 8 8 Compression page 247 If the problem persists contact a system administrator to check the Maximum Attachment Size setting 3 6 6 Setting the e Mail Server SMTP Server page 84 12020002 Coul...

Page 423: ... sending fax data Try the following Check that the LAN cable of the scanner and SMTP server is connected properly Contact a system administrator to check that then scanner IP address and SMTP server settings are correct 6 3 Network Connection Troubleshoot ing page 296 Contact a system administrator to check that the SMTP server is working prop erly Contact a system administrator to check the maxim...

Page 424: ...rwrite the existing file on the Save screen set Overwrite old files as Yes and try again 12040005 Network is busy Try again later Try again later 12040006 User name or password may be incorrect Re enter the user name and password 12040007 Not connected to the network Check that the system network is function ing normally by performing a ping test from another machine in the network other than the ...

Page 425: ...assword for this network folder Try the following Login with a different account Contact a network administrator to have the password changed 12040100 Error network folder access was refused Try the following Contact a network administrator to check whether the network folder can store data For the MTIFF format the file size for the scanned data may not exceed 2GB Try adjusting the scan parameters...

Page 426: ...398 ...

Page 427: ...Network Scanner fi 6000NS Operator s Guide 399 D Appendix D Glossary ...

Page 428: ...erformed by the CCD sensors inside of this unit B5 size A standard international paper size 182 257mm approximately 7 17 10 12inches B6 size A standard international paper size 128 182mm approximately 5 04 7 17inches Brightness Refers to the brightness level of the scanned images Business card size A standard paper size 89 51mm Portrait orientation is used for this scanner Canadian DOC Regulations...

Page 429: ...satellite and cable The Part 15 of the FCC regulations men tioned in this manual is designed to prevent harmful interferences on radio communication of radio receivers and other devices which radiate radio frequency energy and provides for the certification of radio receivers It also provides the certification of low power transmit ters and the operation of certificated transmitters without a lice...

Page 430: ...SY A collection of rubber pads and metal leaf springs that is used to help separate a single docu ment sheet from a batch in the ADF paper chute for feeding into the ADF Paper jam A warning that appears when a document sheet is jammed in the document feed path or document feeding is interrupted by a slipping sheet Pick roller A roller that picks the next document sheet out of the ADF paper chute a...

Page 431: ... the more dots or pixels that can be used and the greater the resulting fineness of detail that can be expressed Simplex scan mode A scan mode where only one side of each document sheet is scanned See also Duplex scan mode Ultrasonic sensor A type of sensor that uses ultrasonic sound waves in this case to detect document multifeeds by recognizing differences in how the sound penetrates single vers...

Page 432: ...404 ...

Page 433: ...56 the user data store 146 blank page skip 254 brightness 250 buffer job 189 201 227 C carbonless paper 324 care 269 changing the admin password 61 checking the user log 265 cleaning 270 frequency 271 the ADF 272 the keyboard 278 the LCD touch panel 278 clearing the system log 143 the user data store 152 the user logs 138 color mode 230 common buttons and indicators 179 compression 240 247 contras...

Page 434: ... idler rollers 271 276 installing 36 IP address 70 K keyboard 4 25 278 L LAN connector 4 LCD touch panel 4 24 278 LDAP list 190 LDAP server 77 183 location 53 login 183 via the network interface 34 via the scanner s touch panel 31 logout 29 M main menu 180 maintenance 144 managing the scanner 27 the system log 139 the user log 133 materials cleaning 270 maximum document loading capacity 326 maximu...

Page 435: ...details 104 printer list 209 R region timezone 53 registering a network folder 108 a network printer 93 regular user 175 removing a network folder 116 a network printer 102 renaming a network folder 113 a network printer 99 replacement cycle 279 replacing the pad assembly 281 the pick roller 282 replacing parts 279 required settings 28 resetting the usage counter 130 resolution 232 restoring the u...

Page 436: ...4 setting up the scanner 27 sheet guide 5 side guides 4 SMTP server 19 84 specifications 331 standby 22 standby mode 57 58 startup button 4 22 31 183 system log 139 system settings 45 system settings file 154 system status 127 T top cover 4 U ultrasonic sensor 271 updating the scanner s system software 163 URL 36 usage status 128 130 user data store 152 user log 133 265 user log summary 133 V view...

Page 437: ...and procedures described in this manual profit loss due to defects and any claims by a third party z Copying of the contents of this manual in whole or in part and copying of the scanner application is forbidden under the copyright law Network Scanner fi 6000NS Operator s Guide P3PC 1852 06ENZ0 Date of issuance November 2009 Issuance responsibility PFU LIMITED ...

Reviews: