background image

2-11

Please confirm if FUJITSU ISIS scanner driver 
and ScandAll 21 were installed correctly with 
the following procedure          

3.

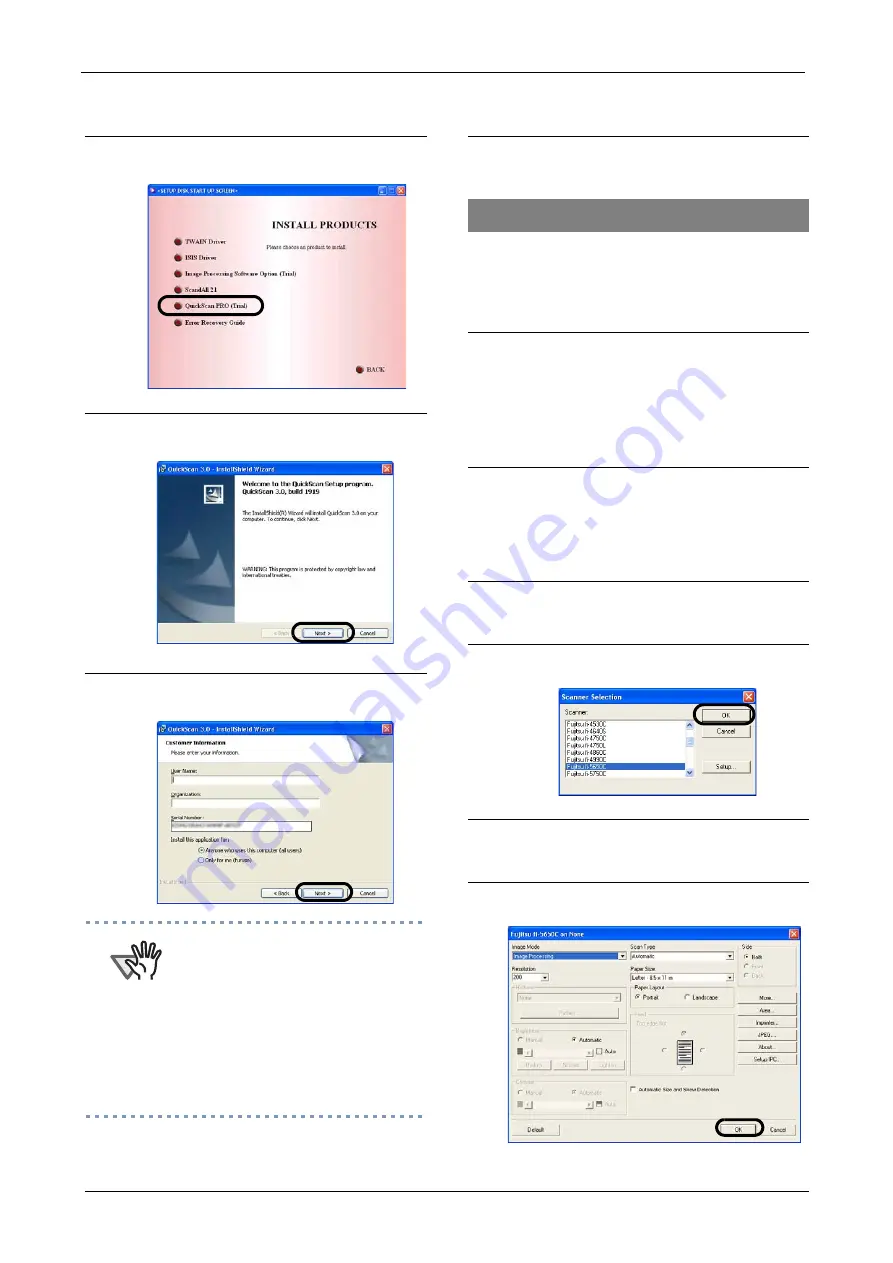
Click the [QuickScan PRO (trial)] 
button in the following screen.

4.

Install the application following the 
instructions on the window.

5.

Input the requested information and 
click on the [Next] button.

ATTENTION

QuickScan Pro, attached to the Setup 
CD-ROM is a trial version. Therefore, 
there is a limitation of 30 program starts. 
Purchasing this software is necessary if 
you intent to use this software unlimited. 
(when installing and using the trial 
version, please use the displayed serial 
number. For the operations of 
QuickScan, please refer to the 
"Overview of QuickScan" or the 
"QuickScan Help". Please click [Start], 
[Program], and then [QuickScan] in turn, 
and select then the file to refer.

6.

Install the application following the 
instructions on the window.

Confirming the installation

1.

Load the documents on the scanner.

For loading documents, please refer to 
Chapter 2 "BASIC SCANNER 
OPERATIONS" of the "fi-5650C Operator's 
Guide".

2.

Start QuickScan Pro.

Please select [Start], [Programs], 
[QuickScan] in turn, then click on 
[QuickScan].

3.

Select [Scan], and [Select Scanner...] 
from the menu bar.

4.

Select Fujitsu fi-5650C, then click the 
[OK] button.

5.

Select [Preview Setting...] from the 
[Scan] menu. 

6.

Set the reading resolution and docu-
ment size, then click [OK].

Summary of Contents for fi-5650C

Page 1: ...Getting Started fi 5650C Image Scanner P3PC E967 02EN ...

Page 2: ......

Page 3: ...ception which can be determined by turning the equipment off and on the user is encouraged to try to correct the interference by one or more of the follow ing measures Reorient or relocate the receiving antenna Increase the separation between the equipment and receiver Connect the equipment into an outlet on a circuit different from that to which the receiver is located Consult your dealer or an e...

Page 4: ...e in applications simply called high safety applications from here on that directly involve danger to life and health when a high degree of safety is required for example in the control of nuclear reactions at nuclear power facilities automatic flight control of aircraft air traffic control operation control in mass transport systems medical equipment for sustaining life and missile firing control...

Page 5: ...bove operating system the general term Windows is used Manufacturer PFU LIMITED International Sales Dept Imaging Business Division Products Group Solid Square East Tower 580 Horikawa cho Saiwai ku Kawasaki shi Kanagawa 212 8563 Japan Phone 81 44 540 4538 All Rights Reserved Copyright PFU LIMITED 2006 Note Liability READ ALL OF THIS MANUAL CAREFULLY BEFORE USING THIS PRODUCT IF THIS PRODUCT IS NOT ...

Page 6: ... in severe injury or death CAUTION This indication alerts operators to an operation that if not strictly observed may result in safety hazards to personnel or damage to equipment Symbols Used In This Manual This manual uses the following symbols in explanations in addition to warning indications ATTENTION This symbol alerts operators to particularly important information Be sure to read this infor...

Page 7: ...ant warnings described in this manual The glass surface inside the ADF becomes hot during the operation Be careful not to touch the glass surface inside the ADF ATTENTION Do NOT remove from the scanner stain or scratch the warning labels Do not touch the AC cable with wet hands Do not touch the power plug with wet hands Doing so might cause electric shock Do not damage the AC cable A damaged AC ca...

Page 8: ...t insert or drop metal objects in to the scanner Do not scan wet documents or documents with paper clips or staples Do not splash or allow the scan ner to get wet If foreign objects water small metal objects liquids etc get inside the scanner immediately turn off the scanner and disconnect the power plug from the power outlet then contact the store where you bought the scanner or the Maintenance S...

Page 9: ... one or two hours before you use it Protect the scanner from static electricity Install the scanner away from strong magnetic fields and other sources of electronic noise Also protect the scanner from static electricity as this might cause the scanner to malfunction Do not use aerosol sprays near the scanner Do not use aerosol sprays to clean the scanner Aerosol sprays cause dirt and dust to enter...

Page 10: ...viii ...

Page 11: ...of scanner package 1 2 1 2 Names and functions of parts 1 2 1 3 Functions of the operator panel 1 3 Chapter 2 INSTALLATION OF THE SCANNER 2 1 2 1 Installing the scanner 2 2 2 2 Connecting the scanner to your PC 2 3 2 3 Installing the Scanner Application 2 4 Appendix AP 1 Appendix 1Troubleshooting AP 2 Appendix 2Daily Care AP 7 Appendix 3Replacing Consumables AP 9 ...

Page 12: ...x ...

Page 13: ...1 1 Chapter1 PREPARING THE SCANNER 1 1 Checking the contents of scanner package 1 2 1 2 Names and functions of parts 1 2 1 3 Functions of the operator panel 1 3 ...

Page 14: ...per Chute Holds in place the document pages sheets that feed into the ADF 3 ADF Paper Chute Extension Please pull out when scanning a long size sheet 4 Side Guide It is adjusted to the width of the paper in order not to scanned skewed pages 5 Side guide button Used for adjusting the side guides 6 ADF Button Press this button to open the ADF 7 ADF Automatic Document Feeder It transports a document ...

Page 15: ...lear plastic cover over the panel to indicate the button s function 12 USB Interface Connector Used for connecting a USB interface cable from a PC 13 Power Inlet Used for connecting a AC cable from the power outlet 14 Power Switch Used for turning ON OFF the scanner 15 Third Party Slot Optional Slot The slot for an option board and extended memory boards 16 EXT connector Connector port for optiona...

Page 16: ... alternately To return the scanner to the ready status 1 press the Scan or Send to button while the error is indicated E Indicates that a device alarm that users cannot solve has occurred during the initialization or scanning of documents E and an alarm code a number or letter are indicated alternately To return the scanner to the ready status 1 press Scan or Send to button while the alarm is indi...

Page 17: ...2 1 Chapter 2 INSTALLATION OF THE SCANNER 2 1 Installing the scanner 2 2 2 2 Connecting the scanner to your PC 2 3 2 3 Installing the Scanner Application 2 4 ...

Page 18: ...on the rear side of the ADF as shown in the figure below so that the side guides facing upwards 3 Setting the Stacker Mount the Stacker onto the scanner aligning the protrusions to the holes on the scanner You can fix the stacker at two positions the upper position or the lower position 4 Connecting the AC cable Open the cable cover located below the ADF paper chute and insert the AC cable into th...

Page 19: ...able and the SCSI cable at the same time It is not possible to use the USB interface with Windows 95 and or WindowsNT 4 0 Connecting the USB Cable 1 Please connect a USB cable to the Scanner Open the cable cover located below the ADF paper chute and connect the USB interface cable to the USB interface connector Once the cable is connected close the cable cover 2 Please connect the other end of the...

Page 20: ...TENTION When connecting the SCSI interface cable be sure to first connect the SCSI interface cable then turn on the scanner and your PC Connect the scanner so that it is the terminated device on the SCSI daisy chain 1 Connect the SCSI cable to the scanner Open the cable cover located below the ADF paper chute connect the SCSI cable to the SCSI interface connector and make sure it is firmly connect...

Page 21: ...or details on connecting the scanner refer to 2 1 Installing the scanner on page 2 in this manual ATTENTION Uninstall Scanner Utility for Microsoft Windows in Add Remove Programs of the control panel Installing the FUJITSU TWAIN32 Scanner Driver HINT Windows XP screenshots are used in this section The windows and opera tions may slightly vary depending on your OS 1 Turn the scanner ON 2 Turn on yo...

Page 22: ...til the installation of TWAIN driver automatically starts 7 Select a language used for installa tion on Choose Setup Language window and click OK 8 Install the application following the instructions on the window 9 When the InstallShield Wizard Com plete window appears click Finish 10 Your computer is restarted and the scanner will be detected Do not remove the Setup CD ROM from the CD drive until...

Page 23: ...andard such as ScandAll 21 Installing ScandAll 21 ATTENTION When using Windows NT 4 0 Windows 2000 and or Windows XP please login as a user with Administrator privileges privileges of the administrator of your PC 1 Insert the Setup CD ROM in your CD drive The SETUP DISK STARTUP SCREEN will be displayed 2 Click INSTALL PRODUCTS 3 Click ScandAll 21 4 Select an appropriate language from the Choose Se...

Page 24: ...r to be used Select Select Source from the Scan menu 4 In the displayed dialog box please select FUJITSU fi 5650Cdj or FUJITSU TWAIN32 then click the Select button HINT For Windows 98 Windows Me Windows 2000 Windows XP select FUJITSU fi 5650Cdj For Windows 95 Windows NT 4 0 FUJITSU TWAIN32 5 Select To View from the scan menu 6 Set the scanning resolution document size etc on the TWAIN driver windo...

Page 25: ... scanner is automatically detected and A detection wizard of the new hardware or An addition wizard of new hardware may be displayed Please click the cancel button and close the wizard screen The screen might dif fer slightly depending on your OS 3 Insert the Setup CD ROM into the CD Drive The SETUP DISK STARTUP SCREEN will be displayed ATTENTION This screen may not be displayed when the Autoplay ...

Page 26: ...on Finish 10 The system is restarted and the scan ner will be detected Do not remove the Setup CD ROM until the PC is restarted completely ATTENTION Depending on the OS the following operations may be necessary For Windows 98 When a request for inserting the CD ROM of Windows 98 appears insert it into the CD drive and click the OK button For Windows 2000 When Digital Signature not Found appears cl...

Page 27: ...ion please use the displayed serial number For the operations of QuickScan please refer to the Overview of QuickScan or the QuickScan Help Please click Start Program and then QuickScan in turn and select then the file to refer 6 Install the application following the instructions on the window Confirming the installation 1 Load the documents on the scanner For loading documents please refer to Chap...

Page 28: ...ation was performed successfully HINT Refer to QuickScan Overview or QuickScan Help for information about QuickScanTM functions and operations On the Start menu point to Programs QuickScan and click the file Installing Error Recovery Guide 1 Insert the Setup CD ROM in your CD drive The SETUP DISK STARTUP SCREEN will be displayed 2 Click INSTALL PRODUCTS 3 Click Error Recovery Guide in the fol lowi...

Page 29: ...r CD ROM drive The CD ROM is automatically recognized and the Adobe Acrobat6 0 AutoPlay screen will be displayed ATTENTION The Adobe Acrobat 6 0 AutoPlay screen may not appear when the Autoplay setting of your PC is turned off In this case run AutoPlay exe on the CD ROM directly from the explorer or My Computer 2 Click the Install button when the following screen is displayed Then click the Instal...

Page 30: ...2 14 ...

Page 31: ...AP 1 Appendix Appendix 1 Troubleshooting AP 2 Appendix 2 Daily Care AP 7 Appendix 3 Replacing Consumables AP 9 ...

Page 32: ...olve the problem contact the dealer where you purchased the scanner or an authorized FUJITSU service provider Does the Function No display indicates an alarm or an error When the Function No display indicates an alarm or an error refer to 6 TROUBLE SHOOTING in the fi 5650C Operator s Guide Does the alarm state remain displayed even after the scanner has been turned OFF and back ON again Turn OFF a...

Page 33: ...er on a flat level surface Double feed errors occur frequently Do the documents qualify the Document Quality and Double feed Detection Condition in 8 DOCUMENT SPECIFICATON FOR THE ADF of the fi 5650C Operator s Guide fi 5650C Use the documents that qualify the Document Quality and Double feed Detection Condition in 8 DOCUMENT SPECIFICATON FOR THE ADF of the fi 5650C Operator s Guide Are the docume...

Page 34: ...om the document feed path Paper jams occur fre quently Do the documents satisfy the conditions described in 8 2 Document Quality Use documents that satisfy the requirements Is there any debris in the ADF Clean the ADF or remove debris from the ADF Are all the consumables Pick roller set Brake roller installed correctly Correctly install the consumable Pick roller set Brake roller if needed Is any ...

Page 35: ...nd Windows XP adjust the Sub scan Setting on Scanners and Cameras in the Control Panel For Windows 95 and Windows NT 4 0 right click the Scanner Control Center icon select Options Sub scan Setting and adjust the offset Please refer to Chapter 7 Online Setup of the fi 5650 Operator s Guide and adjust the offset from the Software Operation Panel online settings The ADF makes strange noises dur ing s...

Page 36: ...occurred U4 The ADF cover is opened U6 The print cartridge is not installed U7 A paper detection failure has occurred at Imprinter Device alarm Permanent error TABLE 3 Indication Meaning E2 Optical error ADF front E3 Optical error ADF back E4 Motor fuse malfunction E5 Lamp fuse malfunction E6 Operator panel malfunction E7 EEPROM malfunction E8 SCSI interface fuse malfunction E9 Image memory malfun...

Page 37: ...rn OFF the scanner when you clean the Feed rollers Cleaning Materials TABLE 4 Cleaning Materials Part No Remarks Cleaner F1 CA99501 0013 1 bottle Moisten a cloth with this fluid and wipe the respective areas 1 Cleaner F2 CA99501 0014 1 bottle Moisten a cotton swab with this fluid and clean the respective areas For cleaning the plastic rollers only 1 Cleaning Paper CA99501 0012 10 sheets package Mo...

Page 38: ...ter every 10 000 scans When stains are per sistent ADF Chute Roller 3 Pick Arm 3 Pick Roller Set 3 3 Brake Roller 3 3 Feed Rollers 3 3 Plastic Rollers 3 3 3 Sheet Guide 3 Glass 3 Ultrasonic Sensor Clean this part with a dry lint free dry cloth ATTENTION The scanner must be cleaned more frequently if you scan any of the following type of documents Documents of coated paper Documents that are almost...

Page 39: ...requently the scanner is used and cleaned The following pictures shows the locations of the parts to be replaced Refer to Chapter 4 Replacing Consumables fi 5650C Operator s Guide on User Manual CD ROM CAUTION The glass of the inside of the ADF becomes hot during opera tion When you clean the inside of the scanner turn OFF the power and unplug the AC cable from the outlet and wait for at least thr...

Page 40: ...ual in whole or in part and copying of the scanner application is forbidden under the copyright law zThe contents of this manual are subject to change without notice zPFU LIMITED is not liable whatsoever for any damages resulting from use of this scan ner and procedures described in this manual profit loss due to defects and any claims by a third party ...

Reviews: