background image

Installing the NAS

System status checks

The NAS is

fi

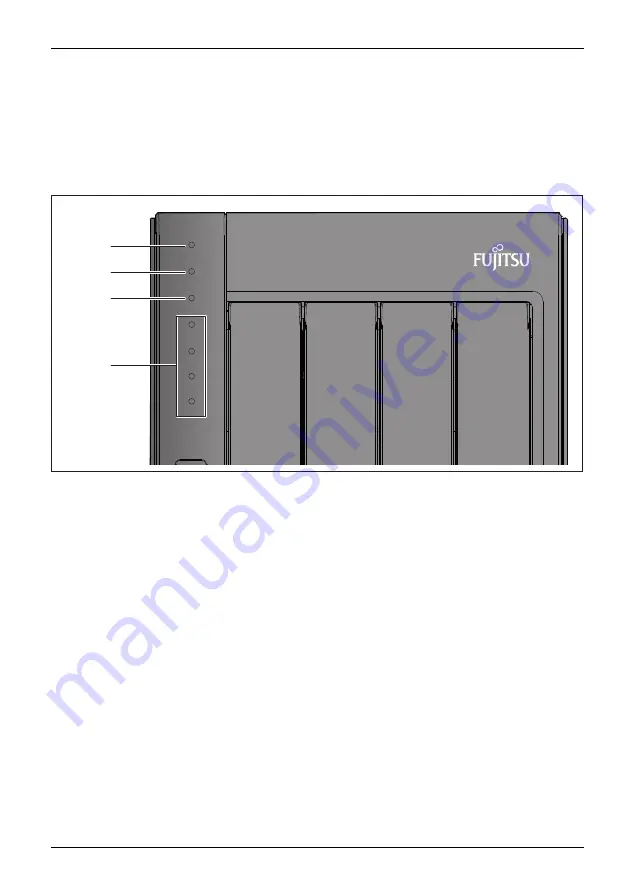
tted with LED indicators to show the system status and further information. When you

switch on the NAS, check the following items to make sure that the system is working normally.
Please note that the information provided by the LEDs described below is only valid if the hard disks
have been correctly installed and the NAS is connected to the network and the power supply.

The image below shows the CELVIN® NAS QE807.

STATUS

LAN

USB

HDD1

HDD2

HDD3

HDD4

1

2

3

4

1 = System status
2 = LAN
3 = USB

4 = HDD 1 - 2 (QE707)

HDD 1 - 4 (QE807)

Fujitsu

15

Summary of Contents for CELVIN NAS QE707

Page 1: ...System Operating Manual CELVIN NAS ...

Page 2: ...n the Internet at http www fujitsu com fts You can find driver updates at http support ts fujitsu com download Should you have any technical questions please contact our Hotline Service Desk http support ts fujitsu com contact servicedesk Your sales partner Your sales office We hope you enjoy working with your new Fujitsu system ...

Page 3: ......

Page 4: ...ujitsu Technology Solutions GmbH Mies van der Rohe Straße 8 80807 Munich Germany http www fujitsu com fts Copyright Fujitsu Technology Solutions GmbH 2018 All rights reserved Publication Date 02 2018 Order No A26341 F103 Z329 1 7619 edition 1 ...

Page 5: ...e NAS 25 Copying data using the front USB port 53 Web Server 55 FTP server 57 Using the Qsync synchronisation software 58 NetBak Replicator 64 Surveillance station 66 Firmware update 72 NAS maintenance 74 Troubleshooting RAID operation errors 78 Technical data 82 GNU GENERAL PUBLIC LICENSE 83 ...

Page 6: ...and other countries CELVIN is a registered trademark of Fujitsu Technology Solutions GmbH or its subsidiaries Microsoft and Windows are trademarks or registered trademarks of Microsoft Corporation in the United States and or other countries Linux is a registered trademark of Linus Torvalds in the United States and other countries All other trademarks specified here are the property of their respec...

Page 7: ...Administrations interface 28 Opening the main menu 29 Open the Control Panel Applications 31 Accessing the NAS from Linux 32 Storage management 33 Use flexible volume management 33 Architecture of the flexible volume management 33 Creating a new storage pool 34 Expanding storage pool capacity online 36 Creating a new volume 42 Expanding volume capacity online 45 Creating a new block based iSCSI LU...

Page 8: ... optional 68 Set up Surveillance Station 69 Use further cameras 70 Firmware update 72 Updating the system firmware using Fujitsu Qfinder 73 NAS maintenance 74 Shutting down rebooting the server 74 Resetting the administrator password and network settings 75 Failure or malfunction of a hard disk 76 Power failure or abnormal shut down 76 Abnormal system software behaviour 76 System temperature prote...

Page 9: ...NAS The CELVIN NAS is hereinafter also referred to as NAS It is available in two device versions as a model with 2 hard disks QE707 or as a model with 4 hard disks QE807 Back up your system regularly to avoid any potential data loss Fujitsu Technology Solutions will not accept responsibility for the loss of or the recovery of any data in any form QE707 QE807 Disp lay safe ty note s Sa fe ty N ot e...

Page 10: ...ctivity that must be performed Indicates a result This font indicates data entered using the keyboard in a program dialogue or at the command line e g your password Name123 or a command used to start a program start exe This font indicates terms and texts used in a software interface e g Click on Save names of programs or files e g Windows or setup exe This font indicates cross references to anoth...

Page 11: ...e a chemical cleaning agent or aerosol to clean your NAS Do not place any objects on top of the NAS for the server s normal operation and to avoid overheating When installing a hard disk in the NAS use the flat head screws in the product package to fit the hard disk in the NAS Do not place the NAS near any liquid Do not place the NAS on any uneven surface to avoid falling off and damage Make sure ...

Page 12: ...y cause harmful interference to radio communications However there is no guarantee that interference will not occur in a particular installation If this equipment does cause harmful interference to radio or television reception which can be determined by turning the equipment off and on the user is encouraged to try to correct the interference by one or more of the following measures Reorient or r...

Page 13: ...a or transmitter To prevent radio interference to the licensed service this device is intended to be operated indoors and away from windows to provide maximum shielding Equipment or its transmit antenna that is installed outdoors is subject to licensing Users are not authorized to modify this product Any modifications invalidate the warranty This equipment may not be modified altered or changed in...

Page 14: ...LVIN NAS Server Hardware overview CELVIN NAS QE707 Front STATUS LAN USB HDD1 HDD2 1 2 3 4 5 1 LED indicators Status LAN USB 2 LED indicators HDD 1 2 3 On Off switch 4 One touch copy button 5 USB 3 0 10 Fujitsu ...

Page 15: ...Your CELVIN NAS Server Rear 2 3 4 5 1 1 Kensington security slot 2 Reset button for password and network settings 3 2 x Gigabit LAN 4 2 x USB 3 0 5 Power supply Fujitsu 11 ...

Page 16: ...r CELVIN NAS Server CELVIN NAS QE807 Front STATUS LAN USB HDD1 HDD2 HDD3 HDD4 1 2 3 4 5 1 LED indicators Status USB LAN 2 LED indicators HDD 1 4 3 On Off switch 4 One touch copy button 5 USB 3 0 12 Fujitsu ...

Page 17: ...Your CELVIN NAS Server Rear 2 3 4 5 1 1 Kensington security slot 2 Reset button for password and network settings 3 2 x Gigabit LAN 4 2 x USB 3 0 5 Power supply Fujitsu 13 ...

Page 18: ...nology Solutions will accept no liability whatsoever for any product defects faulty operation and or any time and costs associated with data loss data recovery insofar as the cause can be attributed to misuse or improper installation of hard disks regardless of the circumstances or for whatever reason When installing a hard disk new or used which has not yet been installed on the NAS please note t...

Page 19: ... sure that the system is working normally Please note that the information provided by the LEDs described below is only valid if the hard disks have been correctly installed and the NAS is connected to the network and the power supply The image below shows the CELVIN NAS QE807 STATUS LAN USB HDD1 HDD2 HDD3 HDD4 1 2 3 4 1 System status 2 LAN 3 USB 4 HDD 1 2 QE707 HDD 1 4 QE807 Fujitsu 15 ...

Page 20: ...rives in a RAID 5 or RAID 6 configuration are faulty the hard disk data can still be read Error during hardware self test Flashes red every 0 5 sec The NAS is in degraded mode one member drive fails in RAID 1 RAID 5 or RAID 6 configuration Flashes green every 0 5 sec The NAS is booting up The NAS has not been configured The hard disk has not been formatted Green The NAS is ready for use System sta...

Page 21: ...eep that sounds when the device is started up cannot be deactivated Signal tone No of repetitions Description Short beep 0 5 sec 1 The NAS is booting up The NAS is shutting down software shut down The user pressed the reboot button to reboot the NAS The system firmware was updated Short beep 0 5 sec 3 An attempt is being made to copy NAS data to an external storage device connected to the front US...

Page 22: ...o install Fujitsu Qfinder Fujitsu Qfinder will then run automatically If the programme does not start automatically double click on the Qfinder shortcut on the desktop If you are using Windows 7 8 10 the following window will be displayed Set a checkmark against Private networks such as my home or work network Click on Allow access Fujitsu QFinder detects the NAS on the network and if necessary as...

Page 23: ...in the NAS Note that during NAS set up the installed hard disk will be formatted and all the data on it will be lost Follow the instructions for initial configuration The configuration process may take up to twenty minutes if the hard disk used has a capacity larger than 1 TB Select the desired disk configuration for the NAS Server Fujitsu 19 ...

Page 24: ... in the network RAID 0 data carrier resolution RAID 0 striping data carrier combines 2 or more hard disks in one larger data carrier The data is stored on the hard disks without parity information and no redundancy is offered The storage capacity corresponds to the total of all capacities of the individual disks in the network RAID 1 data carrier mirroring RAID 1 copies the data between two hard d...

Page 25: ...t a second set of parity information is distributed across all disks in the network The network can tolerate the failure of two disks To create a RAID 6 network at least 4 hard disks are required The storage capacity of a RAID 6 network is equal to N 2 size of the smallest hard disk N is the total number of hard disks in the arrangement RAID 10 data carriers RAID 10 combines the advantages of RAID...

Page 26: ...d as a network drive and click on Network Share Download Multimedia USB and Web are standard network releases for the use of Download Station Multimedia Station external USB storage devices automatic copy function or web servers Recordings is the standard network share for using the Surveillance Station Enter the default user name and password Standard user name admin Default password admin 22 Fuj...

Page 27: ...Installing the NAS Select the drive letter to be used for the connection and click on Finish Fujitsu 23 ...

Page 28: ...Installing the NAS Once a connection has been successfully established the network share will become available for use as a local data carrier in Windows Explorer 24 Fujitsu ...

Page 29: ... be found then please search the whole network for the NAS Double click the name of the NAS to establish a connection or Click on Start Run or keep the Windows key on your keyboard pressed and press the R key Enter NAS name or NAS IP to access the shared folders on the NAS The placeholders NAS name and NAS IP represent the name and IP address of your NAS You can use the Fujitsu Qfinder to access t...

Page 30: ...Connecting to the NAS Enter your user name and password Standard user name admin Default password admin Files can be uploaded to the network shares 26 Fujitsu ...

Page 31: ...unning Qfinder If it is not possible to search for the IP address of the NAS please try connecting the NAS directly to the computer Then restart Fujitsu Qfinder Enter the user name and password to log in Standard user name admin Default password admin The NAS supports encrypted SSL login This allows the server to be configured and managed over and encrypted data link To use this function check the...

Page 32: ...ith various applications 2 System control 3 Display desktop 4 Main menu 5 Search 6 Background tasks 7 External devices 8 Notifications and warnings 9 Personal settings 10 Restart shut down log off 11 Help language desktop features 12 Control centre 13 Next desktop 14 Trash To display the administration interface a screen resolution of at least 1024 x 768 is recommended 28 Fujitsu ...

Page 33: ... which are either provided and maintained by QNAP Systems Inc or have been designed and submitted by independent developers and approved by QNAP Systems Inc These applications can be installed via the App Centre Please note that Fujitsu accepts no liability for the content function and security of these applications If you have any problems with these applications please contact the respective dev...

Page 34: ...Connecting to the NAS Click on The main menu is displayed 30 Fujitsu ...

Page 35: ...arty application a new browser window will open instead of a window within the desktop area Click on the Help button in the top right hand corner of the window to find out more information about the respective menu or application Click to minimise a window You can maximise the window again later using the task bar Click to maximise a window Click to close a window Fujitsu 31 ...

Page 36: ...e Name Directory to Mount For example if the IP address of the NAS is 169 254 100 100 and the link to the network share folder public should be created in the mnt pub directory use the following command mount t nfs 169 254 100 100 public mnt pub The above command can only be executed when logged in as root Log in with the user name specified previously The network share folder can be accessed via ...

Page 37: ...t or duplicated data backup and reduces the risk of data loss With thin provisioning storage space can be used more efficiently Users can dynamically add or expand capacity as required in order to use the storage for the intended applications Architecture of the flexible volume management HDD Management Storage Pool Volume Volume 2 Storage Pool Shared Folder Shared Folder 1 Shared Folder 2 Shared ...

Page 38: ...n the selected drives will be deleted Select Storage manager Storage space and to open the storage creation window click on Create New storage pool Select the drives which you want to add to the new storage pool and a suitable type of RAID for backups Click on Next 34 Fujitsu ...

Page 39: ...te that if snapshot storage allocation is deactivated the system will automatically use unallocated storage space from the storage pool for snapshots In this case you must monitor the used storage space in order to ensure that sufficient storage space is available for new snapshots The new storage pool is now created Fujitsu 35 ...

Page 40: ...acity Creating a new RAID group for backups Adding drives to an existing RAID group Note that all the data on the selected drives will be deleted Creating a new RAID group Select Storage manager Storage space click on Manage and then to open the assistant for the storage pool expansion click on Expand pool 36 Fujitsu ...

Page 41: ...Connecting to the NAS Select Create and add a new RAID group Click on Next Select the drives which you want to add to the RAID group and a suitable type of RAID Click on Next Fujitsu 37 ...

Page 42: ...Connecting to the NAS Confirm your settings on the overview page and to finish click on Expand The capacity of the storage pool will now be expanded 38 Fujitsu ...

Page 43: ...sks are not supported in a storage pool expansion Select Storage manager Storage space click on Manage and then to open the assistant for the storage pool expansion click on Expand pool Select Add new data carrier s to an existing RAID group select an existing RAID group from the drop down list and then click on Next Fujitsu 39 ...

Page 44: ...Connecting to the NAS Select a drive to be added to the RAID group and click on Next 40 Fujitsu ...

Page 45: ...Connecting to the NAS Confirm your settings on the overview page and to finish click on Expand The capacity of the storage pool will now be expanded Fujitsu 41 ...

Page 46: ...ic single volume best performance Thick multi volume good performance and flexibility Thin multi volume excellent flexibility and storage efficiency Select Storage manager Storage space Create and then to open the assistant for creating a new volume click on New volume 42 Fujitsu ...

Page 47: ...dure to be followed here is described below using the example of a Thick multi volume Select the name of the storage pool and then click on Next Specify the volume capacity and the remaining options and then click on Next Fujitsu 43 ...

Page 48: ...Connecting to the NAS Confirm your settings on the overview page and then click on Finish A new volume will now be created 44 Fujitsu ...

Page 49: ...cting to the NAS Expanding volume capacity online Select Storage manager Storage space select a volume and click on Manage To open the assistant for changing the volume size click on Expand volume Fujitsu 45 ...

Page 50: ...Connecting to the NAS Specify the new capacity and click on Apply The capacity of the volume will now be expanded 46 Fujitsu ...

Page 51: ...ion assistant click on New iSCSI LUN In order for the LUN to be integrated by an iSCSI initiator it must be assigned to an iSCSI target If no iSCSI target has been created before you can do this now with the option Only one iSCSI target You can also select the option iSCSI target with an allocated LUN to combine the two individual steps required in a single operation Select Only iSCSI LUN and then...

Page 52: ...ing to the NAS Select Allocate storage from a storage pool as an iSCSI LUN and select the storage pool Click on Next Enter a LUN name select Thin Provisioning and specify the capacity Click on Next 48 Fujitsu ...

Page 53: ...Connecting to the NAS Select an iSCSI target for mapping imaging and then click on Next Fujitsu 49 ...

Page 54: ...Connecting to the NAS Confirm your settings on the overview page and to finish click on Next A block based iSCSI LUN will now be created 50 Fujitsu ...

Page 55: ...Connecting to the NAS Expanding iSCSI LUN capacity online Select Storage manager iSCSI storage select an iSCSI LUN and to open the iSCSI LUN configuration page click on Action Modify Fujitsu 51 ...

Page 56: ...Connecting to the NAS Enter the new capacity and to finish click on Apply The capacity of the volume will now be expanded 52 Fujitsu ...

Page 57: ...re a hard disk has been installed and formatted in the NAS This will create the USB standard network share Switch on the NAS Configure the function of the one touch copy button on the page Backup Manager USB One Touch Copy Connect the USB drive e g digital camera or flash drive to the front USB port on the NAS Press the one touch copy button Data will be copied to the NAS according to the previous...

Page 58: ... folder for each partition is created on the target device as a backup folder The backup folder is named after the backup date and partition number YYYYMMDD 1 at partition 1 YYYYMMDD 2 at partition 2 etc If the source storage device only contains one partition the backup folder is simply named YYYYMMDD Files are copied from the source to the target Extra files at the target are deleted files with ...

Page 59: ...Samba Open a web browser and enter NAS IP Web or NAS Name Web Log in to the folder and upload the web pages By FTP Log in to the FTP service and upload the web pages to the folder Using Web File Manager Log in to the Web File Manager and upload the web pages to the folder The file index html index htm or index php will be the home page of the website On the web server side click on the http NAS IP...

Page 60: ...will not change however The default user name for MySQL is root The password is admin Change the root password immediately after logging in through the phpMyAdmin administration interface SQLite administration SQLiteManager is a multi lingual web based tool for managing SQLite databases You can download it from http www sqlitemanager org Follow the steps below or refer to the INSTALL file in the S...

Page 61: ...e enable this function in Network Service and follow the steps below Open Internet Explorer and enter ftp NAS IP or ftp NAS Name It is essential that secure passwords are used when using the FTP server A secure password contains numbers letters and special characters Fujitsu 57 ...

Page 62: ...ter or mobile device Qsync Clients Create a user account on the NAS As a NAS administrator Create a user account in the administration area of the NAS under Control Panel Privileges User Create As a NAS user Contact your system administrator so that they can create an account for you Every NAS user account is automatically a Qsync user account Install Qsync utility The Qsync utility synchronises a...

Page 63: ... the port number to the IP address Otherwise enter only one IP address standard port number 8080 Start using Qsync To open the local Qsync folder double click on the Qsync shortcut on the desktop Click on the Qsync symbol in the taskbar display the menu Copy or drag your files into the local Qsync folder The files are copied to your other devices which you use Qsync with This means that you no lon...

Page 64: ...e to drag and drop files into the Qsync folder Qsync can transfer files with a size of maximum 50 GB in a LAN Local Area Network Qsync does not support access via SAMBA FTP or AFP Access files via File Station or Qsync The app CELVIN NAS Explorer is only able to synchronise the file list and does not download the files onto a mobile device If you need the files you must download them Offline editi...

Page 65: ... like to share Select Share Click on Send if you would like to send the link via email or copy the link Click on Settings to set further options for the link such as expiry date password or the creation of an SSL link Mobile devices Click on the symbol in the right upper page Select Share Download Link Select Send via Email if you would like to send the link via email Select Send via Text Message ...

Page 66: ...members can access the folder The folder only becomes a team folder after the invitations have been accepted Team folder users cannot share their access further Synchronisation manager Click on the Qsync symbol in the task bar in order to display the administration feature With the administration feature you can Add files Control the synchronisation process View information on synchronisation and ...

Page 67: ...he administration area Function Information Options Offers links to install the Qsync utility and File Station Overview List of total number of online users De activation of the Qsync utility only for administrators Users List with online user information Manage Qsync users only administrators List of statuses of connected devices Computer name of the computer logged onto Name of the device as a Q...

Page 68: ...NAS Data is transferred via LAN or WLAN Installing NetBak Replicator Download the programme Fujitsu NetBak Replicator from the Fujitsu website at http www fujitsu com fts download Follow the on screen instructions to install the application A shortcut icon will appear on the desktop upon successful completion of the installation process Double click on the icon to start NetBak Replicator 64 Fujits...

Page 69: ...to Access Control Share Folders to create a share folder for backup purposes Make sure the share folder is available for access by all users or that you log in to the share folder with an authorized account or as administrator Launch NetBak Replicator To find details about how to use the software press the F1 key Fujitsu 65 ...

Page 70: ...ivate the function under Control Panel Applications Station Manager You can find a list of compatible IP cameras at http www fujitsu com fts support manuals Prepare IP camera The NAS the camera your computer and the router are correctly connected to each other Their IPs are on the same subnet The IP camera is switched on and correctly set up Follow the descriptions in your IP camera manual for cor...

Page 71: ...ter In this example the following installation is used NAS IP 192 168 1 60 Camera IP 192 168 1 10 Computer IP 192 168 1 32 Router IP 192 168 1 100 You can find out the IP address of your camera with Fujitsu Qfinder Some IP cameras provide a special program for IP configuration Further information can be found in the operating instructions of the camera Fujitsu 67 ...

Page 72: ...arantee for complete compatibility Connect the USB webcam to the NAS USB port If the webcam is supported it will be listed in an entry in the System Log under System Settings System Logs Install the app QUSBCam so that the USB webcam can be used with the NAS To do this open the Recommended category in the App Centre Search for QUSBCam Click on Download QUSBCam is installed To configure settings cl...

Page 73: ...r the IP address or USB webcam can be successfully connected click on Test If your IP camera supports audio recordings you can switch on the option at Recorder settings Click Apply to save the changes Configure the settings of Camera 2 following the above steps After you have added the network cameras to the NAS click on Monitor If you are accessing this page for the first time with a web browser ...

Page 74: ...hanged By purchasing licenses via the QNAP License Store you enter into an exclusive contractual relationship with QNAP Systems Inc Fujitsu does not assume any liability for the availability or quality of the licenses Visit the QNAP License Store To create a new account or log in with an existing account click on Account Two passwords are set at registration The first one is for unpacking the lice...

Page 75: ...ve you will need the password previously set to decompress it Copy the Product Authorisation Key PAK from the text file In the app navigate to the field Licence Manager Install Licence Add the PAK to the field Make sure that the NAS is connected to the internet As soon as the camera licence is activated you can set up the other cameras as described under Set up Surveillance Station Page 69 As soon...

Page 76: ...tp www fujitsu com fts support to check if it is necessary to update the firmware Before updating the system firmware back up all data stored on the hard disk to avoid any data being lost during the system update Open the administration interface and select Control Panel Firmware Update Firmware Update Click on Browse to select the new firmware to update the system Select the corresponding IMG fil...

Page 77: ...ick on Update firmware in the Tools menu Log on as an administrator Browse to select the correct firmware for the NAS Click Start to update the system The Fujitsu Finder can be used to update all servers of the same model on the same local network Please note that this process requires administrator access to all the servers to be updated Fujitsu 73 ...

Page 78: ...art the server Select Shut down to switch off You can force the download if the server cannot be shut down in the usual way Forcing the shut down can cause damage to the file system as well as data loss To force a shut down of the server press and hold the power button for more than 10 seconds The server will beep once and then shut down immediately The Fujitsu Qfinder can be used to restart or sh...

Page 79: ...lowed VLAN is deactivated Advanced system reset 10 sec Press and hold the reset button for 10 seconds Two beeps sound after the third and tenth seconds The NAS resets all system settings to the factory settings just like with the web based system reset under Control Panel System Settings System Configuration Reset to factory settings only the data is retained Settings previously made by you such a...

Page 80: ...es not function properly after restart please do the following If the system configuration is lost due to the shut down or power failure then reconfigure the system manually In the event of abnormal operation of the system or if error messages are displayed contact customer services for technical support Abnormal system software behaviour If the system software does not operate correctly the NAS w...

Page 81: ...tivated this influences the settings below so that a low current consumption less than 0 5 W can be retained by the server in deactivated state Wake on LAN Deactivated AC operations resumption The server remains off if the power supply is restored after a power failure Switch on switch off restart on schedule Deactivated If EuP mode is deactivated the server s power consumption in deactivated stat...

Page 82: ... if the RAID rebuild has failed LED The Status LED on the NAS is flashing red The status of the drive configuration is displayed as In degraded mode in Control Panel System settings Storage manager Establish which hard disk s caused the RAID rebuild failure Go to the Control Panel System settings System logs to search for the following error messages to find out which hard disk s caused the error ...

Page 83: ... disk caused the error and then follow the steps below to rectify the problem Circumstance Procedure The error is caused by the newly plugged in drive If the last drive to be connected e g HDD 1 caused the rebuild error then disconnect HDD 1 and connect another new drive to start RAID rebuilding The error was caused by an existing drive e g HDD 2 in the RAID configuration If the RAID configuration...

Page 84: ...ly eliminate the risk of electric shock Fujitsu Technology Solutions recommends switching off the NAS before replacing hard disks To replace a hard disk during ongoing operation proceed as follows Have a new hard disk ready to replace the faulty hard disk The capacity of the new hard disk should be the same as or greater than the capacity of the faulty hard disk Log in to the NAS Check the drive c...

Page 85: ...r RAID 6 drive has been restored from inactive to degraded mode via RAID restore you can read and write data on the drive as normal The drive status is restored to normal state after the synchronisation If the disconnected hard disk is damaged RAID restore will not work CELVIN RAID 5 CELVIN RAID 6 Degenerated mode N 1 N 1 N 2 Write protected for immediate data backup and HDD replacement N 1 bad bl...

Page 86: ...rear 2 Supports USB printer USB storage and control of uninterrupted power supply over USB Dimensions 169 x 102 x 219 mm H x W x D 169 x 160 x 219 mm H x W x D Weight 1 28 kg net 2 32 kg gross 3 kg net 4 3 kg gross Operating temperature 0 40 C Humidity 20 80 Power supply External power supply 65 W Input 100 240 V 2A 50 60 Hz Output 12 V 5 417 A External power supply 90 W Input 100 240 V 2A 50 60 H...

Page 87: ...o the recipients the same freedoms that you received You must make sure that they too receive or can get the source code And you must show them these terms so they know their rights Developers that use the GNU GPL protect your rights with two steps 1 assert copyright on the software and 2 offer you this License giving you legal permission to copy distribute and or modify it For the developers and ...

Page 88: ...icense and how to view a copy of this License If the interface presents a list of user commands or options such as a menu a prominent item in the list meets this criterion 1 Source Code The source code for a work means the preferred form of the work for making modifications to it Object code means any non source form of a work A Standard Interface means an interface that either is an official stan...

Page 89: ...under any other circumstances is permitted solely under the conditions stated below Sublicensing is not allowed section 10 makes it unnecessary 3 Protecting Users Legal Rights From Anti Circumvention Law No covered work shall be deemed part of an effective technological measure under any applicable law fulfilling obligations under article 11 of the WIPO copyright treaty adopted on 20 December 1996...

Page 90: ...sical medium customarily used for software interchange b Convey the object code in or embodied in a physical product including a physical distribution medium accompanied by a written offer valid for at least three years and valid for as long as you offer spare parts or customer support for that product model to give anyone who possesses the object code either 1 a copy of the Corresponding Source f...

Page 91: ... does not include a requirement to continue to provide support service warranty or updates for a work that has been modified or installed by the recipient or for the User Product in which it has been modified or installed Access to a network may be denied when the modification itself materially and adversely affects the operation of the network or violates the rules and protocols for communication...

Page 92: ...ou may not propagate or modify a covered work except as expressly provided under this License Any attempt otherwise to propagate or modify it is void and will automatically terminate your rights under this License including any patent licenses granted under the third paragraph of section 11 However if you cease all violation of this License then your license from a particular copyright holder is r...

Page 93: ...ontrol includes the right to grant patent sublicenses in a manner consistent with the requirements of this License Each contributor grants you a non exclusive worldwide royalty free patent license under the contributor s essential patent claims to make use sell offer for sale import and otherwise run modify and propagate the contents of its contributor version In the following three paragraphs a p...

Page 94: ...e you have permission to link or combine any covered work with a work licensed under version 3 of the GNU Affero General Public License into a single combined work and to convey the resulting work The terms of this License will continue to apply to the part which is the covered work but the special requirements of the GNU Affero General Public License section 13 concerning interaction through a ne...

Page 95: ... INCIDENTAL OR CONSEQUENTIAL DAMAGES ARISING OUT OF THE USE OR INABILITY TO USE THE PROGRAM INCLUDING BUT NOT LIMITED TO LOSS OF DATA OR DATA BEING RENDERED INACCURATE OR LOSSES SUSTAINED BY YOU OR THIRD PARTIES OR A FAILURE OF THE PROGRAM TO OPERATE WITH ANY OTHER PROGRAMS EVEN IF SUCH HOLDER OR OTHER PARTY HAS BEEN ADVISED OF THE POSSIBILITY OF SUCH DAMAGES 17 Interpretation of Sections 15 and 1...

Reviews: