background image

Working with the notebook

Working with the notebook

Notebook,operation

Notebook

This chapter describes the basics for operating your notebook. Please read the chapter
entitled

"Connecting external devices", Page 56

for instructions on how to connect

devices such as a mouse and a printer to the notebook.

Please refer to the notes in

"Important notes", Page 12

.

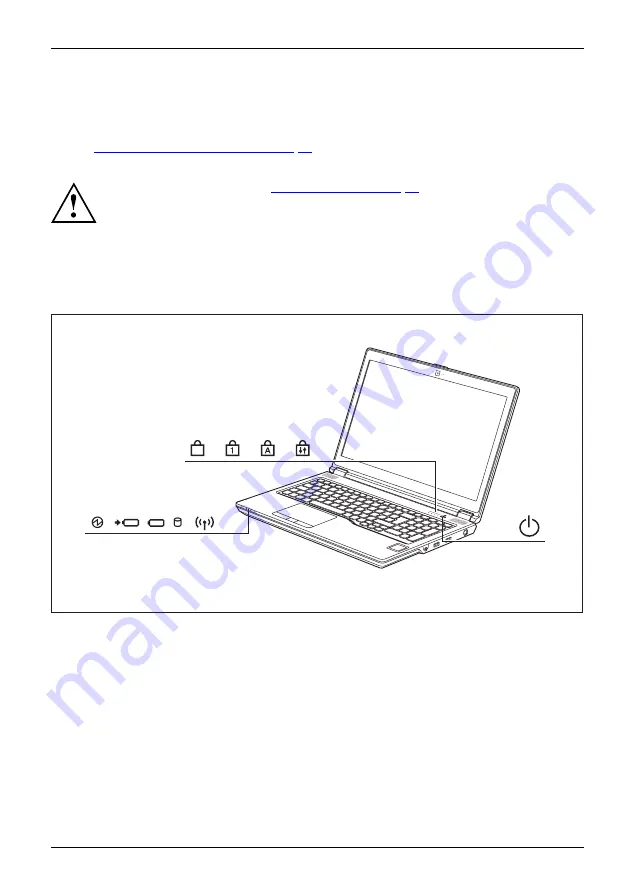
Status indicators

Statusindicators

The status indicators provide information about the status of the power supply,
the drives and the keyboard functions.

F

Fujitsu

19

Summary of Contents for CELSIUS H780

Page 1: ...System Operating Manual FUJITSU CELSIUS H780 ...

Page 2: ...e found on the Internet at http www fujitsu com fts You can find driver updates at http support ts fujitsu com download Should you have any technical questions please contact our Hotline Service Desk http support ts fujitsu com contact servicedesk Your sales partner Your sales office We hope you enjoy working with your new Fujitsu system ...

Page 3: ......

Page 4: ...ujitsu Technology Solutions GmbH Mies van der Rohe Straße 8 80807 Munich Germany http www fujitsu com fts Copyright Fujitsu Technology Solutions GmbH 2018 All rights reserved Publication Date 06 2018 Order No A26391 K481 Z320 1 7619 edition 1 ...

Page 5: ... notes 12 First time setup of your device 16 Working with the notebook 19 Security functions 49 Connecting external devices 56 Removing and installing components during servicing 63 Settings in BIOS Setup Utility 74 Troubleshooting and tips 77 Technical data 85 Manufacturer s notes 87 Index 88 ...

Page 6: ...may only be used publicly with the permission of NVIDIA and no passage of this document may be interpreted as such a permission A fair use of the NVIDIA trademarks in the advertising for and marketing of NVIDIA products requires a correspondingly explicit acknowledgement SD SDHC and SDXC logos are trademarks or registered trademarks of SD 3C LLC in the USA and or other countries USB Type C and USB...

Page 7: ...ing on the notebook 22 Notebook switching off 22 Keyboard 23 Separate number block 25 Function keys and key combinations 25 Keyboard with background lighting optional 27 Country and keyboard settings 27 Touchpad and touchpad buttons 28 Moving the pointer 28 Selecting an item 28 Executing commands 29 Dragging items 29 Touchscreen LCD screen without touch function device dependent 30 Using fingers 31...

Page 8: ...word 51 Password protection for booting of the operating system 52 Password protection for the hard disk 53 Boot from Removable Media 53 Owner Information device dependent 53 Trusted Platform Module TPM 54 Enabling TPM 54 Disabling TPM 54 SmartCard reader 55 Inserting the SmartCard 55 Connecting external devices 56 Connecting an external monitor 57 Connecting USB devices 58 USB port with charging ...

Page 9: ...ing and tips 77 Help if problems occur 77 Restoring the hard disk contents under Windows 78 The notebook s date or time is incorrect 78 The notebook s LCD screen remains blank 79 The LCD screen is difficult to read 79 The external monitor remains blank 79 The external monitor is blank or the image is unstable 80 The notebook cannot be started 80 The notebook stops working 81 The printer does not pr...

Page 10: ...Contents 6 Fujitsu ...

Page 11: ... properties Information on the connections and user components of your notebook can be found in Ports and controls Page 9 Further information The Windows drivers for your device can be found on our Internet site The factory installation of your device does not support any other operating system Fujitsu Technology Solutions accepts no liability whatsoever if any other operating system is used Softw...

Page 12: ...me123 or a command used to start a program start exe This font indicates information that is displayed on the screen by a program e g Installation is complete This font Indicates terms and texts used in a software interface e g Click on Save names of programs or files e g Windows or setup exe This font Indicates cross references to another section e g Safety information cross references to an exter...

Page 13: ... device Please familiarise yourself with these components before you start to work with the device Front 3 1 2 5 8 9 4 1 6 6 11 10 7 1 Microphone 2 Webcam 3 Webcam LED 4 Status displays 5 On off switch 6 Loudspeakers 7 Fingerprint recognition optional or palm vein recognition optional 8 Touchpad buttons 9 Status displays 10 Touchpad 11 TouchStick optional Fujitsu 9 ...

Page 14: ...itor port VGA 4 HDMI port 5 USB 3 1 Gen1 port with charging function USB Type A 6 USB Type C with Intel ThunderboltTM3 7 SmartCard reader 8 Memory card slot SD Right side 1 2 3 1 Combined headphone and microphone port 2 USB port 3 1 Gen2 USB Type A 3 DC input connector DC IN 10 Fujitsu ...

Page 15: ...Bottom 1 2 3 4 6 5 1 Battery SIM card underneath battery 2 Battery release 2 3 Opening to remove the battery 4 Battery release 1 5 Hard disk service tray 1 x HDD and 1 x M 2 module 6 Memory service compartment Fujitsu 11 ...

Page 16: ...e device directly on your lap and make sure that the ventilation openings are not obstructed Read the information on the ambient conditions in the Technical data Page 85 and First time setup of your device Page 16 before preparing your notebook for use and switching it on for the first time When cleaning the device please observe the relevant notes in the section Cleaning the notebook Page 15 Pay a...

Page 17: ...evice get near flammable gases or into hazardous environments e g petrol station paintshops as the transmitted radio waves can cause an explosion or a fire For information on how to switch wireless components on and off see chapter Switching the wireless components on and off Page 41 Energy saving Notes Energy Energysaving Switch the notebook off when it is not in use Switch off external connected d...

Page 18: ...pter for your notebook Do not use any other voltage converter Check whether the local mains voltage and the power cable are compatible If this is not the case buy a power cable that matches the local conditions Contact the relevant authorities of the country you will be travelling in as to whether you may operate the radio component integrated into your notebook computer Please observe the additio...

Page 19: ...lean the display surface with a very soft slightly damp cloth Switch the notebook off Cleaning Notes Notebook Keyboard Touchpad LCDscreen In order to prevent accidentially switching the device on remove the power cable from the mains adaptor and remove the battery see Removing and installing the battery Page 33 The surface can be cleaned with a dry cloth If particularly dirty use a cloth which has...

Page 20: ...R switch off your device during the first time setup process When the device is delivered the battery is located in the battery compartment The battery must be charged if you want to operate your device using the battery When used on the move the built in battery provides the device with the necessary power You can increase the operating time by using the available energy saving functions For instr...

Page 21: ...e that the rubber feet of the device may mark certain types of delicate surfaces Keep other objects at least 100 mm 3 94 inches away from the device and its mains adapter to ensure adequate ventilation Never cover the ventilation slots of the device Do not expose the device to extreme environmental conditions Protect the device from dust humidity and heat Mains adapter connecting Preparingforopera...

Page 22: ...DO NOT restart the device unless you are requested to do so To make it easier to use your device for the first time the operating system is pre installed on the hard disk Switch on your device During installation follow the instructions on screen If a Windows operating system is installed on your device you will find more information on the system and drivers help programmes updates manuals etc on t...

Page 23: ...chapter entitled Connecting external devices Page 56 for instructions on how to connect devices such as a mouse and a printer to the notebook Please refer to the notes in Important notes Page 12 Status indicators Statusindicators The status indicators provide information about the status of the power supply the drives and the keyboard functions F Fujitsu 19 ...

Page 24: ... indicator lights up red The battery is charged to between 0 and 12 of its maximum capacity The indicator is not illuminated No battery is inserted Indicator flashes red An error has occured The indicator flashes white orange or red The device is in standby mode Drive indicator Drive Indicator The indicator is illuminated One of the drives e g hard disk is being accessed Radio components indicator I...

Page 25: ... pressed The effect that this key has varies between applications F F Lock indicator Anzeige FLock The indicator lights up The key combination Fn F was pressed Instead of the imprinted standard functions of the function keys the Fn functions can be executed by pressing the keys directly see chapter Function keys and key combinations Page 25 Fujitsu 21 ...

Page 26: ...k on The power on indicator is lit Notebook switching off Back up your data and close all applications before you switch off your device Otherwise data might be lost Shut down the operating system correctly Notebook If the notebook does not switch itself off automatically press the ON OFF button for about five seconds Close the LCD screen 22 Fujitsu ...

Page 27: ...functions of an enhanced keyboard Some enhanced keyboard functions are mapped with key combinations The following description of keys refers to Windows Additional functions supported by the keys are described in the relevant manuals supplied with your application programs The figure below shows how to access the different characters on keys with overlaid functions The example applies when the Caps ...

Page 28: ...he character printed on the upper left of the key will appear when that key is pressed To cancel the Caps Lock function simply press the Caps Lock key again Shiftkey CapsLock Shift key The Shift key causes uppercase characters to appear In the case of overlay keys the character printed on the upper left of the key appears when that key is pressed Shiftkey Shift Fn key The Fn key enables the specia...

Page 29: ...ion programs Key combinations are entered as follows Press the first key in the combination and keep it pressed While holding the first key down press the other key or keys in the combination If the key combination Fn F is pressed Instead of the imprinted standard functions of the function keys the Fn functions can be executed by pressing the keys directly Function key Description Switch microphone ...

Page 30: ...htness Power management functions Use this function key to activate the energy saving functions see chapter Using the power management features Page 35 F9 Energysavingfunctions Toggle output screen If an external monitor is connected the screen on which the output is to be displayed can be selected with this function key Screen output is possible only on the notebook s LCD screen on the LCD screen...

Page 31: ... using the Windows keys are detailed in the manual for your operating system In addition the following non labelled key combinations are supported Fn S Pause Fn B Break Fn R SysRq Keyboard with background lighting optional Keyboard Backgroundlighting On this version of the keyboard repeated pressing of the key combination Fn space bar allows the background lighting to be switched on and off and al...

Page 32: ...a conventional mouse The precision touchpad supports multi finger input You can also deactivate the touchpad via the keyboard so that you cannot move the cursor unintentionally see chapter Function keys and key combinations Page 25 Moving the pointer Move your finger on the touchpad Touchpad or Press down gently with your finger on the TouchStick If you want to move the pointer to the left for exampl...

Page 33: ... TouchStick touchpad button twice The command is executed Dragging items Move the pointer to the item you wish to select Select the desired object and hold down the left TouchStick touchpad button Drag the object to the desired position Lift your finger from the touchpad or Lift your finger from the TouchStick The item will be moved Fujitsu 29 ...

Page 34: ...l consists of three subpixels red green and blue making a total of about 3 million subpixels According to ISO 9241 307 class II a maximum of 2 light and 2 dark pixels and in addition 5 light or 10 dark subpixels or an equivalent mix 1 light subpixel counts as 2 dark subpixels are allowed to be defective Pixel A pixel consists of 3 subpixels normally red green and blue A pixel is the smallest eleme...

Page 35: ...ut fields Data must be entered for some apps for instance an Internet page or your name and password Tap on the input field An on screen keyboard opens with which you can enter your data Webcam Webcam Depending on the software used you can use your Webcam to take pictures record video clips or take part in web chats The WebCam has its own status indicator The indicator lights up when the WebCam is s...

Page 36: ...ating system appears If you do not connect the mains adapter within about 5 minutes of the message appearing your notebook will automatically switch off Monitoring the battery charging level Battery Batterystatusmeter Windows also has a Battery status meter in the taskbar for monitoring the battery capacity When you place the mouse pointer on the battery symbol the system displays the battery stat...

Page 37: ...ttery for long periods in the discharged state This can make it impossible to recharge Removing a battery Prepare for removal see chapter Preparing to remove components Page 64 3 4 2 1 Slide battery release 1 in the direction of the arrow 1 and hold it in place Push release mechanism 2 in the direction of the arrow 2 Reach into the opening 3 lift the rechargeable battery 3 and remove the rechargea...

Page 38: ...stalling a battery 1 2 Insert the battery in the battery compartment 1 Push the battery release mechanism 2 in the direction of the arrow 2 Complete the insertion process see chapter Finishing component removal Page 73 34 Fujitsu ...

Page 39: ...et help with most settings by pressing F1 to open the Microsoft Help When the notebook is in power saving mode the following must be remembered During power saving mode open files are held in the main memory or in a swap file on the hard disk Never turn off your notebook while it is in a power saving mode If the built in battery is nearly empty close the open files and do not go into power saving mod...

Page 40: ...performance is always available Silent The fan rotation speed and therefore the noise created by the fan is reduced Call up the BIOS Setup Utility In the menu Advanced Miscellaneous Configurations select the Fan Control function Choose the setting Normal or Silent Instructions for how to call up and operate the BIOS Setup Utility can be found in chapter Settings in BIOS Setup Utility Page 74 36 Fu...

Page 41: ...click into place The label area must be facing upward Do not apply any force otherwise the delicate contact surfaces could be damaged Memorycard Depending on the particular type used the memory card may protrude slightly from the slot Removing the memory card Memorycard In order to protect your data always follow the correct procedure for removing the card see the documentation for your operating ...

Page 42: ... chapter Function keys and key combinations Page 25 for information on setting the volume and also enabling disabling the loudspeakers via the keyboard If you attach an external microphone the built in microphone is disabled When you connect headphones or external speakers the built in speakers are disabled Information on connecting headphones and a microphone can be found in Connecting external d...

Page 43: ...artment and can only be accessed when the battery is removed Inserting the SIM card The device support cards in micro SIM format 15 mm x 12 mm Prepare for installation of the SIM card see chapter Preparing to remove components Page 64 Remove the battery see Removing a battery Page 33 1 Slide the SIM card into the slot 1 until you hear it engage as shown in the diagrams on the battery compartment I...

Page 44: ...emove the battery see Removing a battery Page 33 1 2 Press on the edge of the SIM card 1 so that it pops up slightly out of the slot Pull the SIM card out of its slot in the direction of the arrow 2 Install the battery again see Installing a battery Page 34 Complete the removal see chapter Finishing component removal Page 73 40 Fujitsu ...

Page 45: ...in more information on LTE from your service provider Setting up WLAN access Requirement A WLAN must be available and you must have the corresponding access information Information on configuring the WLAN access can be found in the documentation for your operating system Access via LTE optional If you ordered an integrated LTE module with your system you can enjoy optimum reception and maximum ener...

Page 46: ...able can be obtained from a specialist dealer Use a shielded network cable CAT 5e Switching between automatic graphics NVIDIA Optimus Technology and use of 3D graphics exclusively This function can be set in the BIOS Setup utility under Advanced Video Features The system can either automatically switch between the processor graphics and the 3D graphics NVIDIA Optimus Technology only use the 3D gra...

Page 47: ...l devices Ports on the Port Replicator PortReplicator Ports 3 1 5 6 2 7 8 9 10 11 12 13 4 1 Headphone jack 2 Microphone port 3 Security lock device 4 USB port 3 1 Gen1 USB Type C 5 USB port 3 1 Gen1 USB Type A 6 Display ports 7 VGA monitor port 8 DVI D screen connection 9 LAN port 10 DC input connector DC IN 11 On off button 12 Connector of the port replicator for the docking port on the underside...

Page 48: ...iture bed This can block the air vents of the notebook and cause overheating and damage Place the port replicator on a stable flat and non slip surface Please note that the port replicator s rubber feet may mark certain types of surface Never place the port replicator and the mains adapter on a heat sensitive surface Do not expose the port replicator to extreme environmental conditions Protect the ...

Page 49: ...tebook is not operated with the LCD monitor closed when the notebook is connected to the Port Replicator The resulting overheating can cause reduced performance and increased activity of the integrated fan PortReplicator Switch the notebook off Remove the power plug of the mains adapter from the mains socket Disconnect the mains adapter cable from the DC socket DC IN of the notebook Position the n...

Page 50: ...ble into the mains socket 2 Connect the mains adapter cable to the DC jack DC IN of the Port Replicator 3 When the notebook is connected to a Port Replicator the operating system creates a hardware profile for the Docked mode In this profile for example the setting is saved as to which monitor was last used for output This profile will be loaded as soon as the notebook is connected to a Port Replicat...

Page 51: ... Port Replicator lights up Switching off notebook via Port Replicator Close all applications and shut down your operating system please refer to the manual for the operating system If the notebook cannot be shut down properly press the ON OFF button on the Port Replicator for about four seconds The notebook will switch itself off Any unsaved data may however be lost Fujitsu 47 ...

Page 52: ... removed from the Port Replicator during operation We recommend that the notebook is switched off or that the appropriate undocking function provided by the operating system is executed 2 1 Pull the unlocking lever in the direction of the arrow 1 until you hear the notebook unlatch Lift off the notebook 2 48 Fujitsu ...

Page 53: ... a safe place If you forget your passwords you will need to contact the our Service Desk Deletion or resetting of passwords is not covered by your warranty and a charge will be made for assistance Configuring the fingerprint sensor Fingerprintsensor Fingerprintsensor Whether or not your device has a fingerprint sensor depends on the device configuration you have ordered The fingerprint sensor can recor...

Page 54: ...can be found on the Internet at http www fujitsu com fts solutions business technology security secure index html Using the Security Lock Your device comes with a Security Lock mechanism for the Kensington Lock Cable You can use the Kensington Lock Cable a sturdy steel cable to help protect your notebook from theft The Kensington Lock Cable is available as an accessory Fujitsu recommends the use o...

Page 55: ...ve you access to some of the functions You can only set up a user password if a supervisor password has already been assigned Please refer to section Settings in BIOS Setup Utility Page 74 for a description of how to call up and operate the BIOS Setup Utility Assigning the supervisor and user passwords Start the BIOS Setup Utility and go to the Security menu Select the Set Supervisor Password field...

Page 56: ... password removed Removing the supervisor password simultaneously deactivates the user password Password protection for booting of the operating system With the supervisor password you have set in the BIOS Setup Utility see section Assigning the supervisor and user passwords Page 51 you can also prevent starting of the operating system Operatingsystem Activating system protection Start the BIOS Se...

Page 57: ...d to do this and press the Enter key If you do not want to change any other settings you can exit the BIOS Setup From the Exit menu choose the option Exit Saving Changes Press the Enter key and select Yes The notebook will restart and the settings will be adopted Owner Information device dependent The BIOS feature Owner Information enables you to enter up to 80 characters of text which is displaye...

Page 58: ...der in the TPM By clicking on Enabled all secret keys e g SRK Storage Root Keys AIK Attestation Identity Keys etc generated by applications are deleted Please note that you will then no longer be able to access the data you have encrypted with the keys based on that holder From the Exit menu choose the option Exit Saving Changes Press the Enter key and select Yes The notebook will restart and TPM ...

Page 59: ... to be able to take advantage of all the security features of your notebook you will need a CardOS SmartCard from Fujitsu The SmartCard can only be used with a PIN offering maximum protection even if you lose the SmartCard In order to maximise your security the CardOS SmartCard is disabled if three incorrect attempts are made to enter the PIN When you use the CardOS SmartCard for the first time you...

Page 60: ...connect cables during a thunderstorm Never pull at a cable when disconnecting it Always grasp the plug With some devices such as USB devices it is not necessary to switch off the notebook and the device before connecting disconnecting For more information about whether or not devices need to be switched off please refer to the documentation supplied with the external device Some of the external de...

Page 61: ...on notebook or on optional port replicator Digital HDMI port on the notebook Digital DVI D monitor port on the optional Port Replicator Digital display port on the optional port replicator Switch off the notebook and the external monitor Plug the data cable of the external monitor into the monitor port First switch on the external monitor and then the notebook You can also switch between the exter...

Page 62: ... transfer rate of 12 Mbit s USB 2 0 has a data transfer rate of up to 480 Mbit s USB 3 0 has a data transfer rate of up to 5 Gbit s USB 3 1 Gen1 has a data transfer rate of up to 5 Gbit s USB 3 1 Gen2 has a data transfer rate of up to 10 Gbit s Additional information can be found in the documentation for the USB devices Connect the data cable to the external device Connect the data cable to a USB ...

Page 63: ... power supply e g a monitor or printer USB devices are hot pluggable This means you can connect and disconnect the cables of USB devices while the system is running Additional information can be found in the documentation for the USB devices Please note that the USB Type C port version offers a maximum output of 5 V 3 A Connect the data cable to the external device Connect the data cable to a USB ...

Page 64: ...more quickly if an external USB device is being charged The power supply unit must already be connected when the notebook is switched off as otherwise the USB charging function will be disabled and the connected USB devices will not be charged Some USB devices e g mobile telephones require a driver in order to utilise the USB charging function In this case the USB charging function will not work w...

Page 65: ...ler please note the following information The headset port on your notebook is a 3 5 mm jack socket If you want to connect a headset headphones or loudspeakers you will need a 3 5 mm jack plug Microphone port on the optional port replicator Audiodevices connecting Audioports Microphone connecting Using the microphone connection on the optional port replicator you can connect an external microphone...

Page 66: ...nect either a set of headphones or external speakers to your notebook computer Connect the audio cable to the external device Connect the audio cable to the headphone jack of the port replicator If you purchase a cable from a retailer please note the following information The headphone jack is a 3 5 mm jack socket If you want to connect headphones or a speaker you will need a 3 5 mm jack plug 62 F...

Page 67: ...Switch the notebook off and pull the power plug out of the mains socket Always remove the battery Take care when you use the locking mechanisms on the battery and any other component Never use sharp objects such as screwdrivers scissors or knives as leverage to remove covers Notes Board ESD Boards with electrostatic sensitive devices ESD are marked with the label shown When handling boards fitted w...

Page 68: ... notes Page 12 When installing removing memory modules the battery must be removed from the notebook and the notebook must not be connected to the power supply see Preparing to remove components Page 64 Only use memory expansion modules that have been approved for your notebook see Technical data Page 85 Never use force when installing or removing a memory extension Make sure that foreign objects ...

Page 69: ...s Page 64 1 2 Remove the screw 1 Keep the screw in a safe place Lift the cover off the notebook 2 Removing memory modules 3 2 1 1 Carefully push the two mounting clips outwards 1 Memoryexpansion Memorymodule The memory module snaps upwards 2 Pull the memory module out of its slot in the direction of the arrow 3 Fujitsu 65 ...

Page 70: ...ntacts and the recess a facing the slot 1 Memoryexpansion Memorymodule Carefully push the memory module downwards until you feel it click into place 2 Attaching the cover 2 1 Place the cover in the correct mounting position 1 Tighten the screw 2 Complete the installation see Finishing component removal Page 73 66 Fujitsu ...

Page 71: ...mory service compartment see Removing a cover Page 65 1 1 2 Remove the screws 1 Keep the screws in a safe place If you are removing more than one component at the same time store the screws for the individual components separately from each other If you install the wrong screws components may be damaged The screws are not all the same length and when the cover is installed the correct screws must ...

Page 72: ...cing Removing the hard disk HDD 1 3 2 Slide the hard disk carefully in the direction of the arrow 1 Carefully lift the hard disk out of the hard disk tray 2 Remove the connector 3 4 4 Disconnect the hard disk brackets from the hard disk 4 68 Fujitsu ...

Page 73: ...nstalling components during servicing Inserting the hard disk HDD Never install the hard disk in the device without the corresponding hard disk brackets 1 1 Attach the hard disk brackets to the hard disk 1 Fujitsu 69 ...

Page 74: ...Removing and installing components during servicing 3 2 Attach the connector 2 Place the hard disk into the hard disk tray 3 70 Fujitsu ...

Page 75: ...ents during servicing Remove the M 2 module 1 2 Undo the screw 1 The M 2 module snaps slightly upwards Pull the M 2 module in the direction of the arrow 2 and out of the slot on the mainboard and remove it from the casing Fujitsu 71 ...

Page 76: ...ert the M 2 module at a slight angle in the direction of the arrow 1 into the slot on the mainboard Fasten the M 2 module in place in the slot with the screw 2 A second M 2 module is located under the keyboard If the M 2 module should be replaced please contact our service 72 Fujitsu ...

Page 77: ... compartment see Attaching the cover Page 66 Finishing component removal After you have removed or changed the system components as you required please prepare your device for operation again as follows Install the battery again see Installing a battery Page 34 Turn the notebook the right way up again and place it on a flat surface Reconnect the cables that you disconnected before Fujitsu 73 ...

Page 78: ...g to the BIOS processor and notebook System Advanced system settings Advanced Configuration of various hardware components such as mouse keyboard processor Security Password settings and security functions Boot Configuration of the start up sequence Exit Exits the BIOS Setup Utility Starting the BIOS Setup Utility Reboot the device switch off on or reboot the operating system BIOSSetupUtility Depend...

Page 79: ...he BIOS Setup Utility With the F9 key you can load the default settings of the BIOS Setup Utility Use the cursor keys or to select the menu you wish to access to make changes The menu is displayed on the screen Select the option you want to change with the cursor keys or Press the Enter key Press the ESC key to exit the selected menu For future reference make a note of the changes you have made fo...

Page 80: ...ndard entries for all menus of the BIOS Setup Utility choose Load Setup Defaults and Yes Discard Changes Discard changes without exiting the BIOS Setup Utility To discard the changes you have made select Discard Changes and Yes The settings in place when BIOS Setup Utility was called remain effective You can now make additional settings in the BIOS Setup Utility If you want to exitBIOS Setup Utili...

Page 81: ...nnected to your system Your sales contract Our notebooks have been designed primarily with mobile applications in mind This means that considerable effort has been made to optimise components and equipment in terms of weight space and energy requirements Depending on the particular configuration you have purchased it is possible that functionality may be slightly reduced compared to a desktop PC if...

Page 82: ...ge appears press the function key F12 Insert the Windows Recovery CD into the optical drive Select CD ROM and press the Enter key Follow the instructions on the screen After the installation you must install all the drivers again Some installed hardware components will not be correctly supported until this has been done Insert the Drivers Utilities CD DVD into the optical drive The CD starts autom...

Page 83: ...ooting Monitor is switched off Switch the external monitor on Power saving has been activated monitor is blank Press any key to continue Brightness is set to dark Adjust the brightness of the monitor Screen output is set to the notebook s LCD screen Press the key combination to switch the screen output see Function keys and key combinations Page 25 The external monitor s power cable or data cable ...

Page 84: ...n Change the following setting Set the screen resolution Set the screen resolution as described in the documentation for your operating system Select monitor Select monitor 1 or 2 as described in the documentation for your operating system The notebook cannot be started Notebook Cause Troubleshooting The battery is not installed correctly Check whether the battery is installed correctly in its com...

Page 85: ...inter is not connected correctly Check that the data cable connecting the notebook to the printer is properly connected The printer driver is faulty or not correctly installed or it is the wrong printer driver Check that the data cable connecting the notebook to the printer is properly connected Check whether the correct printer driver is loaded refer to the printer documentation The wireless conn...

Page 86: ...or SmartCard lost If you have lost your User SmartCard you can continue working with the Supervisor SmartCard and initialise a new User SmartCard or deactivate the SystemLock function If you have lost the Supervisor SmartCard you can continue working but you no longer have all your rights and can no longer initialise a Supervisor SmartCard If you have lost both SmartCards you can no longer boot yo...

Page 87: ...OK and press the Enter key Extended memory failed at offset xxxx Failing Bits zzzz zzzz When testing the extended memory an error has resulted at the address xxxx Check whether the additional memory module has been inserted correctly Failure Fixed Disk n The settings of the hard disk drive are incorrect Start the BIOS Setup Primary Master submenu and select the correct settings Keyboard controller...

Page 88: ...to do so Real time clock error Contact your sales outlet or our customer service centre nnnnK Shadow RAM failed at offset xxxx Failing Bits zzzz Contact your sales outlet or our customer service centre System battery is dead Replace and run SETUP Contact your sales outlet or our customer service centre System cache error Cache disabled Contact your sales outlet or our customer service centre Syste...

Page 89: ...s Weight without touchscreen function 2 7 kg 5 95 lbs Main memory Slots 4 slots 260 pin DDR4 2400 SO DIMM with a total of max 64 GByte Approved memory modules 8 GB or 16 GB DDR4 2400 SO DIMM The data sheet for the device provides further technical data You will find the data sheet on your device or on the Internet at http www fujitsu com fts support Rechargeable battery You can find information on t...

Page 90: ...c Secondary Nominal power 230 W Rated voltage 19 5 V Maximum rated current 11 8 A An additional mains adapter or power cable can be ordered at any time Mains adaptor port replicator Technicaldata Electrical specifications Nominal power 330 W Rated voltage 19 5 V Max rated current 16 9 A An additional mains adapter or power cable can be ordered at any time 86 Fujitsu ...

Page 91: ...fujitsu com fts about fts environment care Certification markings Certificationmarkings Certification markings are listed as applicable in the Manual Appendix Additional Certifications supplement If such markings are available you can find the supplement on the Internet at http support ts fujitsu com Manuals with the Operating Manual for your device Fujitsu 87 ...

Page 92: ... notes 13 Board 63 Buttons 23 C Caps Lock 24 indicator 20 Certification markings 87 Charging capacity battery 32 Cleaning 15 Components installing removing 63 Configuration BIOS Setup Utility 74 Connecting audio devices 61 62 Connecting headphones 61 62 Ctrl Alt Del 27 Cursor control 24 Cursor keys 24 D Date is incorrect 78 Device setting up 17 Disable microphone 25 Drive indicator 20 E Enable micro...

Page 93: ...ng 37 removing 37 Memory expansion installing 66 removing 65 Memory module important notes 64 installing 66 removing 65 Microphone 38 Microphone connecting 61 Mobile operation 14 Monitor connecting 57 drifting display 80 remains blank 79 Monitor port see VGA connection socket 57 N Notebook before you travel 14 cannot be started 80 cleaning 15 stops working 81 switching off 22 transporting 14 using...

Page 94: ...s 37 Standby indicator 20 Status indicators 19 Supervisor password changing 52 entering 51 removing 52 Switching on the notebook 22 Switching on for the first time 18 System configuration 74 System expansion 64 see Adding memory 64 System settings BIOS Setup Utility 74 T Tab key 24 Technical data 85 Mains adapter 86 notebook 85 Technical specifications Mains adaptor 86 The wireless connection to a ne...

Page 95: ...6 Volume control 38 W Webcam 31 Windows key 24 Wireless component safety notes 13 Wireless components switch off 26 switch on 26 Wireless LAN Switching the module off 41 Switching the module on 41 Wireless LAN safety notes 13 Fujitsu 91 ...

Reviews: