


Job Assembly
213
Co
py
4
Original Orientation
Allows you to specify the orientation of the document so that the machine can identify the
top of the document.
Note
•
If the [Original Orientation] setting differs from the actual document orientation, the machine may
not detect the top of the document correctly.
z
Upright Images
Select this option when placing the top edge of the document against the top side of the
document glass or document feeder.
z
Sideways Images
Select this option when placing the top edge of the document against the left side of the
document glass or document feeder. Always select [Sideways Images] when the top of
the document is placed facing the left side (horizontal text).
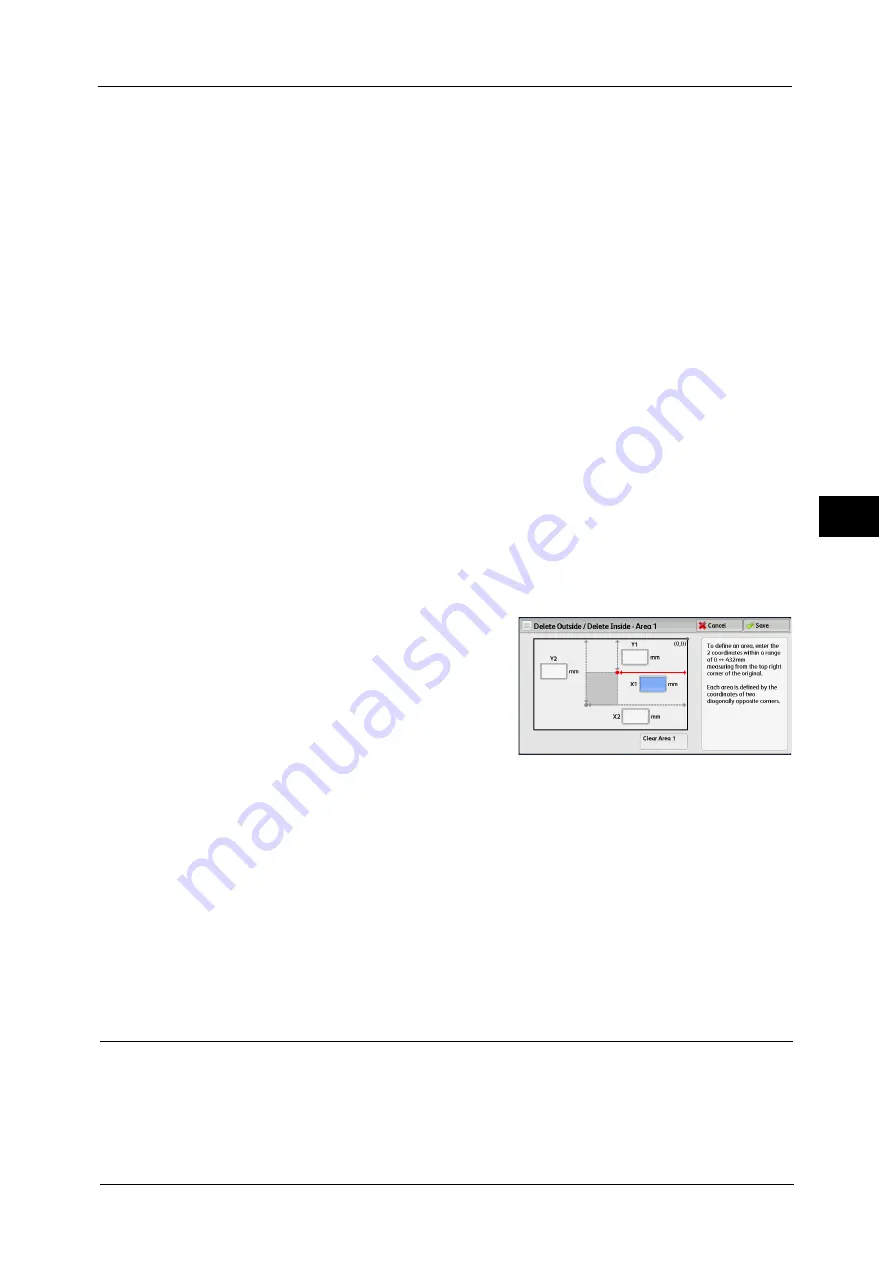
[Delete Outside/Delete Inside - Area 1 (Area 2 or Area 3)] Screen
This screen allows you to specify the area to be deleted. The area is defined by the rectangle
formed between the points X1, Y1 and X2, Y2. The origin point is the top right corner of a
document.
You can specify a value in the range from 0 to 432 mm for the width (X) and the length (Y)
in 1 mm increments.
Note
•
Specify the 2 coordinates from the top right corner of the document.
•
When specifying multiple areas, the specified areas can overlap each other.
•
When [Reduce/Enlarge] is set, the specified area will be reduced or enlarged accordingly.
1
Select [Area 1], [Area 2], or [Area 3].
2
Select the text box for [X1], and enter the value
for X1 using the numeric keypad.
3
Select the text box for [Y1], and enter the value for Y1 using the numeric keypad.
4
Select the text box for [X2], and enter the value for X2 using the numeric keypad.
5
Select the text box for [Y2], and enter the value for Y2 using the numeric keypad.
Note
•
If all of [X1], [Y1], [X2], and [Y2] are set to [0], the area will be invalid. If no other area is specified, the
Delete Outside/Delete Inside feature cannot be used.
•
Pressing the <C (Clear)> button clears the value you have entered.
Clear Area 1 (Area 2 or Area 3)
Clears all the values set for Area 1 (Area 2 or Area 3).
Stored Programming (Calling a Stored Program for Build Job)
This feature allows you to call a stored program for Build Job.
This feature is the same as "Calling a Stored Program for Build Job" (P.338). For more information, refer to "Calling a Stored
Program for Build Job" (P.338).
Summary of Contents for Versant 80 Press
Page 1: ...User Guide Versant 80 Press ...
Page 18: ...18 Index 1007 ...
Page 159: ...Image Quality 159 Copy 4 2 Select a button to adjust the color tone ...
Page 214: ...4 Copy 214 Copy 4 ...
Page 304: ...5 Scan 304 Scan 5 ...
Page 382: ...11 Job Status 382 Job Status 11 ...
Page 562: ...14 CentreWare Internet Services Settings 562 CentreWare Internet Services Settings 14 ...
Page 580: ...16 E mail Environment Settings 580 E mail Environment Settings 16 ...
Page 618: ...18 Encryption and Digital Signature Settings 618 Encryption and Digital Signature Settings 18 ...
Page 916: ...22 Problem Solving 916 Problem Solving 22 ...
Page 1018: ...1018 Index ...